


Nested Chat in AutoGen: Building more responsive and dynamic AI proxy interactions
Advances in artificial intelligence (AI) have enabled chatbots to develop rapidly. Today, with the advent of AI agents, chatbots are able to handle more complex and layered interactions, far beyond the limitations of traditional conversations. In our previous article, Building a Multi-Agent Chatbot with AutoGen, we explore the concept of sequential chat using AutoGen, which allows structured, rotating communication between multiple agents. Now, based on this, we will move to a more complex feature: nested chat. With AutoGen's powerful framework, nested dialogue allows robots to maintain smooth communication rather than follow a fixed order. They can delve into other tools in a single conversation flow, handle interrupts and recover smoothly. This article will guide you to implement nested chats in AutoGen and highlight its relevance in creating responsive, dynamic proxy interactions.
Table of contents
- What is nested chat?
- Implement nested chat in AutoGen
- Prerequisites
- Step 1: Use the tool to define the outline proxy
- Step 2: Define the writer and reviewer agent
- Step 3: Register for Nested Chat
- Step 4: Start Nested Chat
- FAQ
What is nested chat?
Let's first understand what nested chat is.
Consider a three-party proxy chat where two proxy conversations are required to repeatedly engage in circular conversations. Chats between these two agents can be added to nested chats. After completing this separate conversation, the agent can bring the context back to the main conversation.
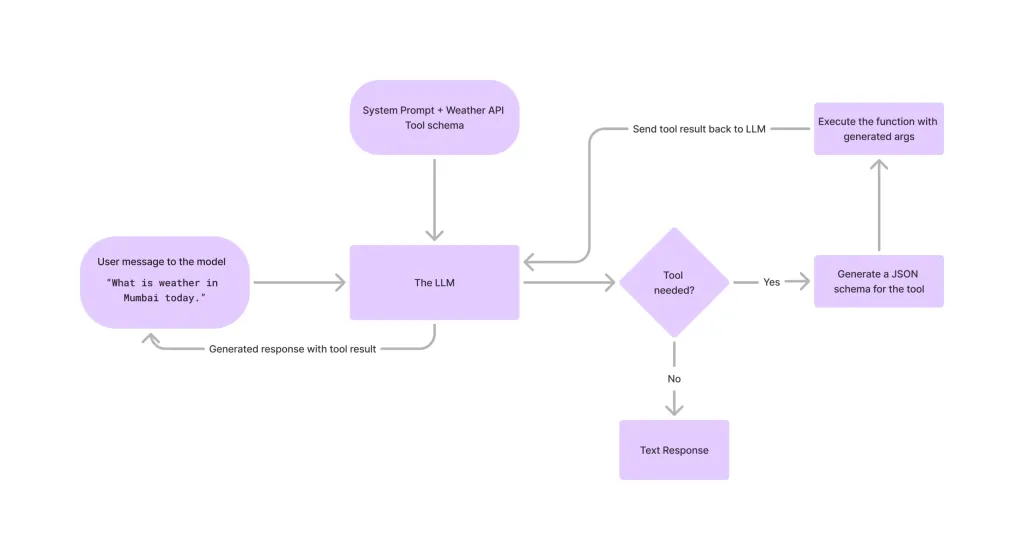
The following figure shows the conversion process of nested chats.

When an incoming message triggers a condition, the message enters a nested chat. The nested chat can be a dual proxy chat, sequential chat, or any other chat. The chat results of the nested chat will then be sent back to the main conversation.
Implement nested chat in AutoGen
In this article, we will use nested chat to build an article writing system. To do this, we will create three agents – one for writing an article outline, one for writing an article from this outline, and one for reviewing the article. We want the writer and reviewers to talk to each other multiple times, so we put these two agents in a nested chat.
In addition, we will provide the profile proxy with permission to access the network query tool.
Now, let's do this with code.
Prerequisites
Before building the AutoGen proxy, make sure you have the necessary API keys for the required LLM. In this exercise, we will also use Tavily to search the network.
Load the .env file with the required API key. Here we will use OpenAI and Tavily API key().
<code>from dotenv import load_dotenv load_dotenv('/home/santhosh/Projects/courses/Pinnacle/.env')</code>
Define the LLM to be used as config_list
<code>config_list = { "config_list": [{"model": "gpt-4o-mini", "temperature": 0.2}] }</code>
Required keystore
autogen-agentchat – 0.2.37
Tavily-python – 0.5.0
Now, let's start implementing it.
Step 1: Use the tool to define the outline proxy
Define user_proxy proxy, which will also execute the tool. Then use LLM to define the outline to generate the article outline.
<code>from autogen import ConversableAgent user_proxy = ConversableAgent( name="User", llm_config=False, is_termination_msg=lambda msg: msg.get("content") is not None and "TERMINATE" in msg["content"], human_input_mode="TERMINATE") outline = ConversableAgent( name="Article_outline", system_message="""您是一位经验丰富的內容策略師,負責為指定主題的文章創建詳細的提綱。您的目標是將文章組織成邏輯部分,以便清晰有效地傳達主要思想。如有需要,請使用web_search工具。任務完成後返回“TERMINATE”。""", llm_config=config_list, silent=False, )</code>
Define the web_search function to query the network.
<code>def web_search(query: str) -> str: tavily_client = TavilyClient() response = tavily_client.search(query, max_results=3, days=10, include_raw_content=True) return response['results']</code>
Use the executor user_proxy to register the web_search function to the outline proxy.
We set the executor to user_proxy so that we can review the outline sent to the writer's agent.
<code>register_function( web_search, caller=outline, # 助手代理可以建议调用。 executor=user_proxy, # 用户代理可以执行调用。 name="web_search", # 默认情况下,函数名称用作工具名称。 description="搜索互联网以获取给定查询的结果", # 工具的描述。 )</code>
Step 2: Define the writer and reviewer agent
Define one agent to generate article content and another to review articles and provide suggestions for improvement.
<code>writer = ConversableAgent( name="Article_Writer", system_message="""您是一位熟练的作家,负责根据给定的提纲创作一篇全面、引人入胜的文章。您的目标是遵循提纲中提供的结构,用经过充分研究、清晰且内容翔实的內容扩展每个部分。保持文章长度约为500字。如有需要,請使用web_search工具。任務完成後返回“TERMINATE”。""", llm_config=config_list, silent=False, ) reviewer = ConversableAgent( name="Article_Reviewer", system_message="""您是一位熟练的技术文章审阅者。审阅给定的文章,并提供建议以使文章更具吸引力和趣味性。""", llm_config=config_list, silent=False, )</code>
Step 3: Register for Nested Chat
Now we can register nested chats for both agents.
<code>writer.register_nested_chats( trigger=user_proxy, chat_queue=[ { "sender": reviewer, "recipient": writer, "summary_method": "last_msg", "max_turns": 2, } ], )</code>
In the above code, this will trigger nested chat when user_proxy sends any message to the writer proxy. The writer agent will then write the article and the reviewer agent will review the article multiple times based on max_turns (twice in this case). Finally, the results of the nested chat will be sent back to the user agent.
Step 4: Start Nested Chat
Now that everything is set up, let's start the chat
<code>chat_results = user_proxy.initiate_chats( [{"recipient": outline, "message": "撰写一篇关于微软发布的Magentic-One代理系统的文章。", "summary_method": "last_msg", }, {"recipient": writer, "message": "这是文章提纲", "summary_method": "last_msg", }])</code>
Here we will write an article about the Magentic-One agent system. First, the user_proxy proxy will start chatting with the outline proxy and then start chatting with the writer proxy.
Now the output of the above code will look like this:

As we can see, user_proxy first sends a message to the outline proxy explaining the subject of the article. This will trigger the tool call, and user_proxy executes the tool. Based on these results, the outline agent generates an outline and sends it to the writer agent. After that, the nested chat between the writer agent and the reviewer agent will continue as discussed above.
Now, let's print the final result, i.e. the article about magic-one.
<code>print(chat_results[1].chat_history[-2]['content'])</code>

in conclusion
Nested chat in AutoGen enhances the functionality of chatbots by enabling complex multitasking interactions in a single conversation process. Nested chat allows bots to start separate dedicated chats and seamlessly integrate their output. This feature supports dynamic, targeted responses to a variety of applications, from e-commerce to healthcare. With nested chat, AutoGen paves the way for more responsive, context-aware AI systems. This enables developers to build complex chatbots that can effectively meet a variety of user needs.
If you want to learn more about AI Agents, check out our exclusive Agent AI Pioneer Program!
FAQ
Q1. What is nested chat in AutoGen and how is it different from sequential chat? A. Nested chat in AutoGen allows chatbots to manage multiple sub-conversations in a chat process, often involving other agents or tools to retrieve specific information. Unlike sequential chats that follow structured, rotating approaches, nested chats enable bots to handle interrupts and parallel tasks and integrate their output back into the main conversation.
Q2. How does nested chat improve customer support in your application? A. Nested Chat improves customer support by allowing bots to delegate tasks to professional agents. For example, in e-commerce, a chatbot can consult a separate agent to check order status or product information and then forward the information to the user seamlessly, ensuring faster and more accurate response.
Q3. What are the key use cases of nested chat in different industries? A. Nested chat can be applied to different industries. In the banking industry, it provides professional support for account and loan inquiries; in the human resources department, it assists in onboarding tasks; in the healthcare field, it handles appointment arrangements and bill inquiries. This flexibility makes nested chat suitable for any area where multitasking and detailed information processing is required.
Q4. Do I need any specific settings to implement nested chat in AutoGen? A. Yes, implementing nested chat in AutoGen requires configuring a proxy using specific API keys, such as language models or web search tools like Tavily. In addition, each agent must define the appropriate tasks and tools for smooth execution of nested conversations.
Q5. Can I keep track of the costs associated with each nested chat agent in AutoGen? A. Yes, AutoGen allows tracking the costs incurred by each agent in nested chat. By accessing cost attributes in chat results, developers can monitor spending related to proxy interactions, helping to optimize the resource utilization and efficiency of chatbots.
The above is the detailed content of 4 Steps to Build Multi-Agent Nested Chats with AutoGen. For more information, please follow other related articles on the PHP Chinese website!

 Tool Calling in LLMsApr 14, 2025 am 11:28 AM
Large language models (LLMs) have surged in popularity, with the tool-calling feature dramatically expanding their capabilities beyond simple text generation. Now, LLMs can handle complex automation tasks such as dynamic UI creation and autonomous a
 How ADHD Games, Health Tools & AI Chatbots Are Transforming Global HealthApr 14, 2025 am 11:27 AM
Can a video game ease anxiety, build focus, or support a child with ADHD? As healthcare challenges surge globally — especially among youth — innovators are turning to an unlikely tool: video games. Now one of the world’s largest entertainment indus
 UN Input On AI: Winners, Losers, And OpportunitiesApr 14, 2025 am 11:25 AM
“History has shown that while technological progress drives economic growth, it does not on its own ensure equitable income distribution or promote inclusive human development,” writes Rebeca Grynspan, Secretary-General of UNCTAD, in the preamble.
 Learning Negotiation Skills Via Generative AIApr 14, 2025 am 11:23 AM
Easy-peasy, use generative AI as your negotiation tutor and sparring partner. Let’s talk about it. This analysis of an innovative AI breakthrough is part of my ongoing Forbes column coverage on the latest in AI, including identifying and explaining
 TED Reveals From OpenAI, Google, Meta Heads To Court, Selfie With MyselfApr 14, 2025 am 11:22 AM
The TED2025 Conference, held in Vancouver, wrapped its 36th edition yesterday, April 11. It featured 80 speakers from more than 60 countries, including Sam Altman, Eric Schmidt, and Palmer Luckey. TED’s theme, “humanity reimagined,” was tailor made
 Joseph Stiglitz Warns Of The Looming Inequality Amid AI Monopoly PowerApr 14, 2025 am 11:21 AM
Joseph Stiglitz is renowned economist and recipient of the Nobel Prize in Economics in 2001. Stiglitz posits that AI can worsen existing inequalities and consolidated power in the hands of a few dominant corporations, ultimately undermining economic
 What is Graph Database?Apr 14, 2025 am 11:19 AM
Graph Databases: Revolutionizing Data Management Through Relationships As data expands and its characteristics evolve across various fields, graph databases are emerging as transformative solutions for managing interconnected data. Unlike traditional
 LLM Routing: Strategies, Techniques, and Python ImplementationApr 14, 2025 am 11:14 AM
Large Language Model (LLM) Routing: Optimizing Performance Through Intelligent Task Distribution The rapidly evolving landscape of LLMs presents a diverse range of models, each with unique strengths and weaknesses. Some excel at creative content gen


Hot AI Tools

Undresser.AI Undress
AI-powered app for creating realistic nude photos

AI Clothes Remover
Online AI tool for removing clothes from photos.

Undress AI Tool
Undress images for free

Clothoff.io
AI clothes remover

AI Hentai Generator
Generate AI Hentai for free.

Hot Article
Hot Tools

SublimeText3 Linux new version
SublimeText3 Linux latest version

SAP NetWeaver Server Adapter for Eclipse
Integrate Eclipse with SAP NetWeaver application server.

SublimeText3 Chinese version
Chinese version, very easy to use

Dreamweaver Mac version
Visual web development tools

DVWA
Damn Vulnerable Web App (DVWA) is a PHP/MySQL web application that is very vulnerable. Its main goals are to be an aid for security professionals to test their skills and tools in a legal environment, to help web developers better understand the process of securing web applications, and to help teachers/students teach/learn in a classroom environment Web application security. The goal of DVWA is to practice some of the most common web vulnerabilities through a simple and straightforward interface, with varying degrees of difficulty. Please note that this software

