


This guide shows you how to enable and customize Dark Mode on your Mac, offering multiple methods for ease of use.

One-Click Dark Mode with One Switch:
The One Switch app provides a simple menu bar toggle for instant Dark Mode activation and deactivation.
- Download and launch One Switch (available on Setapp).
- Click the One Switch menu bar icon.
- Toggle the Dark Mode switch.

One Switch also allows scheduling Dark Mode transitions.
Manual Dark Mode Activation:
macOS offers built-in Dark Mode controls:
- Access the Apple menu (top-left).
- Select System Settings > Appearance.
- Choose "Dark" from the available options (Light, Dark, Auto).

Note: Automatic switching is linked to Night Shift (System Settings > Displays > Night Shift), affecting screen color temperature.
Adding a Menu Bar Toggle:
While a dedicated Dark Mode menu bar icon isn't directly available, the Control Center offers a quick access method:
- Click the Control Center icon (toggle bar).
- Select Display.
- Choose Dark Mode.

For a persistent menu bar toggle, One Switch is recommended.
Dark Mode in Apps:
System-wide Dark Mode usually applies to Apple apps, but third-party apps require individual settings adjustments (e.g., Chrome's "Appearance" settings).

Increasing Screen Darkness:
To further dim your screen:
- Apple menu > System Settings > Displays.
- Adjust the brightness slider. Alternatively, use the keyboard shortcut (often F1 or a similar function key with a sun icon).

For external displays, consider DisplayBuddy for precise brightness/contrast control.

Deactivating Dark Mode:
Reverse the steps for enabling Dark Mode, selecting "Light" or "Auto" in System Settings > Appearance, or use One Switch.
Switching Between Modes:
Use the Control Center (Display) or One Switch for manual switching. "Auto" mode uses the Night Shift schedule. For independent scheduling, use One Switch.
To increase brightness beyond default limits, consider Vivid (for compatible Macs).

Troubleshooting:
- Automatic Dark Mode Activation: If your Mac automatically switches to Dark Mode, ensure it's not set to "Auto" in Appearance settings.
- Keyboard Shortcut: Create a custom keyboard shortcut for toggling Dark Mode in System Settings > Keyboard > Shortcuts > Services > General > Toggle Dark Mode. (Note: This might not function in macOS Sonoma).
This guide provides comprehensive instructions and solutions for managing Dark Mode on your Mac, leveraging both built-in features and helpful third-party apps. Setapp offers a trial period to explore these apps.
The above is the detailed content of How to make Dark Mode on a Mac. For more information, please follow other related articles on the PHP Chinese website!

 Launch All Apps & Documents Related to a Project with Stapler for MacMay 13, 2025 am 10:37 AM
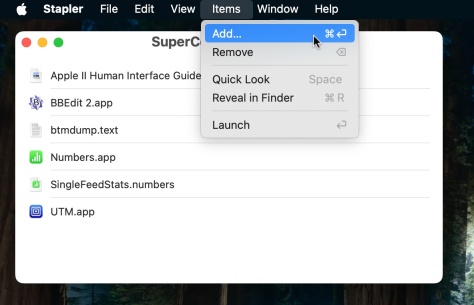
Longtime Mac users may recall a handy old shareware application for the Classic Macintosh called Stapler, which essentially helped manage projects by grouping a series of apps and documents into a single document that when opened would then launch al
 How to Get Apple Intelligence on Your iPhone, iPad, or MacMay 13, 2025 am 10:32 AM
Apple Intelligence is a set of AI features that Apple is rolling out in beta, and will debut to a larger set of Apple device owners in the fall. Apple Intelligence offers many features from writing and creating text and emails, to taking actions and
 MacOS Sonoma 14.6.1 & Ventura 13.6.9 Released with Bug FixesMay 13, 2025 am 10:25 AM
If you feel like you have spent a significant amount of your time updating system software on your Apple devices lately, you’re in for a treat; another round of system software updates! This time around, Apple has released MacOS Sonoma 14.6.1 alon
 MacOS Sequoia 15 Beta 6 Available for TestingMay 13, 2025 am 10:23 AM
Apple has issued the 6th beta version of MacOS Sequoia for users enrolled in the developer beta testing program. Usually a matching public beta build arrives soon after, which in this case dev beta 6 would be versioned as public beta 4. MacOS Sequoia
 MacOS Sonoma 14.6 Update Released with Bug Fixes & Security UpdatesMay 13, 2025 am 10:20 AM
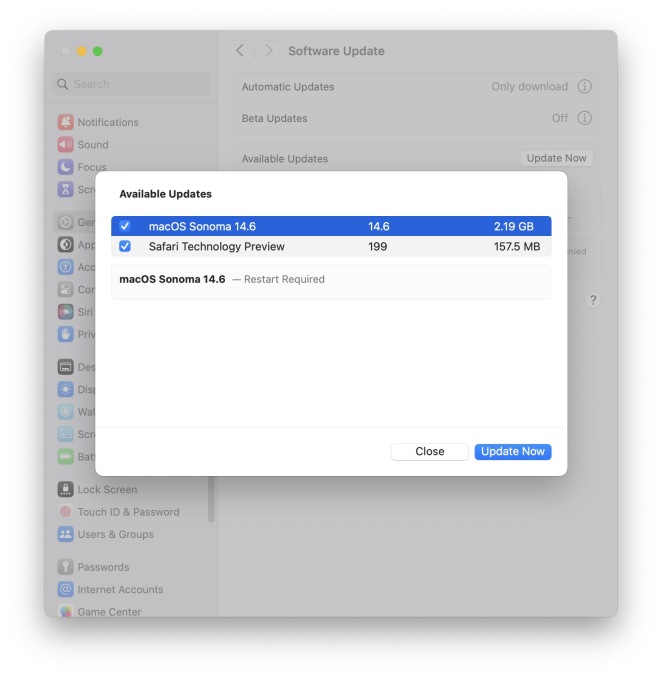
Apple has released macOS Sonoma 14.6 for Mac users running the Sonoma operating system. The MacOS Sonoma 14.6 software update primarily focuses on bug fixes and security updates for most Macs, however it does include a nice new feature specifically
 MacOS Sequoia 15 Beta 5 Available to DownloadMay 13, 2025 am 10:06 AM
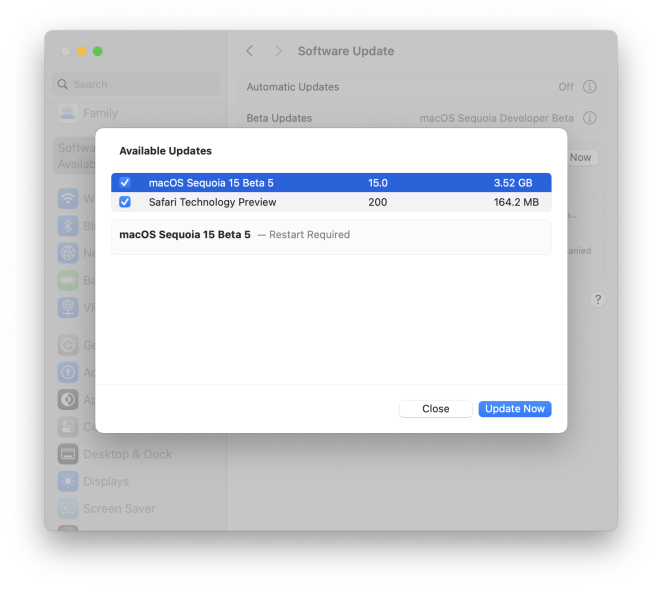
MacOS Sequoia beta 5 is now available for users enrolled in the developer beta testing program to download and install onto their Macs. MacOS Sequoia beta 5 carries the build of 24A5309e, and usually a new developer beta build is soon followed by a m
 Beta 2 of iOS 18.1, MacOS Sequoia 15.1, & iPadOS 18.1 Released with Apple IntelligenceMay 13, 2025 am 09:49 AM
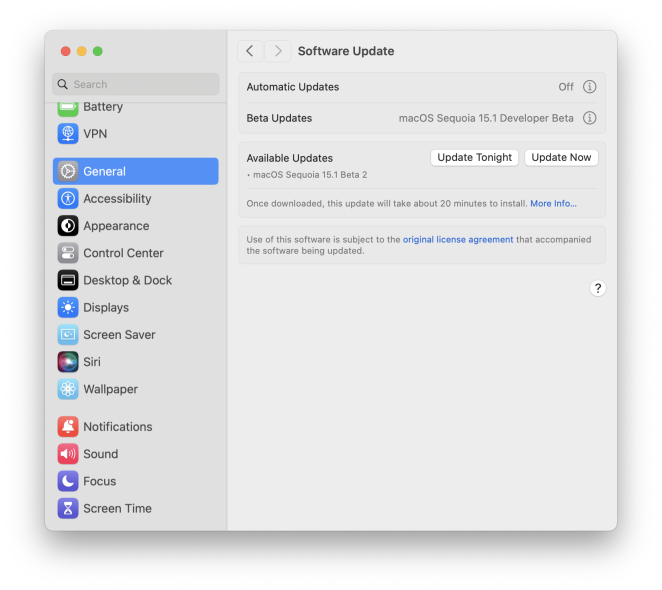
Apple has released the second beta of iOS 18.1, iPadOS 18.1, and MacOS Sequoia 15.1, each with support for Apple Intelligence AI features, on supported devices anyway. The release of these new beta updates is unusual in that they’re concurrent wit
 How to Uninstall VMWare Fusion on MacMay 13, 2025 am 09:44 AM
You might be aware that VMWare Fusion Pro is now free to download and install, and perhaps you installed it on a Mac to test virtual machines or to play around with, and now you’ve decided you no longer need VMware on the Mac. But VMware Fusion P


Hot AI Tools

Undresser.AI Undress
AI-powered app for creating realistic nude photos

AI Clothes Remover
Online AI tool for removing clothes from photos.

Undress AI Tool
Undress images for free

Clothoff.io
AI clothes remover

Video Face Swap
Swap faces in any video effortlessly with our completely free AI face swap tool!

Hot Article
Hot Tools

VSCode Windows 64-bit Download
A free and powerful IDE editor launched by Microsoft

SAP NetWeaver Server Adapter for Eclipse
Integrate Eclipse with SAP NetWeaver application server.

SecLists
SecLists is the ultimate security tester's companion. It is a collection of various types of lists that are frequently used during security assessments, all in one place. SecLists helps make security testing more efficient and productive by conveniently providing all the lists a security tester might need. List types include usernames, passwords, URLs, fuzzing payloads, sensitive data patterns, web shells, and more. The tester can simply pull this repository onto a new test machine and he will have access to every type of list he needs.

Atom editor mac version download
The most popular open source editor

PhpStorm Mac version
The latest (2018.2.1) professional PHP integrated development tool

