

 System TutorialWindows SeriesMastering the 24H2 Windows 11 Update: Installation Guide and Key Feature Analysis
Mastering the 24H2 Windows 11 Update: Installation Guide and Key Feature Analysis

Mastering the 24H2 Windows 11 Update: Installation Guide and Key Feature Analysis
This section will provide a comprehensive guide to installing the Windows 11 24H2 update, covering the process step-by-step and highlighting crucial considerations. Before beginning, ensure you back up your important data. This is a crucial preventative measure against data loss, which, while rare, is always a possibility during any major operating system update.
Step 1: Check for Updates: Open Settings (Win I), navigate to "Windows Update," and click "Check for updates." If the 24H2 update is available, it will be listed.
Step 2: Download and Installation: Click "Download and install." The download size will vary depending on your system configuration, but expect a substantial download. Ensure your computer is connected to a stable internet connection and plugged into power during the entire process. Avoid using your computer during the download and installation to prevent potential interruptions.
Step 3: Restart your Computer: Once the download and installation are complete, your computer will automatically restart. Allow the process to complete without interruption. This may take some time, depending on your hardware.
Step 4: Post-Installation Verification: After the restart, verify the update's successful installation by checking your Windows version in Settings > System > About. Look for the build number corresponding to the 24H2 update.
Key Features Analysis: The 24H2 update typically includes performance enhancements, bug fixes, and security patches. Specific features vary based on the exact build, but common improvements often include enhanced system stability, improved battery life (on laptops), and updated security protocols. Microsoft usually provides a detailed changelog accompanying the update, which you can consult for a complete list of changes. Always check Microsoft's official website for the most accurate and up-to-date information.
What are the most significant performance improvements in the 24H2 Windows 11 update?
Significant performance improvements in the 24H2 Windows 11 update (the specifics vary depending on the exact build number) often include:
- Improved boot times: Faster startup times are frequently reported, resulting in quicker access to your system. This is often achieved through optimizations in the boot process and driver management.
- Enhanced application responsiveness: Applications may launch faster and run more smoothly, particularly older applications that may have had compatibility issues with previous versions of Windows 11.
- Better resource management: Improved memory management and CPU utilization can lead to a more efficient use of system resources, especially beneficial for users with less powerful hardware. This could translate to less lag and smoother multitasking.
- Increased battery life (laptops): Power management improvements often result in extended battery life on laptops, depending on usage patterns and hardware specifications.
- Gaming performance improvements: While not always guaranteed, some updates include optimizations that can enhance gaming performance, depending on the game and hardware. Check for game-specific patch notes as well.
- Enhanced file system performance: Improvements to the file system can lead to faster file access and transfers, particularly noticeable when dealing with large files or many files.
How can I troubleshoot common installation problems encountered during the 24H2 Windows 11 update?
Troubleshooting installation problems requires a systematic approach. Common issues include:
- Insufficient disk space: Ensure you have sufficient free space on your system drive (usually C:). The update requires a considerable amount of free space to download and install successfully. Delete unnecessary files or uninstall unused programs to free up space.
- Driver conflicts: Outdated or corrupted drivers can interfere with the update. Update all your drivers to the latest versions before attempting the update. You can typically do this through the device manager or using the manufacturer's website.
- Internet connection problems: A stable and reliable internet connection is essential. Ensure your internet connection is working correctly. Try restarting your router or modem if necessary.
- Corrupted system files: Corrupted system files can prevent successful installation. Run the System File Checker (SFC) and Deployment Image Servicing and Management (DISM) tools to repair any corrupted files. These are command-line tools, so search online for instructions on how to use them properly.
- Third-party antivirus software: Temporarily disable your third-party antivirus software before attempting the update. It's crucial to re-enable it after the update completes.
- Update errors: Specific error codes will provide clues about the problem. Search online for the error code to find solutions or contact Microsoft support.
- Hardware incompatibility: Very rarely, hardware might be incompatible with the update. Check Microsoft's system requirements for the 24H2 update to ensure your hardware meets the minimum specifications.
If problems persist, consider performing a clean installation of Windows 11. This is a more advanced step and should only be attempted if other troubleshooting steps fail. Remember to back up your data before attempting a clean installation.
Is it worth upgrading to the 24H2 Windows 11 update, considering potential risks and benefits?
The decision of whether or not to upgrade to the 24H2 Windows 11 update depends on your individual needs and priorities.
Benefits: The update often brings performance improvements, security patches, and new features. These improvements can lead to a smoother and more secure computing experience.
Risks: While rare, there's always a potential risk of encountering problems during the installation process or experiencing unexpected issues after the update. Data loss is a potential risk, although backing up your data mitigates this risk significantly. Some applications might have compatibility issues with the new update, although this is becoming increasingly rare.
Recommendation: Generally, upgrading to the latest Windows update is recommended to benefit from performance enhancements, security patches, and new features. However, before upgrading, ensure you back up your important data. If you rely heavily on specific applications, verify their compatibility with the 24H2 update before proceeding. If you are unsure, waiting a few weeks after the release might allow time for others to report any widespread issues. Consider your comfort level with troubleshooting potential problems. If you are not comfortable troubleshooting technical issues, you might want to wait for a bit.
The above is the detailed content of Mastering the 24H2 Windows 11 Update: Installation Guide and Key Feature Analysis. For more information, please follow other related articles on the PHP Chinese website!

 Fedora 42 Joins the Windows Subsystem for LinuxMay 09, 2025 am 03:01 AM
Pushing the boundaries of Linux: exploring unusual applications. Purely for fun, of course. Posts 7 Technically, you can create a WSL image for any compatible Linux distribution. However, officially supported images offer a significantly smoother e
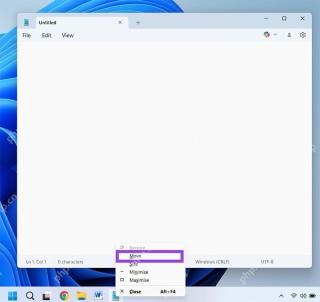 How to Move a Window When You Can't Click on the Title BarMay 09, 2025 am 01:03 AM
When applications unexpectedly extend beyond your screen's edges, accessing their title bars becomes impossible. This is especially common with dual monitors but can occur on single displays as well. This guide offers solutions for regaining control
 This Limited-Edition 'Skeleton” HDD Shows You How It Writes BytesMay 08, 2025 pm 09:04 PM
The HD-SKL, a limited-edition hard drive, is a modern take on Buffalo's 1998 Skeleton Hard Disk. The original, a 4.3GB drive with a clear acrylic case, was produced in a limited run of 500 units. While Buffalo cites its 1978 Melco 3533 turntable as
 The New Surface Pro Doesn't Feel ProMay 08, 2025 am 06:01 AM
The new Surface Pro: A step back? Microsoft's latest Surface Pro offers connectivity via two USB-C ports, supporting charging, USB 3.2 data transfer, and DisplayPort 1.4a (up to two 4K monitors at 60Hz). However, the device ships without a power ad
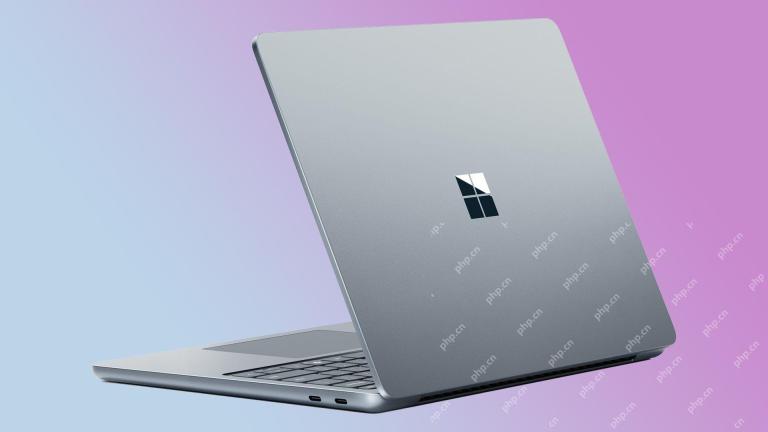 Microsoft Challenges the MacBook Air With New Surface LaptopMay 08, 2025 am 03:02 AM
Microsoft's latest Surface Laptop aims to rival the MacBook Air, but with some notable compromises. The absence of a Surface Connect port marks a significant departure from previous models, reflecting the growing prevalence of Thunderbolt and USB do
 Solve the problem that the svn plugin in eclipse always prompts for password inputMay 07, 2025 pm 05:03 PM
1. Background Recently, when using the svn plug-in to manage remote warehouse code in eclipse, prompts to enter passwords are always prompted to enter passwords, which is particularly annoying. After hard work, I finally solved the problem and shared it with you~ 2. Analysis of the password mechanism of the svn plug-in and the cause of the problem. When we use the svn plug-in for the first time and enter the password, a file that saves the password will be generated, and then the svn plug-in will read the username and password information by default every time. When eclipse is started, the configuration information will be automatically read into the program cache. After the password of svn is modified, it is impossible to log in again, and there is no prompt to re-enter the password. At this time, we can delete the relevant configuration files and let the svn plugin prompt us to re-enter the password. However, ec
 How to restore the win8 system details stepsMay 07, 2025 pm 05:00 PM
The steps to start system restore in Windows 8 are: 1. Press the Windows key X to open the shortcut menu; 2. Select "Control Panel", enter "System and Security", and click "System"; 3. Select "System Protection", and click "System Restore"; 4. Enter the administrator password and select the restore point. When selecting the appropriate restore point, it is recommended to select the restore point before the problem occurs, or remember a specific date when the system is running well. During the system restore process, if you encounter "The system restore cannot be completed", you can try another restore point or use the "sfc/scannow" command to repair the system files. After restoring, you need to check the system operation status, reinstall or configure the software, and re-back up the data, and create new restore points regularly.
 'Modern Operating System Original Book 3rd Edition'May 07, 2025 pm 04:57 PM
"Modern Operating Systems (English Edition 3rd Edition)" is a classic work written by Professor Tanenbaum. With his profound experience in the design of three operating systems, the book perfectly integrates theory and practice. The third edition of the book explores a number of topics in depth, such as process, threading, storage management, file systems, I/O deadlock, interface design, multimedia, performance trade-offs, and introduces the latest trends in operating system design. The book not only explains the principles and practices of modern operating systems in detail, but also pays special attention to Linux operating systems, Windows Vista operating systems, embedded operating systems, real-time operating systems and multimedia operating systems. Covering Windows Vista and the latest Linux/Unix operations


Hot AI Tools

Undresser.AI Undress
AI-powered app for creating realistic nude photos

AI Clothes Remover
Online AI tool for removing clothes from photos.

Undress AI Tool
Undress images for free

Clothoff.io
AI clothes remover

Video Face Swap
Swap faces in any video effortlessly with our completely free AI face swap tool!

Hot Article
Hot Tools

SublimeText3 Mac version
God-level code editing software (SublimeText3)

SublimeText3 Linux new version
SublimeText3 Linux latest version

ZendStudio 13.5.1 Mac
Powerful PHP integrated development environment

SublimeText3 English version
Recommended: Win version, supports code prompts!

Safe Exam Browser
Safe Exam Browser is a secure browser environment for taking online exams securely. This software turns any computer into a secure workstation. It controls access to any utility and prevents students from using unauthorized resources.

