


How to clone a Steam Deck with Clonezilla? The operation is complicated and follow the comprehensive guide on Clonezilla Steam Deck SSD upgrade. Besides, MiniTool introduces a simple way for you to accomplish this task.
As a handheld gaming computer, Steam Deck allows running many games available on the Steam storefront client. Maybe you also have a Steam Deck. But usually, the default SSD storage size cannot satisfy the needs, especially when you run large games. This is why you consider upgrading the SSD. Today, we focus on Clonezilla Steam Deck SSD upgrade.
Without further ado, let’s get started.
Also read: A Step-By-Step Steam Deck SSD Upgrade Guide
What You’ll Need
To back up Steam Deck SSD with Clonezilla and restore the image, there are some things you need to prepare:
- An NVMe 2230 SSD that is compatible with Steam Deck.
- A USB flash drive
- An external hard drive that is equal to or larger than the internal SSD size of your Steam Deck.
- An external keyboard
- A USB-C dock with at least three USB ports
- A screwdriver and a spudger
Step 1: Create a Clonezilla USB Drive
For the Clonezilla Steam Deck upgrade, the first thing should be creating a bootable USB drive.
- Download Clonezilla ISO from its official website.
- Connect a USB drive to your PC and launch Rufus.
- Select Clonezilla ISO and burn it to the USB drive.
Step 2: Boot into Clonezilla Live Environment
To clone Steam Deck SSD with Clonezilla, enter the Clonezilla environment:
1. Turn off Steam Deck by hitting the Power button and choosing Shutdown.
2. Connect your USB stick, external hard drive, & keyboard to the USB dock, and connect the dock to Steam Deck.
3. Hold the Volume Down button and click Power until Steam Deck enters the BIOS menu. Make sure you open Boot Manager.
4. Press the A button to select your USB drive (listed as Linpus Lite). Now, you are in the Clonezilla environment.
Step 3: Perform the Setup Procedure
Before the backup process for Steam Deck Clonezilla, take these steps:
1. Choose the first Clonezilla option on the boot screen using the A button.
2. Pick a language.
3. Select Start_Clonezilla to continue.
Step 4: Clonezilla Steam Deck Backup Process
1. To run Clonezilla Steam Deck SSD image backup, choose device_image to go on.
2. Choose local_dev and press Enter if you have connected the external hard drive.

3. Press Ctrl C to skip a prompt and choose your target disk.
4. Skip checking the file system and click Done.
5. Pick Beginner mode and then savedisk.
6. Decide the local disk source for the backup, such as the internal SSD in your Steam Deck (listed as nvme0n1)
7. Choose the compression option.
8. Skip checking the file system for the source drive.
9. Check the saved image.
10. Decide whether to encrypt the image.
11. Press Y to begin backing up Steam Deck. This process will take some time.
Step 5: Install New SSD to Steam Deck
1. Shut down Steam Deck.
2. Use a screwdriver and a spudger to open the back of your Steam Deck.
3. Remove the original SSD.
4. Insert the new 2230 NVME SSD and hold it in place.
Step 6: Restore Clone Image to New SSD
For Clonezilla Steam Deck, the last step is restoring the backed-up image to your new SSD.
1. Boot Steam Deck from the USB drive to the Boot Manager menu.
2. Finish the setup procedure and enter the mode selection window (mentioned in Step 3).
3. Choose restoredisk to continue instead of savedisk.
4. Select the image you have created.
5. Pick the internal SSD to restore the image to.
6. Check the image and decide whether to use the partition table from the cloned image or to create a new partition table.
7. Begin the restoration procedure.
That’s all the information about how to back up Steam Deck and restore it to a large SSD for disk upgrade. From the guide on Steam Deck Clonezilla, you notice the task is a bit complicated and requires many steps. To easily perform the Steam Deck SSD upgrade, we recommend using the cloning software, MiniTool ShadowMaker.
Steam Deck SSD Upgrade via MiniTool ShadowMaker
This software stands out with its rich features and friendly user interface, simplifying the cloning process. Its Clone Disk feature supports sector by sector cloning, allowing cloning all the sectors of the source disk to the target disk. Get this tool to begin.
Step 1: Remove the original SSD from your Steam Deck.
Step 2: Connect two SSDs to your PC via an adapter and launch MiniTool ShadowMaker Trial Edition.
Step 3: Navigate to Tools and click Clone Disk.

Step 4: Select the source drive and target drive, then begin cloning.
Everything is cloned to the large SSD. Put that SSD to your Steam Deck and you can enjoy large storage for games.
The End
For the Steam Deck Clonezilla SSD upgrade, you need to back up Steam Deck and restore the image to an SSD, requiring many steps. Fortunately, MiniTool ShadowMaker makes the SSD upgrade in Steam Deck easy via direct disk cloning.
The above is the detailed content of Clonezilla Steam Deck SSD Upgrade, Watch the How-to Guide. For more information, please follow other related articles on the PHP Chinese website!

 Black Boxes on Desktop Icons: Find Powerful Tips to RemoveMay 12, 2025 pm 08:07 PM
Encountering black squares instead of desktop icons in Windows 11/10? This comprehensive guide offers several straightforward solutions to restore your icons to their original appearance. Quick Navigation: Black Squares on Desktop Icons Solution 1:
 CapCut Project File Location: How to Find, Recover, and ShareMay 12, 2025 pm 08:06 PM
This MiniTool guide offers a complete walkthrough for managing CapCut projects, covering location, recovery, and sharing. Mastering these steps ensures efficient project handling. Quick Navigation: CapCut Project File Location on PC Backing Up CapC
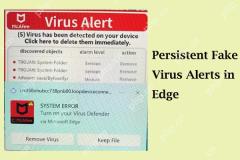 Persistent Fake Virus Alerts in Edge: How to Identify & AvoidMay 12, 2025 pm 08:05 PM
Edge browser fake virus warning: a guide to identifying, handling and prevention Many users report encountering fake virus warnings in Microsoft Edge browser. These warnings usually appear in the form of pop-ups, claiming that malware or viruses are detected, attempting to induce users to download malware or take harmful actions. This article will guide you on how to identify, deal with, and prevent such false warnings. How to identify fake virus warnings in Edge browser? False virus warnings usually have the following characteristics: Use emergency and panic language: Try to force users to act by creating panic. Use fake company logos: Imitate the logo of well-known security software or Microsoft. Regular companies will not issue warnings in this way. Request to dial
 Effective Ways to Fix EVERSPACE 2 Crashing/Not LaunchingMay 12, 2025 pm 08:03 PM
EVERSPACE 2 Crash Problem and Solutions Have you encountered a crash problem while playing EVERSPACE 2? If this problem bothers you, this MiniTool article will help you. This article will explain common causes and effective solutions to EVERSPACE 2 crashes. Quick navigation: EVERSPACE 2 Startup Crash How to fix EVERSPACE 2 crash Summarize EVERSPACE 2 Startup Crash The EVERSPACE 2 crash problem has always been the focus of players. Many players have reported different types of crashes, including crashes at startup, sudden exits during the game, and interactions with Unreal Engine
 Apex Integrity Error 0x8000001: 3 Useful Methods HereMay 12, 2025 pm 08:02 PM
Encountering the Apex Legends integrity error 0x8000001, causing game crashes? This guide provides effective solutions. Let's explore the fixes. Apex Integrity Error 0x8000001: A Crashing Problem Many Apex Legends players report encountering the &quo
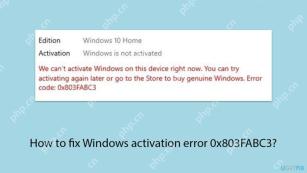 How to fix Windows activation error 0x803FABC3?May 12, 2025 pm 06:00 PM
Windows activation is a critical process in Windows 11 that verifies your operating system copy is genuine, enabling full functionality like personalization fea
 How to Use Copilot in Microsoft OneDrive? Everything You NeedMay 11, 2025 pm 08:02 PM
Unlock the Power of Microsoft OneDrive Copilot: Your AI-Powered File Assistant This MiniTool guide unveils the capabilities of Copilot in OneDrive, a revolutionary AI assistant designed to streamline your file management and boost productivity. Expl
 A Guide to Fix A Supported Game Is Required to Use This FeatureMay 11, 2025 pm 08:01 PM
Troubleshooting the NVIDIA GeForce Experience "Supported Game Required" Error Encountering the "A supported game is required to use this feature" error in NVIDIA GeForce Experience while using game filters, screen recording, or ad


Hot AI Tools

Undresser.AI Undress
AI-powered app for creating realistic nude photos

AI Clothes Remover
Online AI tool for removing clothes from photos.

Undress AI Tool
Undress images for free

Clothoff.io
AI clothes remover

Video Face Swap
Swap faces in any video effortlessly with our completely free AI face swap tool!

Hot Article
Hot Tools

SecLists
SecLists is the ultimate security tester's companion. It is a collection of various types of lists that are frequently used during security assessments, all in one place. SecLists helps make security testing more efficient and productive by conveniently providing all the lists a security tester might need. List types include usernames, passwords, URLs, fuzzing payloads, sensitive data patterns, web shells, and more. The tester can simply pull this repository onto a new test machine and he will have access to every type of list he needs.

DVWA
Damn Vulnerable Web App (DVWA) is a PHP/MySQL web application that is very vulnerable. Its main goals are to be an aid for security professionals to test their skills and tools in a legal environment, to help web developers better understand the process of securing web applications, and to help teachers/students teach/learn in a classroom environment Web application security. The goal of DVWA is to practice some of the most common web vulnerabilities through a simple and straightforward interface, with varying degrees of difficulty. Please note that this software

Dreamweaver CS6
Visual web development tools

Atom editor mac version download
The most popular open source editor

Dreamweaver Mac version
Visual web development tools

