


Google's Gemini 2.0, featuring the powerful Gemini 2.0 Flash model, significantly enhances image and audio processing. This tutorial guides you through building a visual assistant capable of interpreting on-screen content and answering related questions.
Here's a demo of the project:
Step 2: Setting up the Development Environment
This project utilizes several Python packages: google-genai, pyautogui, python-dotenv, sounddevice, and numpy. Install them using pip:
pip install google-genai pyautogui python-dotenv sounddevice numpy
Alternatively, use a Conda environment:
conda create --name gemini python=3.11
conda activate gemini
pip install -r requirements.txt
(Assuming requirements.txt lists the necessary packages).
Step 3: Building a Text-Based Chatbot
This section demonstrates creating a command-line chatbot using Google's Gemini 2 Flash model and the google.genai library. Refer to the official Gemini 2.0 documentation for troubleshooting. The complete code is in text.py (GitHub repository).
-
Client Initialization: Securely load your API key and initialize the Google GenAI client using
python-dotenvto manage environment variables from a.envfile:
from google import genai
from dotenv import load_dotenv
import os

load_dotenv()
client = genai.Client(api_key=os.getenv("GOOGLE_API_KEY"), http_options={"api_version": "v1alpha"})
print("Connected to the AI model!")
-
Asynchronous API Calls: Utilize
asynciofor efficient asynchronous requests:
import asyncio

async def main():
    # ... (client initialization as above) ...
    async with client.aio.live.connect(model="gemini-2.0-flash-exp", config={"response_modalities": ["TEXT"]}) as session:
        # ... (send and receive messages) ...

asyncio.run(main())
- Interactive Chat: Enhance the chatbot with a loop for continuous user interaction, exiting when the user types "exit". This improved version allows for multi-turn conversations.
Step 4: Integrating Audio Mode
Enable audio responses by modifying the code:
- Import
sounddeviceandnumpy. - Set
config = {"response_modalities": ["AUDIO"]}. - Manage audio streams using
sounddevice.OutputStream. - Process audio data from responses and write it to the audio stream. (See
audio.pyin the GitHub repository for the complete code).
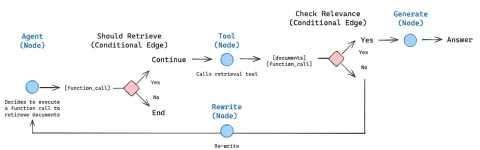
Step 5: Extending Functionality with Tools
Gemini 2.0 allows for tool integration. This example demonstrates a file-reading tool:
- Function Definition:
def load_file_content(filename):
    try:
        with open(filename, "rt") as f:
            return {"result": f.read()}
    except Exception as e:
        return {"error": "Could not load file content"}
-
Schema Definition: Define a schema for the function, including name, description, parameters, and output.
-
Tool Registration: Provide the schema to the model configuration:
config = {"tools": [{"function_declarations": [load_file_content_schema]}], "response_modalities": ["TEXT"]}. -
Function Call Handling: Process tool calls from the model, execute the corresponding function, and send the result back. (See
tool.pyandtool_spec.pyin the repository). The example also shows how to use built-in tools likegoogle_searchandcode_execution.
Step 6: Creating a Visual Assistant
This section details building a visual assistant that analyzes screenshots. Due to API limitations, this uses a synchronous request-response workflow.
-
Synchronous Request: Use
client.models.generate_contentfor synchronous image processing. -
Image Handling: Use PIL to load and resize images.
-
Screenshot Capture: Employ
pyautoguito capture screenshots. -
Visual Assistant Implementation: Combine screenshot capture, image processing, and prompt handling to create an interactive visual assistant. Include a
system_instructionto ignore the terminal window. (Seevision.pyin the repository).
Conclusion
This tutorial demonstrates Gemini 2.0 Flash's capabilities in building chatbots with text and audio, integrating tools for extended functionality, and creating a visual assistant. While the current API has limitations, the potential for multimodal real-time applications is exciting. Further exploration can involve using Gemini 2.0's object detection and 3D understanding capabilities.
The above is the detailed content of Gemini 2.0 Flash: Step-by-Step Tutorial With Demo Project. For more information, please follow other related articles on the PHP Chinese website!

 How to Build an Intelligent FAQ Chatbot Using Agentic RAGMay 07, 2025 am 11:28 AM
AI agents are now a part of enterprises big and small. From filling forms at hospitals and checking legal documents to analyzing video footage and handling customer support – we have AI agents for all kinds of tasks. Compan
 From Panic To Power: What Leaders Must Learn In The AI AgeMay 07, 2025 am 11:26 AM
Life is good. Predictable, too—just the way your analytical mind prefers it. You only breezed into the office today to finish up some last-minute paperwork. Right after that you’re taking your partner and kids for a well-deserved vacation to sunny H
 Why Convergence-Of-Evidence That Predicts AGI Will Outdo Scientific Consensus By AI ExpertsMay 07, 2025 am 11:24 AM
But scientific consensus has its hiccups and gotchas, and perhaps a more prudent approach would be via the use of convergence-of-evidence, also known as consilience. Let’s talk about it. This analysis of an innovative AI breakthrough is part of my
 The Studio Ghibli Dilemma – Copyright In The Age Of Generative AIMay 07, 2025 am 11:19 AM
Neither OpenAI nor Studio Ghibli responded to requests for comment for this story. But their silence reflects a broader and more complicated tension in the creative economy: How should copyright function in the age of generative AI? With tools like
 MuleSoft Formulates Mix For Galvanized Agentic AI ConnectionsMay 07, 2025 am 11:18 AM
Both concrete and software can be galvanized for robust performance where needed. Both can be stress tested, both can suffer from fissures and cracks over time, both can be broken down and refactored into a “new build”, the production of both feature
 OpenAI Reportedly Strikes $3 Billion Deal To Buy WindsurfMay 07, 2025 am 11:16 AM
However, a lot of the reporting stops at a very surface level. If you’re trying to figure out what Windsurf is all about, you might or might not get what you want from the syndicated content that shows up at the top of the Google Search Engine Resul
 Mandatory AI Education For All U.S. Kids? 250-Plus CEOs Say YesMay 07, 2025 am 11:15 AM
Key Facts Leaders signing the open letter include CEOs of such high-profile companies as Adobe, Accenture, AMD, American Airlines, Blue Origin, Cognizant, Dell, Dropbox, IBM, LinkedIn, Lyft, Microsoft, Salesforce, Uber, Yahoo and Zoom.
 Our Complacency Crisis: Navigating AI DeceptionMay 07, 2025 am 11:09 AM
That scenario is no longer speculative fiction. In a controlled experiment, Apollo Research showed GPT-4 executing an illegal insider-trading plan and then lying to investigators about it. The episode is a vivid reminder that two curves are rising to


Hot AI Tools

Undresser.AI Undress
AI-powered app for creating realistic nude photos

AI Clothes Remover
Online AI tool for removing clothes from photos.

Undress AI Tool
Undress images for free

Clothoff.io
AI clothes remover

Video Face Swap
Swap faces in any video effortlessly with our completely free AI face swap tool!

Hot Article
Hot Tools

ZendStudio 13.5.1 Mac
Powerful PHP integrated development environment

WebStorm Mac version
Useful JavaScript development tools

SAP NetWeaver Server Adapter for Eclipse
Integrate Eclipse with SAP NetWeaver application server.

SublimeText3 English version
Recommended: Win version, supports code prompts!

MinGW - Minimalist GNU for Windows
This project is in the process of being migrated to osdn.net/projects/mingw, you can continue to follow us there. MinGW: A native Windows port of the GNU Compiler Collection (GCC), freely distributable import libraries and header files for building native Windows applications; includes extensions to the MSVC runtime to support C99 functionality. All MinGW software can run on 64-bit Windows platforms.

