


Last year, Genesis was released as an exciting new tool for creating realistic physics simulations, interactive 4D worlds, and more. I was eager to try it, but getting it to work wasn’t easy. I must admit I faced a lot of challenges during the setup.
In this tutorial, I’ll briefly share the problems I ran into, and show how I eventually got it running using Google Colab and a couple of tricks.
If you only want an overview of Genesis, check out my previous article, Genesis Physics Engine: A Guide With Examples.
My Initial Setup Experience With Genesis
When I first started working with Genesis, I followed the installation steps in the documentation. Right away, I hit problems with dependencies. Genesis requires a specific version of a module called Taichi (1.7.x), but my macOS didn’t support it. For reference, my Mac is 8 years old….
After some research, I realized other users had the same issues, even with better computers. After hours of effort, and discovering that Genesis only works with certain Python versions, I finally installed it.
But new problems popped up. It wouldn’t render anything, and I had several issues with OpenGL. Even when I tried running the example files from their GitHub, I faced more errors and conflicts.
Then, when I thought I had sorted it out, I started getting errors like "uniform not found," which meant some of the rendering settings were missing.
Throughout this process, I researched online to see if anyone else had encountered the same issues. It turned out I wasn't the only one—many people faced the same difficulties, and many seemed unable to find a solution to make their scripts work.
How I Made Genesis Work: Google Colab to the Rescue
After the initial frustration, I decided to try Google Colab with a Pro account, and it turned out to be exactly what I needed. Using Colab’s GPU resources, I was able to:
- Install all required dependencies with no issues whatsoever.
- Use the GPU backend to achieve great performance and realistic rendering.
- Finally, run basic examples and explore Genesis’ potential.
I selected the NVIDIA A100-SXM4-40GB, which proved to be powerful enough to handle Genesis simulations efficiently.
Once I set up my Google Colab environment and installed Genesis, I tried to run the simplest example from the documentation:
import genesis as gs
gs.init(backend=gs.cpu)
scene = gs.Scene(show_viewer=True)
This example should initialize Genesis with the CPU backend and display a basic scene. However, I immediately ran into the following error:
GenesisException: No display detected. Use show_viewer=False for headless mode.
The error message indicates that Genesis is trying to create a graphical window to render the scene, but Google Colab doesn’t support real-time visualization. Colab runs in a remote environment with no access to a local display, so the show_viewer=True parameter in the gs.Scene() initialization doesn’t work.
As suggested by the error message, I modified the code to disable the viewer:
import genesis as gs
gs.init(backend=gs.cpu)
scene = gs.Scene(show_viewer=True)
This allowed the script to execute without crashing. However, this approach meant there was no way to visualize the results directly.
After looking online, I discovered that others had faced the same issue. Many proposed solutions involved configuring remote OpenGL environments or using Xvfb to create a virtual display. Unfortunately, I couldn’t get these methods to work reliably in Colab, likely due to dependency conflicts and limitations of the environment.
At this point, I needed a more practical workaround!
Since real-time rendering wasn’t an option in Colab, I decided to save the rendered output frame by frame as images. With these ideas, I was able to generate a sequence of images that could later be combined into an animation.
Implementation and Outputs
In this section, I am going to walk you through the implementation of the code and the outputs I got.
Setting up the GPU environment
First of all, I installed Genesis:
GenesisException: No display detected. Use show_viewer=False for headless mode.
Then, I initialized Genesis with the CUDA backend for GPU acceleration.
scene = gs.Scene(show_viewer=False)
This is the output I got:
pip install genesis-world
Creating and building the scene
Create a directory to save the results
The first thing I needed was a folder where Genesis could save the images it rendered.
import genesis as gs
gs.init(backend=gs.cuda)
The os.makedirs() function creates a folder called simulation_frames in the specified path, and the exist_ok=True argument ensures that if the folder already exists, no error will be raised.
This way, I had a dedicated place to save all the frames and outputs from my simulation.
Initialize the scene
Next, I needed to create a scene where I could add objects and interact with them.
[Genesis] [INFO] Running on [NVIDIA A100-SXM4-40GB] with backend gs.cuda. Device memory: 39.56 GB.
[Genesis] [INFO] ? Genesis initialized. Version: 0.2.1, Seed: None, Precision: 32.
gs.Scene() initializes a new simulation space, and show_viewer=False disables real-time visualization. At this point, I had an empty scene ready to start building on.
Add a plane and a box
With the scene ready, I started adding objects. I first added a plane, which acts as the ground.
import os
save_dir = "/content/simulation_frames"
os.makedirs(save_dir, exist_ok=True)
The plane serves as a flat base for the simulation. By default, it’s infinite and lies flat along the x-y axis.
Next, I added a box to the scene:
scene = gs.Scene(show_viewer=False)
I set the box to be at (0, 0, 0), right in the center of the scene, and I resized it to be 0.5 units wide, tall, and deep, making it smaller than the default.
Now, I had a simple setup: a plane as the ground and a box resting on top of it.
Add a camera
To capture what was happening in the scene, I added a camera.
import genesis as gs
gs.init(backend=gs.cpu)
scene = gs.Scene(show_viewer=True)
I set the image resolution to 320x240 pixels, a practical choice for testing, and positioned the camera at (3.5, 2.0, 2.5), which gave it a clear view of the scene from slightly above and to the side. To make sure that the box remained in focus, I aimed the camera at (0, 0, 0.5), just above the center of the box. With a 30-degree field of view (FOV), the camera captured a narrow and focused perspective of the scene.
Build the scene
The next step was to build the scene to prepare it for simulation and rendering.
GenesisException: No display detected. Use show_viewer=False for headless mode.
This step is crucial because Genesis uses just-in-time (JIT) compilation to optimize the simulation. When I built the scene, Genesis:
- Allocated memory for the objects in the scene.
- Prepared GPU kernels for rendering and physics calculations.
- Set up all the necessary data structures for the simulation to run smoothly.
Now everything was ready—my plane, box, and camera were set up, and the scene was built.
Rendering and saving outputs
To visualize the simulation, I rendered and saved the outputs frame by frame. Each frame was stored as an image in the simulation_frames directory.
scene = gs.Scene(show_viewer=False)
During the rendering process, I observed that the first few frames rendered quickly (up to 2,297 FPS), but performance decreased as the simulation progressed. The FPS eventually dropped to around 0.33 FPS by frame 25. This could be due to increasing computational complexity of the simulation or perhaps GPU resource constraints for larger scenes.
This is the output I got:
pip install genesis-world
These are the images I got:


Each image shows how the box moves in relation to the plane over time, as seen through the camera. The simulation runs in steps, and with each step, the box's position changes, making it look like the box is moving.
This example highlights how Genesis can simulate and display simple physical interactions. While this setup is basic, it gives a good idea of how objects behave in the scene. But you can totally create more complex and realistic scenarios with Genesis! We will explore some of these capabilities in the next section.
Exploring Genesis: Capabilities and Features
Object and scene creation
Genesis allows you to create complex scenes by adding various objects and morphs. Objects can range from simple primitives like planes, boxes, and spheres to more complex entities like robots and terrains.
Shape Primitives:
- gs.morphs.Plane
- gs.morphs.Box
- gs.morphs.Cylinder
- gs.morphs.Sphere
External File Support:
- MJCF: gs.morphs.MJCF for MuJoCo XML robot configurations.
- URDF: gs.morphs.URDF for Unified Robot Description Format files.
- Mesh: gs.morphs.Mesh for 3D assets like .obj, .ply, .stl, .glb, and .gltf.
Genesis uses a unified concept called a "morph," encapsulating geometry and pose information. This object-oriented design allows direct interaction with entities using their methods.
Rendering and visualization
One of Genesis's key strengths is its ability to create detailed visual outputs using advanced camera features. The cameras work in a "headless mode," meaning they can generate images without needing a display screen. They can produce various types of visuals, including regular color images (RGB), depth maps showing how far objects are, segmentation masks that label different parts of the scene, and normal maps that represent surface details.
Recording videos
You can create videos by letting cameras automatically record each frame of the simulation. You can even move the camera during the recording to make the video more dynamic and immersive.
For example, you can configure a camera to move in a circular path around the scene while capturing frames. The cam.start_recording() function begins the recording, and during each step of the simulation, the camera's position is updated. Once all the frames are captured, cam.stop_recording() saves the video as "video.mp4".
The final video gives a smooth view of the simulation, showing how the objects interact and move over time.
Terrain generation for locomotion tasks
You can also create different types of terrains for robotics and AI training. You can use its built-in terrain options or design your own by providing custom height maps with gs.morphs.Terrain. These terrains are perfect for testing and training how robots move, making Genesis a great tool for robotics research.
Extensibility
You can also customize your simulations in several ways. You can add realistic textures to objects, making them look more lifelike. It also supports many file formats for importing models, and if a format isn’t supported, you can request it to be added. Additionally, you can create your own custom object shapes (called morphs) using personalized files and settings.
Conclusion
This tutorial provided a simple example to help you get started with Genesis. We covered the basics, like creating scenes, adding objects, and rendering outputs, to show how this powerful physics engine works.
However, this is just the beginning of what Genesis can do. With the right hardware, like a strong GPU and enough memory, there are so many possibilities. You can use it for complex robotics simulations or for creating high-quality datasets for AI training. Although setting it up can be tricky, it’s definitely a tool with huge potential!
The above is the detailed content of Genesis Physics Engine: A Step-by-Step Guide to Setting Up Genesis. For more information, please follow other related articles on the PHP Chinese website!

 Let's Dance: Structured Movement To Fine-Tune Our Human Neural NetsApr 27, 2025 am 11:09 AM
Scientists have extensively studied human and simpler neural networks (like those in C. elegans) to understand their functionality. However, a crucial question arises: how do we adapt our own neural networks to work effectively alongside novel AI s
 New Google Leak Reveals Subscription Changes For Gemini AIApr 27, 2025 am 11:08 AM
Google's Gemini Advanced: New Subscription Tiers on the Horizon Currently, accessing Gemini Advanced requires a $19.99/month Google One AI Premium plan. However, an Android Authority report hints at upcoming changes. Code within the latest Google P
 How Data Analytics Acceleration Is Solving AI's Hidden BottleneckApr 27, 2025 am 11:07 AM
Despite the hype surrounding advanced AI capabilities, a significant challenge lurks within enterprise AI deployments: data processing bottlenecks. While CEOs celebrate AI advancements, engineers grapple with slow query times, overloaded pipelines, a
 MarkItDown MCP Can Convert Any Document into Markdowns!Apr 27, 2025 am 09:47 AM
Handling documents is no longer just about opening files in your AI projects, it’s about transforming chaos into clarity. Docs such as PDFs, PowerPoints, and Word flood our workflows in every shape and size. Retrieving structured
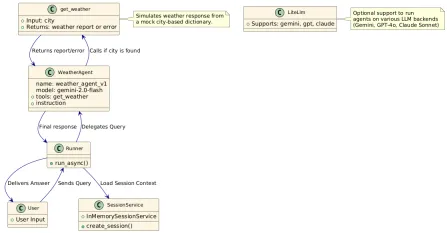 How to Use Google ADK for Building Agents? - Analytics VidhyaApr 27, 2025 am 09:42 AM
Harness the power of Google's Agent Development Kit (ADK) to create intelligent agents with real-world capabilities! This tutorial guides you through building conversational agents using ADK, supporting various language models like Gemini and GPT. W
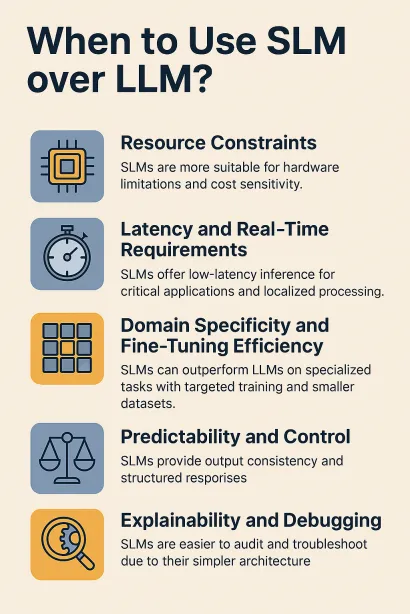 Use of SLM over LLM for Effective Problem Solving - Analytics VidhyaApr 27, 2025 am 09:27 AM
summary: Small Language Model (SLM) is designed for efficiency. They are better than the Large Language Model (LLM) in resource-deficient, real-time and privacy-sensitive environments. Best for focus-based tasks, especially where domain specificity, controllability, and interpretability are more important than general knowledge or creativity. SLMs are not a replacement for LLMs, but they are ideal when precision, speed and cost-effectiveness are critical. Technology helps us achieve more with fewer resources. It has always been a promoter, not a driver. From the steam engine era to the Internet bubble era, the power of technology lies in the extent to which it helps us solve problems. Artificial intelligence (AI) and more recently generative AI are no exception
 How to Use Google Gemini Models for Computer Vision Tasks? - Analytics VidhyaApr 27, 2025 am 09:26 AM
Harness the Power of Google Gemini for Computer Vision: A Comprehensive Guide Google Gemini, a leading AI chatbot, extends its capabilities beyond conversation to encompass powerful computer vision functionalities. This guide details how to utilize
 Gemini 2.0 Flash vs o4-mini: Can Google Do Better Than OpenAI?Apr 27, 2025 am 09:20 AM
The AI landscape of 2025 is electrifying with the arrival of Google's Gemini 2.0 Flash and OpenAI's o4-mini. These cutting-edge models, launched weeks apart, boast comparable advanced features and impressive benchmark scores. This in-depth compariso


Hot AI Tools

Undresser.AI Undress
AI-powered app for creating realistic nude photos

AI Clothes Remover
Online AI tool for removing clothes from photos.

Undress AI Tool
Undress images for free

Clothoff.io
AI clothes remover

Video Face Swap
Swap faces in any video effortlessly with our completely free AI face swap tool!

Hot Article
Hot Tools

mPDF
mPDF is a PHP library that can generate PDF files from UTF-8 encoded HTML. The original author, Ian Back, wrote mPDF to output PDF files "on the fly" from his website and handle different languages. It is slower than original scripts like HTML2FPDF and produces larger files when using Unicode fonts, but supports CSS styles etc. and has a lot of enhancements. Supports almost all languages, including RTL (Arabic and Hebrew) and CJK (Chinese, Japanese and Korean). Supports nested block-level elements (such as P, DIV),

Dreamweaver CS6
Visual web development tools

VSCode Windows 64-bit Download
A free and powerful IDE editor launched by Microsoft

Atom editor mac version download
The most popular open source editor

Safe Exam Browser
Safe Exam Browser is a secure browser environment for taking online exams securely. This software turns any computer into a secure workstation. It controls access to any utility and prevents students from using unauthorized resources.

