


iPhone Photo Editing Guide: Easily master photo editing skills
iPhone photo editing is powerful and easy to get started, and you can easily improve your photo quality whether you are a newbie or a veteran. Enhance pictures with preset effects or manually adjusting settings without expensive software.
The iPhone's photo editor also offers advanced features such as selective editing, allowing you to make precise adjustments to specific areas of your image. Additionally, you can easily share edited photos directly from the app, post them to social media platforms or send them to friends and family.
How to edit photos with iPhone
Most of the time, we take photos casually, and we don’t consider composition or lighting when shooting. We just capture the moments as fast as possible. Fortunately, this is where post-editors come in. Just like frosting a cake, editing images makes them look more perfect. And, editing photos on your iPhone may be easier than dealing with buttercream frosting.
Crop, rotate or flip photos
After taking a selfie, passers-by accidentally came into the camera? Don't worry, the cropping tool can help you solve this problem. Cropping is one of the easiest and quickest ways to remove unwanted elements or distractors from your photos. Trimming edges can also improve the composition of photos by adjusting the position and balance of elements within the picture. In the Photos app, click on any thumbnail to view it in full screen. To start making changes, click Edit and then click Crop Icon to select one of three ways to crop your photos.

1. Crop manually: After selecting the Crop Icon, drag the corners of the rectangle to contain the area you want to keep in the photo. Click "Done" to crop.

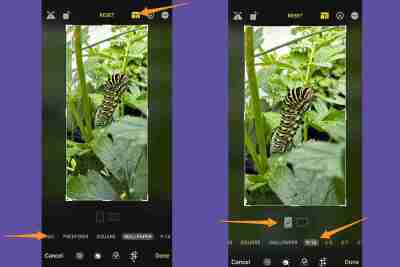
2. Zoom Crop: Alternatively, you can scale iPhone images by activating the cropping tool and pinching it. When the photo is displayed as the desired cropping effect, click "Done" to save.
- Pro tip: If you choose scale cropping (e.g. 9:16), you can select either vertical or horizontal orientation by clicking on the two rectangles below the image.
How to rotate pictures on iPhone
Click on the "Rotation Icon" (a square with arrows curved around a corner) to rotate the photo 90 degrees at a time. Continue to rotate until you get the desired orientation. Click "Done" to confirm the changes.

How to flip a photo on iPhone
Touch the "Flip Icon" (mirror triangle with the arrow above) to invert the image horizontally. Click "Done" to save the edit.

Note that if you don't like your crop, rotate, and/or flip at any time during the editing process, you can click Cancel in the lower left corner of the screen and then click Discard Changes.
Sometimes, you won't notice tilted or skewed lines in the photo until after shooting. Fortunately, using iPhone's editing software, you can easily change the perspective. Open a photo on your iPhone, click Edit, and then click Crop Icon.
Below the photo, you will see three options for correcting horizontal lines in the photo and adjusting vertical and horizontal viewing angles. When you select the option you want to use, drag the slider below to make precise changes. There is also an "Auto" option at the top of the screen, which will automatically adjust the photos according to the selected adjustments.
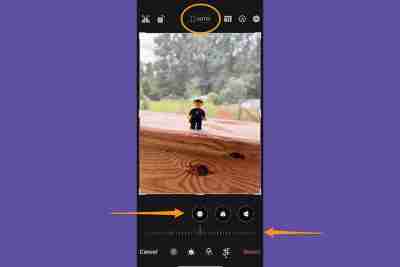
1. Calibration: This adjustment corrects the horizontal line in the photo.

2. Vertical viewing angle: Correct or modify the perceived height or angle of an object in the photo to correct vertical lines that may appear tilted or distorted.

3. Horizontal Perspective: Change the horizontal lines and angles in the photo to ensure the parallel lines are aligned with the way you want.

After adjusting the perspective, select "Done" to save the changes; if you are not satisfied, click "Cancel", and then click "Discard Changes".
Light and color are important factors when editing photos (and anywhere) with your iPhone, as they affect the overall atmosphere and visual appeal of the image. The right light highlights the subject, adds depth, and makes important details stand out. Similarly, changing the color of a photo can make the viewer develop a certain mood, create a specific atmosphere, and even convey information. Your phone's Photos app has tools that allow you to adjust the light and color of your picture.
[Related: How to take a better selfie]
First, open the photo you want to change. Click Edit and swipe left under the image to see what you can edit. The quickest and simplest way to make adjustments is to click “Auto”, and the slider under the “Auto” tab will allow you to adjust the editing intensity recommended by your iPhone.
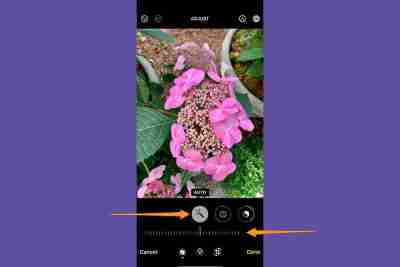
However, if you prefer full control of editing, the iPhone Photo Editor allows you to adjust each effect individually for custom editing. The effects you can change include:
- Exposure: Increasing exposure can make the image brighter, while reducing exposure can create a darker, more dramatic effect.
- Brightness: Enhance the overall clarity and vitality of the image, making it more visually impactful.
- Highlights: Highlight the brightest part of the image, increasing brightness and contrast.
- Shadow: Darks darker areas in the image and creates depth.
- Contrast: Makes the difference between light and dark areas more obvious.
- Brightness: Change the overall light and darkness of a photo, but not as violent as adjusting the exposure.
- Black Dots: Adjust the darkest point in the image to better control the overall tone range.
- Saturation: Effects the intensity and richness of colors in the image.
- Brightness: Similar to saturation, but aims to enhance the color more subtle and more naturally.
- Warm Tone: Adjust the color temperature of the image to make it look warmer (yellower/orange) or cooler (blueer).
- Tone: Adjust the overall color balance of the image to add subtle tones to the entire image.
- Sharpness: Enhances the sharpness and details of the image, making edges and fine textures clearer.
- Sharpness: Improve the overall sharpness and clarity of the image by enhancing the differences between different elements and increasing depth.
- Noise reduction: Reduces digital noise in the image, making the image look smoother and clearer. This helps minimize granular or spot-like effects that may occur in low light conditions.
- Vizzy: Darks the corners and edges of the image, creating a subtle or dramatic spotlight effect.

Apply filters
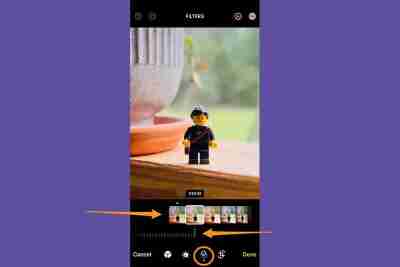
Filter effect allows you to easily add creative and artistic elements to your photos, making the image more visually appealing and charming. To apply a filter, open the photo, click Edit, and then click the Filter Button (three overlapping circles) to bring up the filter effect options. There are nine filters to choose from. Use the slider below the selected effect to adjust its strength, and if you need to delete the filter, click "Original". Click "Done" to confirm the editing.
Portrait mode editing skills
If you like to use Portrait Mode, you need to be familiar with the iPhone's Portrait Mode-specific enhancements. These allow you to adjust the depth of field (also known as bokeh), which is the distance range in the photo that looks sharp in focus and makes the subject stand out. The editing tool for portrait mode also includes studio lighting effects for enhanced flexibility and creativity.

Adjustment f Stop will increase or decrease background blur. The smaller the stop, the more blur you see. A larger f stop means less blur. Click the "f stop icon" and a slider will appear at the bottom of the screen, allowing you to adjust the effect.

To adjust the light, click one of the effects. You can choose from natural light, studio light, contour light, stage light, stage monochrome light and high-profile monochrome light. Move the slider to the left or right to increase or decrease the effect.

Writing or painting on photos
Writing or painting on pictures can be fun, and the iPhone makes this easy. Select a photo, then go to Edit and click the Pen button. Draw on pictures using various drawing tools and colors.

You can click the "plus button" to enlarge or add titles, text, shapes, and even your signature. Click "Done" to save the changes, or if you don't like the changes, click "Cancel".
How to undo photo editing on iPhone
If you make editing mistakes, don't worry - iPhone's Photos app offers you many opportunities to undo editing.
Undo and redo editing: Click the Left and right arrows at the top of the screen to undo and redo multiple editing steps.

Restore edited photos: If you saved your changes and decide you don't like the edit, you can open the photo, select Edit, and then click Restore to restore the original version.

Copy and paste the edit to multiple photos
iPhone allows you to copy and paste edits from one photo to one or more other photos, which is especially useful when you try to edit a series of similar photos. First open the photo containing the edits you want to copy. Then click the "More Options" button (three dots) and click "Copy Edit". Click Cancel, and then click the Back button to return to the photo library.

Then, click "Select" and then touch the thumbnail of the photo you want to edit. Finally, select Paste Edit from the More Options menu.

How to remove topics from iPhone photos
While you can't edit the background of your photo using the Photos app on your iPhone (you need to install a separate app for this), you can cut and paste a part of the picture - the theme.
For this purpose, the subject and background of the photo should be clear and clear, and the background should not be too busy or similar to the subject. First open the image, then hold the theme. You should see a white glow around the subject and a window will pop up asking you to "copy or share". If that doesn't work, move your finger and try again – sometimes, selecting a topic requires more than one attempt.

If successful, your iPhone will automatically detach the theme from the background, which you can copy and paste into another app, or share with the standard sharing option.

Change date, time or location if necessary
Your iPhone stores date, time, and location in the metadata of your photo. If you need to change this information, you can do so. Open the photo you want to change and click the "More Options Button" (three dots) in the upper right corner. Touch "Adjust Date and Time" or "Adjust Position", enter new information, and then click "Adjust".

To change the date, time, or location of multiple photos at once, click Select, touch the thumbnail of the image you want to change, and follow the steps above. If you change your mind, don't worry - you can undo the metadata edit by clicking on the "More Options Button" and then clicking on "Adjust Date and Time" or "Adjust Position" and then clicking on "Restore".
FAQ
The above is the detailed content of How to edit photos on an iPhone—a detailed guide. For more information, please follow other related articles on the PHP Chinese website!

 What to Do Before Replacing a Hard Drive? Learn Essentials!May 04, 2025 pm 08:02 PM
Upgrade the hard drive and improve the computer performance! This article will guide you the steps you need to take before replacing a hard drive on your Windows computer with a larger disk or SSD to avoid unnecessary hassle. Preparation: Choose the right hard drive: When choosing a hard disk, you should not only consider the difference between SSD and HDD, but also consider factors such as storage capacity, form factor size and budget. SSD capacity ranges from 256GB to 4TB or even larger, choose the capacity that suits your needs. Also, check which SSD slot is used for your laptop or desktop and make sure that the SSD you choose (such as 2.5-inch and 3.5-inch SATA SSD, M.2 2280/2230/2242 SSD, etc.) is compatible with your computer. Finally, according to
 Sultan's Game Save File Location: A Detailed Roadmap GuideMay 04, 2025 pm 08:01 PM
Mastering Sultan's Game: Save File Location and Backup Strategies This guide helps you locate and protect your Sultan's Game save files. Released on March 31st, 2025, Sultan's Game's engaging narratives and appealing visuals have made it a popular c
 A Step-by-Step Guide to Copy ESXi VM to a USB DriveMay 03, 2025 pm 08:01 PM
Offsite VM backups are crucial. This guide demonstrates how to easily copy ESXi virtual machines to a USB drive for secure, accessible storage. Method 1: Manual VM File Download This method copies the core VM files. Power off the target VM in the V
 Windows 10 KB5055612: New Features & What if It Failed to InstallMay 02, 2025 pm 08:01 PM
This non-security update, KB5055612 for Windows 10 version 22H2 and related versions, released April 22, 2025, offers several quality improvements. This guide details installation and troubleshooting steps. KB5055612: Key Improvements This update enh
 Unlock Helpful Methods to Fix KB5055642 Not InstallingMay 02, 2025 pm 06:01 PM
Troubleshooting KB5055642 Installation Problems on Windows 11 This guide offers solutions for users encountering issues installing Windows 11 Insider Preview Build 26200.5562 (KB5055642), released April 21, 2025. This update introduces enhanced featu
 How to fix Windows update error 0xca00a000?May 02, 2025 pm 06:00 PM
Updates are vital to ensure that a Windows system runs well and is protected from potential outside threats, such as software vulnerabilities. Unfortunately, Wi
 Learn How to Resolve Steam Invalid Platform Error on WindowsMay 01, 2025 pm 06:01 PM
Encountering the Steam "Invalid Platform" error? This MiniTool guide offers several solutions to get you back in the game. This frustrating error typically means your game is incompatible with your operating system. Understanding the Error
 How to fix Xbox app error 0x80073cf9 in Windows?May 01, 2025 am 02:00 AM
The Windows Xbox app lets you manage your Game Pass library, view friends, and launch PC games from one place. Its a hub of Microsofts gaming experience, especi


Hot AI Tools

Undresser.AI Undress
AI-powered app for creating realistic nude photos

AI Clothes Remover
Online AI tool for removing clothes from photos.

Undress AI Tool
Undress images for free

Clothoff.io
AI clothes remover

Video Face Swap
Swap faces in any video effortlessly with our completely free AI face swap tool!

Hot Article
Hot Tools

SecLists
SecLists is the ultimate security tester's companion. It is a collection of various types of lists that are frequently used during security assessments, all in one place. SecLists helps make security testing more efficient and productive by conveniently providing all the lists a security tester might need. List types include usernames, passwords, URLs, fuzzing payloads, sensitive data patterns, web shells, and more. The tester can simply pull this repository onto a new test machine and he will have access to every type of list he needs.

Safe Exam Browser
Safe Exam Browser is a secure browser environment for taking online exams securely. This software turns any computer into a secure workstation. It controls access to any utility and prevents students from using unauthorized resources.

Atom editor mac version download
The most popular open source editor

Dreamweaver CS6
Visual web development tools

MantisBT
Mantis is an easy-to-deploy web-based defect tracking tool designed to aid in product defect tracking. It requires PHP, MySQL and a web server. Check out our demo and hosting services.

