
Home >Backend Development >PHP Tutorial >How to Use Varnish and Cloudflare for Maximum Caching
How to Use Varnish and Cloudflare for Maximum Caching

- 尊渡假赌尊渡假赌尊渡假赌Original
- 2025-02-08 09:48:13527browse

Core points
- The collaborative use of Varnish and Cloudflare maximizes website caching capabilities and significantly improves loading speed and user experience. Varnish is a powerful cached HTTP reverse proxy, while Cloudflare is a globally distributed network of proxy servers that provide performance and security.
- Varnish installation and configuration involve changing the server default port to 8080 and replacing the default ports in
/etc/default/varnishand/lib/systemd/system/varnish.serviceto 80. Varnish and Nginx must then be restarted for the changes to take effect. - Cloudflare settings require registration of an account and domain name. The domain name server must be updated to point to Cloudflare's name server, so Cloudflare has full control over the domain name. Cloudflare's automatic compression and Rocket Loader tools further optimize the website.
- Other tweaks can be made to further improve performance, such as adding favicon, applying Nginx optimization, and activating HTTP/2 with Varnish. However, Varnish and Cloudflare must be carefully configured to work together effectively and avoid potential problems such as double caching.
This article is part of a series of articles about building sample applications (multi-image gallery blogs) for performance benchmarking and optimization. (View the repository here.)
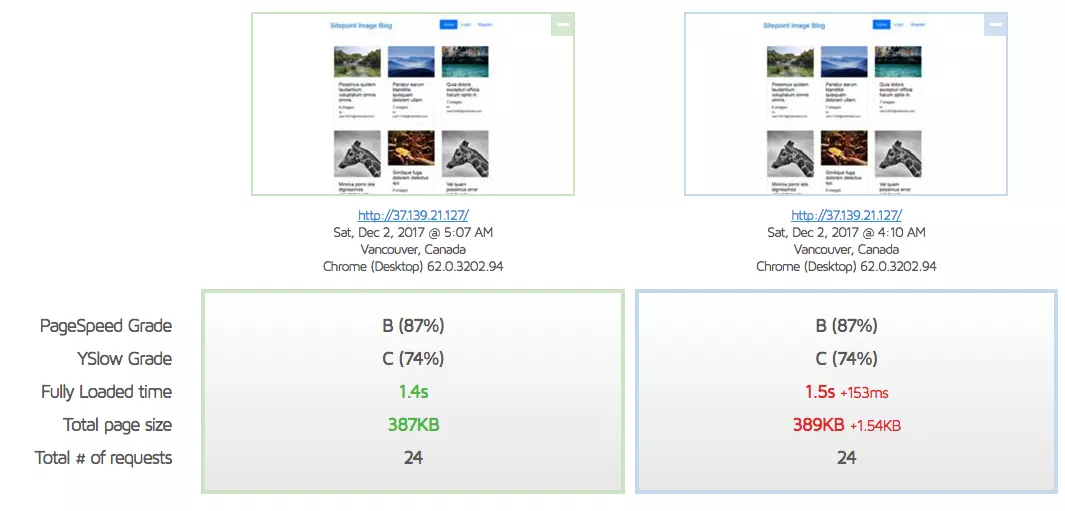
As shown in this report, our website’s login page loads very quickly and scores well overall, but it can use another layer of cache and even use a CDN to really get good performance.
To learn more about GTMetrix and other tools that can be used to measure and debug performance, see Improved page loading performance: Pingdom, YSlow, and GTmetrix.
Let us use what we learned in previous Varnish articles, as well as the knowledge we gained in the Introduction to CDN and Introduction to Cloudflare articles to truly adjust our server content delivery.
Varnish
Varnish is created only to become a super cache before a regular server.
Note: Given that Nginx itself is a pretty good server, people usually choose one rather than both. There is no harm in having both at the same time, but you must be wary of possible cache failure problems. Both must be set correctly so that the cache of one of the caches does not remain stale when the other cache is updated. This can result in different content being displayed to different visitors. Setting this item is beyond the scope of this article and will be described in future guides.
We can install Varnish by doing the following:
<code>curl -L https://packagecloud.io/varnishcache/varnish5/gpgkey | sudo apt-key add -
sudo apt-get update
sudo apt-get install -y apt-transport-https</code>
Ubuntu's current repository list does not have Varnish 5, so additional repositories are needed. If the file /etc/apt/sources.list.d/varnishcache_varnish5.list does not exist, create it. Add the following to it:
<code>deb https://packagecloud.io/varnishcache/varnish5/ubuntu/ xenial main
deb-src https://packagecloud.io/varnishcache/varnish5/ubuntu/ xenial main</code>
Then, run:
<code>curl -L https://packagecloud.io/varnishcache/varnish5/gpgkey | sudo apt-key add -
sudo apt-get update
sudo apt-get install -y apt-transport-https</code>
The result should be similar to:
<code>deb https://packagecloud.io/varnishcache/varnish5/ubuntu/ xenial main
deb-src https://packagecloud.io/varnishcache/varnish5/ubuntu/ xenial main</code>
Then, we change the server's default port to 8080. We do this because Varnish will be on port 80 and forward the request to 8080 as needed. If you are doing local development on Homestead Improved as in the beginning of this series, the files you need to edit are located in /etc/nginx/sites-available/homestead.app. Otherwise, it may be in /etc/nginx/sites-available/default.
<code>sudo apt-get update
sudo apt-get install varnish
varnishd -V</code>
Next we will configure Varnish itself by editing /etc/default/varnish and replacing the default port on the first line (6081) with 80:
<code>$ varnishd -V
varnishd (varnish-5.2.1 revision 67e562482)
Copyright (c) 2006 Verdens Gang AS
Copyright (c) 2006-2015 Varnish Software AS</code>
The same operation is also required in /lib/systemd/system/varnish.service:
<code>server {
    listen 8080 default_server;
    listen [::]:8080 default_server ipv6only=on;</code>
Finally, we can restart Varnish and Nginx for the change to take effect:
<code>DAEMON_OPTS="-a :80 \
   -T localhost:6082 \
   -f /etc/varnish/default.vcl \
   -S /etc/varnish/secret \
   -s malloc,256m"</code>
The last command is to make the previously edited varnish.service daemon settings reload as well, otherwise it will only consider changes to the
file. Since there is currently an error, Varnish does not release the port correctly unless it is done, and therefore the stop process needs to be started. /etc/default/varnish
The two low scores are mainly because we "did not serve from a consistent URL", as GTMetrix says:

Cloudflare
Next, let's set up Cloudflare. First, let's register an account:


Cloudflare will then scan and copy these existing records, allowing you to add any missing records if your system fails to recognize all records.

At the end of this process, the domain name servers of the original registrar need to be updated so that they point to Cloudflare's name servers. At this point, Cloudflare will completely control your domain name (although it may take up to 24 hours to spread to all possible visitors).
You can use the Cloudflare dashboard to view account levels and settings applied to a given domain name.

After the service is activated, we can compare the new GTMetrix results with the old results.

While YSlow prefers us 6% now, it seems like we can do more, as Cloudflare integration obviously slows our website down by 23%.
First, let's try to turn on autocompression (under Speed in Cloudflare dashboard) and clear the cache completely (under Cache). Then, before comparing, we will run the test a few times so that the cache warms up correctly.

It's much better! A few extra test runs may bring it closer to the original 1.4-second loading time, but let's also take a look at CloudFlare's Rocket Loader tool. It is in the beta phase and works by bundling all the JavaScript (even external files) it can find and loading those files asynchronously. It then caches these resources locally in the browser, rather than refetching them from the remote server. Compare here.

Sadly, this is not ideal. YSlow prefers us because we have better compression and fewer requests, but these tools seem to be incorrectly configuring certain settings that have worked better before. Let's turn it off and clear the cache, the previous settings are better.
Other possible adjustments
Don't forget favicon!
Adding favicon is always a good idea – fewer 404 requests and looks better in the browser. Furthermore, the waterfall diagram clearly tells us that about 1.6 seconds of about 330 milliseconds are used to wait for favicon!

Success! After adding favicon, we reduced it by another 300 milliseconds.
Nginx adjustment
You may have come to this post after skipping Nginx optimization. It is recommended that you apply the techniques as well. The tweaks performed in this post have actually been applied to the live version of the website and therefore to a different server than in the post. Coordinated Varnish and Nginx here will produce better results:
<code>curl -L https://packagecloud.io/varnishcache/varnish5/gpgkey | sudo apt-key add -
sudo apt-get update
sudo apt-get install -y apt-transport-https</code>

HTTP/2
Consider using Varnish to activate HTTP/2. Can you see these blockages in the waterfall diagram?
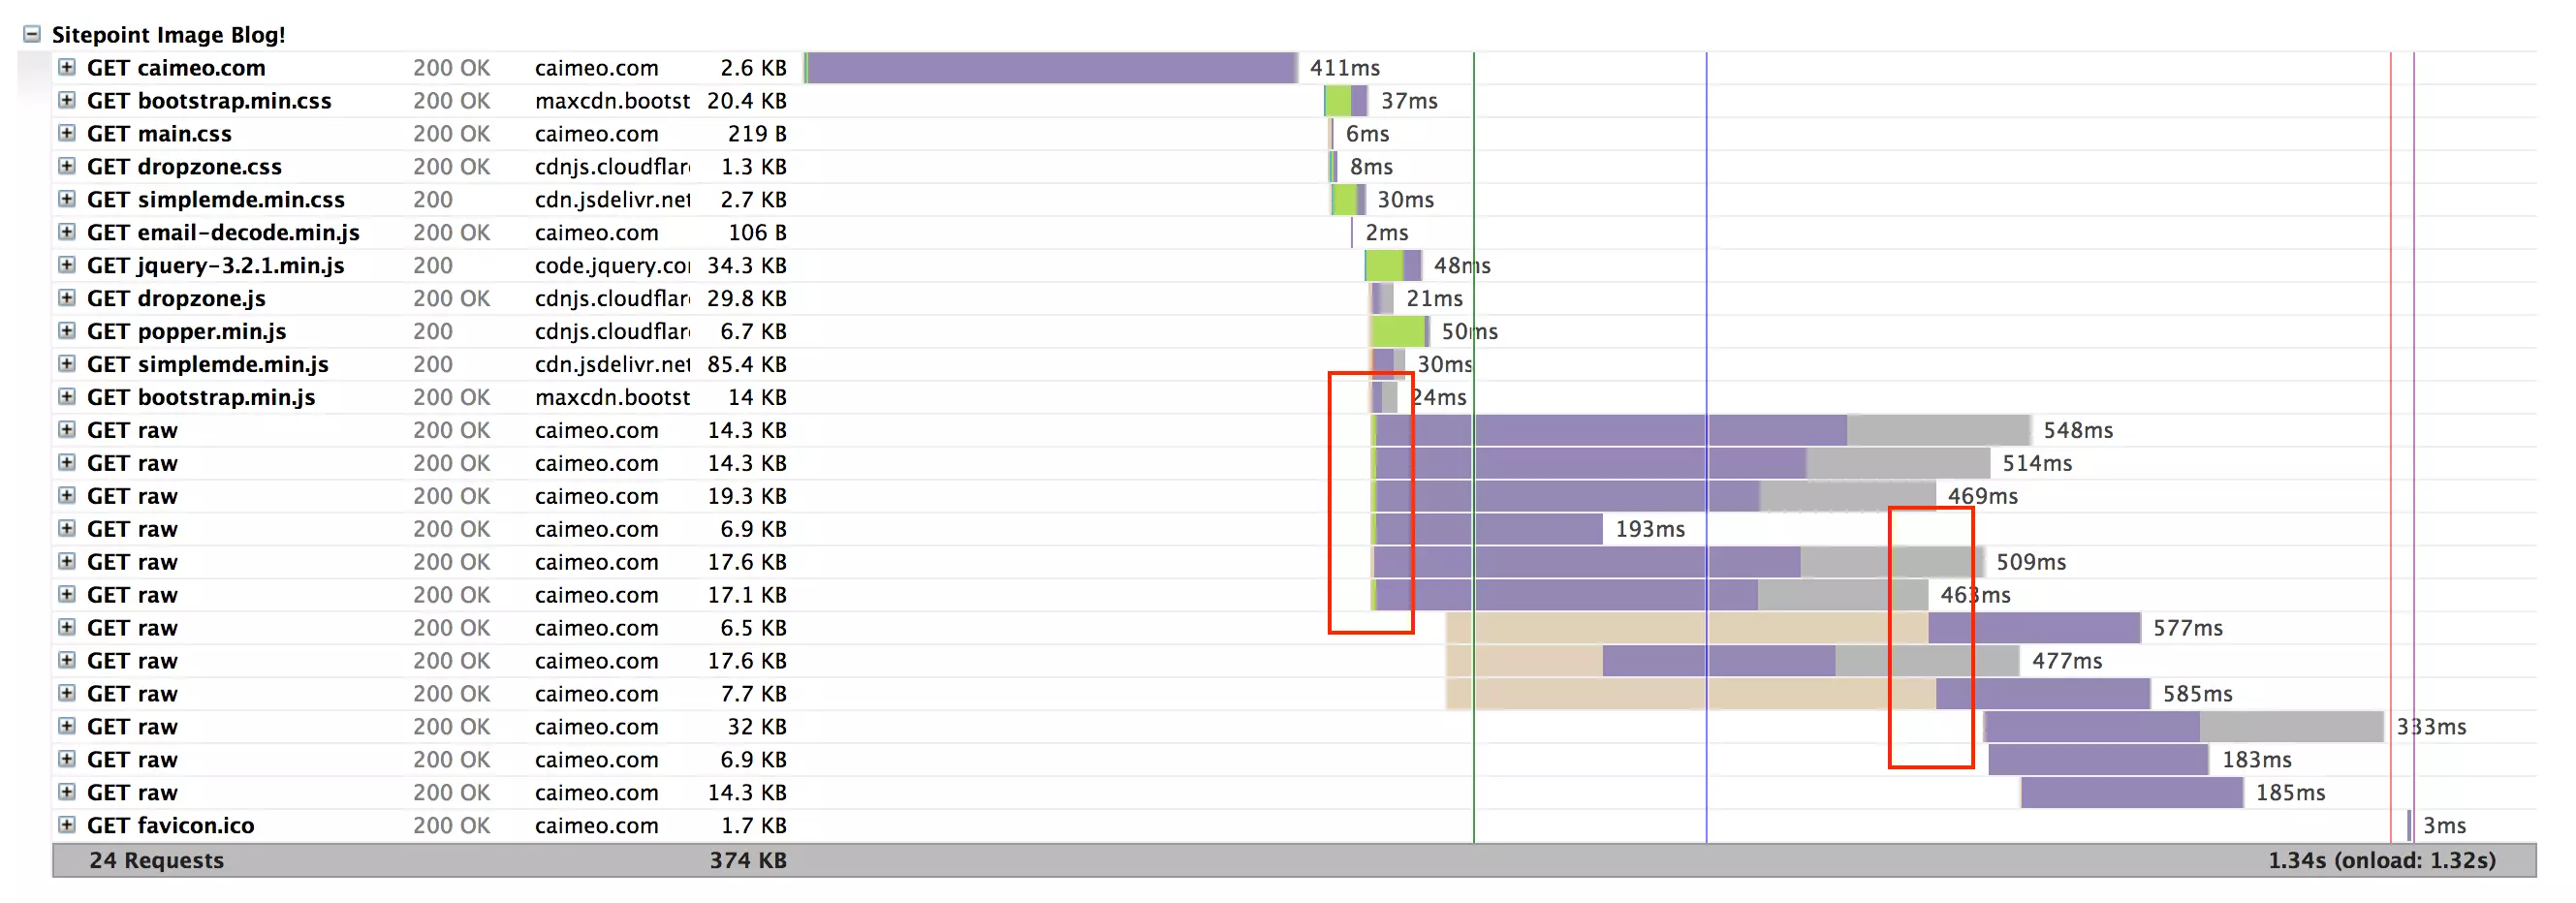
This is because they load several at a time, while other files wait for the previous files to load. With HTTP/2, this issue disappears and the entire website loads faster, downloading multiple files over the same connection. One caveat is that the website requires a certificate. Nowadays, using Let's Encrypt is very easy to implement. Another caveat is that you need to rebuild with Nginx containing HTTP/2 modules, so you need to make some tweaks on the server. Another caveat is that Varnish support for HTTP/2 is still in beta and should not be overly dependent.
To learn how to configure Varnish and HTTP/2, see this tutorial.
Conclusion
We used Varnish as an additional caching layer and Cloudflare’s free plan as our CDN, which significantly improved our GTMetrix score. While our optimization process may be a bit too much for such a simple application, it’s been known from day one that our application can handle hundreds of thousands of users per second without crashing, all at $10 a unit on the server, this is very reassuring.
If we missed any steps and you recognize other performance tips we can do, let us know!
FAQ for Maximum Caching with Varnish and Cloudflare
What are the main benefits of using Varnish and Cloudflare in combination?
The main benefit of using Varnish and Cloudflare is to maximize the caching capability of your website. Varnish is a powerful cached HTTP reverse proxy that can increase website speeds up to 1000%, while Cloudflare is a globally distributed network of proxy servers that can provide performance and security for your website. When combined, they can significantly increase website loading speeds, enhance user experience and improve your SEO ranking.
How does Varnish work with Cloudflare?
Varnish works in conjunction with Cloudflare by caching the static content of the website and making it available to visitors. When a visitor requests a page, Varnish checks whether it has a cached version of the page. If so, it will provide the cached page to the visitor. If not, it gets the page from the server, caches it, and then provides it to the visitor. Cloudflare, on the other hand, acts as a reverse proxy between the visitor and Varnish. It provides additional caching and protects your website from malicious traffic.
Can I use Cloudflare instead of Varnish Cache?
While Cloudflare provides caching functionality, it cannot directly replace Varnish Cache. Varnish Cache is a powerful HTTP accelerator designed for dynamic and content-rich websites. It is very flexible and can be customized to your specific needs. Cloudflare, on the other hand, is a CDN service that provides a range of services, including caching, but it is not as customizable as Varnish. Therefore, the best results can be obtained by combining the two.
How to configure Cloudflare and Varnish?
It takes multiple steps to use Cloudflare with Varnish. First, you need to install and configure Varnish on the server. Then you need to set up Cloudflare to work with Varnish. This includes changing your DNS settings to point to Cloudflare, and configuring Cloudflare to cache your website content and delivering traffic to Varnish.
What is Turpentine, and how does it relate to Varnish and Cloudflare?
Turpentine is a Magento extension that improves compatibility between Magento and Varnish. It provides a more powerful and flexible caching solution for the Magento store. While it has no direct relationship with Cloudflare, using Turpentine with Varnish can enhance the performance of the Magento store, and Cloudflare can further improve this performance.
How to use Cloudflare's page rules with Varnish?
Cloudflare's page rules allow you to control how Cloudflare handles different parts of your website. You can use these rules to enhance Varnish's caching capabilities. For example, you can create a rule to bypass Cloudflare's cache of certain pages, allowing Varnish to handle the cache of those pages.
Can I use Varnish and Cloudflare for WordPress websites?
Yes, you can use Varnish and Cloudflare for your WordPress website. Both Varnish and Cloudflare are WordPress compatible and can significantly improve the performance of WordPress websites.
How does using Varnish and Cloudflare affect SEO?
Using Varnish and Cloudflare has a positive impact on SEO. By increasing the loading speed of your website, they can enhance the user experience and improve your SEO ranking. Google has pointed out that website speed is one of the signals its algorithm uses to rank pages.
What are the potential problems when using Varnish and Cloudflare in combination?
A potential problem with using Varnish and Cloudflare is the possibility of double caching, i.e. both Varnish and Cloudflare cache the same content. This can lead to outdated content being provided to visitors. To avoid this, you need to carefully configure Varnish and Cloudflare to ensure they work together effectively.
How to troubleshoot issues with Varnish and Cloudflare?
Troubleshooting issues with Varnish and Cloudflare involves checking the configuration of both services, checking server logs, and using tools such as varnishlog and varnishstat. If you are still having problems, you can seek help from the Varnish and Cloudflare communities or contact their support team.
The above is the detailed content of How to Use Varnish and Cloudflare for Maximum Caching. For more information, please follow other related articles on the PHP Chinese website!