


If you travel regularly with your Mac or iOS device, you likely find yourself connecting to new Wi-Fi networks: at airports, in train stations, in hotels, restaurants, pubs, or at clients’ offices. Whether you connect to these networks with your Mac, iPhone, or iPad, miraculously, your devices will remember these networks and sync them via iCloud — so your other Apple products can access them too, if you use iCloud Keychain.
Your Apple device’s ability to remember previously connected to networks can be both good and bad. While it means you don’t have to search for or remember login credentials when you connect to a known Wi-Fi network on a different device, it can lead to a surfeit of Wi-Fi networks stored in your keychain and potentially allow you to unknowingly connect to a Wi-Fi network that might not be secure. You can cull these Wi-Fi networks, but you can only really clean them out on a Mac.
In this article, I’ll show you how to remove these Wi-Fi networks so your Macs and iOS devices forget them.
How to Remove Wi-Fi Networks from iPhone or iPad
You can remove wi-fi networks on an iPhone or an iPad, but only if you are near enough to those networks for your device to detect them. If you go to Settings > Wi-Fi, you’ll see some available wi-fi networks. Tap the i icon next to a network that you have previously joined, then tap Forget this Network. The device will remove that network.

If you want to remove all saved Wi-Fi networks on your iOS device, there is a nuclear option. If you follow these steps, the iOS device deletes all your Wi-Fi networks and passwords, along with other network settings. However, this does not carry over to iCloud Keychain if you are using it, and the only way to fully delete these saved networks is on a Mac.
The steps for the nuclear option are as follows:
- on iOS 15 or later: Settings > General > (scroll down) Transfer or Reset iPhone > Reset > Reset Network Settings
- on iOS 14 or older: Settings > General > (scroll down) Reset > Reset Network Settings
How to View and Remove Saved Wi-Fi Networks via Network Settings
There are two ways you can view (and remove) saved Wi-Fi networks on a Mac. The first way is in the Mac’s Network settings.
To do this, open System Settings, then click Network. Click Wi-Fi in the sidebar, then scroll down and click Advanced at the bottom of the settings pane. In the Known Networks section, you will see a list of networks.

This list shows the networks that you have connected to, and whose passwords are saved on your devices. You can delete networks by clicking the … icon next to a network, then choosing Remove from List.
RELATED: Prevent Your Mac from Connecting to the Wrong Wi-Fi Network
When you do this, your iCloud Keychain will update, and they will be eventually removed from all your devices that sync to the same iCloud account.
In some cases, you may not be able to remove Wi-Fi networks from the Network settings, but you will be able to delete them from Keychain Access (see below for the second method to remove Wi-Fi networks).
How to View and Remove Saved Wi-Fi Networks via Keychain Access
The second way to remove saved networks is via Keychain Access. This app is located in the Utilities folder in your Applications folder, and it stores passwords, certificates, encryption/decryption keys, secure notes and more. One of the items it stores as “passwords” is the credentials you use to log into Wi-Fi networks; specifically, they are recorded as “AirPort network password.”
To find these, click the search box at the top right of your Keychain Access window and type “AirPort.” You’ll see a number of items, and the Kind column shows them as AirPort base station password, AirPort Disk password, and AirPort network password. (You may not have items in all three categories.) The latter are your Wi-Fi network credentials.

Interestingly, when I look at my AirPort network passwords, I see many of those that are in the Network settings, but not all. And some show as being in the iCloud keychain, while others are in the System keychain, even though they sync to and from my other devices. (For example, some of the networks I see on my Mac are those that I only connected to with my iPhone.) To delete any of these networks, click them, then press Delete, and click Delete in the confirmation dialog.
Note that any changes you make on your Mac will take time to propagate to other Macs, and to iOS devices.
It’s a good idea to go through these networks from time to time. You may have connected to a network when you were traveling and not want to automatically connect to it again. Clearing out these networks will also prevent your Mac from automatically connecting to networks masquerading as legitimate, since the only identifying information for a Wi-Fi network is its SSID (or the name you see) and anyone can use the same network name, potentially leading you to connect to an insecure network.
The above is the detailed content of How to Remove Wi. For more information, please follow other related articles on the PHP Chinese website!

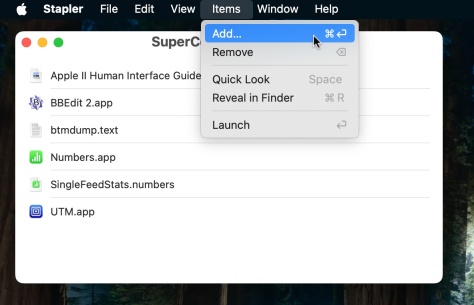 Launch All Apps & Documents Related to a Project with Stapler for MacMay 13, 2025 am 10:37 AM
Longtime Mac users may recall a handy old shareware application for the Classic Macintosh called Stapler, which essentially helped manage projects by grouping a series of apps and documents into a single document that when opened would then launch al
 How to Get Apple Intelligence on Your iPhone, iPad, or MacMay 13, 2025 am 10:32 AM
Apple Intelligence is a set of AI features that Apple is rolling out in beta, and will debut to a larger set of Apple device owners in the fall. Apple Intelligence offers many features from writing and creating text and emails, to taking actions and
 MacOS Sonoma 14.6.1 & Ventura 13.6.9 Released with Bug FixesMay 13, 2025 am 10:25 AM
If you feel like you have spent a significant amount of your time updating system software on your Apple devices lately, you’re in for a treat; another round of system software updates! This time around, Apple has released MacOS Sonoma 14.6.1 alon
 MacOS Sequoia 15 Beta 6 Available for TestingMay 13, 2025 am 10:23 AM
Apple has issued the 6th beta version of MacOS Sequoia for users enrolled in the developer beta testing program. Usually a matching public beta build arrives soon after, which in this case dev beta 6 would be versioned as public beta 4. MacOS Sequoia
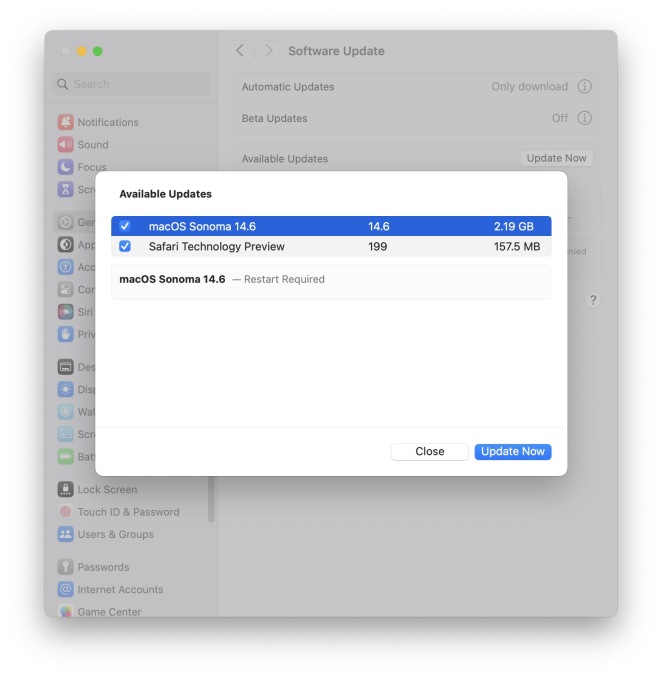 MacOS Sonoma 14.6 Update Released with Bug Fixes & Security UpdatesMay 13, 2025 am 10:20 AM
Apple has released macOS Sonoma 14.6 for Mac users running the Sonoma operating system. The MacOS Sonoma 14.6 software update primarily focuses on bug fixes and security updates for most Macs, however it does include a nice new feature specifically
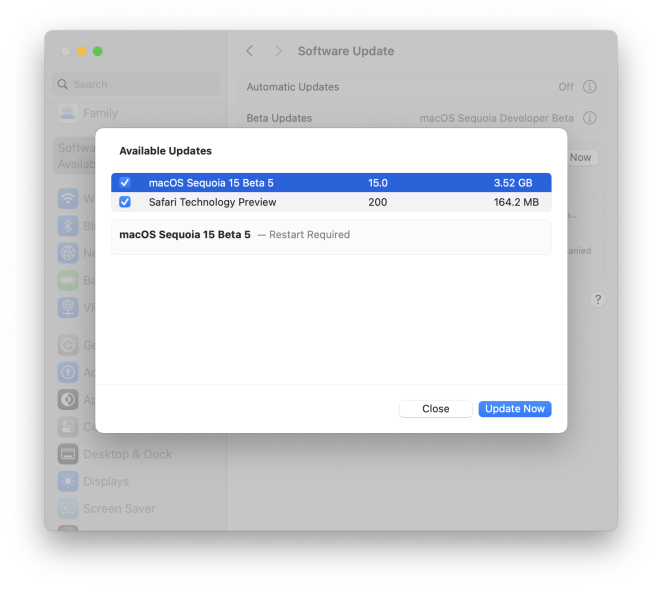 MacOS Sequoia 15 Beta 5 Available to DownloadMay 13, 2025 am 10:06 AM
MacOS Sequoia beta 5 is now available for users enrolled in the developer beta testing program to download and install onto their Macs. MacOS Sequoia beta 5 carries the build of 24A5309e, and usually a new developer beta build is soon followed by a m
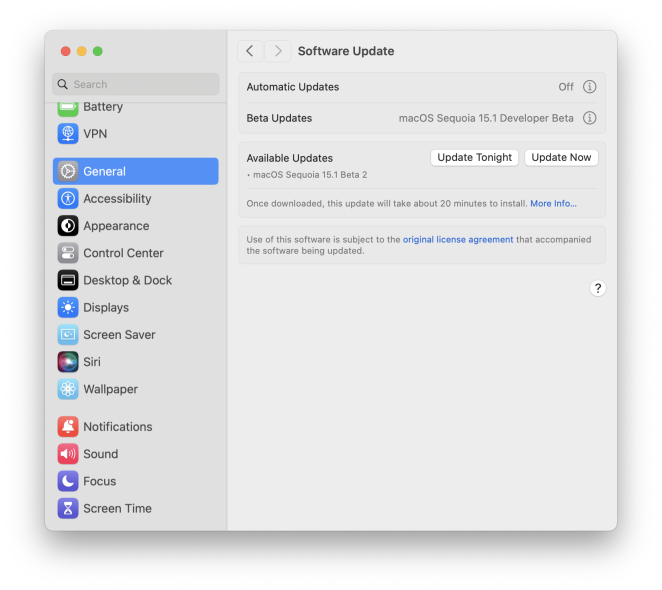 Beta 2 of iOS 18.1, MacOS Sequoia 15.1, & iPadOS 18.1 Released with Apple IntelligenceMay 13, 2025 am 09:49 AM
Apple has released the second beta of iOS 18.1, iPadOS 18.1, and MacOS Sequoia 15.1, each with support for Apple Intelligence AI features, on supported devices anyway. The release of these new beta updates is unusual in that they’re concurrent wit
 How to Uninstall VMWare Fusion on MacMay 13, 2025 am 09:44 AM
You might be aware that VMWare Fusion Pro is now free to download and install, and perhaps you installed it on a Mac to test virtual machines or to play around with, and now you’ve decided you no longer need VMware on the Mac. But VMware Fusion P


Hot AI Tools

Undresser.AI Undress
AI-powered app for creating realistic nude photos

AI Clothes Remover
Online AI tool for removing clothes from photos.

Undress AI Tool
Undress images for free

Clothoff.io
AI clothes remover

Video Face Swap
Swap faces in any video effortlessly with our completely free AI face swap tool!

Hot Article
Hot Tools

VSCode Windows 64-bit Download
A free and powerful IDE editor launched by Microsoft

Notepad++7.3.1
Easy-to-use and free code editor

SecLists
SecLists is the ultimate security tester's companion. It is a collection of various types of lists that are frequently used during security assessments, all in one place. SecLists helps make security testing more efficient and productive by conveniently providing all the lists a security tester might need. List types include usernames, passwords, URLs, fuzzing payloads, sensitive data patterns, web shells, and more. The tester can simply pull this repository onto a new test machine and he will have access to every type of list he needs.

PhpStorm Mac version
The latest (2018.2.1) professional PHP integrated development tool

EditPlus Chinese cracked version
Small size, syntax highlighting, does not support code prompt function

