


Everyone who uses a Mac has a user account. If you’re the only person using your Mac, then there will only be one account. But if you share your Mac with other users — your family or coworkers, for example — your Mac will contain multiple user accounts. At least one of these is an administrator account, and that account is allowed to change any settings on the Mac. Others can be standard accounts, and their users can change settings that affect some of what they do on the computer. You can also have accounts that are managed with parental controls; these are designed so your kids can use your computer safely. Finally, there are sharing only accounts, which you can create to allow users to access some files on your Mac over a network.
In this article, I’m going to explain how to create user accounts, when and how to use each of these different types of accounts, and how to delete them when you don’t need them any longer.
The First Account: The Administrator
When you set up a new Mac, you have to create a user account, and that first user account has to be an administrator account. The administrator is the person who can change any settings on the computer. If there were no administrator, then no one could, for example, set up other new user accounts as well as make other important changes to the way the Mac works. The administrator can change settings such as which startup disk the computer uses, which files can be shared, backup and security settings, and more.
In addition to creating new user accounts, the administrator can modify existing user accounts. He or she can allow any user to also be an administrator — you can have as many administrator accounts as you want — and can also reset the password of any user account. And the administrator can enable and set up parental controls on any account.
To see your existing user accounts, go to System Settings > Users & Groups. This preference pane shows a list of existing user accounts, lets you create new accounts, and it also lets you set a number of login options.

Start by looking at your own user account; it’s at the top of the list. Click it and you see a number of options. You can change your password if you wish, and at the bottom of the pane, you can check Allow user to reset password using Apple ID. If you enable this option, and the user has logged in with their Apple ID, they can reset their account password, if they’ve forgotten it, by entering their Apple ID and the corresponding password.
Prior to macOS Ventura, there was a Login Items tab on this pane. This has moved to System Settings > General > Login Items. It shows a list of apps that launch when you log into or start up this Mac. You can add apps to this list by dragging their icons to it, or by clicking the icon and navigating to an app. Remove any apps by selecting them in the list and clicking the – icon.

Standard User Accounts
Standard users are limited only in their ability to change certain settings and access system files. Otherwise, each standard user has full access to the files in their home folder — the one with the house icon and their username — and can change any settings in System Preferences that apply to their personal use of the Mac.
To create a new standard user account, click Add User; you’ll be asked to enter your administrator’s password, then a dialog displays with Standard selected as the type of account. Enter the user’s full name, then an account name — it’s best that this is an abbreviated name, and it can’t contain spaces — then enter a password and enter it again in the Verify field. If you wish to have a password hint to remind the user of their password in case they forget it, you can enter that as well. Click Create User, and the Mac will create a new account, and a new home folder, for that user. They will be able to log in and access their files.

Administrator Accounts
In the same dialog above, you can choose to create an administrator account. Click the New User menu, and choose Administrator. The rest of the creation process is the same as for standard accounts.
Sharing Only Account
A sharing only user account allows a user to access specific shared folders on your Mac. If you use your Mac for file sharing at home or at work, you may want to create accounts for users so they can access files on the computer but do nothing else. To do this, select Sharing Only from the New User menu. Fill in the rest of the information as above, but to provide access to selected folders, you must then go to the Sharing preference pane in System Preferences. See this Apple support document for more information on file sharing.
Guest Account
Finally, you will notice a Guest User listed in the settings pane. Click the i icon next to this user and check Allow guests to log in to this computer. When the guest account feature is active, any guest to your home or your office can sit down at this Mac and click on Guest on the login screen to be able to use the computer. You really don’t want your friends to check their email on the web while in your user account, where they could potentially access a lot of your personal information or files.
None of their files will be saved; when they log out everything will be deleted. But they can browse the web, configure Mail to use their email account temporarily, send instant messages, and more. And unless you check the option to allow them to connect to shared folders, they will have no access to any of the files on the computer.
The Guest Account settings also have an option to limit access to adult websites.
Account with Parental Controls
To create a new account with parental controls, start by making a new standard user account. When you’ve done that, go to the Screen Time settings, which is where you apply parental controls.
There are two ways to enable and apply parental controls with Screen Time:
If you’re using Family Sharing, click the Family Sharing menu at the top left corner of the Screen Time preference pane and choose the name of one of your children. You can manage their screen time settings from any Mac, iPhone, or iPad. If you’re not using Family Sharing, you’ll need to log in with your child’s user name and password.
In both cases, you have access to a number of settings in the Screen Time sidebar. Click App & Website Activity, and your Mac asks you if you want to enable this feature. This also changes the display of the Screen Time settings, to include a number of options.
Downtime is where you set time periods, by day of the week, when your child is not allowed to use the computer.

In App Limits, you can choose apps you want to limit access to. For example, if you don’t want your child to be able to use the TV app for more than one hour a day, you can set a limit here. They get a notification five minutes before their time is up.

Use Communication Limits to limit who children can contact via FaceTime and Messages (and if your child has an iPhone, and is signed in with the same Apple ID, the settings you apply here also affect the Phone app on that device). And enable Communication Safety to tell the Mac to detect nude photos and videos before a child sees them.
Always Allowed lets you set contacts that your children can always communicate with, such as parents or other family members. You can also whitelist apps so they can use specific apps without limits.

The Content & Privacy section gives you a large number of settings regarding which type of web content they can view, what they can do with Game Center games, which stores they can access, and which age ratings content for them is allowed, and many other options. Check this section carefully, and remember that these settings also apply to an iOS device that your children use.
Screen Distance is a new setting in iOS 17 and iPadOS 17 that alerts users if they’re holding the screen to close to their yes. This setting doesn’t affect Macs.
If you enable Share across devices, these settings will apply to all devices used by the same person. You can also set a Screen Time passcode, which allows you to override limitations easily. So if your child has to finish their homework, and needs to use Safari, but is out of time, you can enter the passcode to give them more time.
Create Groups
If you have a lot of users accessing your Mac in a business or school, it can be useful to create one or more groups. Click Add Group to create a new group, name the group, then click the i icon to the right of the group name. You can add any user accounts on your Mac. Group settings only apply to file sharing and screen sharing, not to any Screen Time options. When you go to the Sharing settings, you can then choose a group name rather than a number of user names, which changing these settings.
Deleting Accounts
While you may create accounts for users who will be accessing your Mac for a long time, you may also temporarily create an account for, say, a friend who is staying with you for a week or a temporary employee. When they no longer need access to this Mac, click the i icon next to their account in the user list, then click Delete User to delete it. You’ll be given an option to save all their files in a disk image, leave their home folder in the Users folder, or delete the home folder.
Bottom Line
While most Mac users only have a single account on their computers, it can be useful to create additional accounts for friends, family, or coworkers. This is easy to do, and all of your files are secure even when another user works on your Mac.
The above is the detailed content of Understanding User Accounts in macOS. For more information, please follow other related articles on the PHP Chinese website!

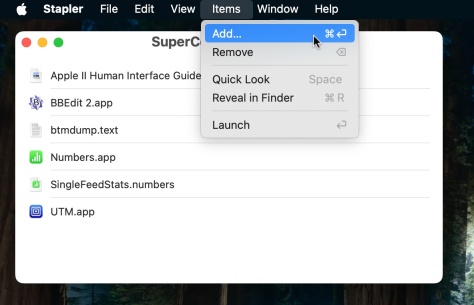 Launch All Apps & Documents Related to a Project with Stapler for MacMay 13, 2025 am 10:37 AM
Longtime Mac users may recall a handy old shareware application for the Classic Macintosh called Stapler, which essentially helped manage projects by grouping a series of apps and documents into a single document that when opened would then launch al
 How to Get Apple Intelligence on Your iPhone, iPad, or MacMay 13, 2025 am 10:32 AM
Apple Intelligence is a set of AI features that Apple is rolling out in beta, and will debut to a larger set of Apple device owners in the fall. Apple Intelligence offers many features from writing and creating text and emails, to taking actions and
 MacOS Sonoma 14.6.1 & Ventura 13.6.9 Released with Bug FixesMay 13, 2025 am 10:25 AM
If you feel like you have spent a significant amount of your time updating system software on your Apple devices lately, you’re in for a treat; another round of system software updates! This time around, Apple has released MacOS Sonoma 14.6.1 alon
 MacOS Sequoia 15 Beta 6 Available for TestingMay 13, 2025 am 10:23 AM
Apple has issued the 6th beta version of MacOS Sequoia for users enrolled in the developer beta testing program. Usually a matching public beta build arrives soon after, which in this case dev beta 6 would be versioned as public beta 4. MacOS Sequoia
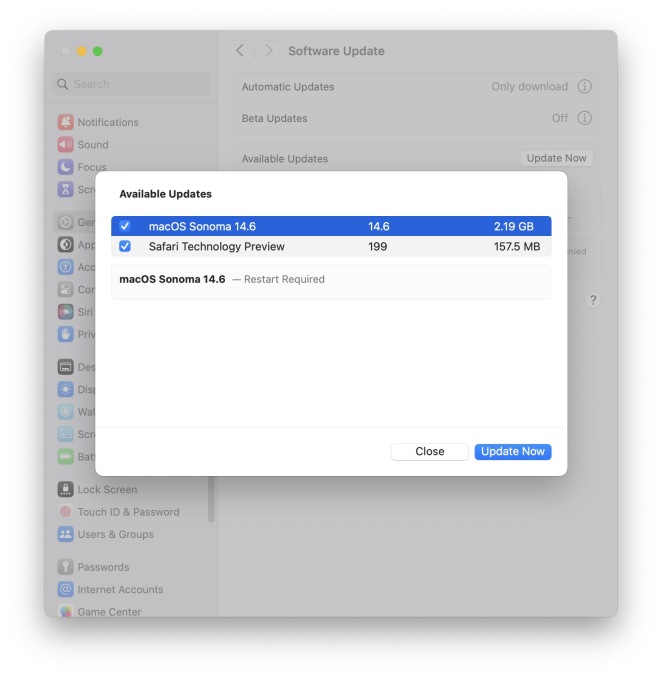 MacOS Sonoma 14.6 Update Released with Bug Fixes & Security UpdatesMay 13, 2025 am 10:20 AM
Apple has released macOS Sonoma 14.6 for Mac users running the Sonoma operating system. The MacOS Sonoma 14.6 software update primarily focuses on bug fixes and security updates for most Macs, however it does include a nice new feature specifically
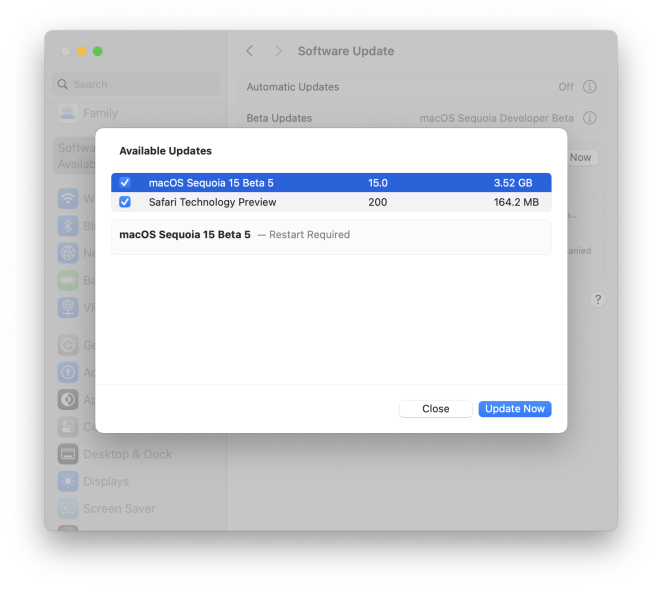 MacOS Sequoia 15 Beta 5 Available to DownloadMay 13, 2025 am 10:06 AM
MacOS Sequoia beta 5 is now available for users enrolled in the developer beta testing program to download and install onto their Macs. MacOS Sequoia beta 5 carries the build of 24A5309e, and usually a new developer beta build is soon followed by a m
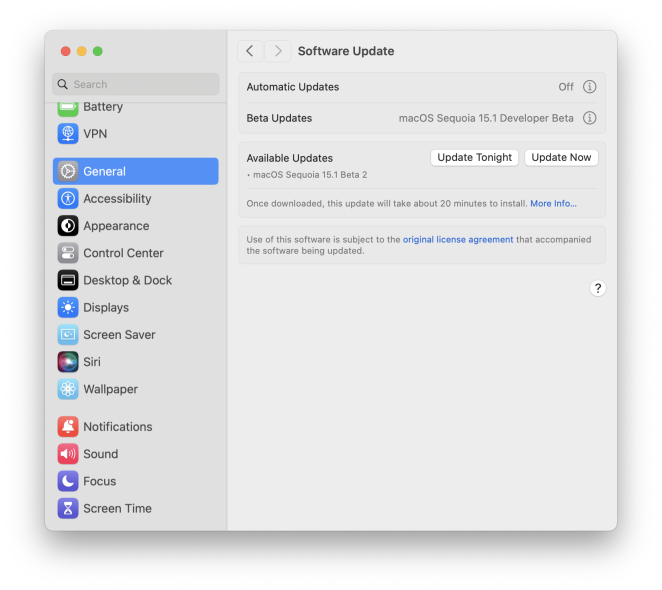 Beta 2 of iOS 18.1, MacOS Sequoia 15.1, & iPadOS 18.1 Released with Apple IntelligenceMay 13, 2025 am 09:49 AM
Apple has released the second beta of iOS 18.1, iPadOS 18.1, and MacOS Sequoia 15.1, each with support for Apple Intelligence AI features, on supported devices anyway. The release of these new beta updates is unusual in that they’re concurrent wit
 How to Uninstall VMWare Fusion on MacMay 13, 2025 am 09:44 AM
You might be aware that VMWare Fusion Pro is now free to download and install, and perhaps you installed it on a Mac to test virtual machines or to play around with, and now you’ve decided you no longer need VMware on the Mac. But VMware Fusion P


Hot AI Tools

Undresser.AI Undress
AI-powered app for creating realistic nude photos

AI Clothes Remover
Online AI tool for removing clothes from photos.

Undress AI Tool
Undress images for free

Clothoff.io
AI clothes remover

Video Face Swap
Swap faces in any video effortlessly with our completely free AI face swap tool!

Hot Article
Hot Tools

VSCode Windows 64-bit Download
A free and powerful IDE editor launched by Microsoft

SAP NetWeaver Server Adapter for Eclipse
Integrate Eclipse with SAP NetWeaver application server.

SecLists
SecLists is the ultimate security tester's companion. It is a collection of various types of lists that are frequently used during security assessments, all in one place. SecLists helps make security testing more efficient and productive by conveniently providing all the lists a security tester might need. List types include usernames, passwords, URLs, fuzzing payloads, sensitive data patterns, web shells, and more. The tester can simply pull this repository onto a new test machine and he will have access to every type of list he needs.

Atom editor mac version download
The most popular open source editor

PhpStorm Mac version
The latest (2018.2.1) professional PHP integrated development tool

