


You open files every time you use your Mac, most often, probably, by double-clicking them. But did you know that there are lots of different ways to open files? You can use your mouse, your trackpad, or even your keyboard. You can open files in windows, from menus, and from dialogs. Here are a dozen ways you can open files on a Mac.
1. Double-click to Open Files
The basic way to open a file on the Mac — and on Windows as well — is to double-click a file. By default, it opens with the application that is assigned to work with its file type; so, if you have Microsoft Office on your Mac, a .docx file opens in Word, and an .xls file opens in Excel. Some file extensions are clearer about which app opens them, such as .pages or .numbers files that open with the Pages and Numbers apps. Only one app can open each file type when you double-click it, but as you’ll see below, you can open files with other apps, and you can change the default app that opens a given file type.
If you receive a file as an attachment to an email, you can open it by double-clicking it, as you would a file in the Finder.
2. Drag and Drop to Open Files
You can open a file by dragging it onto an app icon, either in a Finder window, or in the Dock. If that app can open the file, the icon will highlight, and when you drop the file the app will launch (if it’s not already running) and display the file.
3. Open Files from the Keyboard
You can also open a file from the keyboard. Select a file in a Finder window or on the Desktop, and press Command-down-arrow. As with double-clicking, the file opens with the app its file type is associated with. You can also press Command-O to open a selected file.
4. Open any File from an Open Dialog
As discussed in an article about using the Open and Save dialogs, you can open any file from an app’s Open dialog (if that app supports the file type). Just press Command-O in your app, navigate to the file, select it, and click Open or press Return.
If you want to view a file when you’re in an Open dialog, you can select and it press the space bar to view it in Quick Look.
5. Re-Open a File from the Open Recent Menu
If you’ve worked on a file in a specific app, you can re-open it from that app’s Open Recent menu. Choose File > Open Recent, then select the file. Note that this menu only stores a limited number of files. You can adjust this number in System Settings > Desktop & Dock, by choosing a number from none to 50 for Recent documents, applications, and servers.

6. Open Files from a Dock Icon
If you click and hold an app icon in your Mac’s Dock, you’ll see that there’s a menu showing recent items, if the app can open files. Select a file to open it with that app. As above, this menu only contains a limited number of files. Some apps, such as Calendar, Reminders, and Notes can’t open files, but manage data directly.
7. Open Files from the Recent Items Menu
If you choose the Apple menu, then Recent Items, you’ll see a list of recent apps, documents, and servers. Select a file from the Documents section, and it opens in its assigned app. As above, you can control how many items display in this menu in the General preferences. The difference between this and the Open Recent menu in apps is that this menu shows recently opened files from all apps, whereas each app also has its own Open Recent menu that only shows its own files.
8. Use Spotlight to Open Files
You can use Spotlight to search for files — by their name, or even by keywords in their content — and open them from the results. Just use the arrow keys to select a file and press Return, or double-click it.

If you want to see a file you’ve found in Spotlight, in its location, press Command-Return, and a new Finder window opens with that file highlighted.
9. Open Files from the Dock
If you have added files to the right-hand section of the Dock (or the bottom, if you position the Dock on either side of your screen), a single click will open that file.
And if you have folders in that part of the Dock, click and hold a folder icon to see a list of the files it contains. Select one to open it.
10. Use Quick Look to Open Files
If you select a file in the Finder then press the Space bar, you’ll see a preview of the file. If you then want to open the file, you can click the Open With… button at the top of the preview window. This will show the name of the app that is assigned to open that file type, and it will say, for example, Open With Preview.

11. Right-Click to Open Files
If you right-click a file in the Finder, you’ll see two menu items: Open and Open With. The former lets you open the file with the app associated with its file type, and the latter displays a sub-menu containing all the apps that can open that file. This is the best way to open a file with an app other than the one that opens its file type by default.

You can also select a file and choose File > Open With to access the same sub-menu. Note that in some cases, you may have a large number of apps that can open files, for types such as PDF, JPEG, etc.
12. Open Files From the Command Line
If you use the command line, you probably already know that you can open files in the Terminal app. Just type the open command, followed by a space then the full path to the file, then press Return. Your command should look like this:
open /Users/kirk/Documents/My\ Folder/My\ File
Note that if there are spaces or other special characters in the file path, you may either need to “escape” them by prepending a backslash character (), or alternatively you can put the whole path in quotation marks:
open "/Users/kirk/Documents/My Folder/My File"
Thankfully, there’s a much quicker way to do this, if you can see the file in the Finder. Type open, then a space, then drag the file onto the Terminal window. This automatically fills in its whole file path, including backslashes where required.
After you’ve entered the command, press the Return or Enter key on the keyboard to open the file with its associated app.
Bonus Tip: How to Associate a File Type with an Application
I mentioned above that file types are associated with applications. For each file type — such as .doc, .xls, .txt — there is one and only one app on your Mac that will open the files automatically, such as when you double-click files. But you can change this.
Take as an example .txt files. By default, they open with Apple’s TextEdit. But you may have a preferred text editor and want all these files to open with this app.
Select any .txt file in the Finder, then press Command-I. In the Open With section, you’ll see a menu showing that TextEdit is the default app (unless you’ve already changed this for .txt files). Click the menu and select your preferred text editor, then click Change All. The Mac will remember to open all .txt files in your selected app.

Note that you will still be able to open these files with other apps, by dragging them onto app icons, from the Open With contextual menu, and so on. Give these tips a try and you’ll soon discover how they will make you more productive!
The above is the detailed content of 12 Ways to Open Files on a Mac. For more information, please follow other related articles on the PHP Chinese website!

 Launch All Apps & Documents Related to a Project with Stapler for MacMay 13, 2025 am 10:37 AM
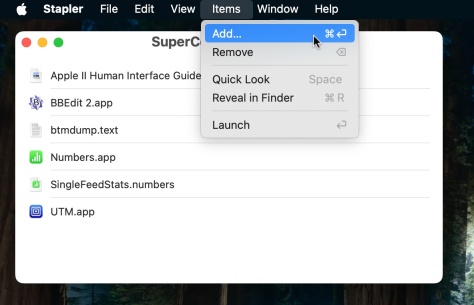
Longtime Mac users may recall a handy old shareware application for the Classic Macintosh called Stapler, which essentially helped manage projects by grouping a series of apps and documents into a single document that when opened would then launch al
 How to Get Apple Intelligence on Your iPhone, iPad, or MacMay 13, 2025 am 10:32 AM
Apple Intelligence is a set of AI features that Apple is rolling out in beta, and will debut to a larger set of Apple device owners in the fall. Apple Intelligence offers many features from writing and creating text and emails, to taking actions and
 MacOS Sonoma 14.6.1 & Ventura 13.6.9 Released with Bug FixesMay 13, 2025 am 10:25 AM
If you feel like you have spent a significant amount of your time updating system software on your Apple devices lately, you’re in for a treat; another round of system software updates! This time around, Apple has released MacOS Sonoma 14.6.1 alon
 MacOS Sequoia 15 Beta 6 Available for TestingMay 13, 2025 am 10:23 AM
Apple has issued the 6th beta version of MacOS Sequoia for users enrolled in the developer beta testing program. Usually a matching public beta build arrives soon after, which in this case dev beta 6 would be versioned as public beta 4. MacOS Sequoia
 MacOS Sonoma 14.6 Update Released with Bug Fixes & Security UpdatesMay 13, 2025 am 10:20 AM
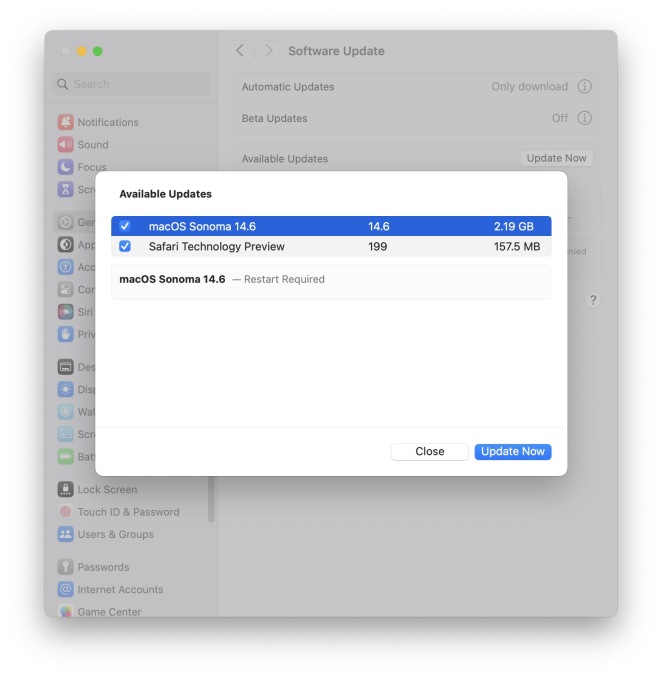
Apple has released macOS Sonoma 14.6 for Mac users running the Sonoma operating system. The MacOS Sonoma 14.6 software update primarily focuses on bug fixes and security updates for most Macs, however it does include a nice new feature specifically
 MacOS Sequoia 15 Beta 5 Available to DownloadMay 13, 2025 am 10:06 AM
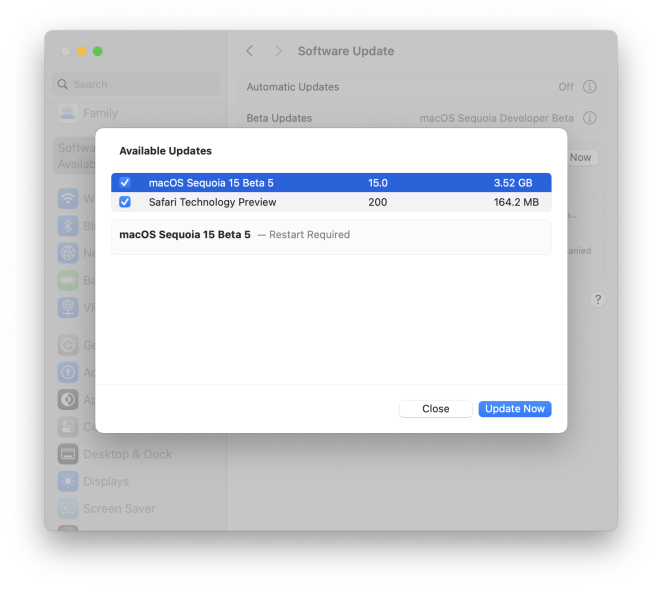
MacOS Sequoia beta 5 is now available for users enrolled in the developer beta testing program to download and install onto their Macs. MacOS Sequoia beta 5 carries the build of 24A5309e, and usually a new developer beta build is soon followed by a m
 Beta 2 of iOS 18.1, MacOS Sequoia 15.1, & iPadOS 18.1 Released with Apple IntelligenceMay 13, 2025 am 09:49 AM
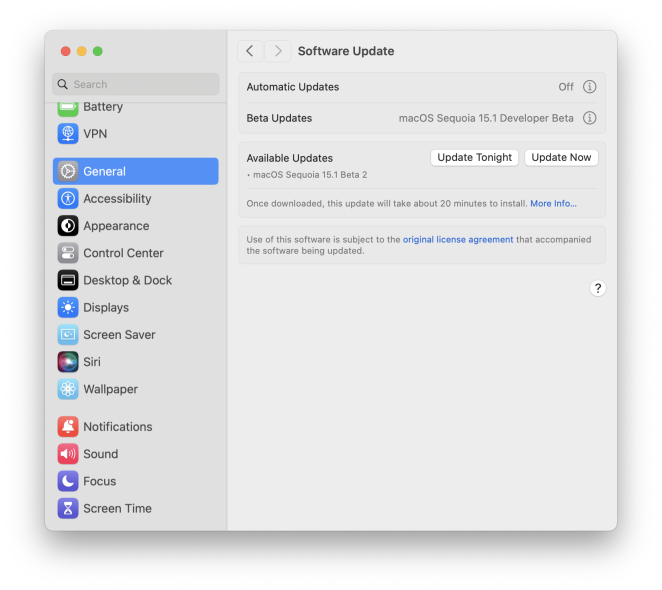
Apple has released the second beta of iOS 18.1, iPadOS 18.1, and MacOS Sequoia 15.1, each with support for Apple Intelligence AI features, on supported devices anyway. The release of these new beta updates is unusual in that they’re concurrent wit
 How to Uninstall VMWare Fusion on MacMay 13, 2025 am 09:44 AM
You might be aware that VMWare Fusion Pro is now free to download and install, and perhaps you installed it on a Mac to test virtual machines or to play around with, and now you’ve decided you no longer need VMware on the Mac. But VMware Fusion P


Hot AI Tools

Undresser.AI Undress
AI-powered app for creating realistic nude photos

AI Clothes Remover
Online AI tool for removing clothes from photos.

Undress AI Tool
Undress images for free

Clothoff.io
AI clothes remover

Video Face Swap
Swap faces in any video effortlessly with our completely free AI face swap tool!

Hot Article
Hot Tools

SublimeText3 English version
Recommended: Win version, supports code prompts!

VSCode Windows 64-bit Download
A free and powerful IDE editor launched by Microsoft

SublimeText3 Linux new version
SublimeText3 Linux latest version

Dreamweaver CS6
Visual web development tools

Zend Studio 13.0.1
Powerful PHP integrated development environment

