


Real-time dashboards are incredibly useful in various applications, from tracking website analytics to monitoring live financial data or even keeping tabs on IoT devices.
? In this tutorial, we’ll show you how to build one using React and Encore.ts. You’ll learn to create a dynamic dashboard that streams updates instantly, empowering you to make quick, informed decisions.
To get a glimpse of what we’ll build, check out this GIF of the finished product and the source code here. Let’s dive in!

Prerequisites
Before we start, make sure you have these things installed on your computer
- Node.js (v18 or later)
- Npm (v10 or later)
What and Why Encore
Encore.ts is an open-source framework that helps you build backends with TypeScript, ensuring type safety. It's lightweight and fast because it doesn't have any NPM dependencies.
When developing distributed backend systems, it's often hard to replicate the production environment locally, leading to a poor developer experience. You may end up dealing with a lot of complexity just to get things running locally in a reasonable way, which takes time from focusing on building the actual application. Encore.ts addresses this by providing a complete toolset for building distributed systems, including:
- The local environment matches the cloud
- Cross-service type-safety
- Type-aware infrastructure
- Automatic API docs & clients
- Local test tracing
- And more
Alright, we talked about what Encore is and how it helps us build backend services. In the next section, let's install Encore locally and start building.
Installing Encore
To work with Encore, we need to install the CLI, which makes it very easy to create and manage local environments.
# macOS
brew install encoredev/tap/encore

# Windows
iwr https://encore.dev/install.ps1 | iex

# Linux
curl -L https://encore.dev/install.sh | bash
Creating Encore application
Creating an Encore application is very easy, you just need to run the command.
encore app create
You will be asked the following questions, so choose your answers accordingly.
Select language for your applicatio : TypeScript
Template: Empty app
App Name : real-time-dashboard
Once the App is created then you can verify the application config in encore.app
{
    "id":   "real-time-dashboard-<random-id>",
    "lang": "typescript"
}
</random-id>
All right, we have created the Encore application. Let's talk about Streaming APIs in Encore in the next section.
What are Streaming APIs in Encore
Before we talk about streaming APIs, let's discuss APIs in Encore. Creating an API endpoint in Encore is very easy because it provides the api function from the module encore.dev/api to define the API endpoint with type safety. Encore also has built-in validation for incoming requests. At their core, APIs are simple async functions with a request and response schema structure. Encore parses the code and generates the boilerplate at compile time, so you only need to focus on defining the APIs.
Streaming APIs are APIs that let you send and receive data to and from your application, allowing two-way communication.
Encore offers three types of streams, each for a different data flow direction:
- StreamIn: Use this to stream data into your service.
- StreamOut: Use this to stream data out from your service.
- StreamInOut: Use this to stream data both into and out of your service.
When you connect to a streaming API endpoint, the client and server perform a handshake using an HTTP request. If the server accepts this request, a stream is created for both the client and the API handler. This stream is actually a WebSocket that allows sending and receiving messages.
Alright, now that we know what APIs and Streaming APIs are in Encore, let's create our dashboard service in the next section with Streaming API endpoints to store and retrieve data in real time.
Creating dashboard service
Let's create a dashboard service where we'll define our sales API to stream data to and from our sales dashboard.
Create a folder at the root level called dashboard and then add an encore.service.ts file. This file will tell Encore to treat the dashboard folder and its subfolders as part of the service.
# macOS
brew install encoredev/tap/encore

# Windows
iwr https://encore.dev/install.ps1 | iex

# Linux
curl -L https://encore.dev/install.sh | bash
Then add the following code to the encore.service.ts file. We import the Service class from encore.dev/service and create an instance of it by using "dashboard" as the service name.
encore app create
Now let's create a dashboard.ts file and set up the sale API.
Select language for your applicatio : TypeScript
Template: Empty app
App Name : real-time-dashboard

Before setting up the API, we will first set up the database to store the sales data. We will use SQLDatabase from the module encore.dev/storage/sqldb to create a PostgreSQL database supported by Encore.
We need to define SQL as a migration, which Encore will pick up when we execute the command encore run.
Create a folder named migrations inside the dashboard folder, and then create a file called 1_first_migration.up.sql. Make sure to follow the naming convention, starting with number_ and ending with up.sql.
# macOS
brew install encoredev/tap/encore

# Windows
iwr https://encore.dev/install.ps1 | iex

# Linux
curl -L https://encore.dev/install.sh | bash
Here, we are creating a table called sales with four columns:
- id: auto-incremented and serves as the primary key
- sale: title of the sale
- total: total amount of the sale
- date: date of the sale
Next, add the following code to the dashboard.ts file.
encore app create
Here, we create an instance of SQLDatabase by giving it the name dashboard and specifying the path to the migrations folder.
We are using the postgres package to listen for and notify changes in the database.
?
Next, add these types and an in-memory map to hold the connected streams (websocket connections).
Select language for your applicatio : TypeScript
Template: Empty app
App Name : real-time-dashboard
Next, let's set up a sale streaming endpoint to send updates when a new sale happens.
{
    "id":   "real-time-dashboard-<random-id>",
    "lang": "typescript"
}
</random-id>
Here we use the api.streamOut function to define the API, which takes two arguments:
- StreamOptions:
- expose: Set to true to make the endpoint public, otherwise false
- auth: Set to true to protect the endpoint with authentication, otherwise false
- path: /sale
- Function: It takes two arguments
- handshake: Used to establish the stream connection
- stream: The stream object
We keep connections in the connectedStreams map and listen to the new_sale channel using a Postgres client. When a new sale happens, we send updates to all connected streams.
Next, we will define the add sale API endpoint, where we get the sale data from the request body and use the db instance to insert the new sale record.
# create dashboard folder
mkdir dashboard

# switch to dashboard folder
cd dashboard

# create encore.service.ts file inside dashboard folder
touch encore.service.ts
Here, after adding the new sale record to the database, we use the Postgres client to send a notification to the new_sale channel with the sale data. This way, the new_sale channel listener gets notified and can take action.
Lastly, let's set up the API endpoint to return the list of sales records.
import { Service } from 'encore.dev/service';

export default new Service('dashboard');
Here, we use the db instance method query to get the data and then process it to return as a list.
Great, we now have all the API endpoints defined. Let's explore the Encore development dashboard in the next section.
Exploring the development dashboard
We have API endpoints with a database setup, but how do we test and debug the services? Don't worry, because Encore provides a Local Development dashboard to make developers' lives easier and boost productivity.
It includes several features to help you design, develop, and debug your application:
- Service Catalog and API Explorer for easily making API calls to your local backend
- Distributed Tracing for easy and powerful debugging
- Automatic API Documentation for sharing knowledge and answering questions
- Encore Flow for visualizing your microservices architecture
All these features update in real time as you change your application.
To access the dashboard, start your Encore application with encore run, and it opens automatically.
# macOS
brew install encoredev/tap/encore

# Windows
iwr https://encore.dev/install.ps1 | iex

# Linux
curl -L https://encore.dev/install.sh | bash
This is how the dashboard looks, and you can test everything locally before going to production. This makes it much easier to test microservices architecture without needing external tools.

Here is an example of adding a new sale using the API explorer. When you click the Call API button, you will get a response and a log. On the right side, you can see the trace of the request.

When you click on the trace link, you get details like database queries, responses, and logs.

Alright, that's all about the local development dashboard. You can explore other options like the Service catalog, flow, and more. In the next section, we'll generate the client with TypeScript type safety to use in the Frontend service (React Application) to communicate with dashboard service APIs.
Generating the client
Encore can generate frontend request clients in TypeScript or JavaScript, keeping request/response types in sync and helping you call the APIs without manual effort.
Create a folder named frontend in the root directory and run the following command to set up the React project using Vite.
encore app create
Next, create a lib folder inside the src directory, add a new file called client.ts, and leave it empty.
Select language for your applicatio : TypeScript
Template: Empty app
App Name : real-time-dashboard
Then, in the package.json file, add a new script called gen-client.
{
    "id":   "real-time-dashboard-<random-id>",
    "lang": "typescript"
}
</random-id>
Next, run the script to create the client in src/lib/client.ts.
# create dashboard folder
mkdir dashboard

# switch to dashboard folder
cd dashboard

# create encore.service.ts file inside dashboard folder
touch encore.service.ts
The src/lib/client.ts file should contain the generated code.
import { Service } from 'encore.dev/service';

export default new Service('dashboard');
Next, create a file named getRequestClient.ts in the lib directory and add the following code. This will return the Client instance based on the environment.
# make sure you are in dashboard folder
touch dashboard.ts
Alright, now we have the client to use in a React application to call the dashboard APIs. In the next section, let's create the frontend service and build the UI for the real-time sales dashboard.
Creating frontend service
In the previous section, we set up a frontend folder with a React application, and now we want to make it a service. Let's create an encore.service.ts file and add the following code to tell Encore to treat the frontend folder as a "frontend" service.
# macOS
brew install encoredev/tap/encore

# Windows
iwr https://encore.dev/install.ps1 | iex

# Linux
curl -L https://encore.dev/install.sh | bash
We have two options:
- Serve the dashboard and frontend services separately
- Serve everything as a single bundle (we will use this approach for this tutorial)
To serve the React application, we need to build and serve it as static assets in Encore. Let's set up the static.ts file in the frontend folder.
Serving static files in Encore.ts is similar to regular API endpoints, but we use the api.static function instead.
encore app create
Here are two important things to note: we are passing the path and dir options.
- path: /!path ensures it acts as a fallback route and doesn't conflict with other endpoints.
- dir: ./dist is the directory of the build version of the React application.
Great, the static endpoint is set up. Now, let's install a few dependencies for our React application
- react-router-dom
- uuid
- tailwind css
Select language for your applicatio : TypeScript
Template: Empty app
App Name : real-time-dashboard
Then update the main.tsx with the code below.
{
    "id":   "real-time-dashboard-<random-id>",
    "lang": "typescript"
}
</random-id>
Next, let's set up Tailwind CSS and update a few files.
# create dashboard folder
mkdir dashboard

# switch to dashboard folder
cd dashboard

# create encore.service.ts file inside dashboard folder
touch encore.service.ts
Change the content section in tailwind.config.js
import { Service } from 'encore.dev/service';

export default new Service('dashboard');
And index.css with the following code.
# make sure you are in dashboard folder
touch dashboard.ts
Now let's create a few components for the sales dashboard.
- SalesTable: to display the sales data in a table format.
# 1_first_migration.up.sql

CREATE TABLE sales (
    id BIGSERIAL PRIMARY KEY,
    sale VARCHAR(255) NOT NULL,
    total INTEGER NOT NULL,
    date DATE NOT NULL
);
Here, we are importing the types from the generated client to match the dashboard service type and ensure type safety.
- SalesMetrics: to show some sales numbers like total, lowest, and average sale.
# dashboard.ts

import { SQLDatabase } from 'encore.dev/storage/sqldb';
import postgres from 'postgres';

const db = new SQLDatabase('dashboard', {
  migrations: './migrations',
});

const client = postgres(db.connectionString);
- RoleSelector: To let users choose a role for the dashboard, we will show two options:
- Viewer: Can view the sales dashboard
- Manager: Can view and create new sales
# dashboard.ts

...

// Map to hold all connected streams
const connectedStreams: Map<string streamout>> = new Map();

interface HandshakeRequest {
  id: string;
}

interface Sale {
  sale: string;
  total: number;
  date: string;
}

interface ListResponse {
  sales: Sale[];
}

</string>
- GenerateSales: to display the generate sale button and contain the logic for generating sales.
To generate sales, we'll need some mock data, so let's create a src/constant.ts file and add the mock data
# dashboard.ts
...

import { api, StreamOut } from 'encore.dev/api';
import log from 'encore.dev/log';

...

export const sale = api.streamOut<handshakerequest sale>(
  { expose: true, auth: false, path: '/sale' },
  async (handshake, stream) => {
    connectedStreams.set(handshake.id, stream);

    try {
      await client.listen('new_sale', async function (data) {
        const payload: Sale = JSON.parse(data ?? '');

        for (const [key, val] of connectedStreams) {
          try {
            // Send the users message to all connected clients.
            await val.send({ ...payload });
          } catch (err) {
            // If there is an error sending the message, remove the client from the map.
            connectedStreams.delete(key);
            log.error('error sending', err);
          }
        }
      });
    } catch (err) {
      // If there is an error reading from the stream, remove the client from the map.
      connectedStreams.delete(handshake.id);
      log.error('stream error', err);
    }
  }
);
</handshakerequest>
# dashboard.ts
...
...

export const addSale = api(
  { expose: true, method: 'POST', path: '/sale/add' },
  async (body: Sale & { id: string }): Promise<void> => {
    await db.exec`
      INSERT INTO sales (sale, total, date)
      VALUES (${body.sale}, ${body.total}, ${body.date})`;

    await client.notify(
      'new_sale',
      JSON.stringify({ sale: body.sale, total: body.total, date: body.date })
    );
  }
);

</void>
Here, we import the getRequestClient and then call the addSale endpoint from the dashboard service. It's very simple, and addSale is type-safe, so if you try to pass any attributes that aren't allowed, you'll get an error.
Next, let's create a SalesDashboard component to show the dashboard view with sales metrics, recent sales, and all-time sales.
# macOS
brew install encoredev/tap/encore

# Windows
iwr https://encore.dev/install.ps1 | iex

# Linux
curl -L https://encore.dev/install.sh | bash
SalesDashboard takes one prop called role, which determines if it will show the GenerateSales component.
saleStream will hold the active stream reference and is strongly typed.
encore app create
When the component mounts, we create the stream connection using the sale endpoint of the dashboard service. We then listen for the socket open and close events and run the appropriate logic based on these events.
We read the sale data from saleStream.current and store it in the recentSalesData state.
When the component unmounts, we clean up and close the current stream.
Select language for your applicatio : TypeScript
Template: Empty app
App Name : real-time-dashboard
This code gets the stored sales using the listSales endpoint from the dashboard service and saves them in the salesData state.
{
    "id":   "real-time-dashboard-<random-id>",
    "lang": "typescript"
}
</random-id>
This code calculates the recent sales and all-time sales data.
# create dashboard folder
mkdir dashboard

# switch to dashboard folder
cd dashboard

# create encore.service.ts file inside dashboard folder
touch encore.service.ts
Finally, update the App.tsx file with this code.
import { Service } from 'encore.dev/service';

export default new Service('dashboard');
Here, we are showing the SalesDashboard and RoleSelector components based on whether the role query parameter is available or not.
Now, let's build the React application by running the command below in the frontend root.
# make sure you are in dashboard folder
touch dashboard.ts
Once you run the command successfully, the dist folder will be created inside the frontend directory.
Great, now in the next section, let's run the application and test it from start to finish.
Running the application
Running the encore application is easy; just use the command below.
# 1_first_migration.up.sql

CREATE TABLE sales (
    id BIGSERIAL PRIMARY KEY,
    sale VARCHAR(255) NOT NULL,
    total INTEGER NOT NULL,
    date DATE NOT NULL
);
Once you run the command successfully, you will see logs in the terminal like this:
# dashboard.ts

import { SQLDatabase } from 'encore.dev/storage/sqldb';
import postgres from 'postgres';

const db = new SQLDatabase('dashboard', {
  migrations: './migrations',
});

const client = postgres(db.connectionString);
Visit http://127.0.0.1:4000 in your browser, and you will see a screen like the one below.

Next, choose Viewer in one tab and Manager in another tab.
- Viewer

- Manager
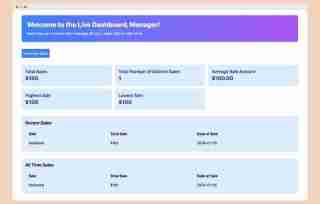
While checking the development dashboard, we created a sale record, and it was saved in the database, so it's also visible in the UI.
Now, from the manager view, click on the Generate Sales button and watch as both tabs on the dashboard update in real-time.
Summary
In this tutorial, we created a real-time sales dashboard using React and Encore.ts. The app updates instantly with new sales and inventory items, helping with quick decisions. We used Encore.ts, an open-source framework, to build the backend with TypeScript for safe and smooth coding. Key features of Encore are:
- Type Safety: Makes sure all API endpoints and data structures are safe, reducing mistakes and making code more reliable.
- Streaming APIs: Allows real-time data streaming with StreamIn, StreamOut, and StreamInOut, enabling two-way communication between the client and server.
- Local Development Dashboard: Offers tools for testing and debugging, like a Service Catalog, API Explorer, and Distributed Tracing, boosting productivity.
- Automatic Client Generation: Creates frontend request clients in TypeScript or JavaScript, keeping request/response types aligned.
- Simplified Microservices: Lets you build apps with multiple services without the usual complexity, providing an easier way to handle microservices.
These features together make it easier to build and manage complex apps, offering a great developer experience.
Relevant links
- Star Encore on GitHub
- Find the Source Code for this example
- Join our Discord Community
The above is the detailed content of How to Build a Real-Time Dashboard with Encore.ts and React. For more information, please follow other related articles on the PHP Chinese website!

 Python vs. JavaScript: Choosing the Right Tool for the JobMay 08, 2025 am 12:10 AM
Whether to choose Python or JavaScript depends on the project type: 1) Choose Python for data science and automation tasks; 2) Choose JavaScript for front-end and full-stack development. Python is favored for its powerful library in data processing and automation, while JavaScript is indispensable for its advantages in web interaction and full-stack development.
 Python and JavaScript: Understanding the Strengths of EachMay 06, 2025 am 12:15 AM
Python and JavaScript each have their own advantages, and the choice depends on project needs and personal preferences. 1. Python is easy to learn, with concise syntax, suitable for data science and back-end development, but has a slow execution speed. 2. JavaScript is everywhere in front-end development and has strong asynchronous programming capabilities. Node.js makes it suitable for full-stack development, but the syntax may be complex and error-prone.
 JavaScript's Core: Is It Built on C or C ?May 05, 2025 am 12:07 AM
JavaScriptisnotbuiltonCorC ;it'saninterpretedlanguagethatrunsonenginesoftenwritteninC .1)JavaScriptwasdesignedasalightweight,interpretedlanguageforwebbrowsers.2)EnginesevolvedfromsimpleinterpreterstoJITcompilers,typicallyinC ,improvingperformance.
 JavaScript Applications: From Front-End to Back-EndMay 04, 2025 am 12:12 AM
JavaScript can be used for front-end and back-end development. The front-end enhances the user experience through DOM operations, and the back-end handles server tasks through Node.js. 1. Front-end example: Change the content of the web page text. 2. Backend example: Create a Node.js server.
 Python vs. JavaScript: Which Language Should You Learn?May 03, 2025 am 12:10 AM
Choosing Python or JavaScript should be based on career development, learning curve and ecosystem: 1) Career development: Python is suitable for data science and back-end development, while JavaScript is suitable for front-end and full-stack development. 2) Learning curve: Python syntax is concise and suitable for beginners; JavaScript syntax is flexible. 3) Ecosystem: Python has rich scientific computing libraries, and JavaScript has a powerful front-end framework.
 JavaScript Frameworks: Powering Modern Web DevelopmentMay 02, 2025 am 12:04 AM
The power of the JavaScript framework lies in simplifying development, improving user experience and application performance. When choosing a framework, consider: 1. Project size and complexity, 2. Team experience, 3. Ecosystem and community support.
 The Relationship Between JavaScript, C , and BrowsersMay 01, 2025 am 12:06 AM
Introduction I know you may find it strange, what exactly does JavaScript, C and browser have to do? They seem to be unrelated, but in fact, they play a very important role in modern web development. Today we will discuss the close connection between these three. Through this article, you will learn how JavaScript runs in the browser, the role of C in the browser engine, and how they work together to drive rendering and interaction of web pages. We all know the relationship between JavaScript and browser. JavaScript is the core language of front-end development. It runs directly in the browser, making web pages vivid and interesting. Have you ever wondered why JavaScr
 Node.js Streams with TypeScriptApr 30, 2025 am 08:22 AM
Node.js excels at efficient I/O, largely thanks to streams. Streams process data incrementally, avoiding memory overload—ideal for large files, network tasks, and real-time applications. Combining streams with TypeScript's type safety creates a powe


Hot AI Tools

Undresser.AI Undress
AI-powered app for creating realistic nude photos

AI Clothes Remover
Online AI tool for removing clothes from photos.

Undress AI Tool
Undress images for free

Clothoff.io
AI clothes remover

Video Face Swap
Swap faces in any video effortlessly with our completely free AI face swap tool!

Hot Article
Hot Tools

ZendStudio 13.5.1 Mac
Powerful PHP integrated development environment

WebStorm Mac version
Useful JavaScript development tools

SAP NetWeaver Server Adapter for Eclipse
Integrate Eclipse with SAP NetWeaver application server.

SublimeText3 English version
Recommended: Win version, supports code prompts!

MinGW - Minimalist GNU for Windows
This project is in the process of being migrated to osdn.net/projects/mingw, you can continue to follow us there. MinGW: A native Windows port of the GNU Compiler Collection (GCC), freely distributable import libraries and header files for building native Windows applications; includes extensions to the MSVC runtime to support C99 functionality. All MinGW software can run on 64-bit Windows platforms.

