


Frieza, the Emperor of the Universe, is a versatile and deadly fighter in Dragon Ball: Sparking Zero. With multiple transformations and a wide range of techniques, Frieza excels at both controlling the battlefield and unleashing devastating energy attacks.

His blend of ranged precision and tactical abilities makes him a formidable choice for players who value strategy as much as raw power. From his iconic Death Beam to his explosive finishing moves, Frieza offers a playstyle that rewards cunning and precision. In this guide, we’ll cover Frieza’s many forms, from the early Z days to Super.
Frieza (Z) First Form

|
Move Name |
Input |
Cost |
Effect |
|---|---|---|---|
| Psychokinesis | R2/RT Up on the D-Pad | 2 Skill Count | Paralyze your opponent for 3 seconds. |
| Pump Up | R2/RT Left on the D-Pad | 2 Skill Count | Gain offensive buffs and reduced Ki recovery for 15 seconds. |
| Death Beam | R2/RT Square/X | 2 Ki Bars | Fires a Beam Super that does over half a bar of damage. |
| Punishing Rush | R2/RT Triangle/Y | 3 Ki Bars | Triggers a Rush Super that does nearly a bar of damage. |
| Death Ball | R2/RT Circle/B (when in Sparking Mode) | Full Ki Bar | Beam Ultimate that does a bar and a half of damage. |
Frieza (Z) First Form In Versus And Online Matches

The trick of using Frieza from the Z era is picking his first form, and then working your way up to his final form. This is because, during nearly all the transformations, Frieza heals half a health bar, letting you stay in the fight for longer while using a single character.
This first form is, of course, the weakest, so you should consider transforming as early as possible. You won’t have much use for the Skill Count either way, since the paralysis done by Psychokinesis doesn’t last long enough to have value, while this Frieza’s version of Pump Up gives him some offensive buffs but also lowers his Ki recovery.
A constant to consider with all Frieza forms is Death Beam, a quick Beam Special that, while it can’t challenge beams in struggles, can interrupt most castings due to how quick and cheap it is. Frieza’s basic Ki blasts share this feature, but it is most effective in his final forms.
Frieza (Z) Second Form

|
Move Name |
Input |
Cost |
Effect |
|---|---|---|---|
| Explosive Wave | R2/RT Up on the D-Pad | 2 Skill Count | Sends out an explosive wave that knocks enemies back. |
| Finish Sign | R2/RT Left on the D-Pad | 3 Skill Count | Gain offensive buffs. |
| Punishing Blaster | R2/RT Square/X | 3 Ki Bars | Fires a Beam Super that does over half a bar of damage. |
| Death Storm | R2/RT Triangle/Y | 4 Ki Bars | Triggers an explosion at the target’s location that does nearly a bar of damage. |
| HAIL Frieza | R2/RT Circle/B (when in Sparking Mode) | Full Ki Bar | Rush Ultimate that does a bar and a half of damage. |
Frieza (Z) Second Form In Versus And Online Matches

Frieza’s second form is considered a large character, although not large enough to warrant armor like other characters like Broly. This means that you have the slow speed grab and moves of a large character without the main benefit, so once again you should save up Skill Count to transform.
This form isn’t without a few tricks, however, like the always-useful Explosive Wave to stop enemy combos. His Death Storm is also a great skill for opponents who like rushing in, although it is rather expensive, and the lack of a Death Beam is felt.
Frieza (Z) Third Form

|
Move Name |
Input |
Cost |
Effect |
|---|---|---|---|
| Explosive Wave | R2/RT Up on the D-Pad | 2 Skill Count | Sends out an explosive wave that knocks enemies back. |
| High-Tension | R2/RT Left on the D-Pad | 3 Skill Count | Gain offensive buffs. |
| Barrage Death Beam | R2/RT Square/X | 2 Ki Bars | Fire several projectiles that can deal up to a bar of damage. |
| High Speed Rush | R2/RT Triangle/Y | 3 Ki Bars | Triggers a Rush Super that does a bar of damage. |
| Crazy Finger Beam | R2/RT Circle/B (when in Sparking Mode) | Full Ki Bar | Rush Ultimate that does nearly two bars of damage. |
Frieza (Z) Third Form In Versus And Online Matches

This Frieza is just as large as the previous form, but far quicker, having most of the weaknesses gone from its moveset. It still has Explosive Wave, but recovers the fabled Death Beam in the form of a Barrage, ideal for using up skills like Afterimage that your opponent might have activated.
Frieza (Z) Fourth Form

|
Move Name |
Input |
Cost |
Effect |
|---|---|---|---|
| Psychokinesis | R2/RT Up on the D-Pad | 2 Skill Count | Paralyze your opponent for 3 seconds. |
| Your Arrogance Disgusts Me! | R2/RT Left on the D-Pad | 3 Skill Count | Enter Sparking Mode. |
| Barrage Death Beam | R2/RT Square/X | 2 Ki Bars | Fire several projectiles that can deal up to a bar of damage. |
| You Might Die This Time | R2/RT Triangle/Y | 3 Ki Bars | Triggers a Rush Super that does a bar of damage. |
| I’ll Destroy This Planet! | R2/RT Circle/B (when in Sparking Mode) | Full Ki Bar | Beam Ultimate that does nearly two bars of damage. |
Frieza (Z) Fourth Form In Versus And Online Matches

Once you make it to this fourth form, transforming no longer heals you, so you’ll have to be more strategic about your next step. Gone is the Explosive Wave, but you have a way to enter Sparking Mode instantly in its place, letting you loop your opponent with a constant onslaught of quick, basic Ki blasts.
Frieza (Z) Full Power

|
Move Name |
Input |
Cost |
Effect |
|---|---|---|---|
| Psychokinesis | R2/RT Up on the D-Pad | 2 Skill Count | Paralyze your opponent for 3 seconds. |
| Long Awaited-For 100% | R2/RT Left on the D-Pad | 3 Skill Count | Enter Sparking Mode. |
| Death Saucer | R2/RT Square/X | 2 Ki Bars | Fires an unblockable Beam Super that does a bar of damage. |
| Nova Strike | R2/RT Triangle/Y | 4 Ki Bars | Triggers an unblockable Rush Super that does a bar of damage. |
| I’m The One Who’ll Kill You! | R2/RT Circle/B (when in Sparking Mode) | Full Ki Bar | Beam Ultimate that does two bars of damage. |
Frieza (Z) Full Power In Versus And Online Matches

Since you don’t heal anymore, you might wonder what the point is in transforming into this Frieza, since it seems to have a similar moveset but lacking the Death Beam. Well, instead of a quick attack, you have two Supers with very clear identities, both of which are unblockable.
Their range, however, isn’t stage-wide, so this Frieza is best used as an aggressive melee fighter. Use Death Saucer mid-distance, and try to close out combos with Nova Strike; players unfamiliar with the full-power version of Frieza will likely assume that it is a normal Rush that can be blocked, only to be blown away by the crash.
Mecha Frieza

|
Move Name |
Input |
Cost |
Effect |
|---|---|---|---|
| Psychokinesis | R2/RT Up on the D-Pad | 2 Skill Count | Paralyze your opponent for 3 seconds. |
| Finish Sign | R2/RT Left on the D-Pad | 3 Skill Count | Gain offensive buffs. |
| Death Beam | R2/RT Square/X | 2 Ki Bars | Fires a Beam Super that does over half a bar of damage. |
| Fissure Slash | R2/RT Triangle/Y | 3 Ki Bars | Fires an unblockable Beam Super that does a bar of damage. |
| Supernova | R2/RT Circle/B (when in Sparking Mode) | Full Ki Bar | Beam Ultimate that does a bar and a half of damage. |
Mecha Frieza In Versus And Online Matches

Both lore and gameplay-wise, this is just a lesser form of the previous Frieza, even having less max Skill Count and lacking the ability to go instantly into Sparking Mode. Its biggest tool is Fissure Slash, an unblockable Beam that can catch players off-guard simply due to the low pick rate of this character.
Frieza (Super)

|
Move Name |
Input |
Cost |
Effect |
|---|---|---|---|
| Psychokinesis | R2/RT Up on the D-Pad | 2 Skill Count | Paralyze your opponent for 3 seconds. |
| Power Of Revenge | R2/RT Left on the D-Pad | 3 Skill Count | Gain offensive buffs. |
| Death Beam | R2/RT Square/X | 2 Ki Bars | Fires a Beam Super that does over half a bar of damage. |
| Super Nova Strike | R2/RT Triangle/Y | 4 Ki Bars | Unblockable Rush Super that does a bar of damage. |
| Super Death Ball | R2/RT Circle/B (when in Sparking Mode) | Full Ki Bar | Beam Ultimate that does nearly two bars of damage. |
Frieza (Super) In Versus And Online Matches

Just like Mecha Frieza, this version of the character pales in comparison to its Z-era counterpart, with a similar benefit of having a Super (a Rush in this case) that can’t be blocked. The big difference is that this Frieza can turn Golden, making it ideal for DP Battle mode, where this Frieza costs six DP while the transformed Golden one costs Eight.
Golden Frieza

|
Move Name |
Input |
Cost |
Effect |
|---|---|---|---|
| Wild Sense | R2/RT Up on the D-Pad | 2 Skill Count | Dodge the next attack and counter it. |
| True Golden Frieza | R2/RT Left on the D-Pad | 3 Skill Count | Enter Sparking Mode. |
| Great Death Beam | R2/RT Square/X | 3 Ki Bars | Fires a Beam Super that does a bar of damage. |
| “No Hard Feelings” Hit | R2/RT Triangle/Y | 3 Ki Bars | Rush Super that does a bar of damage. |
| Earth Breaker | R2/RT Circle/B (when in Sparking Mode) | Full Ki Bar | Rush Ultimate that does two bars of damage. |
Golden Frieza In Versus And Online Matches

Stats-wise, this is the best version of Frieza there is, with decent damage, a quick (albeit expensive) Death Beam, and a skill that instantly puts him in Sparking Mode. You can also go down to the regular Frieza form, something only useful if you need to access the unblockable Rush Super for opponents that block too much.

The above is the detailed content of Dragon Ball: Sparking Zero - Frieza Character Guide. For more information, please follow other related articles on the PHP Chinese website!

 Stalker 2: Heart Of Chornobyl - The Best Gun For Each Ammo TypeMay 09, 2025 am 06:06 AM
Stalker 2 boasts a diverse arsenal, but ammo scarcity demands strategic weapon choices. This guide highlights the top performers for each ammo type, considering damage, fire rate, and magazine capacity. 9x18mm: APSB reigns supreme. While 9x18mm amm
 Roblox: The Strongest Battlegrounds - How To UppercutMay 09, 2025 am 06:04 AM
Roblox: The Strongest Battlegrounds — Master the Hidden Uppercut for Epic Combos! Roblox's Strongest Battlegrounds blends fighting game fundamentals with accessible gameplay, but mastering its nuances is key to success. While character-specific abili
 Revenge Of The Savage Planet: How To Farm ResourcesMay 09, 2025 am 06:03 AM
In Revenge of the Savage Planet, resource gathering is crucial for crafting and upgrading. Before you can build and improve your gear, you'll need to locate four key resources scattered across the alien worlds. Let's explore how to find them all.
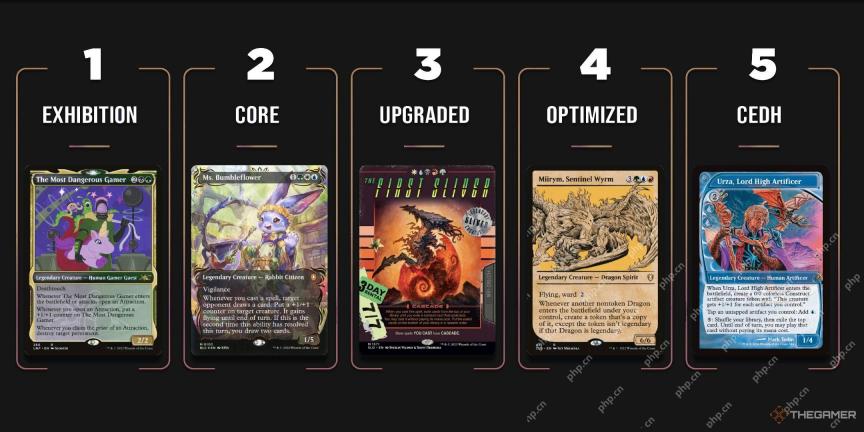 Magic: The Gathering - How To Work Out Which Bracket Your Commander Deck IsMay 09, 2025 am 04:10 AM
Magic: The Gathering's Commander format is renowned for its social and diverse gameplay. Unlike competitive formats, Commander prioritizes fun and balanced matchups over cutthroat competition. This is achieved through a Commander Bracket system, off
 Revenge Of The Savage Planet: Complete Co-Op GuideMay 09, 2025 am 04:07 AM
Detailed explanation of the two-player cooperation mode of "Revenge of the Wild Planet": Explore the strange planet with friends! "Revenge of the Wild Planet" is fun in itself, but playing with friends will make your interstellar adventure even more exciting! This article will introduce the game's cooperation mode in detail, including various gameplay and things to note. The game supports multiple cooperation modes and is very flexible. But there are some restrictions, let’s take a look together! Cooperation mode gameplay The game supports cooperation between two people at most. While the game itself balances single player mode, it also encourages players to conduct various experiments, explore the world and defeat enemies in the most creative ways. Therefore, no matter which stage you are in the game or even just starting a new game, you can turn on the cooperation mode at any time. In the main menu of the game, click
 How Many Planets Are There In Revenge Of The Savage Planet?May 09, 2025 am 04:05 AM
Planet Exploration Guide for "Revenge of the Brutal Planet" Game Planet The title of the game, Revenge of the Furious Planet, hints at the theme of its interstellar exploration. After losing their jobs, players will embark on a journey of exploration and travel between many planets. The game's success lies in its diversity, providing a wealth of enemies and terrain, allowing players to make full use of various tools. How many planets are there in the game? Number and features of the game planet Players initially land on the main star of vibrant and biological stars. But this is just the beginning, not the only planet in the game. Although the main star has its guiding nature, other planets also have their own characteristics. There are five planets in the game, but only four are completely explorable. Each planet has a unique personality: Stellaris P
 Revenge Of The Savage Planet: Every Outfit And How To Unlock ItMay 09, 2025 am 04:04 AM
Stranded on an uncharted planet, recently laid off, with a chatty robot companion and lost gear? At least you've got your fashion sense! In Revenge of the Savage Planet, looking good while surviving is paramount. Death is just a minor setback; style
 Monopoly Go: Tatooine Treasures Rewards Guide (May 7-11)May 09, 2025 am 04:03 AM
Monopoly Go's Star Wars-themed sticker season kicks off with the Tatooine Treasures dig event! Running from 1 PM ET on May 7th to 4 PM ET on May 11th, this 20-level event offers exciting rewards. Whether you need more dice rolls, Crave stickers, or


Hot AI Tools

Undresser.AI Undress
AI-powered app for creating realistic nude photos

AI Clothes Remover
Online AI tool for removing clothes from photos.

Undress AI Tool
Undress images for free

Clothoff.io
AI clothes remover

Video Face Swap
Swap faces in any video effortlessly with our completely free AI face swap tool!

Hot Article
Hot Tools

SublimeText3 Mac version
God-level code editing software (SublimeText3)

SublimeText3 Linux new version
SublimeText3 Linux latest version

ZendStudio 13.5.1 Mac
Powerful PHP integrated development environment

SublimeText3 English version
Recommended: Win version, supports code prompts!

Safe Exam Browser
Safe Exam Browser is a secure browser environment for taking online exams securely. This software turns any computer into a secure workstation. It controls access to any utility and prevents students from using unauthorized resources.

