


Introduction
Hello, everybody!
Today, as the title says ?, I’ll be talking about the event loop.
This is not a topic that interviewers often ask about directly (I can only remember two occasions when they asked me to explain the event loop). BUT, in most interviews, they ask questions that are related to it. For example:
- "If I do this… what should be the behavior?"
- "If my code looks like this, what will be the output?"
- "Why does this code produce this output?"
All those questions are much easier to answer if you understand how the event loop works.
I'll be honest: this topic isn’t my favorite. I much prefer questions about the behavior of code rather than explaining how the event loop works for 10 minutes straight.?

Let’s dive in! ?
## Questions
1. What is the event loop?
2. Examples
What is the event loop?
Short Answer:
The event loop is responsible for handling asynchronous tasks in the JavaScript runtime.
To be honest, I don’t think this answer is enough to satisfy the curiosity of an interviewer asking about the event loop. So, in this post, I’d like to dive deeper into this topic.
More than just knowing the concepts, it’s important to understand how it works. That’s why I’ve added some examples at the end.

Theory
What is the Event Loop?
JavaScript has a runtime based on an event loop, which is responsible for handling tasks. Each language has a unique runtime, and an important point to note is that JavaScript is single-threaded.
What Does Single-Threaded Mean?
Single-threaded means that JavaScript can handle only one task at a time. This is why the event loop is so essential in JavaScript; it helps manage tasks efficiently despite this single-thread limitation.
Components of the Runtime
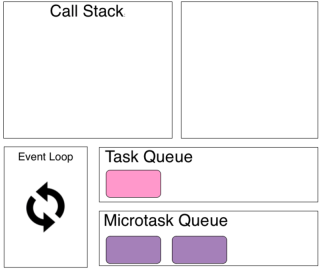
To understand the event loop better, let’s first look at its main components:

Call Stack
The call stack is a data structure that keeps track of the functions we call. You can think of it like a stack of plates: when a function is called, it’s added to the stack, and when it finishes, it’s removed from the stack.
The call stack operates on a LIFO (Last-In-First-Out) principle, meaning JavaScript executes functions in the order they’re stacked—from the topmost item down to the bottom, one at a time (remember, JavaScript is single-threaded).
Queues
In JavaScript’s runtime, we have queues, which hold lists of tasks to be processed. Tasks in these queues wait until the call stack is empty.
Task Queue (or Callback Queue): This queue stores tasks like setTimeout() and setInterval() calls. Tasks here are processed after the call stack is empty and after all tasks in the Microtask Queue have been processed. See more examples of tasks that are stored in this queue on MDN.
Microtask Queue: This queue has priority over the Task Queue. It includes microtasks such as Promise callbacks and asynchronous functions like process.nextTick() and async functions.
The Task Queue works on a FIFO (First-In-First-Out) basis, meaning tasks are processed in the order they’re added, but only after the Microtask Queue is empty.
Event Loop
The event loop is a mechanism that manages the execution of asynchronous code. It observes the call stack and coordinates between the call stack and the queues (Task Queue and Microtask Queue) to keep the code running smoothly.
How Does It Work?
Let's go through the event loop process step by step. Refer to the image below for a visual representation.

In this example:
- The Call Stack has one function.
- The Microtask Queue has two messages.
- The Task Queue has one message.
Step 1: Process the Call Stack
- The event loop starts by looking at the Call Stack.
- It finds a function in the stack and begins executing it.
- Once this function completes, it is removed from the Call Stack.
Step 2: Process the Microtask Queue
- After the Call Stack is empty, the event loop checks the Microtask Queue.
- It takes the first message from the Microtask Queue and pushes it to the Call Stack for execution.

- The function runs and, once completed, is removed from the Call Stack.
- The event loop then moves to the next message in the Microtask Queue and repeats the process.
- This continues until there are no more messages left in the Microtask Queue.

Step 3: Process the Task Queue
- Once both the Call Stack and the Microtask Queue are empty, the event loop turns to the Task Queue.
- It picks the first message in the Task Queue and adds it to the Call Stack.
- The function runs, and when it completes, it’s removed from the Call Stack.
- The event loop will continue this process with each task in the Task Queue, ensuring all tasks are handled one by one.

By following this order—Call Stack, then Microtask Queue, and finally Task Queue—the event loop helps JavaScript handle asynchronous code efficiently, even within its single-threaded environment.
Examples
Now that we understand how the event loop works and how tasks are prioritized, let’s look at some examples.
Example 1
const a = new Promise(function showA(resolve){
  console.log('A');
  resolve('B');
});

setTimeout(function showC() {
  console.log('C');
}, 0);

a.then(function showB(b) {
  console.log(b);
});

const d = function showD() {
  console.log('D');
};

d();
Before continuing, try to think about the order of the output.
✨What do you expect it to be?✨
Let’s break down each part of the code to understand why we get this output.
1. Creating the Promise
const a = new Promise(function showA(resolve) {
  console.log('A');
  resolve('B');
});
- Here, we create a new promise with a callback function.
- Inside this function, console.log('A') is executed immediately, so "A" is printed to the console.
- After logging "A", the promise is resolved with the value "B".
- JavaScript recognizes there’s a .then callback (i.e., showB) that should run once the main call stack is clear, so it adds showB to the Microtask Queue (since promise resolutions go there).
2. setTimeout Call
setTimeout(function showC() {
  console.log('C');
}, 0);
- The setTimeout function schedules showC to run after 0 milliseconds.
- JavaScript places showC in the Task Queue because it’s a timer-based function.
3. a.then Callback
const a = new Promise(function showA(resolve){
  console.log('A');
  resolve('B');
});

setTimeout(function showC() {
  console.log('C');
}, 0);

a.then(function showB(b) {
  console.log(b);
});

const d = function showD() {
  console.log('D');
};

d();
- This line registers a .then handler for the promise we already resolved in the previous step (resolve('B')).
- Since the promise is resolved, showB (the .then callback) is added to the Microtask Queue.
4. Defining d
const a = new Promise(function showA(resolve) {
  console.log('A');
  resolve('B');
});
- This line simply defines the function showD but doesn’t execute it yet, so nothing happens here.
5. Calling d()
setTimeout(function showC() {
  console.log('C');
}, 0);
- Now, we call d(), which is added to the Call Stack and executed. This results in console.log('D'), so "D" is printed to the console.
Final Output Order:
a.then(function showB(b) {
  console.log(b);
});
GIF for reference

Interactive Example
Example 2
const d = function showD() {
  console.log('D');
};
Again, take a moment to think about the order of the output.
✨What do you expect it to be?✨
Let's go with the explanation...
1. Logging "Start!"
d();
- This line is added to the Call Stack and executed immediately.
- As a result, "Start!" is printed to the console.
- setTimeout Call
A
D
B
C
- The setTimeout function schedules showTimeout to run after 0 milliseconds.
- JavaScript places showTimeout in the Task Queue since it’s a timer-based function.
3. Promise Resolution
console.log("Start!");

setTimeout(function showTimeout() {
  console.log("Timeout!");
}, 0);

Promise.resolve("Promise!")
  .then(function showPromise(res) {
    console.log(res);
  });

console.log("End!");
- The promise is resolved immediately with the value "Promise!".
- JavaScript places showPromise (the .then callback) in the Microtask Queue because promises go into the microtask queue after being resolved.
4. Logging "End!"
console.log("Start!");
- This line is added to the Call Stack and executed immediately.
- As a result, "End!" is printed to the console.
Final Output Order:
setTimeout(function showTimeout() {
  console.log("Timeout!");
}, 0);
GIF for reference

Interactive Example
End
This chapter wasn’t too long, but I hope these examples helped you understand how the event loop works.
I strongly recommend experimenting with the interactive page to analyze other examples. Playing around on that page can make it much easier to understand the event loop in action.
Thank you so much for all the love on my previous posts!
See you next week! ?
Bye Bye

The above is the detailed content of Technical Interview Questions - Part Event Loop. For more information, please follow other related articles on the PHP Chinese website!

 Replace String Characters in JavaScriptMar 11, 2025 am 12:07 AM
Detailed explanation of JavaScript string replacement method and FAQ This article will explore two ways to replace string characters in JavaScript: internal JavaScript code and internal HTML for web pages. Replace string inside JavaScript code The most direct way is to use the replace() method: str = str.replace("find","replace"); This method replaces only the first match. To replace all matches, use a regular expression and add the global flag g: str = str.replace(/fi
 jQuery Check if Date is ValidMar 01, 2025 am 08:51 AM
Simple JavaScript functions are used to check if a date is valid. function isValidDate(s) { var bits = s.split('/'); var d = new Date(bits[2] '/' bits[1] '/' bits[0]); return !!(d && (d.getMonth() 1) == bits[1] && d.getDate() == Number(bits[0])); } //test var
 jQuery get element padding/marginMar 01, 2025 am 08:53 AM
This article discusses how to use jQuery to obtain and set the inner margin and margin values of DOM elements, especially the specific locations of the outer margin and inner margins of the element. While it is possible to set the inner and outer margins of an element using CSS, getting accurate values can be tricky. // set up $("div.header").css("margin","10px"); $("div.header").css("padding","10px"); You might think this code is
 10 jQuery Accordions TabsMar 01, 2025 am 01:34 AM
This article explores ten exceptional jQuery tabs and accordions. The key difference between tabs and accordions lies in how their content panels are displayed and hidden. Let's delve into these ten examples. Related articles: 10 jQuery Tab Plugins
 10 Worth Checking Out jQuery PluginsMar 01, 2025 am 01:29 AM
Discover ten exceptional jQuery plugins to elevate your website's dynamism and visual appeal! This curated collection offers diverse functionalities, from image animation to interactive galleries. Let's explore these powerful tools: Related Posts: 1
 HTTP Debugging with Node and http-consoleMar 01, 2025 am 01:37 AM
http-console is a Node module that gives you a command-line interface for executing HTTP commands. It’s great for debugging and seeing exactly what is going on with your HTTP requests, regardless of whether they’re made against a web server, web serv
 Custom Google Search API Setup TutorialMar 04, 2025 am 01:06 AM
This tutorial shows you how to integrate a custom Google Search API into your blog or website, offering a more refined search experience than standard WordPress theme search functions. It's surprisingly easy! You'll be able to restrict searches to y
 jquery add scrollbar to divMar 01, 2025 am 01:30 AM
The following jQuery code snippet can be used to add scrollbars when the div content exceeds the container element area. (No demonstration, please copy it directly to Firebug) //D = document //W = window //$ = jQuery var contentArea = $(this), wintop = contentArea.scrollTop(), docheight = $(D).height(), winheight = $(W).height(), divheight = $('#c


Hot AI Tools

Undresser.AI Undress
AI-powered app for creating realistic nude photos

AI Clothes Remover
Online AI tool for removing clothes from photos.

Undress AI Tool
Undress images for free

Clothoff.io
AI clothes remover

AI Hentai Generator
Generate AI Hentai for free.

Hot Article
Hot Tools

SublimeText3 Chinese version
Chinese version, very easy to use

SublimeText3 Mac version
God-level code editing software (SublimeText3)

MantisBT
Mantis is an easy-to-deploy web-based defect tracking tool designed to aid in product defect tracking. It requires PHP, MySQL and a web server. Check out our demo and hosting services.

Dreamweaver CS6
Visual web development tools

DVWA
Damn Vulnerable Web App (DVWA) is a PHP/MySQL web application that is very vulnerable. Its main goals are to be an aid for security professionals to test their skills and tools in a legal environment, to help web developers better understand the process of securing web applications, and to help teachers/students teach/learn in a classroom environment Web application security. The goal of DVWA is to practice some of the most common web vulnerabilities through a simple and straightforward interface, with varying degrees of difficulty. Please note that this software

