


Java Virtual Machine (JVM) is a program that ensures Java apps can run on any machine. However, there can sometimes be problems with the JVM that frustrate developers and upset users. If you have trouble with the JVM, don’t worry. This guide will show easy steps to fix the Java Virtual Machine Launcher error.

Java Virtual Machine uses Java bytecode, which translates the version of the original Java code. The launcher is the one that starts and sets up the JVM with the right memory, security, and other settings. If you have issues with the JVM launcher, the methods mentioned below can help you fix them.
Method 1: Run Java as an Administrator
When you run a Java program with administrator privileges, it gets access to the system resources without issues, which helps avoid problems with files, settings, and security. Here’s how you can do it:
Step 1: Press Windows S on your keyboard, type This PC, and click Open.

Step 2: Paste the following in the address bar and hit Enter.
C:\Program Files\Java\jdk-21\bin
Note: If you’ve installed Java at a different location, head there.

Step 3: Locate the Java app, right-click on it, and choose Run as administrator.

Method 2: Verify Java Installation
Ensuring that the Java Runtime Environment (JRE) or Java Development Kit (JDK) is correctly installed on the system serves as a crucial initial step when addressing the “Could Not Create the Java Virtual Machine” error on Windows. Moreover, it also checks if all the necessary components are in place.
Verifying the installation involves checking the system’s PATH environment variable to confirm that it includes the correct Java directory. Adhere to the steps below to check if Java is correctly installed on your device:
Step 1: Click the Start icon, type Command Prompt, and click Run as administrator. When prompted, click Yes.

Step 2: In the cmd window, write the command below and hit Enter to run it.
java --version

If found, this command will now check for a Java installation and display its version and installation path. If you see information about a Java version and its path, rest assured that Java is correctly installed on your Windows device.
Also Read: How to open Command Prompt on Windows 11
Method 3: End Java Processes
When confronted with the perplexing failed to launch Java Virtual Machine error, one of the quick fixes is to check if the Java process is running in the background. If so, end them. Here’s how:
Step 1: Launch Task Manager by pressing the Ctrl Shift Esc keys on your keyboard. Ensure to be in the Processes tab.
Step 2: Locate all the Java programs under Background Processes. Right-click on them and click End Task to close the process.
Step 3: Repeat the process until all the Java processes are terminated.

Method 4: Disable Conflicting Software
Sometimes, the culprit behind your Java Virtual Machine (JVM) Launcher woes isn’t the JVM but the software running in the background. These can be antivirus programs, firewalls, or other applications. Disabling them temporarily can expose the true source of the conflict.
If the JVM Launcher launches flawlessly after turning off a specific program, rest assured that you’ve identified the enemy. Here’s how to disable the apps and processes running in the background:
Step 1: Right-click on the Windows icon and select Task Manager.

Step 2: Ensure that you are in the Process tab. Right-click on the programs you wish to close under the Apps and Background Process section and select End Task.

Once you disable any programs, check if the JVM starts running. If you find the culprit, enable the rest of the programs again.
Also Read: How to open Task Manager on Windows 11.
Method 5: Increase the System Memory for Java
If you see the “Could not create the Java Virtual Machine” error, your Java program lacks memory. The memory allocated to Java is called Java heap. To fix this, increase the Java heap size. You can change the runtime parameters in Java Runtime Environment Settings or adjust the _JAVA_OPTIONS variable.
Increase Java Heap Size by Modifying Variables
Step 1: Press the Windows S keys, write ‘Edit the system environment variables’, and click Open.

Step 2: Click the Environment Variables button.

Step 3: Under the System Variable section, click on the New button. Enter the following details in the boxes and click OK twice.
- Variable name: -JAVA_OPTIONS
- Variable value: -Xmx512M
Note: -Xmx512M defines that you’ve allocated 512MB of system memory.

Increase Java Heap Size Using Java Control Panel
Step 1: Click the Start icon, type Control Panel, and click Open.

Step 2: Navigate to Programs.

Step 3: Click Java from the options.

Step 4: Head to the Java tab and click the View button.

Step 5: Double-click on the Runtime Parameters column and write -Xmx512m to assign 512MB memory for the Java apps. Finally, click OK to save the changes.

Method 6: Reinstall Java
A Java Virtual Machine launcher error could stem from various causes. However, a simple yet surprisingly effective solution is to give your Java installation a fresh start. Uninstalling and reinstalling Java can clear away corrupted files, outdated configurations, and conflicting settings, rebooting the entire engine and giving it a clean slate.
This refresh can resolve issues from incomplete updates, incompatible components, or lingering glitches from previous installations. Here’s how to uninstall Java:
Step 1: Launch a web browser.
Step 2: Head to the Java Uninstall Tool page. Download and install the program.
Step 3: Press the Windows icon, type JavaUninstallTooll in the search box, and click Open. Select Yes when prompted.

Step 4: Click the Agree button to initiate the uninstall process. Choose Yes when prompted to continue.

Step 5: Select the Java version you want to uninstall and click Next. Confirm by pressing Yes in the pop-up.

Step 6: Press Yes when asked to remove the Java Deployment Cache.
Note: It helps you free up some space on your device.

Step 7: The JVM is now uninstalled. Now, to reinstall the Java Virtual Machine, click the Get Java button.

Step 8: Download and install the Java files.
Method 7: Install Java in a Windows Clean Boot State
Performing a clean boot on your Windows PC might be the hidden key to unlocking a smooth Java experience. A clean boot temporarily disables non-essential programs and services, creating a pristine environment for software installation.
This can help isolate if conflicting background processes hinder Java’s installation or launch. To do so, open your Windows device in a clean boot state and install the Java Virtual Machine.
Get JVM Up and Running
Java is a widely used programming language. It works on many different operating systems and devices. The Java Virtual Machine is a program that runs Java code. If there’s an issue with the data or code being processed by the JVM, you might see a Java virtual machine launcher error. We hope the methods above helped you fix the Java Virtual Machine error.
The above is the detailed content of 7 Ways to Fix Java Virtual Machine Launcher Error on Windows. For more information, please follow other related articles on the PHP Chinese website!

 The Framework Desktop Might Be The Coolest Tiny PC I've SeenMar 01, 2025 am 03:04 AM
Framework Desktop: The Good, the Bad, and the Unexpected The Framework Desktop, a compact PC emphasizing upgradability, largely delivers on its promise. iFixit's teardown reveals a design prioritizing standard components, making future upgrades sign
 PowerToys Is the Ultimate Work From Home Companion AppMar 03, 2025 am 10:07 AM
PowerToys: Supercharge Your Windows Work-From-Home Experience Working from home presents unique productivity challenges. Distractions abound, demanding a focused workspace. PowerToys helps optimize your home office, whether it's a dedicated space or
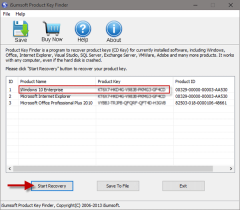 How to Find the Product Key for Windows 10Mar 04, 2025 am 01:46 AM
Retrieve lost Windows 10 product key: Two ways Have you lost your product key after installing genuine Windows 10? Don't worry, this article will introduce two ways to retrieve your keys so that you can reinstall the system in the future. Case 1: Windows 10 is installed but the key is lost Even if you get Windows 10 through a free upgrade or genuine installation, you can easily find the product key using the iSumsoft Product Key Finder as long as your computer works properly. Method 1: Use iSumsoft Product Key Finder Download and install: Download and install iSumsoft Product Key Finder to your computer. Find the product key: Start
 How to Install Windows 11 23H2 on Unsupported PCMar 03, 2025 pm 12:55 PM
In the second half of 2023, Microsoft released the Windows 11 23H2 system. Many users can't wait to upgrade their computer to the latest version, but some users encountered the error message "This computer does not meet the minimum requirements..." when trying to install Windows 11 23H2 on an unsupported computer. don’t worry! This article will provide a step-by-step guide to how to install Windows 11 23H2 on an unsupported computer. Let's get started! Note: Microsoft said, "Installing Windows 11 on unsupported computers is not recommended. If you choose to install Windows 11 on hardware that does not qualify, you should risk compatibility issues." allow
 ASUS Zenbook S 14 (2024) Review: Iterative Refinement of a Premium UltraportableMar 01, 2025 am 06:01 AM
The 2024 ASUS Zenbook S 14: A Top-Tier MacBook Air Competitor The ASUS Zenbook S 14 (2024) emerges as a leading Windows alternative to Apple's MacBook Air, boasting significant upgrades. This refined ultraportable retains its lightweight design and
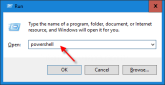 How to Change the Font and Layout of PowerShell WindowMar 03, 2025 pm 01:03 PM
Enhance your Windows 10 PowerShell experience with these simple customization steps! This guide shows you how to adjust PowerShell fonts and enable automatic text wrapping for improved readability and optimal window fitting. Let's get started: Step 1
 Top 3 Windows 11 Gaming Features That Outshine Windows 10Mar 16, 2025 am 12:17 AM
Upgrade to Windows 11: Enhance Your PC Gaming Experience Windows 11 offers exciting new gaming features that significantly improve your PC gaming experience. This upgrade is worth considering for any PC gamer moving from Windows 10. Auto HDR: Eleva
 The Best Ergonomic Keyboards of 2025Mar 03, 2025 am 10:02 AM
Recommended Best Ergonomic Keyboards in 2025 Ergonomic keyboards function the same as regular keyboards, but add support to reduce stress on wrists, hands and fingers. These keyboards are designed to keep your hands and wrists in a more natural position, helping to minimize muscle strain and prevent potential damage from prolonged typing. There are a wide variety of ergonomic keyboards available on the market, so be sure to consider which features are most important to you before purchasing. From layout to design, each type offers unique benefits based on your preferences and needs. Most ergonomic keyboards fall into two categories. The first category is the split keyboard, which, as the name suggests, divides the key layout into two parts for a more natural wrist posture. There are two types of split keyboards:


Hot AI Tools

Undresser.AI Undress
AI-powered app for creating realistic nude photos

AI Clothes Remover
Online AI tool for removing clothes from photos.

Undress AI Tool
Undress images for free

Clothoff.io
AI clothes remover

AI Hentai Generator
Generate AI Hentai for free.

Hot Article
Hot Tools

SublimeText3 Chinese version
Chinese version, very easy to use

SublimeText3 Mac version
God-level code editing software (SublimeText3)

MantisBT
Mantis is an easy-to-deploy web-based defect tracking tool designed to aid in product defect tracking. It requires PHP, MySQL and a web server. Check out our demo and hosting services.

Dreamweaver CS6
Visual web development tools

DVWA
Damn Vulnerable Web App (DVWA) is a PHP/MySQL web application that is very vulnerable. Its main goals are to be an aid for security professionals to test their skills and tools in a legal environment, to help web developers better understand the process of securing web applications, and to help teachers/students teach/learn in a classroom environment Web application security. The goal of DVWA is to practice some of the most common web vulnerabilities through a simple and straightforward interface, with varying degrees of difficulty. Please note that this software

