

 Mobile Game TutorialMobile Game GuideDestiny 2 A Rising Chorus Act 3 walkthrough: All steps, explained
While the future of Bungie developers might not include Destiny 2 thanks to Sony’s restructuring of certain people, the post-Final Shape story is still trucking along. We will update this week by week to give you the best Destiny 2 A Rising Chorus Act 3 walkthrough, detailing all the steps and side quests you need to complete.
Table of contents
- A Resounding Truth
- Step 1 — Defeat the Conductor’s forces in the Exotic mission Encore
- Steps 2 & 3 — Meet with Ikora in the H.E.L.M, then speak with Failsafe
- Step 4 — Find the stolen Golden Age component on Nessus
- Golden Age Component #1
- Golden Age Component #2
- Golden Age Component #3
- Golden Age Component #4
- Golden Age Component #5
- Steps 5 & 6 — Upgrade Failsafe in the H.E.L.M.
- Step 7 — Help Failsafe research specimen NES007 and discover its secrets
- NES007: Step 1 — Defeat Vex with Solar damage
- NES007: Step 2 — Secure the data Failsafe needs
- NES007: Step 3 — Rapidly defeat Vex to acquire a large sampling of their CPUs
- NES007: Steps 3 & 4 — Speak with Failsafe in the H.E.L.M. to review her report and display the specimen in your collection
- Step 8 — Visit the holoprojector in the H.E.L.M.
- Steps 9 & 10 — Visit the holoprojector in the H.E.L.M. and speak to Saint-14
- Step 11 — Recover the Exo data from the Lost Sector on Europa
- Step 12 — Locate the consciousness driver on Europa
- Step 13 — Destroy the Conductor’s Choral Mind in the Exotic Mission Encore
- Step 14 — Visit the holoprojector in the H.E.L.M.
- Steps 15 & 16 — Visit the holoprojector in the H.E.L.M.
- Step 17 — Search the Neomuna Veil Containment terminals
- Step 18 — Install a network relay for Failsafe to boost her connection
- Step 19 — Stop the Conductors plans by destroying the Choral Mind in Exotic mission Encore
- Step 20 — Confront the Conductor
- Steps 21 & 22 — Speak with Failsafe and Saint-14 in the H.E.L.M.
A Resounding Truth
Our first quest line takes us to the everpresent H.E.L.M. location to speak to Failsafe about a new update regarding the big bad of this story, Maya Sundaresh. An interesting cinematic will play, showing the reasoning behind Maya’s sudden transformation.
Once it’s over, speak to Failsafe again and she instructs you to return to the last place you were in Nessus’ core and continue further into the planet. This coincides with the brand-new exotic quest Encore, which just so happens to be our first step in the story quest.
Step 1 — Defeat the Conductor’s forces in the Exotic mission Encore

For our first step, you must launch and complete the new Exotic quest Encore from the H.E.L.M. If you need help getting through the fairly long and arduous mission, we’ve got a great Encore Exotic mission guide just for you.
However, it should be mentioned that if you have not completed Act 1 and Act 2 of A Rising Chorus, you will not be able to start the new Exotic quest or receive the weapon if you join a friend who has the mission unlocked.
Once you complete this mission, not only will you get the new Exotic auto-rifle Choir of One, but your next step of the weekly quest will appear.
Steps 2 & 3 — Meet with Ikora in the H.E.L.M, then speak with Failsafe
Upon returning to the H.E.L.M., Ikora speaks to you about the reasoning for all of this, and what Maya truly wants to accomplish. She leaves you with a lot of questions, and a large AI in the middle of the room to talk to.
Interact with Failsafe, and she expresses her excitement in locating the specific coordinates of the Conductor’s base. In order to help Failsafe with this task, you need to bring her a piece of Golden Age tech, and she just so happens to know where you might find it.
Step 4 — Find the stolen Golden Age component on Nessus

There are a total of 5 Golden Age tech pieces located in The Rift lost sector on Nessus. Teleport to the Exodus Black landing zone on Nessus, and from here, go left towards the wall and you should see the entrance to the lost sector in front of a fuselage on the ground.
Once you get inside, follow the markers until you reach the last area where you’ll find the boss. You can take care of the enemies first, as it will make collecting the tech that much easier.
Golden Age Component #1

The first chest and by far the easiest one to find, is located above the lost sector chest. Simply jump up to the platform and interact with it to grab your first Golden Age Component.
Golden Age Component #2

Our second component is found slightly in front of the lost sector chest in a crate if you’re looking from the start of the room. Head to the left side of the arena and you should see a rectangular box with an opening. Enter the crate and you’ll have your second Golden Age Component.
Golden Age Component #3

Our third piece of tech is found over on the right side of the arena right next to the wall. It should be about midway across the wall, right on the other side of a large object. Interact with it and we are more than halfway done finding the components.
Golden Age Component #4

Immediately from where you found the third component, head straight to the back of the wall. You should see the fourth chest on the right back side of the arena.
Golden Age Component #5

After you snag the fourth piece of tech, turn around looking towards the entrance to the arena, and you should see a raised platform to the right of where you found the third component. Jump up to the second area and inside a room is our final Golden Age Component.
Steps 5 & 6 — Upgrade Failsafe in the H.E.L.M.
Travel back to the H.E.L.M. and interact with Failsafe to upgrade their systems to version 3.0. She gives you a perfected Radiolite Sampler and asks you to complete the latest NES00 quest to progress the story.
Step 7 — Help Failsafe research specimen NES007 and discover its secrets
The next step of A Rising Chorus Act 3 requires you to complete the NES007 side quest, and this might take some time.
NES007: Step 1 — Defeat Vex with Solar damage

Our first stop on the specimen express requires you to defeat 100 Vex with Solar damage. This can be completed anywhere in Destiny 2 but there are a few options that expedite this process.
The Arena Breach Executable activity spawns a decent amount of Vex, and you can gather a ton of new Radiolite along the way. However, there are other types of enemies, so you most likely won’t complete this step on your first go around.
Alternatively, if you travel to Artifact’s Edge landing zone on Nessus, you can enter the Orrery Lost Sector which boasts a plethora of Vex to take care of. Take out as many vex as you can without defeating the boss, and then teleport back to the landing zone and head back to the Lost Sector to respawn the Vex. This helped me complete this mission step in no time and is a good place to keep in mind for a later step.
NES007: Step 2 — Secure the data Failsafe needs
Once you’ve melted enough Vex with Solar, our next step asks us to grab Extracted Data and defeat Vex bosses from the Arena Breach Executable activity. While you can complete this by performing other seasonal activities, I chose the Breach Executable activity since you can easily complete this step in one run alone.
NES007: Step 3 — Rapidly defeat Vex to acquire a large sampling of their CPUs

Next up on our fetch quest of the week, we must rapidly defeat Vex in order to progress the quest. Similar to the first step of this sidequest, I chose to head back to the Orrery Lost Sector, slapped on a machine gun and the new Exotic weapon, and went to town. If you optimize these kills, you should get through this step in one or two runs of the lost sector.
NES007: Steps 3 & 4 — Speak with Failsafe in the H.E.L.M. to review her report and display the specimen in your collection
With all those steps complete and out of the way you can return to the H.E.L.M. to speak with Failsafe, who gives you the seventh specimen and asks you to place it in your display behind her.
Step 8 — Visit the holoprojector in the H.E.L.M.

Return once again to Failsafe and interact with her to listen to a message from Saint-14. He goes into detail about how he feels about his whole situation in regard to the Conductor. Furthermore, he tells you that Failsafe is hard at work researching all the readings you provided from the core of Nessus.
Steps 9 & 10 — Visit the holoprojector in the H.E.L.M. and speak to Saint-14
After due time (or a few seconds depending on your date of play), Saint-14 calls you to the H.E.L.M. to speak about the Conductor once again.
Saint explains that he and Osiris are cooking up ways to defeat the corrupted copy of Maya Sundaresh with our brains instead of just brawn. To this note, they require some Exo data from a certain lost sector on Europa.
Step 11 — Recover the Exo data from the Lost Sector on Europa

For our first step of week 2, open the Destinations tab, select Europa, and fast travel to the Eventide Ruins landing zone. The lost sector we’re aiming for is Perdition, so when you spawn in head south on your Sparrow. You can get some extra help by tracking the mission and following the objective marker on your screen.
There’s nothing in particular you need to do in the area, simply finish the lost sector by beating the boss at the end and claiming the loot chest.
Step 12 — Locate the consciousness driver on Europa

Finishing the lost sector and grabbing the Exo data triggers Failsafe, asking you to grab a consciousness driver from Bray Exoscience on Europa. The easiest and fastest way to get there is by heading back out of the lost sector and taking your sparrow west to the building. This part requires you to use a proximity sensor to find the location of the driver, but we have an easier way.

As soon as you enter through the doors, make a right and head up the stairs into the small room on the second floor. Take care of the enemies in here, and behind a vending machine on the right side of the second room, is our driver.
Step 13 — Destroy the Conductor’s Choral Mind in the Exotic Mission Encore
Finally, for the last real step of Destiny 2 A Rising Chorus Act 3 week 2, we must once again complete the new Exotic mission Encore. There’s nothing different about the mission this time, save for a few extra mobs. Your main task is to complete the mission the exact same way you did last week. The only difference is when you reach Maya’s study room before the final boss, we hear another memory of her and a clone of her wife.
Once the final boss of the mission is completed, you’ll get all the great rewards as well as the next step for the story quest.
Step 14 — Visit the holoprojector in the H.E.L.M.

Head back to the H.E.L.M. and you find another caller on the holoprojector, this time it’s Osiris. It’s pretty much more story exposition about him and Saint-14, wishing he didn’t have to know the true horrors of the Conductor because it reminds Osiris of himself. Before he ends the call, he reminds you to remember what kind of monster you’re up against and to be prepared.
Steps 15 & 16 — Visit the holoprojector in the H.E.L.M.
If you happen to have waited until the third week of story content you simply need to interact with the holoprojector yet again and listen to Ikora explain the rundown of the Conductor once again. Except this time, Ikora tells us that it all ends here, as we go to face off against the Conductor (but not really).
Step 17 — Search the Neomuna Veil Containment terminals
Before we get to hop into our favorite Exotic quest for a third week in a row, we need to find the “true” Chioma by interacting with one of the terminals on Neomuna in the room above where we fought Calus for the last time.

Head to Destinations, select Neomuna and travel to the Veil Containment quest all the way on the left side of the map. While you do have a radar, when you spawn the terminal in question should be located a few feet in front of you to the left.
Step 18 — Install a network relay for Failsafe to boost her connection

Listen to Failsafe’s dialogue after you scan the terminal, then teleport over to the Liming Harbor landing zone and make your way to Ahimsa Park. Upon arriving in the area, keep towards the left wall until you reach an entry to the vex network.
In front of the teleporter, you should see the same icon that was above the terminal you previously scanned. Interact with it to place the network relay, and Failsafe now has a backdoor into the Vex network, in case anything goes awry this time around.
Step 19 — Stop the Conductors plans by destroying the Choral Mind in Exotic mission Encore
Next, we must once again head back into the exotic mission Encore for the third week in a row and complete it in the exact same way. There are a few new enemies, such as Cabal champions influenced by the Conductor, but short of that and some extra heavy ammo in the final boss, you should be fairly familiar with this quest by this point.
Step 20 — Confront the Conductor

Finally, after weeks and months of waiting for the final showdown with the first big villain since The Witness. And sadly, all we get is a cutscene that plays after you complete the exotic mission. The Conductor goes down and gets swallowed into the Vex network, lurking for its next opportunity.
Steps 21 & 22 — Speak with Failsafe and Saint-14 in the H.E.L.M.
Head back to the H.E.L.M. and you can recap the last few months with Failsafe, as she celebrates the bittersweet end of your partnership. After discussing it with her, head behind her where Saint-14 gives his own spiel about what it means to “be” and how he is happy with who he is now.
The end of the first Episode in Destiny history was a bit of a fizzle, but overall it looks as if Bungie has an idea for the direction they want to take Destiny 2 in the coming years. We must now wait until October 2024 to get the next fix of story content. In the meantime, if playing with Solar weapons for the week 1 quest was enticing, then our Solar Warlock builds might be right up your alley.
The above is the detailed content of Destiny 2 A Rising Chorus Act 3 walkthrough: All steps, explained. For more information, please follow other related articles on the PHP Chinese website!

 R.E.P.O. Energy Crystals Explained and What They Do (Yellow Crystal)Mar 18, 2025 am 12:07 AM
I bought expensive weapons or drones in R.E.P.O. but found that the energy was exhausted and became useless? Don't worry, you don't have to spend $50,000 on replacements, just charge your gear! That strange machine at the back of your truck is not a decoration. Here are how to get energy crystals and use them to keep your gear running continuously to avoid bankruptcy. More Reads: All R.E.P.O. Items How to get energy crystal You can buy energy crystals from the service store between levels. They usually cost between $7,000 and $9,000 — while expensive, they are far cheaper than repurchasing gear. In the first few levels, no purchase is required. You don't need them for the time being, so
 Repo: How To Revive TeammatesMar 04, 2025 am 02:44 AM
In the terrifying co-op horror game, R.E.P.O, you and your friends must gather loot and extract valuables. Navigating the creepy corridors and shadowy rooms is perilous, with lurking enemies and horrors around every corner. (Or, let's be honest, so
 Hello Kitty Island Adventure: How To Get Giant SeedsMar 05, 2025 am 04:03 AM
Explore the enchanting Merry Meadows in Hello Kitty Island Adventure! This guide reveals the secrets to unlocking and utilizing Giant Seeds to reach new heights in this delightful game. Friendship Island initially offers five zones, but three more u
 How Long Does It Take To Beat Split Fiction?Mar 07, 2025 am 04:16 AM
Detailed explanation of the game duration of "Split Fiction": main line, branch line and 100% completion Like Hazelight Studio's previous works, Split Fiction is a relatively linear game, but it also contains some extra interesting content. There are some side stories, optional dialogues and easter eggs in the game, but there are not many elements to collect. Although the level is long and includes multiple mechanisms and boss battles, it still takes a considerable time to complete "Split Fiction", especially to achieve 100% completion. The following is a detailed analysis of the game duration: The main plot duration In the case of two-player game (the player level is comparable), it takes about 12 hours to pass the main plot. But this game is more suitable
 Two Point Museum: All Exhibits And Where To Find ThemMar 05, 2025 am 01:02 AM
Two Point Museum: A Comprehensive Guide to Exhibit Discovery Embark on exciting expeditions across various locations in Two Point Museum to unearth a wealth of curiosities for your museums. This guide details how to plan expeditions, manage your fin
 R.E.P.O. Best Graphic SettingsMar 18, 2025 am 01:33 AM
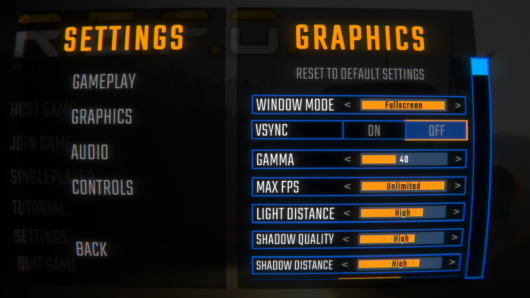
R.E.P.O. Game Screen Setting Guide: How to improve frame rate while ensuring picture quality? This article will guide you to optimize game settings and find the best balance point. Step 1: Full Screen Mode and Frame Rate Adjustment Before adjusting other settings, make sure the game is running in the best mode: Display Mode: Full Screen - Always use Full Screen Mode for optimal performance. Window mode will reduce the frame rate. Vertical Sync (V-Sync): Off - Unless a screen tear occurs, turn off vertical synchronization for a smoother gaming experience. Maximum FPS: Unlimited - If your computer is configured strongly, you can set it to Unlimited. Otherwise, it is recommended to limit it to 60 frames or match your monitor refresh rate. second
 R.E.P.O. How to Fix Audio if You Can't Hear AnyoneMar 17, 2025 pm 06:10 PM
Can't hear other players' voices in the R.E.P.O. game? Even if your microphone is working properly, it can be a problem caused by audio settings or device conflicts. Here are some effective solutions to help you restore your voice chat functionality. 1. Check the output device Open the audio settings of R.E.P.O. and check the output device settings. If set to "Default", manually select your headset or speaker. Restart the game and test voice chat again. 2. Adjust Windows sound settings If R.E.P.O. does not output the sound to the correct device, check the Windows Sound Settings: Right-click the speaker icon in the taskbar and select Sound Settings. Under "Output",
 Suikoden 1 HD Remaster: How To Win The Duel With General TeoMar 06, 2025 pm 06:03 PM
In "Awakening 1&2 HD Remake", some seemingly invincible boss battles can actually be won, and the duel between General Theo and Paine is the best example. In difficult and difficult terms, this battle is very tricky, and you might think that Paine will definitely die. But that's not the case. This guide will explain in detail the key duel: the timing of the duel, the best equipment of Paine, the conditions to be met before the battle, and General Theo's action prediction to help you defeat him. Paine recommended levels and equipment First, go to the Emperor Garden to sharpen Paine's claws to level 12 (the highest level in this stage of the game). Then, equip ninja suits, headdresses and two bodyguard rings (available at Antai’s Armory). Finally, Paine's level should be higher than level 30, at least level 30, the closer it is to 35


Hot AI Tools

Undresser.AI Undress
AI-powered app for creating realistic nude photos

AI Clothes Remover
Online AI tool for removing clothes from photos.

Undress AI Tool
Undress images for free

Clothoff.io
AI clothes remover

AI Hentai Generator
Generate AI Hentai for free.

Hot Article
Hot Tools

mPDF
mPDF is a PHP library that can generate PDF files from UTF-8 encoded HTML. The original author, Ian Back, wrote mPDF to output PDF files "on the fly" from his website and handle different languages. It is slower than original scripts like HTML2FPDF and produces larger files when using Unicode fonts, but supports CSS styles etc. and has a lot of enhancements. Supports almost all languages, including RTL (Arabic and Hebrew) and CJK (Chinese, Japanese and Korean). Supports nested block-level elements (such as P, DIV),

SublimeText3 English version
Recommended: Win version, supports code prompts!

Dreamweaver Mac version
Visual web development tools

Atom editor mac version download
The most popular open source editor

Zend Studio 13.0.1
Powerful PHP integrated development environment

