

 Web Front-endCSS TutorialComplete Guide to Learning HTML, CSS, and JavaScript with Replit to Create a Simple WebGIS Using MapTiler
Introduction
Starting the journey of learning webGIS programming can be a challenge, especially if we are new to the world of HTML, CSS, and JavaScript. Fortunately, with tools like Replit, we can start learning in a simple and direct way. This article will walk you through the basic steps to create a simple WebGIS application using MapTiler. With this tutorial, we will learn how to create interactive maps that can be accessed from anywhere, just by using our browser.
Step 1. Create an Account and Project on Replit
1. Sign up for Replit:
- Open Relplit
- Click the "Sign Up" button in the top right corner.
- Select the desired registration method (Google, GitHub, or email).
- After successful registration, we will be directed to the Replit dashboard.


2. Creating a New Project:
- In the Replit dashboard, click the "Create Repl" button.
- In the Templates section, select "HTML, CSS, JS".
- Give our project a name, for example "WebGIS-Simple".
- Click "Create Repl" to create a project. Once the project is created, we will see three main files: index.html, style.css, and script.js. These files will be used to build our web page.

Step 2: Setting Up the HTML Structure
1. Understanding Basic HTML Structure:
- Open the index.html file in Replit.
- index.html is a file that determines the structure and basic content of our web page.
2. Adding Elements for Map:
- Replace the contents of index.html with the following code:
    <meta charset="UTF-8">
    <meta name="viewport" content="width=device-width, initial-scale=1.0">
    <title>WebGIS Sederhana</title>
    <link rel="stylesheet" href="style.css">
    <script src="https://unpkg.com/maplibre-gl/dist/maplibre-gl.js"></script>
    <link href="https://unpkg.com/maplibre-gl/dist/maplibre-gl.css" rel="stylesheet">


    <h1 id="WebGIS-Sederhana-Menggunakan-MapTiler">WebGIS Sederhana Menggunakan MapTiler</h1>
    <div id="map"></div>
    <script src="script.js"></script>
Explanation:
-
: Displays the page title.
-
: The place where the map will be displayed.
- Maplibre GL: Used to display maps from MapTiler.
Step 3: Adding Styles with CSS
1. Added CSS for Map View:
- Open the style.css file.
- Replace the contents of the style.css file with the following code:
body, html {
  margin: 0;
  padding: 0;
  height: 100%;
  font-family: Arial, sans-serif;
}

#map {
  width: 100%;
  height: 500px;
  margin-top: 20px;
}

h1 {
  text-align: center;
  color: #333;
}
Explanation:
- body, html: Set margins and padding so the map can use the entire screen.
- #map: Sets the map size to full width and 500px height.
- h1: Sets the title display in the middle of the page.
Note: this style section can be adjusted according to your own design and needs by looking at the style code here W3 Schools
Step 4: Integrating MapTiler with JavaScript
1. Getting API Key from MapTiler
- Open MapTiler.
- Click "Sign Up" in the top right corner.
- Fill in the registration form with email or register using a Google account.
- After registering, we will be taken to the MapTiler dashboard.
2. Get API Key:
- In the MapTiler dashboard, click on the "API keys" tab.
- You will see the default API key provided by MapTiler.
- If you want to create a new API key, click the "Create a new key" button.
- Give the new API key a name, for example "WebGIS-Simple", and click "Create".
- Copy the API key we just created. This API key will be used to access the map in our project.
3. Creating an Interactive Map:
- Open the script.js file.
- Add the following code into script.js:
const map = new maplibregl.Map({
  container: 'map', // ID dari elemen div tempat peta akan dirender
  style: 'https://api.maptiler.com/maps/basic/style.json?key=YOUR_MAPTILER_API_KEY', // URL ke gaya peta dari MapTiler dan bagian API KEY masukan API KEY anda
  center: [106.8272, -6.1751], // Koordinat pusat peta (Jakarta)
  zoom: 10 // Level zoom peta
});
Explanation:
- container: Mengacu pada elemen dengan id map di index.html.
- style: URL ke gaya peta dari MapTiler. Gantilah YOUR_MAPTILER_API_KEY dengan API key Anda.
- center: Koordinat geografis pusat peta (Jakarta).
- zoom: Level zoom awal dari peta.
- Jika ingin menambahkan marker pada peta, tambahkan kode berikut di bawah inisialisasi peta.
- Marker akan ditampilkan pada koordinat yang ditentukan.
4. Menambahkan Marker pada Peta (Opsional):
const marker = new maplibregl.Marker()
  .setLngLat([106.8272, -6.1751]) // Koordinat Jakarta
  .addTo(map);
Langkah 5: Menjalankan dan Menguji Proyek
1. Menjalankan Proyek:
- Setelah kita selesai menulis kode, klik tombol "Run" di Replit. Replit akan membuka halaman web yang berisi peta yang sudah kita buat. Mengamati Hasilnya:
- Peta interaktif dari MapTiler akan ditampilkan di halaman web.
- kita bisa memperbesar, memperkecil, dan menggeser peta untuk melihat berbagai bagian.
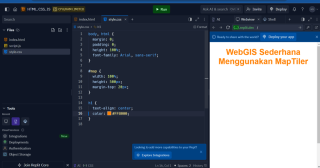
Berikut Adalah Hasil Replit yang sudah kita buat:
Kita telah menyelesaikan proyek WebGIS sederhana ini dan bisa dilihat hasilnya di tautan berikut ini Source WebGIS Sederhana.
Proyek ini menunjukkan bagaimana menggunakan HTML, CSS, JavaScript, dan API MapTiler untuk membangun aplikasi WebGIS sederhana. Anda bisa mencoba sendiri atau menjadikan ini sebagai dasar untuk proyek yang lebih kompleks.
Dengan mengikuti langkah-langkah ini, kita telah berhasil membuat aplikasi WebGIS sederhana menggunakan Replit dan MapTiler. Panduan ini dirancang untuk pemula agar bisa memahami dasar-dasar pengembangan web dengan HTML, CSS, dan JavaScript sambil belajar membuat peta interaktif.
Semangat dan Terima kasih, semoga bermanfaat !


The above is the detailed content of Complete Guide to Learning HTML, CSS, and JavaScript with Replit to Create a Simple WebGIS Using MapTiler. For more information, please follow other related articles on the PHP Chinese website!

 Weekly Platform News: Web Apps in Galaxy Store, Tappable Stories, CSS SubgridApr 14, 2025 am 11:20 AM
In this week's roundup: Firefox gains locksmith-like powers, Samsung's Galaxy Store starts supporting Progressive Web Apps, CSS Subgrid is shipping in Firefox
 Weekly Platform News: Internet Explorer Mode, Speed Report in Search Console, Restricting Notification PromptsApr 14, 2025 am 11:15 AM
In this week's roundup: Internet Explorer finds its way into Edge, Google Search Console touts a new speed report, and Firefox gives Facebook's notification
 The Power (and Fun) of Scope with CSS Custom PropertiesApr 14, 2025 am 11:11 AM
You’re probably already at least a little familiar with CSS variables. If not, here’s a two-second overview: they are really called custom properties, you set
 We Are ProgrammersApr 14, 2025 am 11:04 AM
Building websites is programming. Writing HTML and CSS is programming. I am a programmer, and if you're here, reading CSS-Tricks, chances are you're a
 How Do You Remove Unused CSS From a Site?Apr 14, 2025 am 10:59 AM
Here's what I'd like you to know upfront: this is a hard problem. If you've landed here because you're hoping to be pointed at a tool you can run that tells
 An Introduction to the Picture-in-Picture Web APIApr 14, 2025 am 10:57 AM
Picture-in-Picture made its first appearance on the web in the Safari browser with the release of macOS Sierra in 2016. It made it possible for a user to pop
 Ways to Organize and Prepare Images for a Blur-Up Effect Using GatsbyApr 14, 2025 am 10:56 AM
Gatsby does a great job processing and handling images. For example, it helps you save time with image optimization because you don’t have to manually
 Oh Hey, Padding Percentage is Based on the Parent Element's WidthApr 14, 2025 am 10:55 AM
I learned something about percentage-based (%) padding today that I had totally wrong in my head! I always thought that percentage padding was based on the


Hot AI Tools

Undresser.AI Undress
AI-powered app for creating realistic nude photos

AI Clothes Remover
Online AI tool for removing clothes from photos.

Undress AI Tool
Undress images for free

Clothoff.io
AI clothes remover

AI Hentai Generator
Generate AI Hentai for free.

Hot Article
Hot Tools

SublimeText3 Chinese version
Chinese version, very easy to use

SublimeText3 Mac version
God-level code editing software (SublimeText3)

SecLists
SecLists is the ultimate security tester's companion. It is a collection of various types of lists that are frequently used during security assessments, all in one place. SecLists helps make security testing more efficient and productive by conveniently providing all the lists a security tester might need. List types include usernames, passwords, URLs, fuzzing payloads, sensitive data patterns, web shells, and more. The tester can simply pull this repository onto a new test machine and he will have access to every type of list he needs.

Dreamweaver Mac version
Visual web development tools

PhpStorm Mac version
The latest (2018.2.1) professional PHP integrated development tool

