


How to connect the 6.5mm audio plug? This problem troubles many audiophiles. PHP editor Xinyi will analyze the wiring principles of the 6.5mm audio plug for you in a simple and easy-to-understand way, and guide you to easily complete DIY wiring. Read on to learn more about how to connect the 6.5mm audio plug to unlock a high-quality audio experience.

1. How to connect the 6.5mm audio plug?
First of all, the microphone is mono. The two-channel connector is meaningless. Just use the mono one. The connection method is the phantom power terminal: terminal 2 is connected to the signal (usually the red wire), terminal 3 Connect the negative electrode of the signal (usually a white wire), and connect one end to the ground (a bare copper wire with a shielding layer);
6.5 plug end: The middle terminal is connected to the positive electrode of the signal (usually a red wire), and the other end is connected to the negative electrode of the signal (white wire) ) and the ground wire (bare copper wire) are twisted together and connected to the welding terminal of the plug shell.
2. What is the 6.5mm audio plug?
6.5mm is a balanced line, a three-dimensional interface, the anti-shielding effect is better than 6.35mm, suitable for long lines; headphone plugs and jacks are usually also used in professional or broadcast equipment, this time it is a two-wire structure (divided into signal and ground) used to transmit mono signals; sometimes a three-wire structure (divided into positive pole, negative pole and shielding) is used to transmit mono signals in a balanced manner;
3. Usually in our lives The most common one is a small headphone terminal with a diameter of 1/8 inch (3.5mm), which is what we often see on Walkmans. It is functionally the same as a standard headphone terminal and is mostly used in portable equipment for stereo signal transmission.
3. How to connect the audio plug?
The audio plug needs to be answered on a case-by-case basis. 1. If it is a 3.5mm headphone jack plug, plug it directly into the audio output port or the audio input port of the speaker. 2. If it is a 6.35mm audio interface plug, you need to use a converter or a dedicated audio port to convert the plug into an audio interface that can be plugged into a speaker or computer, and then plug it in. In general, there are many different types of audio plug interfaces. It is necessary to clarify the interface type first, and then carry out corresponding interface processing according to the needs and equipment conditions.
4. What is the role of 6.5mm audio?
1.6.5mm plugs are generally used in high-power output equipment such as speakers, subwoofers, microphones, mixers, etc.
2. The audio system probably includes power amplifiers, peripheral equipment (including compressors, effectors, equalizers, VCDs, DVDs, etc.), speakers (speakers, speakers), mixers, microphones, display equipment, etc. plus Get up a set. Among them, speakers are sound output devices, speakers, subwoofers, etc. A speaker box includes three types of speakers: high, low and medium. Three but not necessarily three.
5. How to connect the audio 4-wire plug?
The audio output is connected to the audio input, and the video output is connected to the video input
6. How to connect the computer host audio to the speaker
How to connect the computer host audio to the speaker
For For many computer users, using computers as entertainment devices at home has become a norm. To get a better sound quality experience, connecting the computer host to the sound system is a crucial step. However, many people may encounter the problem of how to connect the computer host audio to the speakers. In this article, we will introduce several common connection methods to help you achieve high-quality audio output.
Use an audio cable to connect
The easiest way is to use an audio cable to connect the computer host and the speaker. All you need is a 3.5mm audio cable (sometimes called a headphone cable) to connect. First, find the audio output interface on the back of the computer host, which is usually a green round hole. Then plug one end into the audio output interface of the computer host, and the other end into the audio input interface of the stereo, usually a red and white interface. After the connection is completed, you can play the sound from the computer through the speakers.
Use HDMI connection
If your computer host and speakers support HDMI interface, then using HDMI connection is also a good choice. Through the HDMI interface, not only high-definition video signals can be transmitted, but also high-quality audio signals can be transmitted. You only need one HDMI cable to connect the computer host and speakers. Plug one end into the HDMI output interface of the computer host, the other end into the HDMI input interface of the speaker, and then select HDMI as the audio input source through the speaker.
Use a wireless connection
In addition to wired connections, you can also consider using wireless connections to connect your computer host and speakers. One common way to connect wirelessly is through Bluetooth. If your computer host and speakers both support Bluetooth, connecting via Bluetooth is very simple. Just set both the computer host and the speaker to be searchable by Bluetooth, and then connect to the speaker in the computer. This wireless connection method is not only convenient, but also better avoids the tangle of cables.
Use audio interface to connect
Some audio equipment is also equipped with USB or other types of audio interfaces, which can be directly connected to the computer host. This connection method usually provides more stable sound quality output. You only need a corresponding audio connection cable to connect the audio interface of the speaker to the corresponding interface of the computer host. The advantage of this connection method is the stability of signal transmission and the fidelity of sound quality.
요약
어떤 연결 방식을 사용하든 연결 안정성과 신호 전송 품질 유지에 주의해야 합니다. 올바른 연결 방법을 선택하면 더 나은 오디오 경험을 얻을 수 있어 집에서 고품질 음악, 영화, 게임 음향 효과를 즐길 수 있습니다. 이 기사가 컴퓨터 호스트 오디오를 스피커에 연결하는 방법의 문제를 해결하는 데 도움이 되기를 바랍니다.
7단 또는 4단 오디오 플러그를 어떻게 연결하나요?
4섹션 오디오 플러그 배선 방법:
1. 지하 스피커 연결(오디오 및 비디오 프로젝트에서는 디지털 장비가 아날로그 장비에 영향을 미치지 않도록 멀리 설치해야 합니다. 오디오의 경우 복합 주파수 부분의 영향이 하울링 및 노이즈로 나타납니다.
2. 접지 스피커를 연결합니다(디지털 접지와 아날로그 접지는 각각 섀시 접지에 연결해야 합니다. 일반적으로 신호 접지와 차폐 접지는 함께 연결할 수 없습니다).
3. 스피커 간격을 조정합니다. (디지털 전원 접지와 아날로그 전원 접지는 근처에서 서로 연결할 수 없습니다. 별도로 연결한 후 접지해야 합니다.)
4. 스피커 사이의 간격을 수정했습니다(매트릭스가 서로 다른 입력 및 출력 장치에 연결된 경우 전체 시스템이 접지를 공유해야 합니다. 장치 간의 접지 전위 차이를 방지하려면 전체 오디오 및 비디오 시스템이 제대로 작동하지 않음).
5. 라인 어레이 오디오 설치가 완료되었습니다. (매트릭스 스위처는 고충실도 신호 전달 및 스위칭 장치입니다. 신호 감쇠 및 증폭 기능이 없습니다. 신호를 감쇠하거나 증폭해야 하는 경우,
8. 스피커 뒷면의 6.5mm 오디오 커넥터와 XLR 커넥터 중 어느 것이 더 좋은가요?
일반적으로 XLR 커넥터는 무엇입니까? 예를 들어 악기 스피커(기타 스피커 등)에는 6.5mm 악기 인터페이스만 사용할 수 있지만 앰프를 스피커에 연결하면 밸런스드 인터페이스가 더 좋습니다. 인터페이스가 오디오 인터페이스보다 좋습니다
9. 컴퓨터 HDAUDIO 오디오 플러그를 3.5 오디오 플러그로 변환하는 방법
오디오 출력이 자체 디지털 오디오 출력인 경우에도 마찬가지입니다. 만들어진 오디오 케이블은 범용 인터페이스를 가지고 있지만 정상적으로 소리를 낼 수 없습니다. 컴퓨터 3.5 오디오를 동축으로 연결하려면 디지털 신호를 아날로그 신호로 변환해야 합니다. 필수입니다. 현재 지원하는 인터페이스에 따라 인터페이스를 선택할 수 있습니다(Coax to Lotus 인터페이스 또는 Coax to 3.5 인터페이스). 이것은 특정 상점에서 판매되며 가격이 비싸지 않습니다.
10. 오디오 플러그 배선도
오디오 플러그 배선도
오디오 플러그는 헤드폰, 스피커 및 기타 장치에서 흔히 볼 수 있는 중요한 인터페이스이며 특정 배선 방법을 통해 장치에 오디오 신호를 전송합니다. 고품질의 음악과 사운드를 즐길 수 있는 오디오 플러그의 원리와 사용법을 소개합니다.
배선도
오디오 플러그의 배선도는 다음과 같습니다.
___________| 2 | 링|___________|오디오 플러그는 일반적으로 3.5mm 또는 6.35mm 사양을 사용합니다. 배선 방법은 동일합니다. 표준 3.5mm 오디오 플러그는 팁, 링, 슬리브의 세 부분으로 구성됩니다.
배선 다이어그램의 핀 1(팁)은 왼쪽 채널 신호를 나타냅니다. , 핀 2(Ring)는 오른쪽 채널 신호를 나타내고, 핀 3(Sleeve)은 접지 신호를 나타냅니다. 이 방법은
삽입할 때 TRS(Tip)-링-슬리브(Ring-Sleeve) 배선 방식이라고도 합니다. 오디오 플러그를 장치의 헤드폰 잭에 연결하면 팁은 왼쪽 채널 잭에 연결되고 링은 오른쪽 채널 잭에 연결되며 슬리브는 왼쪽 접지 잭에 연결됩니다.
응용 시나리오
오디오 플러그 배선 다이어그램은 일반적으로 휴대폰 및 컴퓨터, 헤드폰, 스피커 및 기타 장치를 통해 사용됩니다. 조합을 통해 다양한 오디오 연결 요구 사항을 충족할 수 있습니다. 다음은 몇 가지 일반적인 적용 시나리오입니다.
헤드폰 잭 인터페이스: 헤드폰 플러그의 팁을 왼쪽 채널 잭에, 링을 오른쪽 채널 잭에, 슬리브를 접지 잭에 삽입하면 고품질 음악을 즐길 수 있습니다. . 이 배선 방법은 일반적인 헤드폰 연결에 적합합니다. 스테레오 스피커 인터페이스: 스피커 플러그의 팁을 왼쪽 채널 잭에 삽입하고 링을 오른쪽 채널 잭에 삽입하고 슬리브를 접지 잭에 삽입하여 스테레오 효과를 얻고 몰입감 넘치는 음악을 즐길 수 있습니다. 마이크 인터페이스: 마이크 기능이 있는 헤드셋을 사용하여 장치의 마이크 잭에 삽입하고 Tip을 사용하여 마이크 사운드를 전송하고 Ring을 사용하여 헤드셋 소리를 전송하고 Sleeve를 사용하여 접지 신호를 전송할 수 있습니다. 녹음이나 통화 기능.주의사항
오디오 플러그를 사용할 때 다음 사항에 주의해야 합니다.
연결 및 분리 시 주의 사항: 오디오 플러그를 연결 및 분리할 때 주의해서 다루십시오. 과도한 힘을 가하면 잭이 손상되거나 플러그가 구부러질 수 있습니다. 잦은 연결 및 분리 방지: 오디오 플러그를 자주 연결하고 분리하면 잭이 마모되거나 찢어지고 접촉 성능이 저하되어 음질이 저하되거나 제대로 연결되지 않을 수 있습니다. 인터페이스를 깨끗하게 유지하십시오. 오디오 플러그와 잭을 정기적으로 청소하여 먼지나 이물질이 들어가 신호 전송 품질에 영향을 미치지 않도록 하십시오.오디오 플러그의 배선도와 배선 방법을 이해함으로써 다양한 오디오 장비를 더 잘 사용하고 유지 관리할 수 있으며 음악과 사운드 감상 경험을 향상시킬 수 있습니다. 이 글이 모든 분들께 도움이 되었으면 좋겠습니다!
The above is the detailed content of How to connect the 6.5mm audio plug?. For more information, please follow other related articles on the PHP Chinese website!

 Black Boxes on Desktop Icons: Find Powerful Tips to RemoveMay 12, 2025 pm 08:07 PM
Encountering black squares instead of desktop icons in Windows 11/10? This comprehensive guide offers several straightforward solutions to restore your icons to their original appearance. Quick Navigation: Black Squares on Desktop Icons Solution 1:
 CapCut Project File Location: How to Find, Recover, and ShareMay 12, 2025 pm 08:06 PM
This MiniTool guide offers a complete walkthrough for managing CapCut projects, covering location, recovery, and sharing. Mastering these steps ensures efficient project handling. Quick Navigation: CapCut Project File Location on PC Backing Up CapC
 Persistent Fake Virus Alerts in Edge: How to Identify & AvoidMay 12, 2025 pm 08:05 PM
Edge browser fake virus warning: a guide to identifying, handling and prevention Many users report encountering fake virus warnings in Microsoft Edge browser. These warnings usually appear in the form of pop-ups, claiming that malware or viruses are detected, attempting to induce users to download malware or take harmful actions. This article will guide you on how to identify, deal with, and prevent such false warnings. How to identify fake virus warnings in Edge browser? False virus warnings usually have the following characteristics: Use emergency and panic language: Try to force users to act by creating panic. Use fake company logos: Imitate the logo of well-known security software or Microsoft. Regular companies will not issue warnings in this way. Request to dial
 Effective Ways to Fix EVERSPACE 2 Crashing/Not LaunchingMay 12, 2025 pm 08:03 PM
EVERSPACE 2 Crash Problem and Solutions Have you encountered a crash problem while playing EVERSPACE 2? If this problem bothers you, this MiniTool article will help you. This article will explain common causes and effective solutions to EVERSPACE 2 crashes. Quick navigation: EVERSPACE 2 Startup Crash How to fix EVERSPACE 2 crash Summarize EVERSPACE 2 Startup Crash The EVERSPACE 2 crash problem has always been the focus of players. Many players have reported different types of crashes, including crashes at startup, sudden exits during the game, and interactions with Unreal Engine
 Apex Integrity Error 0x8000001: 3 Useful Methods HereMay 12, 2025 pm 08:02 PM
Encountering the Apex Legends integrity error 0x8000001, causing game crashes? This guide provides effective solutions. Let's explore the fixes. Apex Integrity Error 0x8000001: A Crashing Problem Many Apex Legends players report encountering the &quo
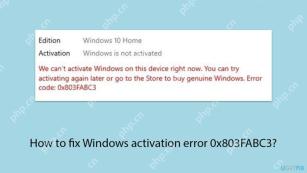 How to fix Windows activation error 0x803FABC3?May 12, 2025 pm 06:00 PM
Windows activation is a critical process in Windows 11 that verifies your operating system copy is genuine, enabling full functionality like personalization fea
 How to Use Copilot in Microsoft OneDrive? Everything You NeedMay 11, 2025 pm 08:02 PM
Unlock the Power of Microsoft OneDrive Copilot: Your AI-Powered File Assistant This MiniTool guide unveils the capabilities of Copilot in OneDrive, a revolutionary AI assistant designed to streamline your file management and boost productivity. Expl
 A Guide to Fix A Supported Game Is Required to Use This FeatureMay 11, 2025 pm 08:01 PM
Troubleshooting the NVIDIA GeForce Experience "Supported Game Required" Error Encountering the "A supported game is required to use this feature" error in NVIDIA GeForce Experience while using game filters, screen recording, or ad


Hot AI Tools

Undresser.AI Undress
AI-powered app for creating realistic nude photos

AI Clothes Remover
Online AI tool for removing clothes from photos.

Undress AI Tool
Undress images for free

Clothoff.io
AI clothes remover

Video Face Swap
Swap faces in any video effortlessly with our completely free AI face swap tool!

Hot Article
Hot Tools

Dreamweaver Mac version
Visual web development tools

SublimeText3 Mac version
God-level code editing software (SublimeText3)

EditPlus Chinese cracked version
Small size, syntax highlighting, does not support code prompt function

MinGW - Minimalist GNU for Windows
This project is in the process of being migrated to osdn.net/projects/mingw, you can continue to follow us there. MinGW: A native Windows port of the GNU Compiler Collection (GCC), freely distributable import libraries and header files for building native Windows applications; includes extensions to the MSVC runtime to support C99 functionality. All MinGW software can run on 64-bit Windows platforms.

SecLists
SecLists is the ultimate security tester's companion. It is a collection of various types of lists that are frequently used during security assessments, all in one place. SecLists helps make security testing more efficient and productive by conveniently providing all the lists a security tester might need. List types include usernames, passwords, URLs, fuzzing payloads, sensitive data patterns, web shells, and more. The tester can simply pull this repository onto a new test machine and he will have access to every type of list he needs.

