

 Computer TutorialsTroubleshootingHow to create a dynamic computer screen saver image, such as a swimming fish?
How to create a dynamic computer screen saver image, such as a swimming fish?

Does it bother you to have vivid computer screen saver pictures, such as smart swimming fish? This article brought to you by php editor Xinyi will reveal the secret of dynamic screen saver pictures. With easy-to-understand explanations, the article will guide you step-by-step to create a stunning interactive screensaver that will bring new life to your computer. Read on to unlock the secrets to making your screen come alive!

1. How to create a dynamic computer screen saver image, like a swimming fish?
Copy this .scr file to C:WindowsSystem32 (put it in the corresponding location on the drive where the system is installed. Most people’s systems are placed on the C drive, so I gave the path to the C drive) and then right-click on win7 - --Personalization---Screen saver, select this fish screen saver just like xp. Right click---Screen saver, select this fish screensaver. If you have an LCD screen, it is not recommended that you use a screen saver. Because the best way to protect an LCD screen is to turn it off when not in use. Screen protection actually shortens the life of the screen. I think it is more appropriate to call it a screen destruction program. It's okay if you want to use it. After all, it will be a long time before the LCD screen is scrapped. Maybe the computer will be scrapped by then
2. How to delete the pictures in the computer screen saver?
When the computer is turned on, the lock screen background appears, which is different from the screensaver. The setting method for turning off both is as follows:
1. Right-click on a blank space on the desktop and select "Personalize", or right-click and use the shortcut key R;
2. Select the lock screen interface on the left side of the personalization interface, and select "Personalize" on the left. Swipe sideways to find "Screen Saver Settings" and click in;
3. In the screen saver setting interface, click the drop-down box to select "None", then click "OK". After the settings are completed, close the personalization settings window.
4. To turn off the startup interface background, turn off the "Show lock screen background image on login screen" switch.
5. Final effect.
3. How to set the screen saver picture?
The operation method of setting a custom picture for the computer screen saver is as follows:
1. First turn on the computer, wait for the computer to start up, right-click on the desktop, and select the "Personalize" option button in the pop-up shortcut menu. Click action.
2. In the pop-up personalization window, select the "Screen Saver" option in the lower right corner. The "Screen Saver Settings" window will pop up. Under the Screen Saver tab, click the drop-down menu and select "Photos" options.
3. After clicking the photo option, click the "Settings" option on the right to make further settings. At this time, the "Photo Screensaver Settings" window will pop up. In the "Use pictures from" group, Click the "Browse" button on the right.
4. At this time, the "Browse Folder" window will pop up. Select the pictures you prepared in advance and put them in the folder. Then select the folder and click OK to complete the settings.
5. After clicking OK, return to the photo screen saver settings window. You can set the slideshow speed. Generally, it is set to medium speed. You can also set whether to play the pictures in order or out of order. At this time, the default is That's it. If you want to change it, just uncheck the button to complete the operation. After the settings are completed, click Save.
6. Return to the initial screen saver setting interface. You can set the time for slide replacement in this window. Just select the default here. The set effect can be previewed and click OK to take effect. , then the operation is completed.
4. How to set a screen saver image?
Tools/Materials
Computer win7
Method/Steps
1. First, right-click on the desktop and select "Personalize".
2. Then, in the pop-up dialog box, click the "Screen Saver" option.
3. Then, click "Photos" in the screensaver, set the time in "Wait", and click "Settings".
4. Finally, click "Browse", find the photos on your computer, select the folder, click "OK", return to the previous dialog box, set the playback speed, and click "Save".
5. Computer screen saver settings?
The steps to set up computer screen saver are as follows:
1. Double-click the control panel on the desktop. As shown in the picture.
2. Click the "Appearance & Personalization" button. As shown in the picture.
3. Click to change the screen saver. As shown in the picture.
4. Click the small downward triangle as shown in the picture and select your favorite screen saver animation in the drop-down menu. As shown in the picture.
5. Set the time for the screen saver to appear in the box. As shown in the picture.
6. Click the OK button. As shown in the picture.
六、電腦主機送不送螢幕保護
在購買電腦主機時,有些用戶可能會疑惑,電腦主機送不送螢幕保護?這是一個常見的問題,也是許多用戶關心的重要議題。在這篇部落格文章中,我們將探討電腦主機是否需要額外的螢幕保護,以及如何有效地保護顯示器。
電腦主機送不送螢幕保護?
首先讓我們來看看電腦主機在購買時是否會附帶螢幕保護。一般情況下,電腦主機的包裝中並不會包含螢幕保護貼或其他螢幕保護裝置。這意味著使用者在購買電腦主機後,需要額外考慮如何保護顯示器的問題。
儘管電腦主機在包裝中未必附帶螢幕保護,但使用者仍可選擇購買第三方的螢幕保護產品來保護顯示器。這些產品通常包括螢幕保護貼、螢幕保護殼等,可有效保護顯示器免受刮傷、灰塵等損壞。
為什麼需要螢幕保護?
螢幕保護在電腦主機使用過程中扮演著非常重要的角色。首先,螢幕保護可以有效防止顯示器被刮傷。在日常使用中,顯示器很容易受到刮傷,尤其是在擦拭螢幕時,如果使用力道過大或擦拭工具不當,很容易損壞顯示器表面。
其次,螢幕保護還可以防止顯示器受到灰塵、指紋等污染。隨著時間的推移,顯示器表面會累積灰塵和指紋,如果長時間不清理,不僅會影響顯示效果,還會影響使用者體驗。
此外,螢幕保護還可以有效減少顯示器反射和眩光,提高顯示效果和舒適性。特別是在明亮的環境下使用電腦主機時,螢幕反射和眩光會給使用者帶來不便,使用螢幕保護可以有效減少這些問題。
如何選擇適合的螢幕保護?
在選擇螢幕保護產品時,使用者需要考慮以下幾個方面:材質、尺寸、透光性等。
材質:螢幕保護產品的材質直接影響其保護效果。一般來說,矽膠、PET等材質的螢幕保護貼較常見,可以有效保護顯示器不受刮傷。
尺寸:選擇合適尺寸的螢幕保護對於保護顯示器至關重要。如果螢幕保護尺寸不匹配,可能會導致安裝困難,甚至影響顯示效果。
透光性:螢幕保護產品的透光性也是一個重要考量。選擇透光性好的螢幕保護產品,可以確保顯示效果清晰,不影響使用者體驗。
如何正確安裝螢幕保護?
正確安裝螢幕保護對於保護顯示器同樣至關重要。以下是一些安裝螢幕保護的步驟和注意事項:
清潔顯示器表面,確保沒有灰塵和指紋。 將螢幕保護產品從底部開始,輕輕放置在顯示器表面。 慢慢向上推進,同時用軟布或刮刀將氣泡擠出,確保貼合度。 最後檢查整體貼合情況,確保螢幕保護安裝正確。透過正確安裝螢幕保護,不僅可以有效保護顯示器,還可以提高顯示效果和使用者體驗。
結語
總的來說,雖然電腦主機在購買時可能不會附帶螢幕保護,但用戶仍然可以選擇購買第三方的螢幕保護產品來保護顯示器。螢幕保護在保護顯示器、提高顯示效果和使用者體驗方面發揮著重要作用,因此使用者在購買電腦主機後,可以考慮投資一些螢幕保護產品。
七、如何正確設定電腦螢幕保護色? | 電腦螢幕保護色設定指南
為什麼需要設定電腦螢幕保護色?
在現代社會,人們長時間盯著電腦螢幕的情況非常普遍。長期使用電子設備會對眼睛帶來疲勞和不適,尤其是輻射對眼睛的傷害,這時候正確設定電腦螢幕保護色就顯得特別重要。
如何正確設定電腦螢幕保護色?
第一步,選擇合適的螢幕保護色。通常來說,**暖色**和**柔和的亮度**是更適合眼睛的。可以嘗試選擇淡黃色或淺灰色作為背景色,並避免使用過於刺眼的顏色。
第二步,調整螢幕亮度。適合眼睛的亮度通常在**150-200cd/m2**之間。可以根據自己的實際感受進行微調,以達到舒適的效果。
電腦螢幕保護色的注意事項
避免過於刺眼的色彩:過於刺眼的顏色會加重視覺疲勞。 注意使用時間:即使是適當的保護色,長時間使用也會對視力造成影響,所以還是要適當控制使用時間並休息。 及時調整:根據環境光線的變化和自身眼睛的感受,及時調整螢幕保護色。透過正確設定電腦螢幕保護色,可以有效緩解長時間使用電腦所帶來的眼睛疲勞和不適感,也有助於保護視力健康。
感謝您閱讀本文,希望以上內容對您正確設定電腦螢幕保護色時有所幫助。
八、蘋果螢幕保護圖片怎麼設定?
工具列中點選設定
在手機的選單程式列中找到工具列,點選工具列進入工具列介面,點選系統設定選項。
點擊顯示與亮度設定
在設定介面中下滑,找到顯示與亮度的設置,點擊進入顯示與亮度設定主介面。
點選自動鎖定設定
下滑畫面找到自動鎖定的設置,點選進入選擇即可。
The above is the detailed content of How to create a dynamic computer screen saver image, such as a swimming fish?. For more information, please follow other related articles on the PHP Chinese website!

 Clipchamp Video Loss on Windows? 2 Ways to Recover Files!May 09, 2025 pm 08:12 PM
Recover Lost Clipchamp Videos: A Step-by-Step Guide Losing a video you've edited in Clipchamp can be frustrating. This guide provides effective methods to recover your lost Clipchamp video files. Finding Your Clipchamp Videos Before attempting recov
 7 Useful Fixes for Action Center Keeps Popping upMay 09, 2025 pm 08:07 PM
Action Center allows you to access quick settings and notifications. However, some users say that they encounter the “Action Center keeps popping up” issue on Windows 11/10. If you are one of them, refer to this post from MiniTool to get solutions.Qu
 Instant Ways to Restore Missing Google Chrome Icon on WindowsMay 09, 2025 pm 08:06 PM
Troubleshoot Missing Google Chrome Icon on Windows Can't find your Google Chrome icon on Windows? This guide offers several solutions to restore it. Why is my Chrome icon missing? Several factors can cause the Chrome icon to vanish from your desktop:
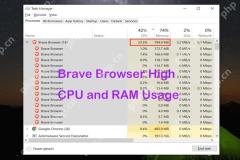 Brave Browser High CPU and RAM Usage: Best 5 Tips to ReduceMay 09, 2025 pm 08:05 PM
Brave browser CPU and memory usage too high? Under Windows 10/11 system, Brave browser's high CPU and memory usage problems have troubled many users. This tutorial will provide a variety of solutions to help you easily resolve this issue. Quick navigation: Brave browser high CPU and memory footprint Solution 1: Clear cookies and cache data Solution 2: Disable hardware acceleration Solution 3: Close the tab and update the Brave browser Solution 4: Disable the plugin Solution 5: Create a new user profile Optional: Run MiniTool System Booster System Optimization Tool Summarize Brave browser high CP
 Targeted Fixes for Xbox Error 0x87e0000f When Installing GamesMay 09, 2025 pm 08:04 PM
Troubleshooting Xbox Error Code 0x87e0000f: A Comprehensive Guide Encountering the Xbox error code 0x87e0000f while downloading games from Xbox Game Pass can be frustrating. This guide provides several solutions to help you resolve this issue and get
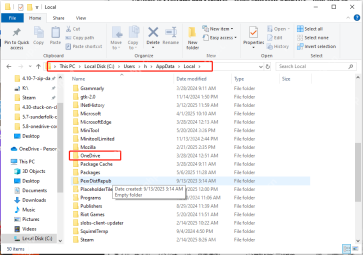 OneDrive Couldn't Start Files on Demand?Top 4 MethodsMay 09, 2025 pm 08:02 PM
OneDrive Files On-Demand troubleshooting: resolving the "OneDrive couldn't start Files On-Demand" error. This MiniTool guide provides solutions for the persistent "Microsoft OneDrive Couldn’t start files on Demand" error (codes 0x
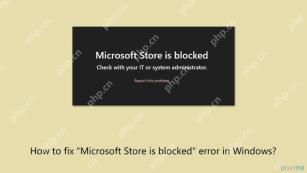 How to fix 'Microsoft Store is blocked' error in Windows?May 09, 2025 pm 06:00 PM
Microsoft Store is blocked error occurs when Windows prevents access to the Microsoft Store app, displaying the message Microsoft Store is blocked. Check with y
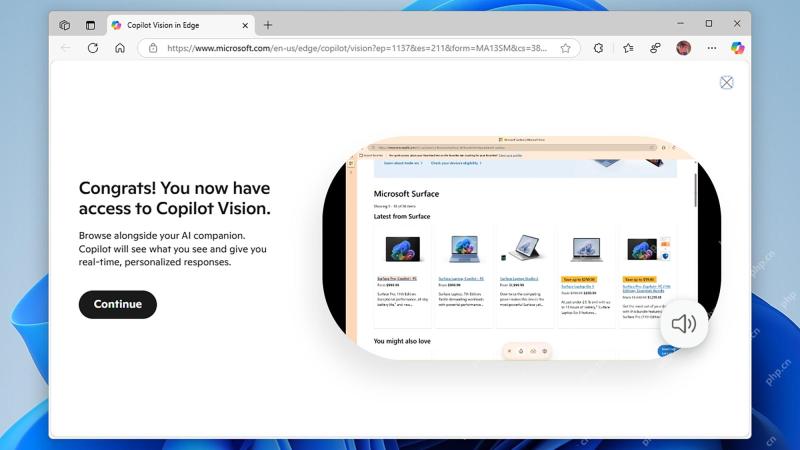 How to use Copilot Vision for free in Microsoft EdgeMay 09, 2025 am 10:32 AM
Staying current with all the new AI tools is a challenge. Many might even overlook readily available AI features. For instance, Copilot Vision is now free for all Microsoft Edge users – a fact easily missed if you don't regularly use Edge or haven't


Hot AI Tools

Undresser.AI Undress
AI-powered app for creating realistic nude photos

AI Clothes Remover
Online AI tool for removing clothes from photos.

Undress AI Tool
Undress images for free

Clothoff.io
AI clothes remover

Video Face Swap
Swap faces in any video effortlessly with our completely free AI face swap tool!

Hot Article
Hot Tools

Dreamweaver CS6
Visual web development tools

VSCode Windows 64-bit Download
A free and powerful IDE editor launched by Microsoft

SublimeText3 Linux new version
SublimeText3 Linux latest version

Zend Studio 13.0.1
Powerful PHP integrated development environment

Safe Exam Browser
Safe Exam Browser is a secure browser environment for taking online exams securely. This software turns any computer into a secure workstation. It controls access to any utility and prevents students from using unauthorized resources.

