


This article provides a comprehensive guide on enabling Copilot for Office 365. It addresses essential prerequisites, step-by-step instructions for activating Copilot integration, and guidance on configuring tailored insights for enhanced productivit

How to enable Copilot for Office 365?
Enable Copilot for Office 365:
-
Prerequisites:
- Ensure you have an Office 365 subscription with access to Exchange Online, SharePoint Online, OneDrive for Business, and Teams.
- Obtain a valid Copilot license.
-
Enable Copilot through the Microsoft 365 admin center:
- Sign in to the Microsoft 365 admin center.
- Navigate to Settings > Services & add-ins > Copilot > Manage.
- Click the Edit button and toggle on the Enable Copilot switch.
- Assign licenses to your users.
-
Activate Copilot integration in Office 365:
- In Outlook, click the Copilot icon in the top-right corner or navigate to Settings > Copilot.
- Activate Copilot by following the on-screen prompts.
-
Configure tailored insights:
- Access Copilot's settings from Outlook or through the Microsoft 365 admin center.
- Select which insights and suggestions you want Copilot to provide.
Is Copilot now available for Office 365?
Yes, Copilot is now available for Office 365. It was initially released as a preview feature in early 2023 and has since become generally available to all eligible subscribers.
What are the steps to activate Copilot integration in Office 365?
To activate Copilot integration in Office 365, follow the steps outlined in the Enable Copilot for Office 365 section above. The activation process involves enabling Copilot in the admin center, activating the add-in in Outlook, and configuring tailored insights.
The above is the detailed content of how to enable copilot for office 365. For more information, please follow other related articles on the PHP Chinese website!

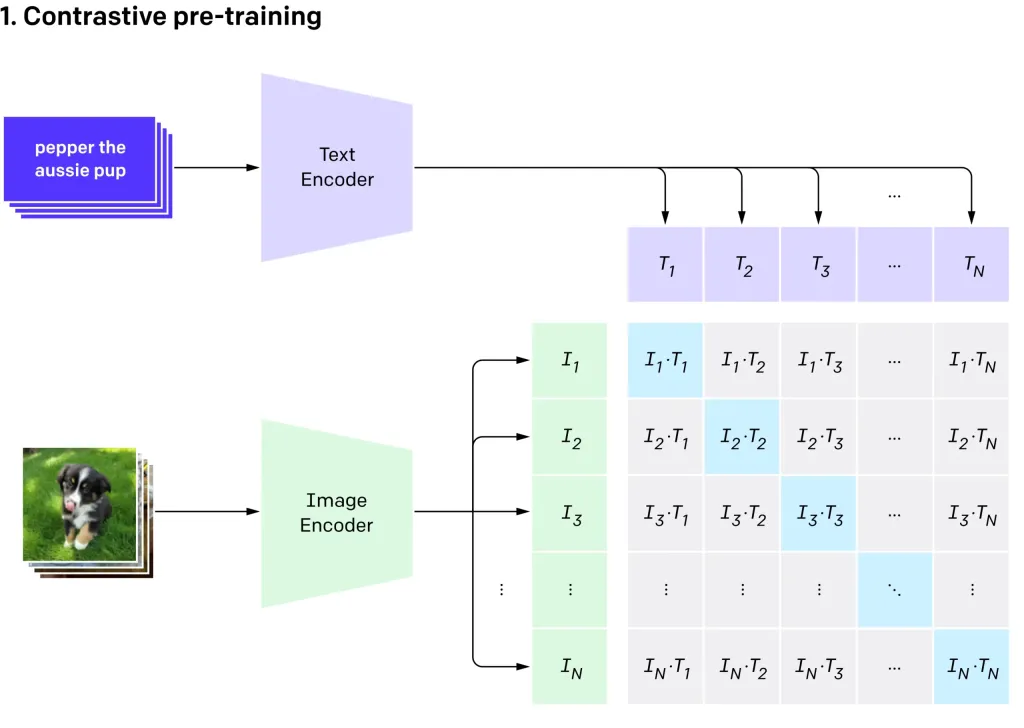 Zero-shot Image Classification with OpenAI's CLIP VIT-L14Apr 11, 2025 am 10:04 AM
OpenAI's CLIP (Contrastive Language–Image Pre-training) model, specifically the CLIP ViT-L14 variant, represents a significant advancement in multimodal learning and natural language processing. This powerful computer vision system excels at represe
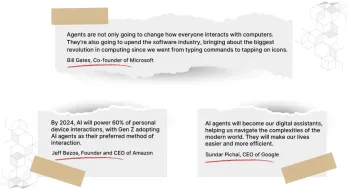 7 Steps to Build an AI Agent with No Code - Analytics VidhyaApr 11, 2025 am 10:03 AM
Harness the power of AI agents with Wordware: a no-code platform for effortless AI agent creation. AI agents are revolutionizing how we interact with computers, automating tasks and streamlining decision-making. This blog demonstrates how to build
 LLMs on Mobile: Present and Future Possibilities - Analytics VidhyaApr 11, 2025 am 09:58 AM
Generative AI: The Next Smartphone Battleground The smartphone industry is locked in a fierce competition: the race to integrate advanced generative AI. From enhancing user interaction to boosting productivity, the stakes are high. Apple's iPhone 16
 Top 10 Generative AI Subreddits to Follow in 2025 - Analytics VidhyaApr 11, 2025 am 09:51 AM
Generative AI: Your Guide to 10 Essential Reddit Communities Generative AI is rapidly evolving, with new models emerging constantly. Staying updated is crucial, and Reddit offers vibrant communities dedicated to this field. This article highlights t
 Key Challenges and Limitations in AI Models - Analytics VidhyaApr 11, 2025 am 09:44 AM
Introduction Artificial intelligence (AI) has rapidly integrated into various workplaces, fueled by substantial investment in AI research and development. AI's applications span a wide range, from straightforward tasks like virtual assistants to com
 Handling NULL Values in SQLApr 11, 2025 am 09:37 AM
Introduction In the realm of databases, NULL values often present unique challenges. Representing missing, undefined, or unknown data, they can complicate data management and analysis. Consider a sales database with missing customer feedback or orde
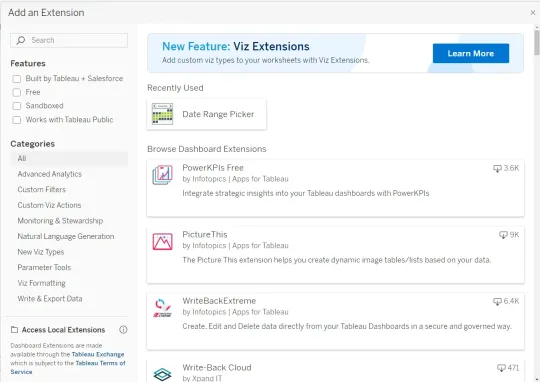 How to Integrate Google Gemini into Tableau Dashboards?Apr 11, 2025 am 09:27 AM
Harnessing the Power of Google Gemini in Tableau Dashboards: An AI-Powered Enhancement Tableau's robust visualization capabilities, spanning data preparation (Tableau Prep Builder), data storytelling (Tableau Desktop), and collaborative sharing (Tabl
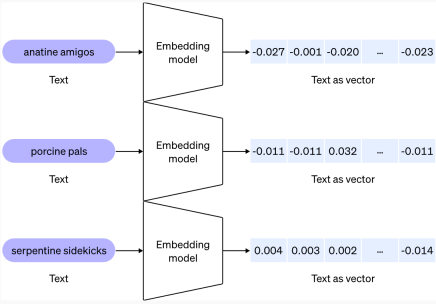 What are Vector Embeddings? Types and Use CasesApr 11, 2025 am 09:18 AM
Unlocking the Power of Vector Embeddings: A Guide to Generative AI Imagine explaining RAG (Retrieval Augmented Generation) to someone who doesn't speak your language – a daunting task, right? Now consider machines, which also struggle to "under


Hot AI Tools

Undresser.AI Undress
AI-powered app for creating realistic nude photos

AI Clothes Remover
Online AI tool for removing clothes from photos.

Undress AI Tool
Undress images for free

Clothoff.io
AI clothes remover

AI Hentai Generator
Generate AI Hentai for free.

Hot Article
Hot Tools

SublimeText3 Linux new version
SublimeText3 Linux latest version

Zend Studio 13.0.1
Powerful PHP integrated development environment

SublimeText3 Chinese version
Chinese version, very easy to use

VSCode Windows 64-bit Download
A free and powerful IDE editor launched by Microsoft

mPDF
mPDF is a PHP library that can generate PDF files from UTF-8 encoded HTML. The original author, Ian Back, wrote mPDF to output PDF files "on the fly" from his website and handle different languages. It is slower than original scripts like HTML2FPDF and produces larger files when using Unicode fonts, but supports CSS styles etc. and has a lot of enhancements. Supports almost all languages, including RTL (Arabic and Hebrew) and CJK (Chinese, Japanese and Korean). Supports nested block-level elements (such as P, DIV),

