


Many times we encounter situations where we need to turn on the computer regularly, such as downloading large files, running programs, etc. Today, PHP editor Xinyi will introduce to you the detailed method of timing computer startup, so that you can easily realize automatic computer startup. Next, this article will guide you step by step, from setting up the BIOS to using system tools, to ensure that you can easily master the skills of timing boot.

1. How to set a timer to start the computer?
How to set a scheduled startup of the computer can be achieved by following the following steps:
1. Turn on the computer and press the DELETE key to enter Bios.
2. Enter the Bios main interface and select the wake-up configuration menu under power options.
3. Open the daily event (daily) under the clock wake-up option, then set the daily boot time below, and select the main startup sequence.
4. You only need to start it once, select single event (once), and then set the number, month, day, hour and minute below.
5. To set a fixed day of the week to turn on the phone every week, select weekly event, and then set the specific day of the week and time below. Save and exit the settings to complete the scheduled power-on setting.
2. How to set the computer startup time?
In Windows operating system, you can follow the steps below to set the computer to start at a scheduled time:
1. Open "Control Panel" and select "System and Security".
2. Select "Administrative Tools" and open "Task Scheduler".
3. In the left panel, click Task Scheduler Library.
4. In the right panel, click Create Basic Task.
5. Enter the task name and description and click "Next".
6. Select the time and date you want to perform the task and click "Next".
7. Select the "Launch a program" option and click "Next".
8. Enter the path and name of the program to be started, such as "C:WindowsSystem32shutdown.exe".
9. Enter "/s" in the "Parameters" field, this will shut down the computer.
10. Click "Next" and confirm the task settings.
Now, you have successfully set up the scheduled startup of your computer. Please note that if you want to set the computer to automatically wake up at a specific time, you need to enable the "Wake Computer" option in the BIOS settings and use the "/h" parameter instead of the "/s" parameter in the Task Scheduler.
3. How to set a scheduled boot time for a powered off computer?
If you want to use the scheduled boot function, first cancel the quick startup in the power management in Windows,
and then set the scheduled boot time, go Try to see if it can be achieved by timing the power on.
4. How to turn on the computer regularly?
Can be set by adding a specified program in "Task Scheduler".
The specific steps are as follows:
1. Click the "Start" button in the lower left corner of the computer desktop, click "All Programs" below and select "Accessories";
2. Then select "System Tools" and click Open "Task Scheduler";
3. After clicking to open "Task Scheduler", select "Create Basic Task" in the "Action" box on the far right;
4. After clicking to enter "Create Basic Task", Enter "Schedule Shutdown" in the name column of the dialog box, and then go to the next step;
5. After filling in the name and entering the next step, you will enter the "Task Trigger" dialog box, and you can choose the scheduled shutdown according to your needs. For the start time, you can choose daily, weekly, or monthly and a specified time. After selecting, click Next. The following takes every day as an example;
6. The following pops up a daily dialog box, where you can enter the time you want to schedule a shutdown or the number of days you want to plan a scheduled shutdown every few days. Note that the start time is the time set now and does not need to be changed;
7. After entering the time, click Next, the startup program dialog box will appear, directly enter the program C:WindowsSystem32shutdown.exe, and click "Add parameters" Enter -s (i.e. shutdown command) in the "Select" column;
8. After clicking Next, a "Summary" dialog box will appear to prompt the completion of the scheduled task. You can carefully check the name, trigger, operation and other information again.
9. Select "When you click Finish, open the dialog box for the properties of this task" at the bottom of the "Summary" dialog box. After clicking Finish, the related properties of the scheduled shutdown will appear. Here you can change the relevant parameters. At this point, the related programs for scheduled shutdown have been set up;
10. You can view the tasks you added in the scheduled task library later. If you want to change the scheduled shutdown time, you can delete the originally set ones. The task of scheduled shutdown can be set again according to your own needs. The blue box in the picture is the scheduled shutdown task. If you want to delete it, right-click "Schedule Shutdown" and select Delete.
5. Set a timer to start the computer?
1. Turn on the computer, select on the desktop, right-click the mouse, and click in the pop-up drop-down box.
2. Expand system tools, click, click on the right, click.
3. Click, click.
4. Set the scheduled power-on time and click.
5. Select and click.
6. Au démarrage du programme, démarrage signifie démarrer. Entrez -s dans le paramètre d'ajout et cliquez.
7.OK, cliquez, l'ordinateur démarrera à l'heure à 9h10 tous les jours.
6. Comment régler la minuterie pour démarrer un ordinateur de bureau ?
Cliquez avec le bouton droit sur l'ordinateur, sélectionnez Gérer, développez Outils système, cliquez sur Planificateur de tâches, cliquez sur Créer une tâche de base, entrez le nom et la description sur la page, sélectionnez le moment dans le déclencheur, sélectionnez l'heure de début, tous les nombres de jours. , puis cliquez sur Démarrer. Entrez démarrage dans la zone programme, programme ou script, entrez -s dans le paramètre d'ajout et cliquez sur Terminer après avoir confirmé qu'il est correct.
7. Comment configurer l'arrêt pour le démarrage planifié de l'ordinateur ?
Arrêt programmé : Cliquez sur Démarrer - Exécuter - Entrez "cmd" - Entrez ensuite "shutdown -s -t 60" dans la case noire qui apparaît - Appuyez ensuite sur Entrée pour terminer la commande d'arrêt programmé (60 dans la commande est le numéro de secondes, 60 signifie qu'il s'éteindra automatiquement après 60 secondes) Démarrage programmé : appuyez sur la touche "Supprimer" pour accéder à l'interface du BIOS au démarrage de l'ordinateur. Sélectionnez le menu "Power Management Setup" dans l'interface principale de configuration du BIOS, définissez la valeur Resume By Alarm sur Enabled et définissez la date et l'heure de démarrage dans "Date (of Month) Alarm" et "Time (hh:mm:ss). Heure d'alarme. Si « Date » est défini sur 0, la mise sous tension par défaut est programmée chaque jour. Après le réglage, appuyez simplement sur « F10 » pour enregistrer les paramètres. La machine redémarrera et le réglage est réussi. Connectez-vous automatiquement. Cliquez sur "Démarrer/Exécuter", saisissez "rundll32 netplwiz.dll,UsersRunDll" et appuyez sur Entrée. La fenêtre "Compte utilisateur" apparaîtra, puis décochez la case "Pour utiliser cette machine, les utilisateurs doivent saisir un nom d'utilisateur et un mot de passe". ". Cliquez sur OK et entrez le compte et le mot de passe auxquels vous souhaitez que l'ordinateur se connecte automatiquement à chaque fois dans la boîte de dialogue contextuelle.
8. Comment définir une heure de démarrage planifiée pour les ordinateurs Dell ?
Le processus de configuration pour que les ordinateurs Dell s'allument et s'éteignent automatiquement via les paramètres CMOS est le suivant :
1. Entrez d'abord dans le programme "CMOS SETUP" (la plupart des cartes mères sont saisies en appuyant sur la touche DEL ou F2 au démarrage de l'ordinateur). ;
2. Ensuite, déplacez la barre lumineuse vers l'option « Configuration de la gestion de l'alimentation » et appuyez sur Entrée pour accéder à son sous-menu
3. Ensuite, réglez l'élément « Reprise par alarme » sur « Activé » et définissez-le dans la « Date ». (du mois)Alarme" élément Date de mise sous/hors tension mensuelle (0 signifie chaque jour, 1 signifie le 1er de chaque mois, 2 signifie le 2 de chaque mois,...), réglez l'heure de mise sous tension dans le "Heure ( hh:mm:ss)Alarme" élément ;
4, enfin enregistrez les paramètres et redémarrez (F10). Après avoir éteint l'ordinateur, l'ordinateur démarrera automatiquement à l'heure spécifiée.
9. Comment définir une heure de démarrage planifiée pour les ordinateurs Lenovo ?
Pour définir le démarrage programmé de l'ordinateur Lenovo, vous pouvez suivre les étapes suivantes :
1. Ouvrez l'interface de configuration du BIOS de l'ordinateur. Vous pouvez accéder aux paramètres du BIOS en appuyant sur le bouton d'alimentation de l'ordinateur, puis en appuyant sur f1, f2, f10, Supprimer et autres touches d'interface.
2. Dans l'interface des paramètres du BIOS, recherchez « Gestion de l'alimentation » ou une option similaire (cette option peut être différente selon les modèles d'ordinateurs Lenovo).
3. Dans « Gestion de l'alimentation », recherchez « Mise sous tension de l'alarme RTC » ou des options similaires.
4. Définissez cette option sur « activé », puis définissez une heure de mise sous tension spécifique (par exemple, la mise sous tension à 6 heures du matin tous les jours).
5. Enregistrez les modifications, quittez l'interface de configuration du BIOS, puis redémarrez l'ordinateur.
De cette façon, l'ordinateur Lenovo s'allumera automatiquement à l'heure définie. Pour annuler le démarrage programmé, définissez simplement l'option dans les étapes ci-dessus sur "désactivé".
10. Comment définir le démarrage programmé des ordinateurs Lenovo ?
Pour définir l'heure de démarrage programmée sur les ordinateurs Lenovo, nous pouvons entrer dans les paramètres du BIOS. Lorsque l'ordinateur est allumé, continuez à appuyer sur la touche F2 ou F10 pour accéder au système BIOS. Dans le système BIOS, nous pouvons trouver l'option "Power Management", puis sélectionner la sous-option "RTC Wakeup".
Dans "RTC Wakeup", nous pouvons définir l'heure de démarrage. Sélectionnez l'heure à laquelle vous souhaitez allumer et appuyez sur "Entrée" pour confirmer. Attendez un instant, le paramétrage est réussi, testez-le pour voir s'il peut démarrer automatiquement.
The above is the detailed content of How to set a timer to start the computer?. For more information, please follow other related articles on the PHP Chinese website!

 Black Boxes on Desktop Icons: Find Powerful Tips to RemoveMay 12, 2025 pm 08:07 PM
Encountering black squares instead of desktop icons in Windows 11/10? This comprehensive guide offers several straightforward solutions to restore your icons to their original appearance. Quick Navigation: Black Squares on Desktop Icons Solution 1:
 CapCut Project File Location: How to Find, Recover, and ShareMay 12, 2025 pm 08:06 PM
This MiniTool guide offers a complete walkthrough for managing CapCut projects, covering location, recovery, and sharing. Mastering these steps ensures efficient project handling. Quick Navigation: CapCut Project File Location on PC Backing Up CapC
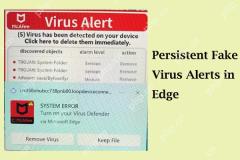 Persistent Fake Virus Alerts in Edge: How to Identify & AvoidMay 12, 2025 pm 08:05 PM
Edge browser fake virus warning: a guide to identifying, handling and prevention Many users report encountering fake virus warnings in Microsoft Edge browser. These warnings usually appear in the form of pop-ups, claiming that malware or viruses are detected, attempting to induce users to download malware or take harmful actions. This article will guide you on how to identify, deal with, and prevent such false warnings. How to identify fake virus warnings in Edge browser? False virus warnings usually have the following characteristics: Use emergency and panic language: Try to force users to act by creating panic. Use fake company logos: Imitate the logo of well-known security software or Microsoft. Regular companies will not issue warnings in this way. Request to dial
 Effective Ways to Fix EVERSPACE 2 Crashing/Not LaunchingMay 12, 2025 pm 08:03 PM
EVERSPACE 2 Crash Problem and Solutions Have you encountered a crash problem while playing EVERSPACE 2? If this problem bothers you, this MiniTool article will help you. This article will explain common causes and effective solutions to EVERSPACE 2 crashes. Quick navigation: EVERSPACE 2 Startup Crash How to fix EVERSPACE 2 crash Summarize EVERSPACE 2 Startup Crash The EVERSPACE 2 crash problem has always been the focus of players. Many players have reported different types of crashes, including crashes at startup, sudden exits during the game, and interactions with Unreal Engine
 Apex Integrity Error 0x8000001: 3 Useful Methods HereMay 12, 2025 pm 08:02 PM
Encountering the Apex Legends integrity error 0x8000001, causing game crashes? This guide provides effective solutions. Let's explore the fixes. Apex Integrity Error 0x8000001: A Crashing Problem Many Apex Legends players report encountering the &quo
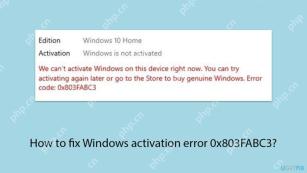 How to fix Windows activation error 0x803FABC3?May 12, 2025 pm 06:00 PM
Windows activation is a critical process in Windows 11 that verifies your operating system copy is genuine, enabling full functionality like personalization fea
 How to Use Copilot in Microsoft OneDrive? Everything You NeedMay 11, 2025 pm 08:02 PM
Unlock the Power of Microsoft OneDrive Copilot: Your AI-Powered File Assistant This MiniTool guide unveils the capabilities of Copilot in OneDrive, a revolutionary AI assistant designed to streamline your file management and boost productivity. Expl
 A Guide to Fix A Supported Game Is Required to Use This FeatureMay 11, 2025 pm 08:01 PM
Troubleshooting the NVIDIA GeForce Experience "Supported Game Required" Error Encountering the "A supported game is required to use this feature" error in NVIDIA GeForce Experience while using game filters, screen recording, or ad


Hot AI Tools

Undresser.AI Undress
AI-powered app for creating realistic nude photos

AI Clothes Remover
Online AI tool for removing clothes from photos.

Undress AI Tool
Undress images for free

Clothoff.io
AI clothes remover

Video Face Swap
Swap faces in any video effortlessly with our completely free AI face swap tool!

Hot Article
Hot Tools

SublimeText3 Mac version
God-level code editing software (SublimeText3)

Dreamweaver CS6
Visual web development tools

WebStorm Mac version
Useful JavaScript development tools

PhpStorm Mac version
The latest (2018.2.1) professional PHP integrated development tool

mPDF
mPDF is a PHP library that can generate PDF files from UTF-8 encoded HTML. The original author, Ian Back, wrote mPDF to output PDF files "on the fly" from his website and handle different languages. It is slower than original scripts like HTML2FPDF and produces larger files when using Unicode fonts, but supports CSS styles etc. and has a lot of enhancements. Supports almost all languages, including RTL (Arabic and Hebrew) and CJK (Chinese, Japanese and Korean). Supports nested block-level elements (such as P, DIV),

