


How to install the system after assembling the computer? This can be a headache for newbies. Today, PHP editor Xinyi brings you a tutorial on assembling a computer and installing a system. From preparation work to detailed installation steps, he will teach you step by step how to easily install the system.

1. Tutorial on assembling a computer and installing the system?
Nowadays, the system installation for assembling a computer is very simple and convenient, and only requires a CD.
First enter the bios settings, set the computer to boot first with the CD-ROM drive, then restart the computer and load the system CD into the CD-ROM drive.
The disc will automatically enter the installation state. At this time, you only need to manually re-partition the partitions, and the rest will be completed automatically.
2. Tutorial on installing system on Xiaomi computer?
1. Insert a good bootable USB flash drive into the Xiaomi laptop. After restarting, press the computer startup shortcut key (F12 or F11 or Esc, etc.) to open the boot menu and select the USB flash drive option you want to enter.
2. After booting from the USB flash drive, it will enter the quick start pe system desktop.
3. Click directly on the pe installation tool and select the system drive letter that needs to be installed in the interface that appears.
4. Click "Browse" to select the win10 system in the quick boot USB flash drive, and then click the "One-click installation" option.
5. After selecting one-click installation, click the "OK" button in the query box to release the system.
6. The system is released, then unplug the USB flash drive and restart the computer.
7. Wait for the system to be set up to use the new system, and the Xiaomi notebook system reinstallation is completed.
3. Tutorial on installing the system on an all-in-one computer?
To install dual systems, you need to install them in order from low to high, for example, install XP to the C drive, then install WIN7 to the D drive, and finally use the boot menu repair tool to repair the boot menu. It is not difficult. You can make a USB bootable disk for installation, so you don't need a CD-ROM drive. very convenient!
Here is the
U disk boot disk creation tool
the latest versionU disk boot disk production video tutorial
U disk installation WIN7 system tutorial
Finally, you need to set the BIOS boot U disk, this is the
U disk installation system BIOS setting tutorial
4. New computer system installation tutorial win10
New computer system installation tutorial: Win10 installation guide
After buying a brand new computer, the first thing to do is to install the operating system. Nowadays, most new computers come with the Windows 10 operating system pre-installed from the factory. This tutorial will introduce you to the installation steps of Win10 system in detail and provide you with reference and guidance. Whether you are an individual user or an enterprise user, this easy-to-understand instructional guide can help you complete the installation quickly.
Preparation
Before starting the installation of Win10 system, you need to make sure you have the following items ready:
Win10 installation disc or USB installation media: You can purchase a genuine Windows 10 installation disc, or create a bootable USB installation media . Activation key: If you purchased genuine Windows 10 installation media, you will be asked to enter your activation key during the installation process. Important data backup: Before installing the system, be sure to back up your important personal files and data to avoid loss. Network connection: During the installation process, you will need to be connected to the Internet to download the latest system updates and drivers.Win10 system installation steps
The following is a simple operation guide to help you complete the installation process of Win10 system:
Step 1: Insert the installation media
Insert the Win10 installation CD or USB installation media into the computer's optical drive or USB interface.
Step 2: Start the computer
Restart the computer and make sure to boot the system from the installation media. If your computer does not automatically recognize the installation media, please enter the BIOS setup interface and change the boot sequence to boot from the optical drive or USB device.
Step 3: Select Language and Locale
During the installation process, you need to select the appropriate language and locale. Choose based on your preferences and region.
Step 4: Enter the activation key
If you purchased genuine Windows 10 installation media, then in this step, you will be prompted to enter the activation key. Make sure you enter the correct key and follow the system instructions to continue.
Step 5: Accept the License Agreement
During the installation process, you need to read and accept the Windows 10 License Agreement. Read the agreement carefully and check the "Agree" option.
Step 6: Select the installation type
In this step, you need to choose the type of installation of Win10 system. The system provides two common options:
Upgrade: If your computer has an old version of Windows installed, you can choose to upgrade to Win10 to keep your personal files and applications. Clean Installation: If your computer is brand new, or you want to wipe out the old system and do a clean installation, choose Clean Installation.Select the appropriate installation type based on your needs and follow the system instructions to continue.
Step 7: Select Disk and Partition
In this step, you need to select the disk and partition where you want to install the system. If you choose to upgrade your installation, your existing data will be automatically detected and retained. If you choose a clean installation, you can choose to format the disk and create new partitions.
Step 8: Wait for the installation to be completed
The system will start to install the Win10 system and automatically restart during the installation process. You need to wait for the installation program to complete all operations and follow the system prompts to set up.
Step 9: System Setup
After the installation is complete, the system will ask you to perform some initial settings, including selecting a computer name, creating a user account, etc. Follow the system prompts to set up and personalize it to your liking.
Step 10: Update and Driver Installation
Once the system setup is complete, you need to connect to the internet and download the latest system updates and drivers. This ensures your system is up to date, providing better performance and security.
Summary
By following the above steps, you can easily install Windows 10 operating system. Always take care to back up important files and be sure to use genuine installation media and activation keys. If you encounter any problems, you can refer to the official Windows 10 documentation or seek professional technical support.
I hope this tutorial can help you, so that your new computer can complete the system installation as soon as possible and enjoy a smooth computing experience!
5. Tutorial on how to install the system on the computer if the USB disk has a system?
Installing a computer system is a relatively complicated process, and the specific steps will vary depending on the operating system, computer brand and specific installation method. The following is a general tutorial, you can operate according to your own situation:
Note: Before installation, please make sure you have backed up important files and have the system image file and activation key required for installation (if necessary ).
1. Obtain the system image file: First, you need to download the required system image file from the official website or a trusted source, such as Windows, macOS or Linux image files. Make sure to download the version that is compatible with your computer model and configuration.
2. Prepare a USB flash drive: Format a USB flash drive that is large enough to ensure that it has enough space to store the system image file. The formatting process will erase all data on the USB flash drive, so be sure to back up important files in advance.
3. Create a bootable USB flash drive: Use a special tool to create a bootable USB flash drive (such as Rufus, UNetbootin, etc.) to write the system image file to the USB flash drive to make it bootable. Follow the tool's instructions and select the correct system image file and USB disk as the target.
4. Set the computer's startup sequence: When the computer starts, press the corresponding keys (such as F2, F12, Delete, etc., the specific keyboard shortcuts may vary depending on the computer brand and model) to enter the computer's BIOS setting interface. In the BIOS interface, find the "Boot" or "Boot Sequence" option and set the USB disk as the first boot item.
5. Install the system: After saving and exiting the BIOS settings, the computer will automatically restart and boot from the USB flash drive. Follow the prompts on the installation interface and select the appropriate options to install the system. During the installation process, you may need to select an installation target, agree to the license agreement, enter an activation key, etc. Complete the corresponding steps according to the instructions of the installation wizard.
6. Complete the installation: Once the installation process is complete, the computer will reboot into the newly installed operating system. At this time, you may also need to install drivers, update the system, restore files, etc.
Please note that the above steps are a general guide and the specific steps may vary depending on your computer and the operating system you are using. Be sure to read and follow the specific guidelines and warnings during installation. If you are unsure about this process or encounter problems, it is recommended to consult relevant technical support or consult the relevant operation manual.
6. Computer system installation tutorial-detailed steps and precautions
Computer system installation tutorial-detailed steps and precautions
In modern society, computers have become an essential tool for people's work and life. However, over time, a computer system may become slow or unstable, making reinstalling the operating system necessary. This article details the steps and precautions on how to install the operating system on your computer, hoping to help those who are interested or in need.
Step 1: Back up important data
Before starting to install the operating system, be sure to back up all important data to prevent loss. Data can be stored on external hard drives, cloud storage, or other secure media to ensure data safety.
Step 2: Prepare the installation media
According to the type of operating system you choose, prepare the corresponding installation media, such as an installation CD or USB flash drive. Ensure the integrity and reliability of the installation media.
Step 3: Enter BIOS setup
When starting the computer, press the corresponding key (usually F2, Delete or F12) to enter BIOS setup. In the BIOS settings, set the boot order to boot from the installation media first.
Step 4: Start installing the system
After restarting the computer, the system will boot from the installation media. Follow the on-screen instructions to select the appropriate language, time zone, and keyboard layout. Then, select "Install Operating System" and follow further prompts to complete the installation process.
Step 5: Configure system settings
After completing the installation of the operating system, the system will ask for some initial settings, such as user account and password, network connection, and privacy options. Configure according to personal needs.
Step 6: Install drivers and updates
After completing the system installation and initial setup, you need to install the drivers and system updates for your computer hardware. Drivers can be obtained from the manufacturer's official website or CD, while system updates can be completed through the update tool that comes with the operating system or official channels.
Note:
Make sure the user has sufficient operating system authorization certificate and license. Choose your installation media carefully and make sure it comes from a reliable source. During the installation process, read the on-screen instructions carefully and operate according to the actual situation. Back up and protect important data from data loss due to operating system installation. Choose the right operating system version and type to meet your personal or work needs. Pay attention to errors or problems that may occur during the installation process, and consult professionals in time.Through the computer installation tutorial provided in this article, readers can learn the detailed steps and precautions on how to install the operating system on the computer. Hopefully this information will help those who need to perform a system reinstall or are interested in doing so. Thank you for reading!
7. Computer system installation tutorial, teach you how to install win7 system on Huawei laptop?
1. Download a USB flash drive creation tool (Chinese cabbage, Laomaotao, Chinese cabbage), etc., make the USB flash drive, test out the stuff first, and then put the win7GHO system files into the USB flash drive.
2. Set up the USB disk to boot when you turn on the computer. You don’t need to enter blos. You can directly search the model of your motherboard brand online. Which is the shortcut startup button? Click on it when you turn on the computer.
3. Select the USB disk item. After entering, select pe to reinstall the system.
8. Tutorial on replacing the hard drive of the computer and installing the system?
1. Make a USB boot disk. First, on a normally used computer, prepare a USB flash drive of more than 8g and insert it into the computer, download and install Xiaobai's one-click system reinstallation tool to create a USB boot disk.
2. Restart the computer with the new hard disk, enter the BIOS settings FirstBoot Device, and select the USB disk as the first boot item.
3. After setting up the U disk to start, save and restart the computer to enter the 01 item pe interface, and select the DISKGENIUS partition tool.
4. Select the new hard drive and click Quick Partition. It is generally recommended to divide it into four areas: C drive for the main system, D drive for software and applications required for installation, and EF drive for your own different files, videos, music, etc. (If you install win10 system, it is usually a gpt partition, and if you install win7 system, it is usually an mbr partition.)
5. After dividing the partitions, click Save in the upper left corner to exit and return to the pe interface. Open the Xiaobai installation tool, select the win10 system image, choose to install and restore to the C drive, and it will be installed automatically.
6. Wait for the installation to complete, unplug the USB disk and restart the computer.
9. Tutorial on how to install the system on ASUS computer?
Start the ASUS computer and press F8 quickly and intermittently to enter the startup interface, then select the CD/DVD disc option to enter and install the pure version of the system. If that doesn't work, then find a USB flash drive to make a boot disk, enter the USB PE system, format the system disk, and then install the system.
10. Tutorial on installing the system on the hard disk of the computer host
Tutorial on installing the system on the hard disk of the computer host
In the process of using the computer, sometimes we need to install the system, especially when replacing the hard disk or reinstalling the system. This tutorial will introduce you in detail how to install the operating system on the computer host and guide you through the entire installation process. Through this tutorial, you will easily learn how to install the system, making your computer look brand new and running more stable and smooth.
Preparation
Before starting to install the system, you need to make the following preparations:
Back up important data: Installing the system may cause data loss, so please back up important data in advance. Operating system installation disk: Prepare the installation disk or USB flash drive of the operating system you need to install. Driver: If necessary, prepare the hardware driver so that it can be installed after the system installation is completed. Installation tools: Prepare screwdrivers, optical drives and other tools to facilitate the removal and installation of hardware.System installation steps
Next, we will explain in detail the steps to install the system on the computer host hard disk:
1. Set up the BIOS
First, you need to enter the BIOS interface of the computer and set the system to boot from the CD or U disk. Usually press the Del, F2 or F10 key to enter the BIOS setup interface. The specific key value depends on your motherboard model.
2. Insert the installation disk
Insert the operating system installation disk into the computer's optical drive. If it is a U disk installation, you need to insert the U disk into the computer's USB interface.
3. Install the system
Restart the computer, press any key according to the prompts during the boot process to enter the installation interface, follow the prompts to select settings such as language and time zone, and then select the installation method and installation location to start installing the operating system.
4. Driver installation
After the system installation is completed, install the motherboard, graphics card, sound card and other hardware drivers to ensure that the hardware devices work properly.
5. Update the system
After the installation is completed, update the system patches and drivers in a timely manner to ensure the safe operation and stability of the system.
Notes
During the process of installing the system, there are some things that need to be paid attention to:
Ensure the integrity and correctness of the installation disk to avoid installation errors. Back up important data to avoid data loss due to system installation. Use caution to avoid damage to the hardware during installation.Through the above steps and precautions, you can successfully complete the process of installing the system on the computer host hard drive, making your computer rejuvenated and working more efficiently.
The above is the detailed content of Tutorial on assembling a computer and installing a system?. For more information, please follow other related articles on the PHP Chinese website!

 Clipchamp Video Loss on Windows? 2 Ways to Recover Files!May 09, 2025 pm 08:12 PM
Recover Lost Clipchamp Videos: A Step-by-Step Guide Losing a video you've edited in Clipchamp can be frustrating. This guide provides effective methods to recover your lost Clipchamp video files. Finding Your Clipchamp Videos Before attempting recov
 7 Useful Fixes for Action Center Keeps Popping upMay 09, 2025 pm 08:07 PM
Action Center allows you to access quick settings and notifications. However, some users say that they encounter the “Action Center keeps popping up” issue on Windows 11/10. If you are one of them, refer to this post from MiniTool to get solutions.Qu
 Instant Ways to Restore Missing Google Chrome Icon on WindowsMay 09, 2025 pm 08:06 PM
Troubleshoot Missing Google Chrome Icon on Windows Can't find your Google Chrome icon on Windows? This guide offers several solutions to restore it. Why is my Chrome icon missing? Several factors can cause the Chrome icon to vanish from your desktop:
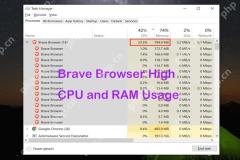 Brave Browser High CPU and RAM Usage: Best 5 Tips to ReduceMay 09, 2025 pm 08:05 PM
Brave browser CPU and memory usage too high? Under Windows 10/11 system, Brave browser's high CPU and memory usage problems have troubled many users. This tutorial will provide a variety of solutions to help you easily resolve this issue. Quick navigation: Brave browser high CPU and memory footprint Solution 1: Clear cookies and cache data Solution 2: Disable hardware acceleration Solution 3: Close the tab and update the Brave browser Solution 4: Disable the plugin Solution 5: Create a new user profile Optional: Run MiniTool System Booster System Optimization Tool Summarize Brave browser high CP
 Targeted Fixes for Xbox Error 0x87e0000f When Installing GamesMay 09, 2025 pm 08:04 PM
Troubleshooting Xbox Error Code 0x87e0000f: A Comprehensive Guide Encountering the Xbox error code 0x87e0000f while downloading games from Xbox Game Pass can be frustrating. This guide provides several solutions to help you resolve this issue and get
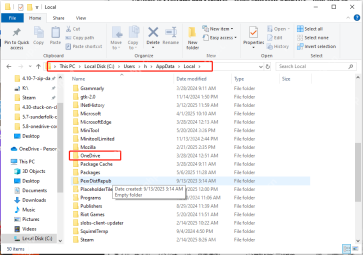 OneDrive Couldn't Start Files on Demand?Top 4 MethodsMay 09, 2025 pm 08:02 PM
OneDrive Files On-Demand troubleshooting: resolving the "OneDrive couldn't start Files On-Demand" error. This MiniTool guide provides solutions for the persistent "Microsoft OneDrive Couldn’t start files on Demand" error (codes 0x
 How to fix 'Microsoft Store is blocked' error in Windows?May 09, 2025 pm 06:00 PM
Microsoft Store is blocked error occurs when Windows prevents access to the Microsoft Store app, displaying the message Microsoft Store is blocked. Check with y
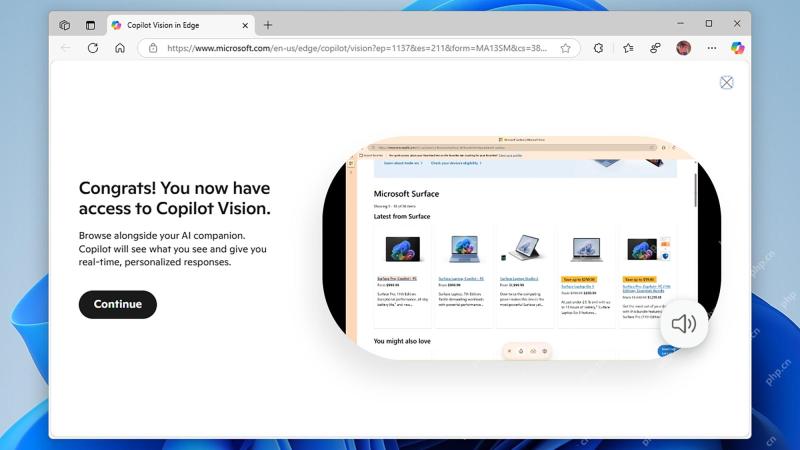 How to use Copilot Vision for free in Microsoft EdgeMay 09, 2025 am 10:32 AM
Staying current with all the new AI tools is a challenge. Many might even overlook readily available AI features. For instance, Copilot Vision is now free for all Microsoft Edge users – a fact easily missed if you don't regularly use Edge or haven't


Hot AI Tools

Undresser.AI Undress
AI-powered app for creating realistic nude photos

AI Clothes Remover
Online AI tool for removing clothes from photos.

Undress AI Tool
Undress images for free

Clothoff.io
AI clothes remover

Video Face Swap
Swap faces in any video effortlessly with our completely free AI face swap tool!

Hot Article
Hot Tools

SublimeText3 Chinese version
Chinese version, very easy to use

PhpStorm Mac version
The latest (2018.2.1) professional PHP integrated development tool

WebStorm Mac version
Useful JavaScript development tools

SAP NetWeaver Server Adapter for Eclipse
Integrate Eclipse with SAP NetWeaver application server.

ZendStudio 13.5.1 Mac
Powerful PHP integrated development environment

