


The longer you use your computer, the more junk files it accumulates. This is especially true if you do not clean it up regularly. Having too many junk files will consume valuable hard drive space and even slow down your computer. So, in this piece, we will show you how to remove junk files from a Windows 10 PC or laptop. There are six ways for you to choose.
- Way 1: By emptying Recycle Bin
- Way 2: Using iSumsoft DupFile Refixer
- Way 3: Using Command Prompt
- Way 4: Using Disk Cleanup
- Way 5: Using Storage Sense
- Way 6: Using iSumsoft System Refixer
Way 1: Get rid of junk files by emptying the Recycle Bin
When you no longer need a file, you usually right-click it and then select Delete to delete it. But in fact, the deleted files do not disappear from your computer immediately, but are temporarily moved to the Recycle Bin and continue to occupy your hard disk space. If you never empty the Recycle Bin, the junk files stored in it can accumulate up to several gigabytes over time. Therefore, empty the Recycle Bin regularly. This is an effective and effortless way that allows you to get rid of unnecessary junk files from your computer in time.

Way 2: Remove junk files with iSumsoft DupFile Refixer
When you accidentally download, save or copy the same file for many times, it may create multiple duplicate files on Computer. Most of these duplicate files are unnecessary and space-wasting, which can be the junk files on your Computer. If you are looking for ways to quickly find and delete duplicate files on Windows Computer, here you should definately try to use a professional duplicate file finder named iSumsoft DupFile Refixer. It is a clean and easy-to-use tool that can help you automatically find and mass delete dupliate files such as photos, video, music, document, etc. at ease without manually searching folder.
Here you can install iSumsoft DupFile Refixer to remove unwanted duplicate files.
Download
Step 1: Click Add icon to choose a drive/folder to scan for duplicate files and then click Settings button.

Step 2: In scan settings, choose the scan file type and size. After setting, click OK and Start scanning.

Step 3: Once the scan report is clearly displayed, one-click on the box for File Name to select all types of duplicate files to delete. This will free up your Computer space and boost your Computer performance.

Way 3: Delete system junk files using command prompt
When your Windows 10 system is processing tasks, the system itself and some applications automatically create temporary files in the background. These files are for temporary use only. When they are no longer needed, they become junk files, and the system does not automatically delete them. Therefore, you need to delete such junk files manually. Follow these steps.
Step 1: Run Command Prompt as administrator.
Step 2: Type del/q/f/s %temp%* and hit Enter. Command Prompt will delete all temporary files except those currently in use by the system.

Way 4: Remove junk files with Disk Cleanup
The Windows system generates more types of junk files apart from temporary files, such as Windows upgrade log files, offline webpage caches, etc. So, Microsoft designs the Disk Cleanup tool in all versions of Windows 10 to help you remove various junk files in one go. Here are the steps.
Step 1: Type disk cleanup in the search box on the taskbar, and then hit Enter. This will start the Disk Cleanup app built in Windows 10.
Step 2: Disk Cleanup will ask you to select the drive you want to clean up. Since system junk files are generated on the OS drive by default, just select your OS drive and click on OK to continue.

3단계: 디스크 정리 창이 열리면 시스템 파일 정리를 클릭하세요.

4단계: 이제 다양한 불필요한 시스템 파일이 창에 나열됩니다. 삭제하려는 모든 파일 형식을 선택하고 확인을 클릭하여 Windows 컴퓨터에서 영구적으로 삭제합니다. 삭제할 파일의 크기에 따라 삭제 프로세스는 몇 분 정도 걸릴 수 있습니다.

Way 5: Storage Sense를 사용하여 정크 파일 자동 제거
Storage Sense는 Windows 10에 통합된 또 다른 도구로, 정크 파일을 자동으로 정리하도록 컴퓨터를 설정할 수 있습니다. 아래 단계를 따르세요.
1단계: Win + I을 사용하여 설정을 엽니다. 그런 다음 홈 페이지에서 시스템 옵션을 선택합니다.

2단계: 왼쪽 창에서 저장소를 선택합니다. 오른쪽 창에서 "저장 공간" 버튼을 켠 다음 "자동으로 공간을 확보하는 방법 변경"을 클릭하세요.

3단계: 다음 페이지에서 저장소 감지가 불필요한 파일을 자동으로 제거할 빈도를 선택할 수 있습니다. 저장소 센스가 시스템 임시 파일, 휴지통 파일 및 다운로드 폴더에서 원치 않는 파일을 자동으로 삭제하도록 임시 파일 아래 확인란을 선택합니다.

Way 6: iSumsoft System Refixer로 정크 파일 정리
실제로 Windows 시스템에서 생성된 유효하지 않거나 손상된 레지스트리 파일, 글꼴 캐시 등과 같이 디스크 정리 및 저장소 센스가 접근할 수 없는 불필요한 파일이 있습니다. Windows 10에서 이러한 정크 파일을 제거하려면 컴퓨터의 경우 iSumsoft System Refixer와 같은 고급 PC 청소 도구를 사용할 수 있습니다. 단계는 다음과 같습니다.
1단계: 컴퓨터에 iSumsoft System Refixer를 다운로드하여 설치합니다. 설치 후 이 도구를 실행하세요.
2단계: 메인 인터페이스 상단에서 Clean All 옵션을 선택한 다음 Scan을 클릭하세요. 즉시 컴퓨터 전체 검사를 수행하고 불필요한 정크 파일을 모두 찾아냅니다.

3단계: 검사가 완료되면 모든 정크 파일이 화면에 표시됩니다. 모든 정크 파일을 한 번에 제거하려면 오른쪽 상단의 Clean 버튼을 클릭하세요.

The above is the detailed content of 6 Ways to Remove Junk Files from Windows 10 PC/Laptop. For more information, please follow other related articles on the PHP Chinese website!

 The New Surface Pro Doesn't Feel ProMay 08, 2025 am 06:01 AM
The new Surface Pro: A step back? Microsoft's latest Surface Pro offers connectivity via two USB-C ports, supporting charging, USB 3.2 data transfer, and DisplayPort 1.4a (up to two 4K monitors at 60Hz). However, the device ships without a power ad
 Microsoft Challenges the MacBook Air With New Surface LaptopMay 08, 2025 am 03:02 AM
Microsoft's latest Surface Laptop aims to rival the MacBook Air, but with some notable compromises. The absence of a Surface Connect port marks a significant departure from previous models, reflecting the growing prevalence of Thunderbolt and USB do
 Solve the problem that the svn plugin in eclipse always prompts for password inputMay 07, 2025 pm 05:03 PM
1. Background Recently, when using the svn plug-in to manage remote warehouse code in eclipse, prompts to enter passwords are always prompted to enter passwords, which is particularly annoying. After hard work, I finally solved the problem and shared it with you~ 2. Analysis of the password mechanism of the svn plug-in and the cause of the problem. When we use the svn plug-in for the first time and enter the password, a file that saves the password will be generated, and then the svn plug-in will read the username and password information by default every time. When eclipse is started, the configuration information will be automatically read into the program cache. After the password of svn is modified, it is impossible to log in again, and there is no prompt to re-enter the password. At this time, we can delete the relevant configuration files and let the svn plugin prompt us to re-enter the password. However, ec
 How to restore the win8 system details stepsMay 07, 2025 pm 05:00 PM
The steps to start system restore in Windows 8 are: 1. Press the Windows key X to open the shortcut menu; 2. Select "Control Panel", enter "System and Security", and click "System"; 3. Select "System Protection", and click "System Restore"; 4. Enter the administrator password and select the restore point. When selecting the appropriate restore point, it is recommended to select the restore point before the problem occurs, or remember a specific date when the system is running well. During the system restore process, if you encounter "The system restore cannot be completed", you can try another restore point or use the "sfc/scannow" command to repair the system files. After restoring, you need to check the system operation status, reinstall or configure the software, and re-back up the data, and create new restore points regularly.
 'Modern Operating System Original Book 3rd Edition'May 07, 2025 pm 04:57 PM
"Modern Operating Systems (English Edition 3rd Edition)" is a classic work written by Professor Tanenbaum. With his profound experience in the design of three operating systems, the book perfectly integrates theory and practice. The third edition of the book explores a number of topics in depth, such as process, threading, storage management, file systems, I/O deadlock, interface design, multimedia, performance trade-offs, and introduces the latest trends in operating system design. The book not only explains the principles and practices of modern operating systems in detail, but also pays special attention to Linux operating systems, Windows Vista operating systems, embedded operating systems, real-time operating systems and multimedia operating systems. Covering Windows Vista and the latest Linux/Unix operations
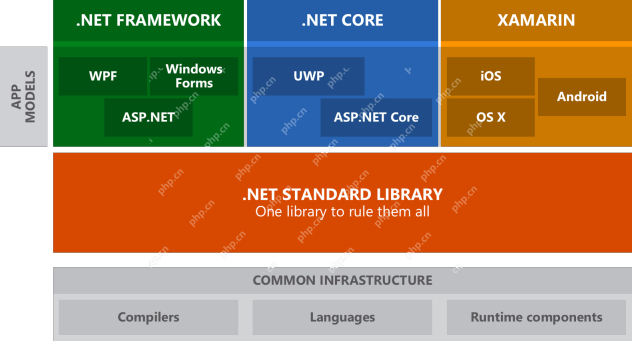 .NET Core Quick Start Tutorial 1. The beginning: Talking about .NET CoreMay 07, 2025 pm 04:54 PM
1. The Origin of .NETCore When talking about .NETCore, we must not mention its predecessor .NET. Java was in the limelight at that time, and Microsoft also favored Java. The Java virtual machine on the Windows platform was developed by Microsoft based on JVM standards. It is said to be the best performance Java virtual machine at that time. However, Microsoft has its own little abacus, trying to bundle Java with the Windows platform and add some Windows-specific features. Sun's dissatisfaction with this led to a breakdown of the relationship between the two parties, and Microsoft then launched .NET. .NET has borrowed many features of Java since its inception and gradually surpassed Java in language features and form development. Java in version 1.6
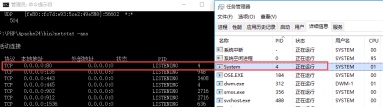 Solve the problem that the 80 port under Windows 10 is occupied by the System with PID 4May 07, 2025 pm 04:51 PM
1. Background Recently, out of curiosity, I updated the Windows 10 system, which is very easy to operate and the experience is quite good. However, when developing in IDEA, when starting the project using port 80, it is found that the port has been occupied. After some attempts, I found a solution and I will share it with you. 2. Solution steps 1. Check the process number PID that occupies port 80 by executing the netstat-ano|findstr "80" command. 2. Since port 80 is occupied by system services, the process cannot be terminated directly. Therefore, use the netshhttpshowservicestate command to view the current HTTP service status. The result is as shown in the figure: from the figure
 10 latest tools for web developersMay 07, 2025 pm 04:48 PM
Web development design is a promising career field. However, this industry also faces many challenges. As more businesses and brands turn to the online marketplace, web developers have the opportunity to demonstrate their skills and succeed in their careers. However, as demand for web development continues to grow, the number of developers is also increasing, resulting in increasingly fierce competition. But it’s exciting that if you have the talent and will, you can always find new ways to create unique designs and ideas. As a web developer, you may need to keep looking for new tools and resources. These new tools and resources not only make your job more convenient, but also improve the quality of your work, thus helping you win more business and customers. The trends of web development are constantly changing.


Hot AI Tools

Undresser.AI Undress
AI-powered app for creating realistic nude photos

AI Clothes Remover
Online AI tool for removing clothes from photos.

Undress AI Tool
Undress images for free

Clothoff.io
AI clothes remover

Video Face Swap
Swap faces in any video effortlessly with our completely free AI face swap tool!

Hot Article
Hot Tools

Dreamweaver Mac version
Visual web development tools

SublimeText3 Linux new version
SublimeText3 Linux latest version

mPDF
mPDF is a PHP library that can generate PDF files from UTF-8 encoded HTML. The original author, Ian Back, wrote mPDF to output PDF files "on the fly" from his website and handle different languages. It is slower than original scripts like HTML2FPDF and produces larger files when using Unicode fonts, but supports CSS styles etc. and has a lot of enhancements. Supports almost all languages, including RTL (Arabic and Hebrew) and CJK (Chinese, Japanese and Korean). Supports nested block-level elements (such as P, DIV),

DVWA
Damn Vulnerable Web App (DVWA) is a PHP/MySQL web application that is very vulnerable. Its main goals are to be an aid for security professionals to test their skills and tools in a legal environment, to help web developers better understand the process of securing web applications, and to help teachers/students teach/learn in a classroom environment Web application security. The goal of DVWA is to practice some of the most common web vulnerabilities through a simple and straightforward interface, with varying degrees of difficulty. Please note that this software

Atom editor mac version download
The most popular open source editor

