


As is known to all, only Administrators have complete control over the PC, while standard user accounts have no rights to perform some of the tasks. If you are a standard user on Windows 10 PC, you must wonder how you can make yourself become the administrator. Now here we explain how to promote a standard user to an administrator in Windows 10.
3 ways to promote the standard user to administrator in Windows 10
- Way 1: through Control Panel
- Way 2: via Computer Management
- Way 3: by Command Prompt
Tips: Either way, firstly you need to log into Windows 10 with an administrator account.
Way 1: Promote standard user to the administrator through Control Panel
Step 1: Access Windows 10 Control Panel.
Step 2: Click on Change account type link under User Accounts.

Note: You need to confirm the UAC dialog if you are using a standard user to make the changes. If you have no password, learn how to get Windows administrator privileges without password.

Step 3: Choose the local user account you want to promote to an administrator.

Step 4: Click on Change the account type link.

Step 5: Check Administrator and click on Change Account Type button.

Way 2: Promote standard user to administrator in Windows 10 via Computer Management
Step 1: Open Computer Management. (Right-click on This PC and select Manage.)
Step 2: Open System Tools > Local Users and Groups > Users. Right-click on the local user and select Properties.

Step 3: The account properties dialog opens. Select Member Of tab. At this point, you can see the account is currently a member of Users group. Click Add.

Step 4: Click Advanced button in the lower left corner.

Step 5: Click on Find Now. Then select the Administrator group from the search results, and click OK. This will make the user a member of Administrators.

Note: Access will be denied if you are using a standard user to make the changes.

Way 3: Promote standard user to administrator via Command Prompt
Step 1: Open Command Prompt as administrator in Windows 10.
Step 2: Type net localgroup Administrators

Tips: If you are not so clear about your local Administrator group name, just type net localgroup and press Enter to display all groups.
In addition to the three ways above, you also can promote a standard user to an administrator with the help of some specialized software programs on the web, which help more when you can't access any administrator in Windows 10.
The above is the detailed content of How to Promote Standard User to Administrator in Windows 10. For more information, please follow other related articles on the PHP Chinese website!

 This Limited-Edition 'Skeleton” HDD Shows You How It Writes BytesMay 08, 2025 pm 09:04 PM
The HD-SKL, a limited-edition hard drive, is a modern take on Buffalo's 1998 Skeleton Hard Disk. The original, a 4.3GB drive with a clear acrylic case, was produced in a limited run of 500 units. While Buffalo cites its 1978 Melco 3533 turntable as
 The New Surface Pro Doesn't Feel ProMay 08, 2025 am 06:01 AM
The new Surface Pro: A step back? Microsoft's latest Surface Pro offers connectivity via two USB-C ports, supporting charging, USB 3.2 data transfer, and DisplayPort 1.4a (up to two 4K monitors at 60Hz). However, the device ships without a power ad
 Microsoft Challenges the MacBook Air With New Surface LaptopMay 08, 2025 am 03:02 AM
Microsoft's latest Surface Laptop aims to rival the MacBook Air, but with some notable compromises. The absence of a Surface Connect port marks a significant departure from previous models, reflecting the growing prevalence of Thunderbolt and USB do
 Solve the problem that the svn plugin in eclipse always prompts for password inputMay 07, 2025 pm 05:03 PM
1. Background Recently, when using the svn plug-in to manage remote warehouse code in eclipse, prompts to enter passwords are always prompted to enter passwords, which is particularly annoying. After hard work, I finally solved the problem and shared it with you~ 2. Analysis of the password mechanism of the svn plug-in and the cause of the problem. When we use the svn plug-in for the first time and enter the password, a file that saves the password will be generated, and then the svn plug-in will read the username and password information by default every time. When eclipse is started, the configuration information will be automatically read into the program cache. After the password of svn is modified, it is impossible to log in again, and there is no prompt to re-enter the password. At this time, we can delete the relevant configuration files and let the svn plugin prompt us to re-enter the password. However, ec
 How to restore the win8 system details stepsMay 07, 2025 pm 05:00 PM
The steps to start system restore in Windows 8 are: 1. Press the Windows key X to open the shortcut menu; 2. Select "Control Panel", enter "System and Security", and click "System"; 3. Select "System Protection", and click "System Restore"; 4. Enter the administrator password and select the restore point. When selecting the appropriate restore point, it is recommended to select the restore point before the problem occurs, or remember a specific date when the system is running well. During the system restore process, if you encounter "The system restore cannot be completed", you can try another restore point or use the "sfc/scannow" command to repair the system files. After restoring, you need to check the system operation status, reinstall or configure the software, and re-back up the data, and create new restore points regularly.
 'Modern Operating System Original Book 3rd Edition'May 07, 2025 pm 04:57 PM
"Modern Operating Systems (English Edition 3rd Edition)" is a classic work written by Professor Tanenbaum. With his profound experience in the design of three operating systems, the book perfectly integrates theory and practice. The third edition of the book explores a number of topics in depth, such as process, threading, storage management, file systems, I/O deadlock, interface design, multimedia, performance trade-offs, and introduces the latest trends in operating system design. The book not only explains the principles and practices of modern operating systems in detail, but also pays special attention to Linux operating systems, Windows Vista operating systems, embedded operating systems, real-time operating systems and multimedia operating systems. Covering Windows Vista and the latest Linux/Unix operations
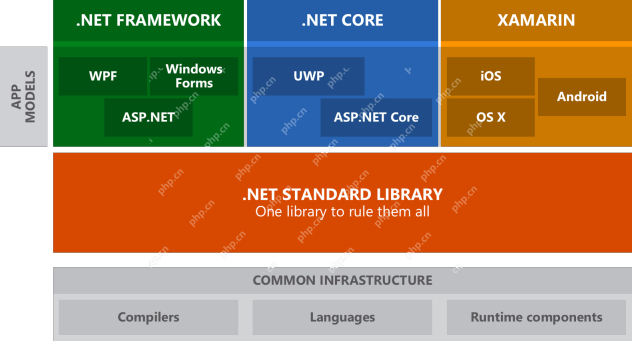 .NET Core Quick Start Tutorial 1. The beginning: Talking about .NET CoreMay 07, 2025 pm 04:54 PM
1. The Origin of .NETCore When talking about .NETCore, we must not mention its predecessor .NET. Java was in the limelight at that time, and Microsoft also favored Java. The Java virtual machine on the Windows platform was developed by Microsoft based on JVM standards. It is said to be the best performance Java virtual machine at that time. However, Microsoft has its own little abacus, trying to bundle Java with the Windows platform and add some Windows-specific features. Sun's dissatisfaction with this led to a breakdown of the relationship between the two parties, and Microsoft then launched .NET. .NET has borrowed many features of Java since its inception and gradually surpassed Java in language features and form development. Java in version 1.6
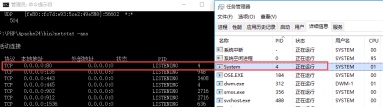 Solve the problem that the 80 port under Windows 10 is occupied by the System with PID 4May 07, 2025 pm 04:51 PM
1. Background Recently, out of curiosity, I updated the Windows 10 system, which is very easy to operate and the experience is quite good. However, when developing in IDEA, when starting the project using port 80, it is found that the port has been occupied. After some attempts, I found a solution and I will share it with you. 2. Solution steps 1. Check the process number PID that occupies port 80 by executing the netstat-ano|findstr "80" command. 2. Since port 80 is occupied by system services, the process cannot be terminated directly. Therefore, use the netshhttpshowservicestate command to view the current HTTP service status. The result is as shown in the figure: from the figure


Hot AI Tools

Undresser.AI Undress
AI-powered app for creating realistic nude photos

AI Clothes Remover
Online AI tool for removing clothes from photos.

Undress AI Tool
Undress images for free

Clothoff.io
AI clothes remover

Video Face Swap
Swap faces in any video effortlessly with our completely free AI face swap tool!

Hot Article
Hot Tools

mPDF
mPDF is a PHP library that can generate PDF files from UTF-8 encoded HTML. The original author, Ian Back, wrote mPDF to output PDF files "on the fly" from his website and handle different languages. It is slower than original scripts like HTML2FPDF and produces larger files when using Unicode fonts, but supports CSS styles etc. and has a lot of enhancements. Supports almost all languages, including RTL (Arabic and Hebrew) and CJK (Chinese, Japanese and Korean). Supports nested block-level elements (such as P, DIV),

EditPlus Chinese cracked version
Small size, syntax highlighting, does not support code prompt function

SecLists
SecLists is the ultimate security tester's companion. It is a collection of various types of lists that are frequently used during security assessments, all in one place. SecLists helps make security testing more efficient and productive by conveniently providing all the lists a security tester might need. List types include usernames, passwords, URLs, fuzzing payloads, sensitive data patterns, web shells, and more. The tester can simply pull this repository onto a new test machine and he will have access to every type of list he needs.

SublimeText3 English version
Recommended: Win version, supports code prompts!

PhpStorm Mac version
The latest (2018.2.1) professional PHP integrated development tool

