


プリンターの履歴をチェックして、何が印刷されたかを確認することは、監視するのがやや難しい場合があります。トナー レベルからはアクセサリの使用量がわからないため、Windows 10 または Windows 11 内でログ記録を有効にする必要があります。これを行う方法がいくつかあります。
Windows 10 で最近印刷したドキュメントのプリンター履歴ログを有効にする
デフォルトでは、各ドキュメントの印刷が終了すると、印刷されたドキュメントの履歴が消去されます。この設定を変更すると、プリンターの印刷キューから最近印刷したドキュメントのリストを表示できるようになります。インストールしたプリンターごとにこの設定を変更する必要があります。
印刷キューにアクセスしてログを有効にする
印刷キューにアクセスするには、Windows の [スタート] メニュー ボタンを右クリックし、[設定] オプションを選択します。ここから、[デバイス] > [デバイス] をクリックします。プリンターとスキャナー。

[プリンターとスキャナー] リストでお使いのプリンターを見つけてクリックし、[キューを開く] をクリックして印刷キューを開きます。

現在の印刷アイテムとキューに入れられた印刷アイテムを含むプリンター キューがリストされます。以前に印刷したドキュメントは表示されないため、ログを有効にする必要があります。
プリンターの印刷キュー ウィンドウで、[プリンター] > をクリックします。プロパティ。または、プリンターを選択し、「プリンターとスキャナー」設定メニューの「管理」をクリックします。

プリンターのプロパティで、[詳細設定] タブをクリックし、[印刷されたドキュメントを保持する] チェックボックスをオンにします。
[OK] をクリックして設定を保存します。

ドキュメント履歴を有効にすると、印刷プロセスの完了後にドキュメントが印刷キューから消えることはなくなります。
Windows 11 で最近印刷したドキュメントのプリンター履歴ログを有効にする
Windows 11 は、以前のものと同様に、デフォルトでは印刷履歴を有効にしません。短期間の印刷履歴を有効にするには、Windows + i を押すか、設定アプリを開き、[Bluetooth とデバイス] > [Bluetooth とデバイス] に移動します。 [プリンターとスキャナー] をクリックし、プリンターを選択します。

下にスクロールして、[プリンターのプロパティ] をクリックします。

[詳細設定] タブを選択し、[印刷されたドキュメントを保持する] の横のボックスにチェックを入れて、[適用] をクリックします。その後、すべてのウィンドウを閉じます。

印刷履歴を確認したいときは、[設定] > [設定] を開くだけです。 Bluetooth とデバイス > [プリンタとスキャナ] でプリンタを選択し、[印刷キューを開く] をクリックします。
イベント ビューアで長期印刷履歴を有効にします。
印刷キューは、以前に印刷したドキュメントの短期的な概要を提供します。長期的なリストを表示したい場合は、Windows イベント ビューアを使用する必要があります。
開始するには、Windows の [スタート] メニュー ボタンを右クリックし、[イベント ビューアー] オプションをクリックします。

イベント ビューアを使用すると、以前に印刷したファイルのリストを表示できますが、まず長期のプリンタ履歴の記録を開始するように Windows を設定する必要があります。 Windows イベント ビューアで、[アプリケーションとサービス ログ] > [アプリケーションとサービス ログ] をクリックします。マイクロソフト> Windowsの左側にある「イベントビューア(ローカル)」メニュー。

This will reveal a significant number of Windows services. Scroll down to find the "PrintService" category.
From here, right-click the "Operational" log and then click the "Properties" button.

Click to enable the "Enable Logging" checkbox and then set a maximum size for the log. The larger the size, the longer Windows will record your printed document history.
Click the "Apply" button to save the setting.

Windows will now automatically save the printer history for all of your installed printers to a log file that you can access within Event Viewer.
View Print History in Event Viewer
Once your printer history is enabled, you can access it at any time from the Event Viewer. To do so, find and open the "PrintService" category and then click on the "Operational" log.

A history of all Windows printer events will be listed, from initial printer spooling to completed or failed prints.
Under the "Task Category" section, items listed as "Printing a Document" are documents that have been successfully printed. Failed prints will also appear in this category.

To make it easier to sort, you can group your print log by categories, making it easy to separate the "Printing a Document" events into their own section. To do so, right-click the "Task Category" heading and then click the "Group Events by This Column" button.

Your items will now be separated by category.
You can minimize the other categories, leaving the "Printing a Document" category to display only a list of your previously printed documents.

Use Third-Party Print Logging Software
While the Event Viewer is functional, it doesn't provide the clearest view of your printed documents. You can use third-party print logging software like PaperCut Print Logger to view your long-term printer history instead.
PaperCut Print Logger provides you with a time-stamped list of your printed documents, including information on the Windows user who printed the document, the document name, and the number of pages and copies.

The admin page can be accessed from the default PaperCut Print Logger directory.
On Windows 10, this is usually C:Program Files (x86)PaperCut Print Logger . Double-click the "ViewLogs" shortcut to open the admin panel, where a list of your printed documents will be available, separated by date.

Once you've opened the PaperCut Print Logger admin page, under the "View" category, click the "HTML" button to access your print history for that date within the panel.
You can also click the "CSV/Excel" button under the "Date (Day)" or "Date (Month)" categories to export your daily or monthly print history as a Microsoft Excel XLS file.

You can also access these logs from the Logs > CSV folder inside your PaperCut Print Logger installation directory.
The above is the detailed content of How to Check Your Printed Document History in Windows 10. For more information, please follow other related articles on the PHP Chinese website!

 10 Ways to Reuse or Repurpose an Old LaptopApr 27, 2025 am 09:30 AM
Repurpose Your Old Laptop: 10 Ingenious Ideas to Avoid the Landfill! Many of us upgrade our laptops every few years, leaving perfectly functional machines gathering dust. Instead of discarding them, consider these ten creative ways to give your old
 This File Manager Solves All My Windows File Explorer WoesApr 27, 2025 am 06:02 AM
This article explores why the author prefers OneCommander, a free third-party file explorer, over Windows File Explorer. The author highlights several key shortcomings of Windows File Explorer, including its slow adoption of modern features (like da
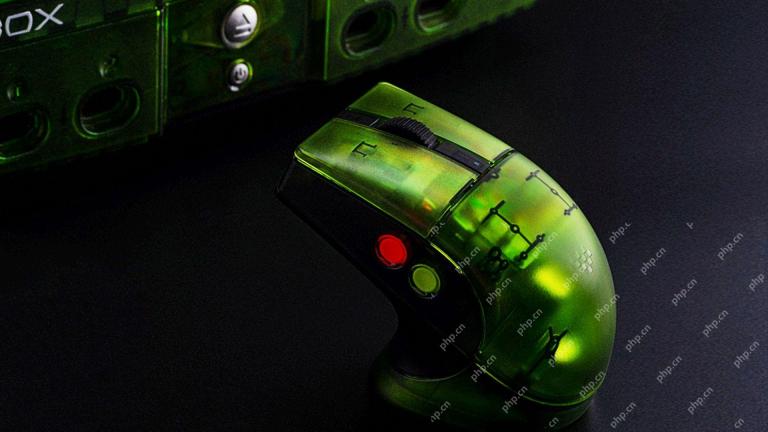 8Bitdo's Retro Xbox Mouse Is Just $48 TodayApr 27, 2025 am 12:56 AM
8BitDo Retro R8 Gaming Mouse: Great Value Offers are coming! The 8BitDo Xbox Edition R8 is an officially licensed translucent green wireless gaming mouse that uses a PAW 3395 sensor, supports three connectivity modes: Bluetooth, 2.4G and wired USB-C, and is equipped with programmable buttons and a charging dock. Amazon is selling well now! This high-performance wireless gaming mouse is currently priced at just $47.99, enjoying a 20% discount, a record low! Originally priced at $59.99, the R8 mouse is absolutely worth the money with its excellent features and officially licensed Xbox design. Its dazzling translucent green shell is similar to the first generation Xbo
 Windows Recall Is Finally Rolling Out After Controversal RevealApr 27, 2025 am 12:55 AM
Copilot PCs Get Enhanced Recall and Windows Search Features Microsoft's Copilot PCs are receiving significant updates to their Recall and Windows Search functionalities. These improvements leverage the power of the device's integrated TPU (Tensor
 Microsoft Is Fixing a Weird Bug in OutlookApr 26, 2025 pm 09:03 PM
High CPU usage in Outlook? Microsoft's got a fix coming. Many Outlook users on Windows have reported a frustrating issue: their CPUs are spiking to 30-50% while simply composing emails. This impacts performance, battery life (especially on laptops),
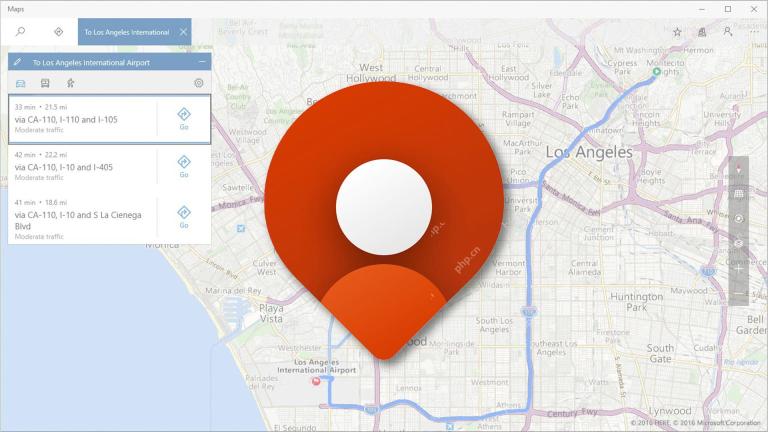 Windows Maps Will Become 'Nonfunctional' This JulyApr 26, 2025 am 09:01 AM
Related ##### Before Dropbox and OneDrive, We Had Windows Briefcase Windows Briefcase: A Pioneer in File Synchronization. Posts 1 Choosing a navigation app? Bing Maps offers the closest experience to the discontinued Windows Maps. Google Maps and
 Before Dropbox and OneDrive, We Had Windows BriefcaseApr 26, 2025 am 06:11 AM
The "breviation package" feature introduced by Windows 95 makes file synchronization possible. At that time, this function was unique in the field of file synchronization. However, with the rise of cloud services such as OneDrive, Microsoft has gradually phased out the "branded briefcase" feature since Windows 8. You might be surprised that file synchronization is not a new technology, in fact, Microsoft has provided this feature with a virtual folder called "Briefcase" as early as Windows 95. A brief history of Windows "Briefcase" As the name suggests, the "brookie" feature was released with Windows 95 released in 1995, which is still considered by many to be one of the best operating systems. It has user friends
 Razer Joins the Vertical Mouse Party With New Pro Click V2Apr 26, 2025 am 03:05 AM
Razer Pro Click V2 Vertical Edition Review: Comfort and Performance Razer's first vertical mouse, the Pro Click V2 vertical version, is known for its ergonomic design. The tilt angle of 71.7 degrees, like a handshake, effectively reduces wrist pressure. In terms of technical specifications, the vertical version and the standard version of Pro Click V2 have many similarities. Both are equipped with Razer's advanced Focus Pro optical sensor, with a maximum sensitivity of 30,000 DPI, a maximum speed of 550 inches per second and a maximum acceleration of 40G. All mechanical buttons can withstand 60 million clicks, ensuring durability. In terms of battery life, the vertical version is up to 6 months


Hot AI Tools

Undresser.AI Undress
AI-powered app for creating realistic nude photos

AI Clothes Remover
Online AI tool for removing clothes from photos.

Undress AI Tool
Undress images for free

Clothoff.io
AI clothes remover

Video Face Swap
Swap faces in any video effortlessly with our completely free AI face swap tool!

Hot Article
Hot Tools

ZendStudio 13.5.1 Mac
Powerful PHP integrated development environment

PhpStorm Mac version
The latest (2018.2.1) professional PHP integrated development tool

DVWA
Damn Vulnerable Web App (DVWA) is a PHP/MySQL web application that is very vulnerable. Its main goals are to be an aid for security professionals to test their skills and tools in a legal environment, to help web developers better understand the process of securing web applications, and to help teachers/students teach/learn in a classroom environment Web application security. The goal of DVWA is to practice some of the most common web vulnerabilities through a simple and straightforward interface, with varying degrees of difficulty. Please note that this software

WebStorm Mac version
Useful JavaScript development tools

SublimeText3 Chinese version
Chinese version, very easy to use

