


After the computer is assembled, it needs to be debugged to see if it can run normally. For novices, they may not know how to debug a newly assembled computer and where to start debugging. Below, PHP editor Apple will bring you a computer assembly and debugging tutorial to help you solve the debugging problems after computer assembly.

How to debug the computer after it is assembled?
After the computer is assembled, if you want to debug the machine, the method is very simple. You need to install the required third-party operating system on the computer hard disk, and then check whether the computer motherboard driver is installed properly. You can open my computer and find the device. Manager, check whether the hardware driver has any abnormalities with exclamation marks or question marks. After the driver is detected, then test the computer to see if all software is opened and it can be used normally without any errors.
How to try the assembled computer machine?
Download the SP2004 professional copying test software. Its high-intensity load can quickly test whether there are problems with the CPU, memory, motherboard, etc. If there is no alarm after 1 hour of continuous copying, congratulations, your computer is completely faulty. Question, it is the best for stability testing of servers. It is a must-have tool for the majority of installers, counter builders, and computer buyers. The computer you assemble is stable and unstable! There are four built-in test modes, and users can choose to focus on test items as needed.
How to assemble the computer configuration after buying it?
After purchasing the computer configuration, there are two methods to choose from for assembly. 1. Find professionals to assemble it for you. Since the installation of computer parts requires certain skills and experience, it is recommended to choose a professional computer assembly master to ensure the safety of the operation. 2. DIY it yourself. If you know enough about computer hardware and have some skills, you can assemble it yourself. However, you need to pay attention to safety issues, read the relevant operation manual carefully, and be careful when operating. In addition, it is recommended to understand the operating steps before assembling the computer and pay attention to anti-static, cable arrangement, slots and other issues to avoid equipment damage during operation.
How to install the system after the computer is assembled?
First of all, you need to prepare an 8 GB U disk. If you are a novice, you can only go to an Internet cafe, or download the Laomaotao U disk PE system from the computers of colleagues and friends, or Chinese cabbage, U disk PE system, these two PE systems are the simplest and easiest to operate. They do not require complicated settings. You only need to download two softwares. For either one, install the U disk to the USB interface and proceed to the next step through the software prompts. , after the installation is completed, you can test whether the U disk PE system is installed through simulated startup
Of course, these two PE systems will release third-party software installations, such as 2345 browser, after the system is installed. Or 360 security software, some software installed on the C drive by default
You can also choose the relatively pure PE system installation software of micro PE. After the installation is completed, test the normal startup, and then copy the downloaded mirror system Go to, U disk
If you don’t use the U disk as the first boot item, enter the BIOS settings, just restart the computer and use the keyboard shortcuts
Ecs, F9, If you press F10, F11, F12, or delete while the hardware self-test is in progress, it will switch to the U disk boot mode. Select the U disk as the startup item to enter the PE system.
After entering the PE system, Assume that you are installing a 256GB solid-state drive and the installation system is WINDOWS 10. Then set the space of the C drive to 60 GB to 80 GB to ensure that in the future use of the system, it will not easily cause insufficient space on the C drive. phenomenon, affecting the system's operating data exchange, resulting in slow operation, and use the HD hard disk tool built into the PE system to select 4096 when partitioning the hard disk, which is the 4K alignment mode for partitioning, to avoid failure of the hard disk caused by not selecting 4K alignment. A series of situations such as slower reading and writing speeds occur
After the partition is completed, use the PE system's built-in system installation tool to copy the image file. Do not restart directly after copying. Select the startup file repair tool to repair the boot file. Perform a repair boot to avoid failure to recognize the boot file during the restart process, causing the system installation to fail.
How to configure the software after the computer is assembled?
You need to turn on the computer, then install a system according to the computer configuration, and then install the software after connecting to the Internet
How to assemble the violent bear?
The assembly process of the Violent Bear is as follows: 1. Make sure all parts are complete: The assembly of the Violent Bear may require multiple parts, including the head, body, limbs, eyes, mouth, etc. Before you start assembling, make sure all the parts are ready and check that they are intact. 2. Attach the head to the body: Usually, the head and body of a violent bear are separate parts and require a specific method to connect them together. Secure the head to the body according to the manufacturer's instructions or assembly instructions. This may involve using screws, glue, or other methods of connection. 3. Fixed limbs: Violent bears usually have four limbs, including two hands and two feet. Fasten these limbs to the body by the same method. Make sure they are securely attached in the correct position to ensure the bear can maintain balance and stability. 4. Attach the eyes and mouth: Depending on the design of the bear, the eyes and mouth may be solid pieces, or they may require special assembly tools for installation. According to the instructions, install the eyes and mouth in the correct position and make sure they are securely fastened. 5. Check the assembly results: After completing the assembly, check the Violent Bear to ensure that all parts are fixed together in the correct way and are not loose or moved. If any problems are found, adjust or re-fix the parts promptly. Please note that the above steps are a general demonstration only and actual assembly steps may vary depending on the product. It is recommended to follow the specific manufacturer's instructions for assembly to ensure correctness and safety. In addition, if you encounter difficulties or have any questions, please consult the manufacturer or seller in time.
After assembling the computer, what does it mean when it lights up?
The video signal is not output, that is, the host's graphics card does not output normally. Check, memory, graphics card
After the air conditioner is installed, how do you test it to prove it is good?
Air conditioning test steps
1. Plug in the power of the air conditioner, turn on the air conditioner, and see if the air conditioner can operate normally, whether the cooling or heating is strong enough. At the same time, pay attention to the condition of the air outlet of the air conditioner, whether it swings normally, whether the air outlet is normal, and whether there are any abnormal sounds and noises. The noise value cannot be ignored. If the sound is too loud, it will directly affect our normal use.
2. Check for leakage. Check whether the socket of the air conditioner is firm and whether it is easy to fall off. Make sure it is stable and can carry the power of the air conditioner.
3. Check whether there is fluorine leakage. When verifying refrigerant leakage, please note that in air conditioners with refrigerant leakage, there will be partial frost from the capillary tube outlet to the evaporator inlet, while other parts will have a small amount of condensation or be dry and frost-free, and the suction pipe temperature of the compressor will be close to the ambient temperature.
4. Check if there is any water leakage. You can use your eyes to observe whether there is any leakage or water droplets oozing out of the indoor unit of the air conditioner.
After the assembled wardrobe is scattered, can it still be assembled?
If it comes apart, it can be reassembled. Don’t lose the screws.
How to assemble a computer mouse?
The steps are as follows:
1. First, prepare all the accessories of the wireless mouse, including: a wireless mouse, 2 batteries matching the wireless mouse, and a USB plug-in for the mouse.
2. The next step is to install the mouse battery. First, gently open the mouse cover. Note: Just lift it gently from the high-curved tail of the mouse. Do not lift it from the scroll wheel (left and right buttons) to avoid damaging the mouse.
3. After opening the mouse cover, you can see that there are two battery slots on the left and right inside. The above prompts the battery installation direction of the positive and negative poles. According to this prompt, insert the 2 batteries and install them.
4. After installing the battery, close the mouse cover.
5. Next, find the notebook USB socket and insert the USB plug-in for the mouse into it.
6. At this time, press the computer power button to turn on the computer. Then turn the mouse over, turn it on, and the prompt light will light up. Note: "I" means open, O means closed.
The above is the detailed content of How to debug the computer after it is assembled?. For more information, please follow other related articles on the PHP Chinese website!

 Black Boxes on Desktop Icons: Find Powerful Tips to RemoveMay 12, 2025 pm 08:07 PM
Encountering black squares instead of desktop icons in Windows 11/10? This comprehensive guide offers several straightforward solutions to restore your icons to their original appearance. Quick Navigation: Black Squares on Desktop Icons Solution 1:
 CapCut Project File Location: How to Find, Recover, and ShareMay 12, 2025 pm 08:06 PM
This MiniTool guide offers a complete walkthrough for managing CapCut projects, covering location, recovery, and sharing. Mastering these steps ensures efficient project handling. Quick Navigation: CapCut Project File Location on PC Backing Up CapC
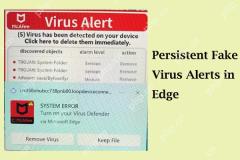 Persistent Fake Virus Alerts in Edge: How to Identify & AvoidMay 12, 2025 pm 08:05 PM
Edge browser fake virus warning: a guide to identifying, handling and prevention Many users report encountering fake virus warnings in Microsoft Edge browser. These warnings usually appear in the form of pop-ups, claiming that malware or viruses are detected, attempting to induce users to download malware or take harmful actions. This article will guide you on how to identify, deal with, and prevent such false warnings. How to identify fake virus warnings in Edge browser? False virus warnings usually have the following characteristics: Use emergency and panic language: Try to force users to act by creating panic. Use fake company logos: Imitate the logo of well-known security software or Microsoft. Regular companies will not issue warnings in this way. Request to dial
 Effective Ways to Fix EVERSPACE 2 Crashing/Not LaunchingMay 12, 2025 pm 08:03 PM
EVERSPACE 2 Crash Problem and Solutions Have you encountered a crash problem while playing EVERSPACE 2? If this problem bothers you, this MiniTool article will help you. This article will explain common causes and effective solutions to EVERSPACE 2 crashes. Quick navigation: EVERSPACE 2 Startup Crash How to fix EVERSPACE 2 crash Summarize EVERSPACE 2 Startup Crash The EVERSPACE 2 crash problem has always been the focus of players. Many players have reported different types of crashes, including crashes at startup, sudden exits during the game, and interactions with Unreal Engine
 Apex Integrity Error 0x8000001: 3 Useful Methods HereMay 12, 2025 pm 08:02 PM
Encountering the Apex Legends integrity error 0x8000001, causing game crashes? This guide provides effective solutions. Let's explore the fixes. Apex Integrity Error 0x8000001: A Crashing Problem Many Apex Legends players report encountering the &quo
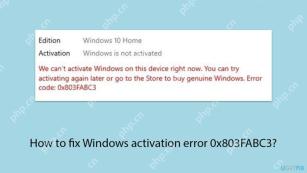 How to fix Windows activation error 0x803FABC3?May 12, 2025 pm 06:00 PM
Windows activation is a critical process in Windows 11 that verifies your operating system copy is genuine, enabling full functionality like personalization fea
 How to Use Copilot in Microsoft OneDrive? Everything You NeedMay 11, 2025 pm 08:02 PM
Unlock the Power of Microsoft OneDrive Copilot: Your AI-Powered File Assistant This MiniTool guide unveils the capabilities of Copilot in OneDrive, a revolutionary AI assistant designed to streamline your file management and boost productivity. Expl
 A Guide to Fix A Supported Game Is Required to Use This FeatureMay 11, 2025 pm 08:01 PM
Troubleshooting the NVIDIA GeForce Experience "Supported Game Required" Error Encountering the "A supported game is required to use this feature" error in NVIDIA GeForce Experience while using game filters, screen recording, or ad


Hot AI Tools

Undresser.AI Undress
AI-powered app for creating realistic nude photos

AI Clothes Remover
Online AI tool for removing clothes from photos.

Undress AI Tool
Undress images for free

Clothoff.io
AI clothes remover

Video Face Swap
Swap faces in any video effortlessly with our completely free AI face swap tool!

Hot Article
Hot Tools

Atom editor mac version download
The most popular open source editor

WebStorm Mac version
Useful JavaScript development tools

MinGW - Minimalist GNU for Windows
This project is in the process of being migrated to osdn.net/projects/mingw, you can continue to follow us there. MinGW: A native Windows port of the GNU Compiler Collection (GCC), freely distributable import libraries and header files for building native Windows applications; includes extensions to the MSVC runtime to support C99 functionality. All MinGW software can run on 64-bit Windows platforms.

SAP NetWeaver Server Adapter for Eclipse
Integrate Eclipse with SAP NetWeaver application server.

VSCode Windows 64-bit Download
A free and powerful IDE editor launched by Microsoft

