

 Computer TutorialsTroubleshootingDoes the Kuroshio BA-210.785G motherboard support AHCI? Why can't I start the system when I install it from SSD, but can I read it when I use another disk to start the system?
SSD cannot boot the system, but can it be read by other disks? Whether the Kuroshio BA-210.785G motherboard supports AHCI mode may affect the boot function of the SSD. This article will explore this issue and help you troubleshoot and resolve SSD boot failure issues.

Does the Kuroshio BA-210.785G motherboard support AHCI? Why can’t I start the system when I install it from SSD, but can I read it when I use another disk to start the system?
785G motherboards have AHCI settings, but the default is the IDE option. You have to open the BIOS settings yourself. After setting it to AHCI, the system needs to be reinstalled, otherwise it will cause a blue screen. Although there are ways to avoid reinstalling the system. , but it is also easy to handle improper blue screens. I feel that reinstalling the system is more reliable and stable. If the SSD system disk cannot be started, it may be that the C drive is not activated. You can use other disks to start the system and read this SSD. Then you choose Win7 as the Example: Start menu—Computer—right mouse button—Management—Disk Management—Open.
Use the mouse to click on the partition where the system is installed on your SSD, right-click the mouse to open the menu, select - Mark Partition as Active Partition, shut down the computer, remove the hard disk and boot from the SSD.
What kind of CPU should Spartak Kuroshio ba-210 be equipped with so that the CPU and motherboard can achieve the best performance?
Since you choose the cost-effective ba-210, you have to consider your budget. Based on the price of the CPU that can be used with this board, I think AMD Athlon II X250 is more suitable. .
Of course you can budget a little more, and AMD Athlon II X630 is an improvement. If I were buying it myself, I would do the latter.How to install the computer motherboard?
1 Installing a computer motherboard requires certain skills and basic operations. 2 First, you need to confirm the compatibility of the motherboard and the chassis, then remove the chassis side panel, determine the location of the CPU slot, and install the CPU in it. Then install the radiator and memory module, and assemble the motherboard. Finally, connect the power supply, hard disk, graphics card and other equipment, and connect various cables to complete the installation. 3 Before installing the motherboard, you need to make some preparations, such as cleaning the inside of the chassis, backing up important data, and avoiding static interference, etc. In addition, you need to pay attention to the installation sequence and operation methods to avoid damaging the motherboard or other hardware devices.
Will there be any conflict if Spartak Kuroshio BA-210 is plugged into a discrete graphics card?
No need to set up, just plug in the independent graphics card, and then connect the VGA interface of the graphics card to the independent graphics card. The BIOS will brake the switch. The first time you enter the system, you may be asked to enter the graphics card driver (Spartak's The BIOS is very weird. The interface for plugging in independent graphics and integrated graphics is blocked, but my classmate can still use it.)
How to install the computer motherboard?
First, install the rear bezel
Before installing the motherboard, you need to install the rear bezel that comes with the motherboard box on the chassis. The installation method of the rear baffle is to align the baffle from the inside of the chassis to the corresponding empty position and press it out. Once you feel it clicks into place, the installation is successful.
When installing, please note that there are metal sheets on the holes of some interfaces on the rear bezel. Remember to bend them inward first, otherwise they will block the rear interfaces of the motherboard. If you find that they are blocked after installing the motherboard, As for the interfaces, all I have to do is dismantle them all and reinstall them.
Second, install the coaxial nut
The motherboard is all fixed in the chassis with screws. The screws are very stable, but the position of each screw must be precise. There are generally 5 to 7 fixing holes on the motherboard. You must choose the appropriate holes to match the motherboard. After selecting, tighten the fixing screws on the base plate. (Most of the current chassis have fixed posts installed, and the positions are correct. , we don’t need to install it separately). Then carefully place the motherboard on it, making sure to align the keyboard port, mouse port, serial and parallel ports on the motherboard with the holes in the cover on the back of the chassis, align all the screws with the fixing holes of the motherboard, and install each screw in turn. In short, the motherboard and the bottom plate are required to be parallel and must not touch each other, otherwise it is easy to cause a short circuit.
Third, connect the ATX power cord
After the motherboard is installed in the chassis, you need to connect the corresponding power cord. At present, the mainstream ATX power supply plugs that supply power to the motherboard are generally 24Pin+4Pin (8Pin). Find the corresponding power plugs and plug them into the corresponding sockets on the motherboard.
The power plug and socket are designed to be fool-proof, so it will be difficult to insert them if they are inserted incorrectly. If you find that there is a 4Pin socket next to the CPU on the motherboard, and only 8Pin is provided on the power supply, break the 8Pin into two 4Pin.
Fourth, connect the front panel signal cable
Only after the front panel cable of the chassis is connected to the motherboard, can the switch, reset button, and audio jack on the front panel of the chassis be used. hole and USB jack. Take the plug on the front panel of the chassis. There are words such as POWERSW (power switch), RESET (reset button), HDD LED (hard disk light) and POWER LED (power light) on it. The USB and audio plugs are integrated. The design is relatively easy to identify.
How to install a new motherboard?
1. It is possible to install a newly purchased motherboard. 2. First, you need to power off the computer and unplug the power cord. Then open the case, locate the existing motherboard and remove it. Next, place the newly purchased motherboard into the case and align it with the screw holes on the case. Use screws to secure the motherboard to the case. Next, plug the power, data, and other cables into the corresponding slots on the motherboard. Finally, close the chassis cover, reconnect the power cord, and start the test. 3. Installing a newly purchased motherboard requires certain skills and patience. During the installation process, pay attention to preventing static electricity and ensuring that all cables are connected correctly to avoid damaging the motherboard. In addition, if you encounter problems, you can refer to the motherboard's installation manual or seek help from professionals.
The above is the detailed content of Does the Kuroshio BA-210.785G motherboard support AHCI? Why can't I start the system when I install it from SSD, but can I read it when I use another disk to start the system?. For more information, please follow other related articles on the PHP Chinese website!

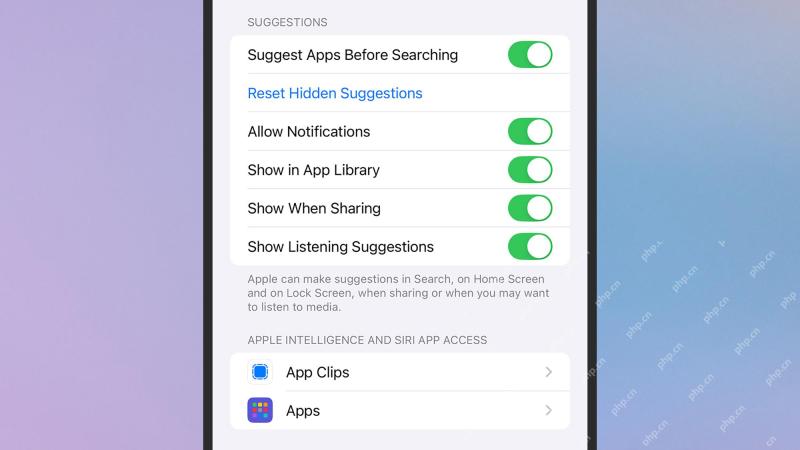 How to manage Siri Suggestions on your iPhoneApr 27, 2025 am 09:46 AM
Recent news highlights the potential pitfalls of Siri Suggestions, an iPhone feature that offers contextual assistance, even inadvertently adding unauthorized individuals to private group chats. This incident, dubbed "Signalgate," undersco
 Fixes for Tempest Rising Crashing/Not Launching/Stuck on LoadingApr 26, 2025 pm 08:01 PM
Tempest Rising is a recently released game. Many players have encountered the problem of the game crashing when starting it. If you are also looking for some methods to fix the problem of Tempest Rising crashing, then this MiniTool article is perfect
 Frequently Asked Questions about Data Recovery: A Top GuideApr 26, 2025 pm 06:01 PM
Data Recovery: A Comprehensive Guide to Recovering Lost Files Have you ever experienced the frustration of losing important data? This guide addresses common questions about data recovery and provides a step-by-step process to retrieve lost files. Qu
 The Elder Scrolls IV: Oblivion Remastered Fatal Error, Quick FixApr 25, 2025 pm 08:05 PM
Solving The Elder Scrolls IV: Oblivion Remastered Crashing Issues The Elder Scrolls IV: Oblivion Remastered, released April 22, 2025, for PS5, Xbox Series X/S, and Windows, boasts stunning visuals and improved gameplay. However, some players experien
 Clair Obscur: Expedition 33 UE-Sandfall Game Crash? 3 Ways!Apr 25, 2025 pm 08:02 PM
Solve the UE-Sandfall game crash problem in "Clair Obscur: Expedition 33" "Clair Obscur: Expedition 33" has been widely expected by players after its release, but many players encountered the error of UE-Sandfall crashing and closing when starting the game. This article provides three solutions to help you smooth the game. Method 1: Change the startup options Change the Steam startup options to adjust game performance and graphics settings. Try setting the startup option to "-dx11". Step 1: Open the Steam library, find the game, and right-click to select "Properties". Step 2: Under the General tab, find the Startup Options section.
 Broken Bluetooth After Windows 11 22H2 Update? Fix It nowApr 25, 2025 pm 08:01 PM
Troubleshooting Bluetooth Issues After the Windows 11 22H2 Update Experiencing Bluetooth problems after updating to Windows 11 22H2? This guide provides solutions to restore your Bluetooth functionality. Issues like audio dropouts during calls (e.g
 How to fix KB5057056 fails to install in Windows 10?Apr 25, 2025 pm 08:00 PM
Microsoft employs a cycle of system updates in order to keep Windows systems stable and secure. An integral part of the cycle is Patch Tuesday, whereby Microsof
 Clair Obscur Expedition 33 Controller Not Working on PC: FixedApr 25, 2025 pm 06:01 PM
Solve the problem of failure of the PC version of "Clair Obscur: Expedition 33" Have you also encountered the problem that the PC version of the "Clair Obscur: Expedition 33" controller does not work properly? Don't worry, you are not alone! This article will provide you with a variety of effective solutions. "Clair Obscur: Expedition 33" has been launched on PlayStation 5, Windows and Xbox Series X/S platforms. This game is an engaging turn-based RPG that emphasizes precise timing. Its uniqueness is the perfect blend of strategic and rapid response. Smooth operation


Hot AI Tools

Undresser.AI Undress
AI-powered app for creating realistic nude photos

AI Clothes Remover
Online AI tool for removing clothes from photos.

Undress AI Tool
Undress images for free

Clothoff.io
AI clothes remover

Video Face Swap
Swap faces in any video effortlessly with our completely free AI face swap tool!

Hot Article
Hot Tools

mPDF
mPDF is a PHP library that can generate PDF files from UTF-8 encoded HTML. The original author, Ian Back, wrote mPDF to output PDF files "on the fly" from his website and handle different languages. It is slower than original scripts like HTML2FPDF and produces larger files when using Unicode fonts, but supports CSS styles etc. and has a lot of enhancements. Supports almost all languages, including RTL (Arabic and Hebrew) and CJK (Chinese, Japanese and Korean). Supports nested block-level elements (such as P, DIV),

ZendStudio 13.5.1 Mac
Powerful PHP integrated development environment

Dreamweaver CS6
Visual web development tools

MantisBT
Mantis is an easy-to-deploy web-based defect tracking tool designed to aid in product defect tracking. It requires PHP, MySQL and a web server. Check out our demo and hosting services.

SecLists
SecLists is the ultimate security tester's companion. It is a collection of various types of lists that are frequently used during security assessments, all in one place. SecLists helps make security testing more efficient and productive by conveniently providing all the lists a security tester might need. List types include usernames, passwords, URLs, fuzzing payloads, sensitive data patterns, web shells, and more. The tester can simply pull this repository onto a new test machine and he will have access to every type of list he needs.

