

 Computer TutorialsTroubleshootingHow to set up the newly assembled computer when starting it up?
For novices who are building a computer for the first time, boot settings are a headache. How to correctly configure the BIOS, install the operating system, connect peripherals, etc. all require certain skills. PHP editor Baicao will provide you with a detailed guide to solve the problem of startup settings step by step. Welcome to read the details and let your new computer start up easily!

How to set up the startup settings for a newly assembled computer?
After assembling the computer by yourself, don’t rush to turn it on first. Check whether the hardware is plugged in firmly, and then plug it in and try to turn it on. Since the newly installed computer does not have a system, after turning it on, first go to the bios to check the motherboard settings and install it. Before the win system, if you install the system from a USB flash drive, first set the first boot item of the bios to USB boot. After restarting, you can insert the USB flash drive to install the system.
The fan of a newly assembled computer is running at high speed but won’t turn on?
Answer: Suggestions for handling a newly assembled computer that has a fan running at high speed but does not turn on:
1. When the monitor is powered on and the signal is displayed, shut down (short press the power button to turn it off, then press it until the power indicator light goes out or unplug it directly) Disconnect the power cord) Power off the case, re-insert and unplug the memory module, and wipe the golden finger with an eraser in a direction (scratching the back of your thumb and fingernail). Reinstall the machine (before operation, touch the wall with both hands to release static electricity or wear anti-static gloves). Simple: slap or kick the chassis twice (note the position: there is no interface on the left and right sides of the chassis; pay attention: use too much force). If the operation needs to be repeated, the two memory modules need to be replaced one by one. Root test
Wuji’s newly assembled computer cannot be turned on?
The analysis and solutions to the reasons why a newly assembled computer cannot be turned on are as follows:
1. There are poor contact problems in various internal components of the machine, such as the most common memory contact problem.
2. There is poor contact between the host and the monitor.
Solution:
1. First, observe whether there is poor contact between the host signal line and the monitor. 2. Turn off the computer and open the case. There is a long strip of equipment on the motherboard, which is the memory. If you look at it, there are two buckles on both sides. If you open it, you can take out the memory and reinsert it (note that it must be inserted in place). ), and then boot up
How to assemble and boot up the computer?
When assembling a computer, the first step is to select the motherboard, CPU, and memory. harddisk. graphics card. chassis and power supply.
The second keyboard, mouse, monitor, camera and other peripherals.
The third part is assembled. Insert the cpu, hard drive, and graphics card. Power supply, etc. are connected as required. The keyboard, mouse, and monitor peripherals are connected to the corresponding interfaces.
The fourth step is to choose a windows system or a linux system when making a system disk. The fifth step is to install the system.
The sixth part starts.
Does the newly assembled computer automatically turn on from time to time?
There may be incompatibilities between systems or programs. Press F8 after booting until the advanced options appear, then let go. Select "Last Known Good Configuration" and press Enter to fix it. If it still doesn't work, press F8 to enter safe mode and restore. Download or reinstall the system.
Caused by excessive temperature of the CPU or other hardware, incompatibility or failure of the memory and graphics card. The hard disk has bad sectors. Please use the system's built-in functions or software to repair the disk, or format the hard disk, repartition the system, and reinstall the system. Power failures and voltage instability can also cause automatic restarts.
Driver incompatibility can also cause restarts. Motherboard component failure. Change the system's default automatic restart: right-click My Computer/Properties/Advanced/Startup and Recovery Settings/uncheck "Automatic Restart" in System Failure, then press OK and Apply to restart the computer. If the above methods are ineffective and you cannot find the problem yourself, it is recommended that you go for maintenance. Go to the device manager and check if there are any conflicts with various drivers. Are there any yellow ones? If it is possible that the device driver is incompatible with the system; then delete the drivers for the sound card, graphics card, network card and other devices, and then install the drivers one by one. Restart the computer after each device is installed to check which device it is. After the fault caused by the driver is detected, download the new version of the driver for the faulty device and then install it. Then clean the dust in the computer, clean the gold fingers of the memory, graphics card and other equipment, and reinstall the memory and other equipment.
After assembling a new computer, the screen does not respond when you turn it on?
1. If the monitor is powered on but shows no signal, shut it down (if a short press of the power switch does not work, press and hold the switch until the power indicator light goes out or unplug the power cord directly). Turn off the power, open the case, and re-insert and unplug the memory. strips, and wipe the gold finger with an eraser in one direction (scraping the back of your thumb nail will also work), and then turn on the phone after installation. If you don't know how to operate it, then it's simple: just kick the chassis (note the location: the center of the side of the left and right side of the chassis that has no interface at the back). If it's a laptop, you can't kick it, but other operations are the same.
2. If the above operation is ineffective, shut down the computer, open the case, re-insert and unplug the graphics card, and tighten the data cable between the monitor and the graphics card. If it still doesn't work, consider the graphics card is damaged and replace it with a new one.
3. If the monitor does not have power (the indicator light does not light up), look at the back of the monitor, plug the power cord plug connected to the monitor upwards, and check whether there is power from the other end of the power cord to the socket.
4. If the host can be displayed when connected to other monitors or the local monitor still cannot be displayed when connected to other normal hosts, it means that the monitor is damaged and needs repair
How to turn on a computer that is not assembled?
If there is no chassis: Find the double row of bare pins from the motherboard (usually including PWR_LED, RST, HDD_LED, PWR, etc., meaning: power indicator light, restart, hard disk indicator light, power supply) . Just short-circuit the two pins of the power supply (connect them with a conductor). If you are using a tractor card: you still need to turn on the host power supply
How to assemble and start a desktop computer?
Assemble a desktop computer and reinstall the system:
1. Make a USB flash drive, then go to the relevant website to download the win system and save it to the USB boot disk, restart the computer and wait for the boot screen to appear and press Start Shortcut key, select u disk boot to enter the u boot main menu, select the "u boot WIN8PE standard version (new machine)" option, press the Enter key to confirm
2. Select the win image in the pe installation tool Place it in the c drive and click OK
3. At this time, click the "OK" button directly in the pop-up prompt window
4. Then the installation tool starts to work, we need to wait patiently for a few minutes
5. After completion, a pop-up prompt box will prompt whether to restart immediately. At this time, we can just click Restart Now.
6. At this time, you can remove the USB disk and restart the system to start the installation. We do not need to perform any operations, just wait for the installation to complete.
After assembling a new computer, there is no signal on the monitor when you turn it on?
After the new computer is assembled, there is no signal on the monitor when it is turned on. You can check to see if it is due to the following reasons:
1. Is the power turned on? If the power is turned on, check to see if it is the power supply of the monitor. Not plugged in properly
2. Check whether the VGA or HDMI cable is plugged in properly. Some computers have two graphics cards, try changing the socket
3. Is the monitor switch turned on
If the above checks are done, there will generally be no problem.
The newly assembled computer cannot boot normally after repeated restarts?
In this case, there must be a problem with the motherboard or memory. It is recommended to ask someone to borrow a memory and try to boot it normally. If it still doesn't work properly, you can go directly to the merchant to replace the motherboard.
The above is the detailed content of How to set up the newly assembled computer when starting it up?. For more information, please follow other related articles on the PHP Chinese website!

 Oblivion Remastered Disk Full Save Failed, Best Tips to FollowApr 27, 2025 pm 08:02 PM
Frustrated by "Disk Full – Save Failed" errors in Oblivion Remastered? This guide provides solutions to get your game saving again. Oblivion Remastered's stunning visuals and gameplay can be ruined by save errors. This post focuses on fix
 Quick Guide to Finding Post Trauma Save File Location on PCApr 27, 2025 pm 08:01 PM
This MiniTool guide explains the Post Trauma save file location and how to back up and restore your game data, safeguarding your progress against loss. Quick Navigation: Post Trauma Save File Location (PC) Backing Up Post Trauma Game Data Recovering
 3 Ways to Troubleshoot SSD Recognized as HDD on WindowsApr 27, 2025 pm 06:13 PM
SSD displays as HDD? Don’t panic! MiniTool teaches you how to solve it easily! Is the SSD displayed as HDD in your disk management? Don't worry, this is common and will not affect the computer or data. This article will introduce several effective ways to solve this problem. Quick navigation: Why is an SSD recognized as an HDD? How to fix an SSD recognized as an HDD? Summarize Displaying an SSD as an HDD is often considered a minor problem, mainly manifested as visual errors in the operating system interface. This error indication does not usually affect the performance or functionality of the SSD, because the drive still operates at its expected speed and capacity. However, it may make it possible to rely on precise drive recognition to perform
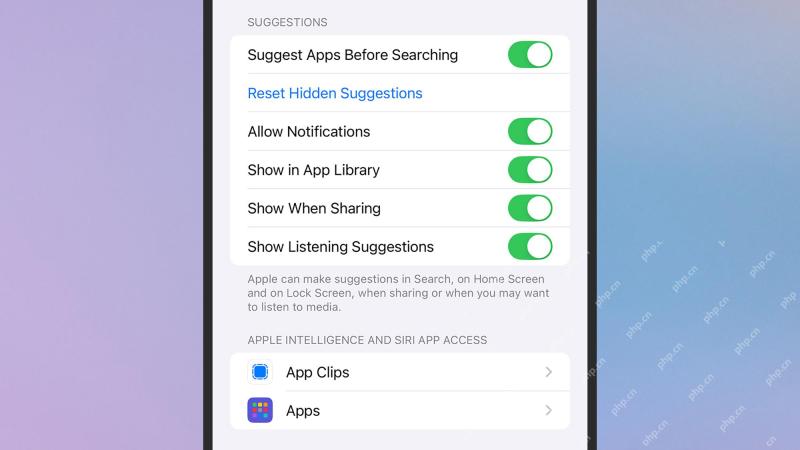 How to manage Siri Suggestions on your iPhoneApr 27, 2025 am 09:46 AM
Recent news highlights the potential pitfalls of Siri Suggestions, an iPhone feature that offers contextual assistance, even inadvertently adding unauthorized individuals to private group chats. This incident, dubbed "Signalgate," undersco
 Fixes for Tempest Rising Crashing/Not Launching/Stuck on LoadingApr 26, 2025 pm 08:01 PM
Tempest Rising is a recently released game. Many players have encountered the problem of the game crashing when starting it. If you are also looking for some methods to fix the problem of Tempest Rising crashing, then this MiniTool article is perfect
 Frequently Asked Questions about Data Recovery: A Top GuideApr 26, 2025 pm 06:01 PM
Data Recovery: A Comprehensive Guide to Recovering Lost Files Have you ever experienced the frustration of losing important data? This guide addresses common questions about data recovery and provides a step-by-step process to retrieve lost files. Qu
 The Elder Scrolls IV: Oblivion Remastered Fatal Error, Quick FixApr 25, 2025 pm 08:05 PM
Solving The Elder Scrolls IV: Oblivion Remastered Crashing Issues The Elder Scrolls IV: Oblivion Remastered, released April 22, 2025, for PS5, Xbox Series X/S, and Windows, boasts stunning visuals and improved gameplay. However, some players experien
 Clair Obscur: Expedition 33 UE-Sandfall Game Crash? 3 Ways!Apr 25, 2025 pm 08:02 PM
Solve the UE-Sandfall game crash problem in "Clair Obscur: Expedition 33" "Clair Obscur: Expedition 33" has been widely expected by players after its release, but many players encountered the error of UE-Sandfall crashing and closing when starting the game. This article provides three solutions to help you smooth the game. Method 1: Change the startup options Change the Steam startup options to adjust game performance and graphics settings. Try setting the startup option to "-dx11". Step 1: Open the Steam library, find the game, and right-click to select "Properties". Step 2: Under the General tab, find the Startup Options section.


Hot AI Tools

Undresser.AI Undress
AI-powered app for creating realistic nude photos

AI Clothes Remover
Online AI tool for removing clothes from photos.

Undress AI Tool
Undress images for free

Clothoff.io
AI clothes remover

Video Face Swap
Swap faces in any video effortlessly with our completely free AI face swap tool!

Hot Article
Hot Tools

SublimeText3 Chinese version
Chinese version, very easy to use

Safe Exam Browser
Safe Exam Browser is a secure browser environment for taking online exams securely. This software turns any computer into a secure workstation. It controls access to any utility and prevents students from using unauthorized resources.

EditPlus Chinese cracked version
Small size, syntax highlighting, does not support code prompt function

SublimeText3 Linux new version
SublimeText3 Linux latest version

SecLists
SecLists is the ultimate security tester's companion. It is a collection of various types of lists that are frequently used during security assessments, all in one place. SecLists helps make security testing more efficient and productive by conveniently providing all the lists a security tester might need. List types include usernames, passwords, URLs, fuzzing payloads, sensitive data patterns, web shells, and more. The tester can simply pull this repository onto a new test machine and he will have access to every type of list he needs.

