
 Mobile TutorialAndroid PhoneMercury router installation tutorial for beginners (detailed step-by-step illustration)
Mercury router installation tutorial for beginners (detailed step-by-step illustration)

Convenient Guide to Setting Up a Home Network With the booming development of the Internet, home networks have become a necessity in modern life. For beginners, Mercury routers are popular for their ease of operation and stable performance. PHP editor Apple will introduce you to the installation steps of Mercury router in detail, allowing you to easily build your own home network. This article will guide you through the installation process step by step, helping you quickly enjoy a stable network connection.

1. Router purchase and preparation
First of all, you need to choose the appropriate router model according to your needs and prepare the required accessories, such as power supply Adapters, network cables, etc. before starting to install your Mercury router.

#2. Network cable connection
Make sure the connection is firm, plug the other end into the WAN port of the Mercury router, and plug one end of the network cable into the broadband modem (or optical modem) on the LAN port.
3. Power connection

Turn on the power, plug the other end into the power interface of the router, and insert the power adapter plug of the Mercury router into the power socket .
4. Router startup
Indicates that the router has started successfully. Observe whether the router indicator light lights up normally and wait for a moment.
5. Enter the router setting interface
Enter in the address bar and open the computer browser "168, 1, 192, 1" or "1, 192, 0, 168" to log in to the router page and press the Enter key (it varies slightly depending on the router model).
6. Enter the default login account and password
Usually, enter the default user name and password "admin" on the login page and press the Enter key.
7. Modify the login password
You need to modify the default login password. In order to ensure network security, after logging into the router setting interface for the first time, set one that is easy for you to remember but not easy for others to guess. password.
8. Set the WAN port connection method
For example, PPPoE, DHCP or static IP, etc. Select the appropriate WAN port connection method according to your own Internet access method.
9. Set Wi-Fi name and password
Set an easily identifiable Wi-Fi name for your home network in the wireless settings - and set a safe and reliable Wi-Fi name (SSID )-Fi password.
10. Set the network encryption method
Such as WPA2, choose the encryption method that suits your network security needs - and set a highly complex encryption password, PSK, etc.
11. Set other advanced options
Virtual server and other functions, such as MAC address filtering, you can further set other advanced options and port mapping as needed.
12. Save the settings and restart the router
Be sure to click the save button. After the settings are completed, the settings will take effect. Restart the router for the settings to take effect, then.
13. Connect to other devices
Connect to the newly set Wi, use a mobile phone, tablet or other computer device - enter the password to successfully connect to the Fi network.
14. Confirm that the network is running normally
Ensure that the network connection is normal, open the browser, try to access some websites, and the speed is smooth.
15. Security strategy and regular maintenance
It is recommended to replace the Wi on a regular basis. In order to ensure network security and stability - and maintain daily maintenance and management of the router, upgrade the router firmware and Fi password in a timely manner.
Novice users can easily install a Mercury router through the detailed tutorials in this article and build their own home network. You can enjoy a stable network connection and high-speed Internet experience, just follow the steps. In order to ensure network security, remember to regularly update passwords and perform router maintenance at the same time. Enjoy the convenience and fun brought by the Internet, and hope that every novice user can successfully build his or her own home network.
The above is the detailed content of Mercury router installation tutorial for beginners (detailed step-by-step illustration). For more information, please follow other related articles on the PHP Chinese website!

 Google Might Skip The Android 15 Update For Your TVApr 28, 2025 pm 09:01 PM
Google May Skip Android 15 for TV, Jumping Straight to Android 16 While many Android phones have updated to Android 15, the situation is different for Android TVs. It's increasingly likely Google will bypass Android 15 entirely for Google TV and And
 Cook Up Your Own Custom Emoji Stickers with Gboard for Android Apr 28, 2025 am 09:17 AM
Unlock the Fun of Emoji Kitchen: Create Custom Stickers with Gboard on Android! Emoji and stickers add personality to your messages, and Android users with Gboard have a secret weapon: Emoji Kitchen. This feature lets you combine two emojis to create
 How to Copy Text from Anywhere on Your Phone — Even if the App Blocks Text Selection Apr 28, 2025 am 09:12 AM
Bypass App Restrictions: Effortlessly Copy Text & Images from Any Android App Copying text from various sources on your Android device is usually straightforward, but some apps block text selection. This forces users to resort to screenshots or
 Android 16's New Protection Mode Will Protect Against Bad USB DevicesApr 28, 2025 am 03:01 AM
Android 16 enhances security with "Advanced Data Protection" for USB connections. This new feature prevents USB access while the phone is locked, significantly reducing data vulnerability. This proactive approach underscores Google's commi
 Google Pixel Notification Issues Keep Getting WorseApr 28, 2025 am 12:53 AM
Google Pixel notification delays and failures are plaguing users, disrupting timely communication. The April update, far from resolving the issue, appears to have exacerbated the problem, leaving many frustrated. Numerous Pixel users report signific
 BOOX Introduces a Pair of Affordable 7-inch eReadersApr 27, 2025 pm 09:02 PM
Onyx BOOX releases new 7-inch e-readers: BOOX Go 7 and BOOX Go Color 7 Gen II. The two products are priced at $250 and $280, respectively, and are both the first 7-inch BOOX e-reader to support stylus input. The BOOX Go 7 is a powerful Android e-reader equipped with a 300ppi Carta 1300 electronic ink screen, Android 13 operating system, built-in speakers (and support Bluetooth), and an asymmetric design with page turning buttons. It is essentially a black and white version of the first generation Go Color 7, with added stylus support and operating system upgrades. Related ##### i
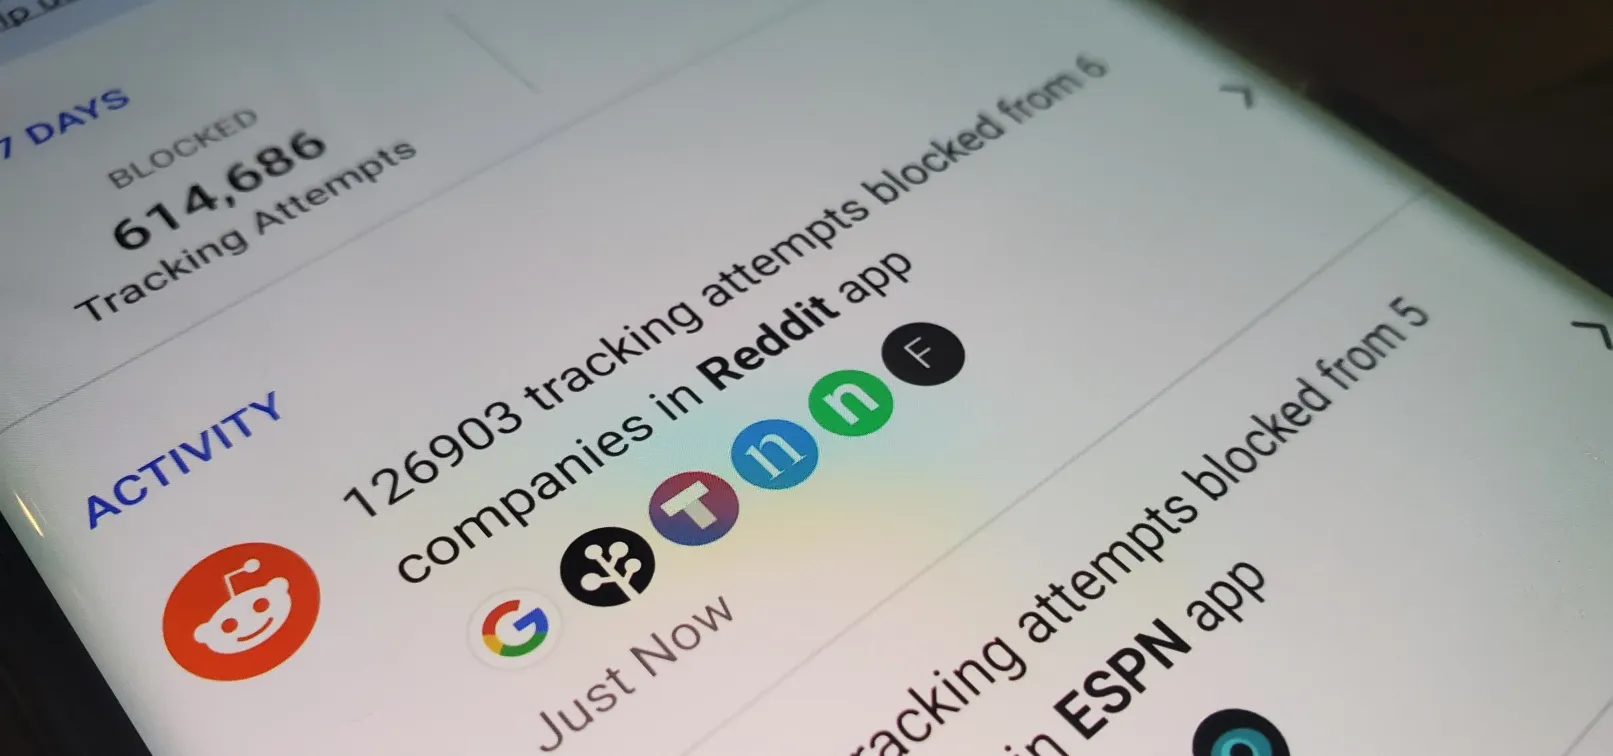 Block Third-Party Trackers in Android Apps from Spying on Your Activity and Selling Your Data Apr 27, 2025 am 09:14 AM
DuckDuckGo launches beta version of app tracking protection to help you prevent apps from tracking your activity. This feature utilizes Android's local VPN connection protocol to monitor network activity and intercept when the application tries to send data to third-party services. While Apple has implemented App Tracking Transparency (ATT) in iOS 14.5, Google has not implemented its Privacy Sandbox, announced earlier this year, which will include similar App Tracking Protection. Therefore, third-party applications like DuckDuckGo are particularly important. Install or update DuckDuckGo If you have not installed D
 How to Check Your Android Security Patch Level to See if You're Protected Against the Latest Vulnerabilities Apr 27, 2025 am 09:04 AM
Many potential vulnerabilities are found in the Android system every month, and Android is no exception. The problem is that many Android devices don't have timely updates – but now many devices get regular monthly security patches that can at least make up for these vulnerabilities. If you want to protect against the latest dangerous hacks, you need to install the latest security patch level. Google releases these patches and a report on changes every month, but they can only guarantee that updates will be sent to their own Pixel devices. With all other phones, you may not receive security patches in time, but there is at least one way to check. Jump to Description: Samsung | Google/Native Android | OnePlus | LG Check you


Hot AI Tools

Undresser.AI Undress
AI-powered app for creating realistic nude photos

AI Clothes Remover
Online AI tool for removing clothes from photos.

Undress AI Tool
Undress images for free

Clothoff.io
AI clothes remover

Video Face Swap
Swap faces in any video effortlessly with our completely free AI face swap tool!

Hot Article
Hot Tools

MantisBT
Mantis is an easy-to-deploy web-based defect tracking tool designed to aid in product defect tracking. It requires PHP, MySQL and a web server. Check out our demo and hosting services.

EditPlus Chinese cracked version
Small size, syntax highlighting, does not support code prompt function

SublimeText3 Chinese version
Chinese version, very easy to use

ZendStudio 13.5.1 Mac
Powerful PHP integrated development environment

SecLists
SecLists is the ultimate security tester's companion. It is a collection of various types of lists that are frequently used during security assessments, all in one place. SecLists helps make security testing more efficient and productive by conveniently providing all the lists a security tester might need. List types include usernames, passwords, URLs, fuzzing payloads, sensitive data patterns, web shells, and more. The tester can simply pull this repository onto a new test machine and he will have access to every type of list he needs.

