


Great Wall Computer Power Supply Troubleshooting Computer power supply faults trouble many users. PHP editor Baicao will provide you with a series of methods to help you diagnose and eliminate the power failure problem of the Great Wall computer, thereby restoring the normal operation of your computer. This article will detail the steps of checking the power cord, replacing the power supply, testing the motherboard, etc., allowing you to solve the problem step by step. Read on for a complete guide to troubleshooting power supply failures.

Great Wall computer power supply troubleshooting?
If Great Wall Computer encounters a power failure, you can try the following troubleshooting steps:
1. Check the power cord: Make sure the power cord is intact and properly connected to the computer and wall outlet. If the power cord is damaged in any way, try a new one.
2. Check the power plug: Make sure the power plug is tight and properly inserted into the computer's power jack.
3. Power Outlets and Power Strips: If using a power strip, make sure the power strip is working and connected to a working power outlet. Try plugging your computer directly into a wall outlet to troubleshoot the power strip.
4. Restart the computer: Sometimes the power management inside the computer can cause problems. Try shutting down the computer completely, waiting a few minutes and then restarting.
5. Disconnect external devices: Disconnect all external devices (such as printers, extended hard drives, USB devices) from the computer, and then restart the computer to see if the problem can be solved. Sometimes a fault in an external device may interfere with the computer's power supply.
6. Power supply unit (PSU) failure: If the above steps do not solve the problem, the power supply unit may be faulty. At this time, it is recommended to contact the after-sales service center of Great Wall Computer, or ask a professional technician to check and replace the power supply unit.
Remember, do not attempt to repair the power supply unit or other computer hardware parts yourself, as this may cause further damage or safety issues. Computer hardware failures are best handled by professionals.
Oriental Automobile troubleshooting and troubleshooting?
Troubleshooting method:
1. Check whether the fuel meets the standards;
2. Use a test light to check whether there is electricity at the fuel cut-off solenoid valve line connector. If there is no electricity, explain The fuse is blown;
3. If the oil cut-off solenoid valve has power, check whether the oil cut-off solenoid valve is working well. The method is to switch the ignition switch between ON
and OFF. , listen carefully to see if there is a slight knocking sound in the fuel cut-off solenoid valve. If there is a sound, it means that the fuel cut-off solenoid valve is working well. If there is no sound, it means that the fuel cut-off solenoid valve is damaged;
4. Check the fuel Check whether the tank tee is loose, whether the oil pipe joint assembly is firm and reliable, and then check whether the tee is blocked;
5. Check whether the joint between the fuel tank tee and the oil pipe to the diesel filter is loose and has oil leakage;
6. Check whether the fuel pipe joints of the engine fuel system are loose or leaking.
Line troubleshooting and repair?
When troubleshooting and repairing circuit lines, experienced electricians can accurately judge the circuit fault based on the circuit breakers, leakage protection closing, and tripping hot spots in the distribution box (cabinet), so as to carry out Quick repairs and troubleshooting. Below I will talk about the analysis and repair methods of several common circuit faults.
In the first case, the electrical load in the circuit is too large, and its fault manifests itself as: after closing the switch, the electrical equipment in the circuit trips after running for a period of time. At this time, the temperature of the switch is abnormal and is significantly higher than the normal temperature. If you try to close the switch immediately, it will not close. You have to wait for the temperature of the switch to drop before closing the switch. This is because the current in the circuit exceeds the operating current of the switch. The solution is to reduce the electrical load in the circuit to within the working load that the switch is allowed to carry.
In the second case, the switch cannot be pushed up and makes a sound like a firecracker. This is when the live wire and neutral wire or the live wire and the ground wire in the circuit are short-circuited together, or the live wire is in contact with grounded metal such as electrical boxes, wire tubes, wire boxes, etc. and is short-circuited. The maintenance method is to use a megger to find the broken short contact and perform insulation treatment.
In the third case, the leakage protection does not close the gate, and it automatically falls down when pushed up (in this case, the circuit breaker is not affected, because the circuit breaker does not have the function of detecting leakage). This is a short-circuit between the neutral line and the ground wire in the circuit or a short-circuit leakage trip between the neutral line and grounded metal such as electrical boxes, wire tubes, wire boxes, etc. The repair method is to use a megger to find out the broken skin and leakage, and then perform insulation treatment.
This is the circuit breaker and leakage protection trip of the distribution box (cabinet). There are several common circuit fault analysis and repair methods.
Pipeline pressure test pump faults and troubleshooting?
Troubleshooting
If a malfunction occurs during the pressure test, the cause of the malfunction other than the pump (leakage of the device under test, piping system, etc.) should first be eliminated, and then the pump malfunction should be checked and eliminated. one.
The pressure rise is very slow or the pressure does not rise
1. The filter is clogged
Replace the medium and clean the water tank and filter, and clean the parts and channels in the pump body if necessary.
2. The suction pipe is leaking
Tighten the suction pipe and check or replace the water inlet valve seat sealing ring.
3. Leakage at other connections
Tighten the threads or replace the seals.
4. The plunger pair seal is damaged
Clean and replace the seal or plunger pair.
5. Leakage in the inlet and outlet valves
Clean the dirt on the pump valve or re-grind it, and replace the inlet and outlet valves.
6. Control and pressure relief valve leakage
Same as above. Clean or re-grind it and replace the valve disc.
Poor pressure holding performance
7. Water outlet valve leaks
Clean the internal dirt or re-grind or replace the water outlet valve.
8. Leakage of control valve or pressure relief valve
Same as 6
9. Leakage at each connection
Same as 3
When various malfunctions occur, be sure to consult and communicate with the manufacturer to avoid problems. The high-pressure test pump we bought before was from Chengdu Lifeng. They have been doing it for more than ten years and have very experienced customer service. Moreover, Lifeng has many maintenance outlets, making maintenance much more convenient.
Oxygen concentrator faults and troubleshooting methods?
Common oxygen concentrator faults and troubleshooting methods
1. Oxygen concentrator failure-oxygen concentrator does not produce air
There are many reasons why the oxygen concentrator does not produce air and The reason is that, first remove the humidification cup and see if there is oxygen coming out of the outlet. If so, check to see if the rubber plug of the humidification cup is tightly plugged. If it is not tightly plugged or the rubber plug was forgotten, just plug it in directly.
2. Failure of household oxygen concentrator - it stops working after a period of time
Many household oxygen concentrators currently have timing functions, and many people will inadvertently do so during use. Started the scheduled function and forgot to cancel it. At this time, the user needs to adjust the timing time after turning on the oxygen concentrator, and adjust it to three to one.
3. Failure of household oxygen concentrator - there will be a popping sound when first used
Basically every user and buyer will ask this question, but the sound is normal. Because the oxygen generator is started by the compressor during use, the molecular sieve will remove the separated nitrogen after purifying the oxygen in the air. The popping sound is the sound of nitrogen, so don't worry.
4. Household oxygen concentrator failure - the gas output of the oxygen concentrator becomes smaller
This problem will easily occur after long-term use. Don’t panic after this problem occurs. It is usually caused by humidification. The tube in the cup is blocked by scale. Just remove the humidification cup and the gas pipe for cleaning. If the problem is still not solved after doing this, please contact the merchant directly.
5. Failure of household oxygen concentrator - there is a peculiar smell in the oxygen at the oxygen outlet.
There are two possibilities:
(1) If it is a newly used oxygen tube, there is It may be due to the odor emitted by the materials used to make oxygen tubes, silicone tubes and ABS plastic tubes.
(2) If it is not a new oxygen suction pipe, it may be because the humidification water tank has not been cleaned or the water has not been changed for a long time. Generally, it will be eliminated after cleaning the humidification water tank and oxygen suction pipe.
LED light fault and troubleshooting?
The first point of troubleshooting: first check whether the lamp beads are in good condition. If there are black spots in the middle of the lamp beads, they are basically broken. If there are only one or two broken ones, you can fix them yourself, poke and solder one. Wire or anything else will do, but if it's too damaged, just replace it!
The lamp bead is burned out
Troubleshooting point 2: Is the lamp wire connector detached, especially the wire on the lamp head? The wire here is easy to fall off. Pull it out gently with your hand to see if it makes contact. It is defective and easy to repair. The nails on the lamp head can be lifted off with a blade.
The third point of troubleshooting: If it is a DOB solution, that is, the components are all on the panel, check whether there are gaps in the component welding. You can turn on the power and use an insulated screwdriver to press each one. Try it and troubleshoot the problem. If it is an independent IC driver, the most common problems are that the connecting wires on both sides are broken or have poor contact, and the copper sheets are warped. It is best to solder these by yourself.
The patrol stick cannot be recognized when connected to the computer. How to troubleshoot?
Hello, I’m not sure which patrol product you are using. If this problem occurs, there are several points to look at:
First: Is there water or dust in the communication port? There are some debris, or the contact pins of the communication port have signs of damage during frequent plugging and unplugging.
Second: Is the communication through USB to COM? If this requires a driver, or the driver you installed is blocked, go to My Computer-right-click Properties-Hardware- — Check in the device manager to see if there is a driver with an exclamation mark. If so, you need to reinstall the driver and take a look.
The above is the detailed content of Great Wall computer power supply troubleshooting?. For more information, please follow other related articles on the PHP Chinese website!

 Clipchamp Video Loss on Windows? 2 Ways to Recover Files!May 09, 2025 pm 08:12 PM
Recover Lost Clipchamp Videos: A Step-by-Step Guide Losing a video you've edited in Clipchamp can be frustrating. This guide provides effective methods to recover your lost Clipchamp video files. Finding Your Clipchamp Videos Before attempting recov
 7 Useful Fixes for Action Center Keeps Popping upMay 09, 2025 pm 08:07 PM
Action Center allows you to access quick settings and notifications. However, some users say that they encounter the “Action Center keeps popping up” issue on Windows 11/10. If you are one of them, refer to this post from MiniTool to get solutions.Qu
 Instant Ways to Restore Missing Google Chrome Icon on WindowsMay 09, 2025 pm 08:06 PM
Troubleshoot Missing Google Chrome Icon on Windows Can't find your Google Chrome icon on Windows? This guide offers several solutions to restore it. Why is my Chrome icon missing? Several factors can cause the Chrome icon to vanish from your desktop:
 Brave Browser High CPU and RAM Usage: Best 5 Tips to ReduceMay 09, 2025 pm 08:05 PM
Brave browser CPU and memory usage too high? Under Windows 10/11 system, Brave browser's high CPU and memory usage problems have troubled many users. This tutorial will provide a variety of solutions to help you easily resolve this issue. Quick navigation: Brave browser high CPU and memory footprint Solution 1: Clear cookies and cache data Solution 2: Disable hardware acceleration Solution 3: Close the tab and update the Brave browser Solution 4: Disable the plugin Solution 5: Create a new user profile Optional: Run MiniTool System Booster System Optimization Tool Summarize Brave browser high CP
 Targeted Fixes for Xbox Error 0x87e0000f When Installing GamesMay 09, 2025 pm 08:04 PM
Troubleshooting Xbox Error Code 0x87e0000f: A Comprehensive Guide Encountering the Xbox error code 0x87e0000f while downloading games from Xbox Game Pass can be frustrating. This guide provides several solutions to help you resolve this issue and get
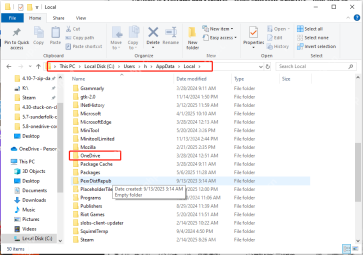 OneDrive Couldn't Start Files on Demand?Top 4 MethodsMay 09, 2025 pm 08:02 PM
OneDrive Files On-Demand troubleshooting: resolving the "OneDrive couldn't start Files On-Demand" error. This MiniTool guide provides solutions for the persistent "Microsoft OneDrive Couldn’t start files on Demand" error (codes 0x
 How to fix 'Microsoft Store is blocked' error in Windows?May 09, 2025 pm 06:00 PM
Microsoft Store is blocked error occurs when Windows prevents access to the Microsoft Store app, displaying the message Microsoft Store is blocked. Check with y
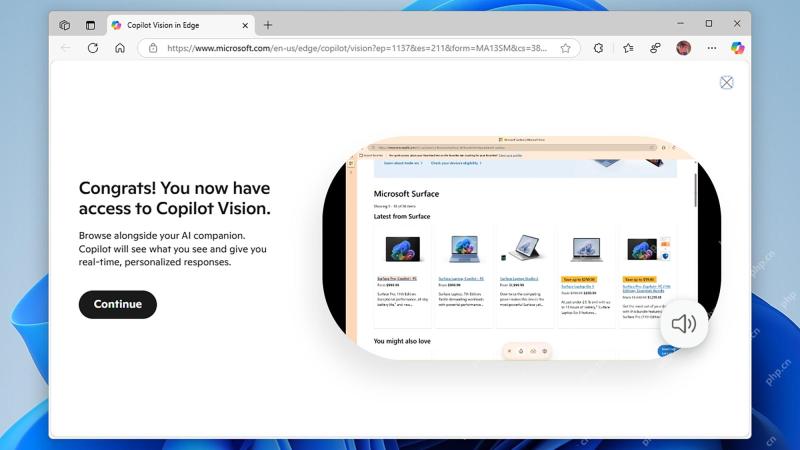 How to use Copilot Vision for free in Microsoft EdgeMay 09, 2025 am 10:32 AM
Staying current with all the new AI tools is a challenge. Many might even overlook readily available AI features. For instance, Copilot Vision is now free for all Microsoft Edge users – a fact easily missed if you don't regularly use Edge or haven't


Hot AI Tools

Undresser.AI Undress
AI-powered app for creating realistic nude photos

AI Clothes Remover
Online AI tool for removing clothes from photos.

Undress AI Tool
Undress images for free

Clothoff.io
AI clothes remover

Video Face Swap
Swap faces in any video effortlessly with our completely free AI face swap tool!

Hot Article
Hot Tools

SecLists
SecLists is the ultimate security tester's companion. It is a collection of various types of lists that are frequently used during security assessments, all in one place. SecLists helps make security testing more efficient and productive by conveniently providing all the lists a security tester might need. List types include usernames, passwords, URLs, fuzzing payloads, sensitive data patterns, web shells, and more. The tester can simply pull this repository onto a new test machine and he will have access to every type of list he needs.

DVWA
Damn Vulnerable Web App (DVWA) is a PHP/MySQL web application that is very vulnerable. Its main goals are to be an aid for security professionals to test their skills and tools in a legal environment, to help web developers better understand the process of securing web applications, and to help teachers/students teach/learn in a classroom environment Web application security. The goal of DVWA is to practice some of the most common web vulnerabilities through a simple and straightforward interface, with varying degrees of difficulty. Please note that this software

SublimeText3 Mac version
God-level code editing software (SublimeText3)

SublimeText3 English version
Recommended: Win version, supports code prompts!

SublimeText3 Linux new version
SublimeText3 Linux latest version

