简单的地图读取、展示
终于到暑假了。。。开始认真整理整理相关学习的心得体会咯~
先把很久之前挖的关于C# 二次开发的坑给填上好了~ 这次先计划用一个月把C# ArcEngine 10.0相关开发的学习心得给发布出来好啦~
第一部分就是最简单的helloworld了:掌握使用控件创建简单的GIS应用程序~
(前期相关环境配置略掉~请自行百度~)
首先打开VS2010,,通过(文件--新建--项目--Windos窗体应用程序) ,我们新建一个名叫“MyHelloWorld”的Windows 窗体应用程序。然后就要开始往里面填控件了:
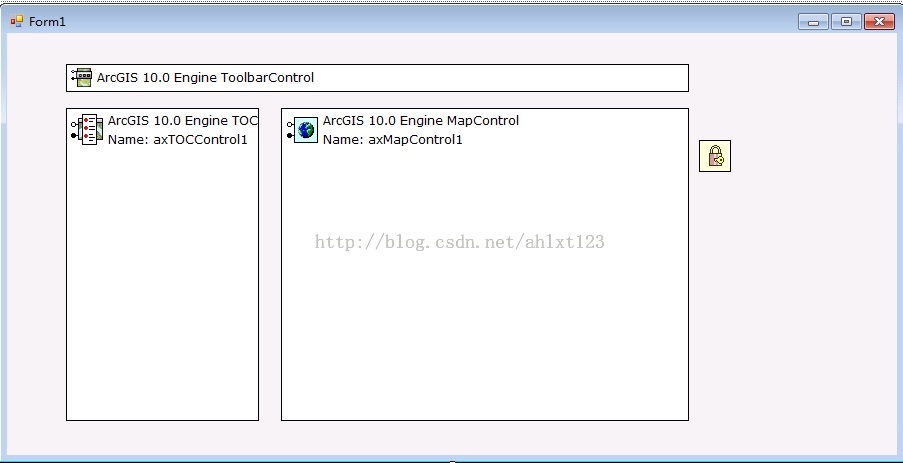
在 VS 的工具箱中找到到和 ArcGIS Engine 相关的控件 ,在这里我们使用AxTOCControl(目录控件),AxLicenseControl (许可控件),以及MapControl,在这里MapControl对应于 ArcMap 中的数据视图,它封装了Map 对象,并提供了额外的属性,方法,事件等。是我们在接来下的一系列开发中必不可少的一环。
将3个控件排列一下后,效果如下图所示:
注意:
1.其中AxLicenseControl 控件是整个Arcengine开发中必须的许可控件,如果没有它或者没有ArcEngine的Lisence许可的话,我们是无法调用任何GIS功能的。
2.将三个控件拖入窗体后,我们会发现系统自动导入了相关引用,但无论是系统自己导入的引用还是我们手动导入的,请注意将引用属性中的“复制本地”设置为False,否则可能会产生无法运行代码的情况。
控件设置好之后,我们打开Program.cs,在系统的入口处添加这样一行代码:
ESRI.ArcGIS.RuntimeManager.Bind(ESRI.ArcGIS.ProductCode.EngineOrDesktop);
这主要是针对Arcgis10.0的变化而设置的,添加后的代码如下:
namespace MyHelloWorld
{
  static class Program
  {
    /// <summary>
    /// The main entry point for the application.
    /// </summary>
    [STAThread]
    static void Main()
    {

      ESRI.ArcGIS.RuntimeManager.Bind(ESRI.ArcGIS.ProductCode.EngineOrDesktop);
      Application.EnableVisualStyles();
      Application.SetCompatibleTextRenderingDefault(false);
      Application.Run(new Form1());
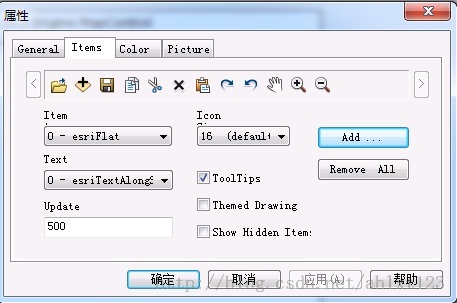
接下来,我们就可以通过设置编辑ToolbarControl的属性,来给它添加上我们需要的工具了,同时要记得在ToolBar控件和axTOCCControl1控件的属性设置中,将ToolBar的Buddy选项设置为axTOCCControl1,这样就可以将二者进行联动。
在ToolbarControl的属性设置中,我们可以通右键——属性——Item来给Toolbar控件设置我们需要的工具,在这里我选择了一些常用的工具:保存、移动、撤销、放大、缩小等等,过程如下图所示:
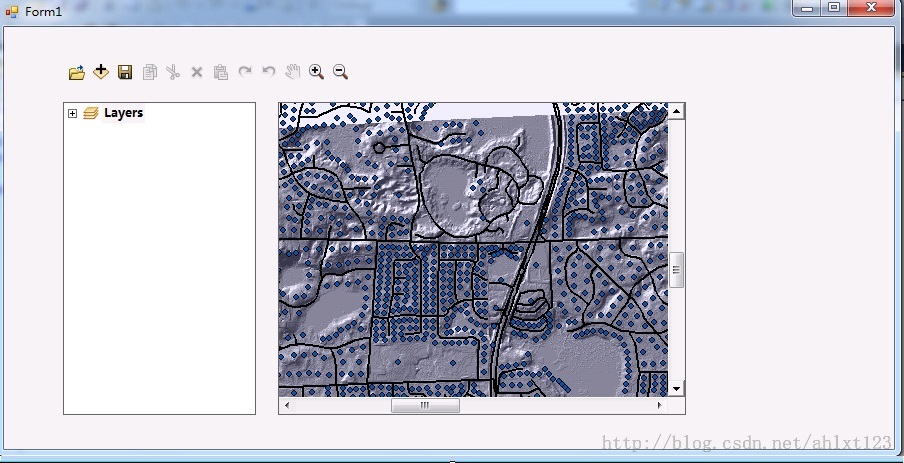
全部设置后之后,第一章的内容就基本结束了,将程序调试后,最终效果如下图,一个最简单的GIS桌面程序就出来啦~~
打开地图文档、鹰眼图的制作
首先是制作一个按钮来负责打开地图文档:
在toolbox中选择Button控件拖入我们的Form中,接下来在该button的Cilck事件中调用 OpenFileDialog类获取文件路径后,
将文件路径调用到axMapControl1.LoadMxFile(path)中就可以打开MXD文档了。
    private void button1_Click(object sender, EventArgs e)
    {
   OpenFileDialog OpenMXD = new OpenFileDialog();
   OpenMXD.Title = "打开地图";
   OpenMXD.InitialDirectory = "E:";
   OpenMXD.Filter = "Map Documents (*.mxd)|*.mxd";
   if (OpenMXD.ShowDialog() == DialogResult.OK)
   {
   string MxdPath = OpenMXD.FileName;
   axMapControl1.LoadMxFile(MxdPath);
<span style="white-space:pre">  </span>}
    }
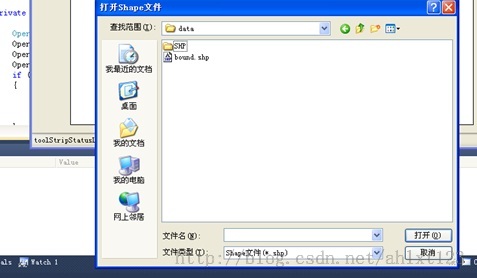
我们可以通过相同的方法打开shape文件,但是这里要注意:
axMapControl1.AddShapeFile()方法中,并不是像LoadMx一样直接输入文件路径就行,而是AddShapeFile(filePath, fileName),因此我们要先编写一个函数将文件路径的字符串进行分割:
private void button2_Click(object sender, EventArgs e)
{
  {
    string[] S = OpenShapeFile();
    try
    {
      axMapControl1.AddShapeFile(S[0], S[1]);
    }
    catch
    {
      MessageBox.Show("请至少选择一个shape文件", "ERROR");

     }

    }
  }


public string[] OpenShapeFile()
{
  string[] ShpFile = new string[2];
  OpenFileDialog OpenShpFile = new OpenFileDialog();
  OpenShpFile.Title = "打开Shape文件";
  OpenShpFile.InitialDirectory = "E:";
  OpenShpFile.Filter = "Shape文件(*.shp)|*.shp";
  if (OpenShpFile.ShowDialog() == DialogResult.OK)
  {
    string ShapPath = OpenShpFile.FileName;
    //利用"\\"将文件路径分成两部分
    int Position = ShapPath.LastIndexOf("\\");
    string FilePath = ShapPath.Substring(0, Position);
    string ShpName = ShapPath.Substring(Position + 1);
    ShpFile[0] = FilePath;
    ShpFile[1] = ShpName;

  }
  return ShpFile;
}
运行后结果如下:
这部分完成后,接下来是鹰眼图的制作~:
鹰眼图的操作主要分为两个部分,当在主控件中重新加载一幅图的时候,另外一个控件的图也发生相应的变化, 大致思路是在获得你在打开主地图后,向鹰眼图(MapControl2)中添加相同的图层,并不断更新你在主地图的当前范围,再在鹰眼图的对应区域中绘制一个红框表示对应范围。
这里主要使用了IEnvelope和IPoint接口,用来获取鼠标所在坐标、绘制表示范围的红框,具体用法可以参考这里~
我们在form中拖入第二个地图控件axMapControl2,用它作为axMapControl1的鹰眼图进行表示。
这里首先对MapControl1的OnMapReplaced事件和OnExtentUpdated事件进行编写,让我们获得MapControl1的地图范围更新,并向MapControl2添加图层、绘制矩形:
private void axMapControl1_OnExtentUpdated(object sender, ESRI.ArcGIS.Controls.IMapControlEvents2_OnExtentUpdatedEvent e)
{
  //设置一个新的外接矩形
  IEnvelope pEnvelope = (IEnvelope)e.newEnvelope;
  IGraphicsContainer pGraphicsContainer = axMapControl2.Map as IGraphicsContainer;
  IActiveView pActiveView = pGraphicsContainer as IActiveView;
  //在绘制前,清除axMapControl2中的任何图形元素
  pGraphicsContainer.DeleteAllElements();
  IRectangleElement pRectangleEle = new RectangleElementClass();
  IElement pElement = pRectangleEle as IElement;
  pElement.Geometry = pEnvelope;
  //设置鹰眼图中的红线框
  IRgbColor pColor = new RgbColorClass();
  pColor.Red = 255;
  pColor.Green = 0;
  pColor.Blue = 0;
  pColor.Transparency = 255;
  //产生一个线符号对象
  ILineSymbol pOutline = new SimpleLineSymbolClass();
  pOutline.Width = 3;
  pOutline.Color = pColor;
  //设置颜色属性
  pColor = new RgbColorClass();
  pColor.Red = 255;
  pColor.Green = 0;
  pColor.Blue = 0;
  pColor.Transparency = 0;
  //设置填充符号的属性
  IFillSymbol pFillSymbol = new SimpleFillSymbolClass();
  pFillSymbol.Color = pColor;
  pFillSymbol.Outline = pOutline;
  IFillShapeElement pFillShapeEle = pElement as IFillShapeElement;
  pFillShapeEle.Symbol = pFillSymbol;
  pGraphicsContainer.AddElement((IElement)pFillShapeEle, 0);
  pActiveView.PartialRefresh(esriViewDrawPhase.esriViewGraphics, null, null);
  //将地图范围显示在StripStatus中
  IPoint ll, Ur;
  ll = axMapControl1.Extent.LowerLeft;
  Ur = axMapControl1.Extent.LowerRight;
  toolStripStatusLabel3.Text = "(" + Convert.ToString(ll.X) + "," + Convert.ToString(ll.Y) + ")";

}

private void axMapControl1_OnMapReplaced(object sender, ESRI.ArcGIS.Controls.IMapControlEvents2_OnMapReplacedEvent e)
{                                                                               //向MapControl2添加图层
  if (axMapControl1.LayerCount > 0)
  {
    axMapControl2.Map = new MapClass();
    for (int i = 0; i <= axMapControl1.Map.LayerCount - 1; i++)
    {

      axMapControl2.AddLayer(axMapControl1.get_Layer(i));
    }
    axMapControl2.Extent = axMapControl1.Extent;
    axMapControl2.Refresh();

  }
}
接下来就是对MapControl2控件的On_MouseDown 和 On_MouseMove事件进行编写,这样可以让我们通过拖动鹰眼图上的红框反向操作MapControl1中的地图位置:
private void axMapControl2_OnMouseMove(object sender, ESRI.ArcGIS.Controls.IMapControlEvents2_OnMouseMoveEvent e)
    {
      if (e.button == 1)
      {
        IPoint pPoint = new PointClass();
        pPoint.PutCoords(e.mapX, e.mapY);
        axMapControl1.CenterAt(pPoint);
        axMapControl1.ActiveView.PartialRefresh(esriViewDrawPhase.esriViewGeography,
        null, null);
      }
    }

    private void axMapControl2_OnMouseDown(object sender, ESRI.ArcGIS.Controls.IMapControlEvents2_OnMouseDownEvent e)
    {
      if (axMapControl2.Map.LayerCount > 0)
      {
        if (e.button == 1)
        {
          IPoint pPoint = new PointClass();                                                             //将点击位置的坐标转换后设为MapControl1的中心
          pPoint.PutCoords(e.mapX, e.mapY);
          axMapControl1.CenterAt(pPoint);
          axMapControl1.ActiveView.PartialRefresh(esriViewDrawPhase.esriViewGeography, null, null);
        }
        else if (e.button == 2)
        {
          IEnvelope pEnv = axMapControl2.TrackRectangle();
          axMapControl1.Extent = pEnv;
          axMapControl1.ActiveView.PartialRefresh(esriViewDrawPhase.esriViewGeography, null, null);
        }
      }

    }
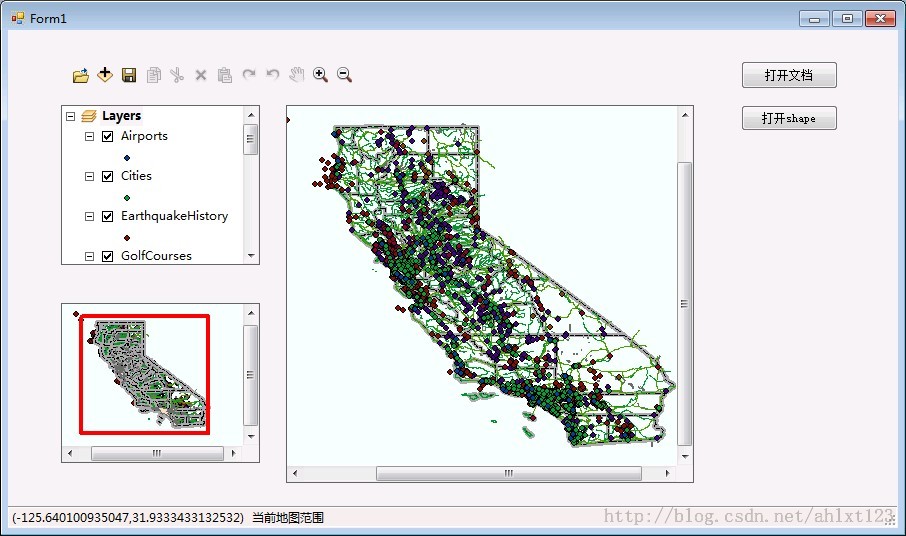
最后在Form左下角再添加一个statusStrip控件,就可以实时显示当前图幅的范围了~
最终效果如下:
属性表的访问与显示
这里主要是访问并显示shapefile的属性表~
大致思路如下:新建一个Form用来获取选中要素的属性表,而在初始界面右键点击对应的矢量要素后,便打开新form将要素属性表展示出来。
下面就开始咯~
首先要添加ESRI.ArcGIS.Controls、Geodatabase的引用,更新命名空间;
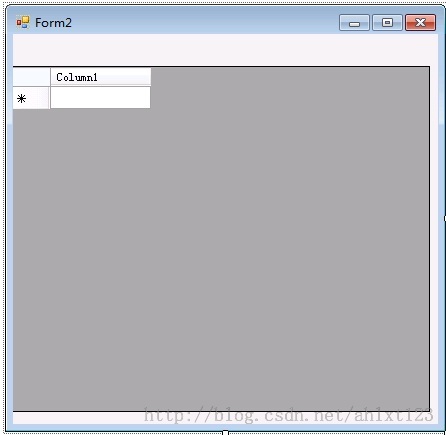
然后我们添加一个用于显示属性表内容新的 Form 窗体,在这个新的窗体上添加 dataGridView 控件,并添加Column。
在Form2中,我们先将可能获得的属性表数据类型进行预定义:
public static string ParseFieldType(esriFieldType fieldType)//将EsriType 转换为String
   {
     switch (fieldType)
     {
       case esriFieldType.esriFieldTypeBlob:
         return "System.String";
       case esriFieldType.esriFieldTypeDate:
         return "System.DateTime";
       case esriFieldType.esriFieldTypeDouble:
         return "System.Double";
       case esriFieldType.esriFieldTypeGeometry:
         return "System.String";
       case esriFieldType.esriFieldTypeGlobalID:
         return "System.String";
       case esriFieldType.esriFieldTypeGUID:
         return "System.String";
       case esriFieldType.esriFieldTypeInteger:
         return "System.Int32";
       case esriFieldType.esriFieldTypeOID:
         return "System.String";
       case esriFieldType.esriFieldTypeRaster:
         return "System.String";
       case esriFieldType.esriFieldTypeSingle:
         return "System.Single";
       case esriFieldType.esriFieldTypeSmallInteger:
         return "System.Int32";
       case esriFieldType.esriFieldTypeString:
         return "System.String";
       default:
         return "System.String";
     }
   }
然后就是获取shpaefile的属性表了,这里我们主要使用 IField、IFeatureCursor、IFeature 这三个接口来达成目标:
接口说明如下:
- IField 接口:用于获取要素表。
- IFeature 接口:用来接收查询出来的要素。
- IFeatureCursor 接口:通过Search进行查询,可以将结果保存在这里,从而利用NextFeature方法,遍历所有要素。
代码如下:
public void Opentable()
    {
      IFields pFields;
      pFields = pFeaturelayer.FeatureClass.Fields;
      dataGridView1.ColumnCount = pFields.FieldCount;
      for (int i = 0; i < pFields.FieldCount; i++)
      {
        string fldName = pFields.get_Field(i).Name;
        dataGridView1.Columns[i].Name = fldName;
        dataGridView1.Columns[i].ValueType = System.Type.GetType(ParseFieldType(pFields.get_Field(i).Type));
      }
      IFeatureCursor pFeatureCursor;
      pFeatureCursor = pFeaturelayer.FeatureClass.Search(null, false);
      IFeature pFeature;
      pFeature = pFeatureCursor.NextFeature();
      while (pFeature != null)
      {
        string[] fldValue = new string[pFields.FieldCount];
        for (int i = 0; i < pFields.FieldCount; i++)
        {
          string fldName;
          fldName = pFields.get_Field(i).Name;
          if (fldName == pFeaturelayer.FeatureClass.ShapeFieldName)
          {
            fldValue[i] = Convert.ToString(pFeature.Shape.GeometryType);
          }
          else
            fldValue[i] = Convert.ToString(pFeature.get_Value(i));
        }
        dataGridView1.Rows.Add(fldValue);
        pFeature = pFeatureCursor.NextFeature();
      }
    }
搞定~接下来就是在初始界面选定要素后跳转界面显示属性表了~
先在form1中进行预定义:
IFeatureLayer pFeatureLayer = null;
public IFeatureLayer pGlobalFeatureLayer; //定义全局变量
public ILayer player;
因为决定在右击鼠标时显示选项,在Form1窗体中添加contextMenuStrip控件,添加选项”显示属性表“,在click事件中打开新form:
Form2 Ft = new Form2(player as IFeatureLayer);
      Ft.Show();
然后就保证右键点击相关图层要素后能够成功打开对应属性表啦,这里主要用了TOCControl的 HitTest()方法:
publicvoid HitTest ( int X, int Y, ref esriTOCControlItem ItemType, ref IBasicMapBasicMap, ref ILayer Layer, ref object Unk, ref object Data );
其中
- X,Y:鼠标点击的坐标;
- ITemType:esriTOCControlItem枚举常量
- BasicMap:绑定MapControl的IBasicMap接口
- Layer:被点击的图层
- Unk:TOCControl的LegendGroup对象
- Data:LegendClass在LegendGroup中的Index。
在TOCControl控件的 OnMouseDown 事件下添加如下代码即可~:
if (axMapControl1.LayerCount > 0)
{
  esriTOCControlItem pItem = new esriTOCControlItem();
  pGlobalFeatureLayer = new FeatureLayerClass();
  IBasicMap pBasicMap = new MapClass();
  object pOther = new object();
  object pIndex = new object();
  axTOCControl1.HitTest(e.x, e.y, ref pItem, ref pBasicMap, ref player, ref pOther, ref pIndex);
}
if (e.button == 2)
{
  contextMenuStrip1.Show(axTOCControl1, e.x, e.y);
}
大功告成~~
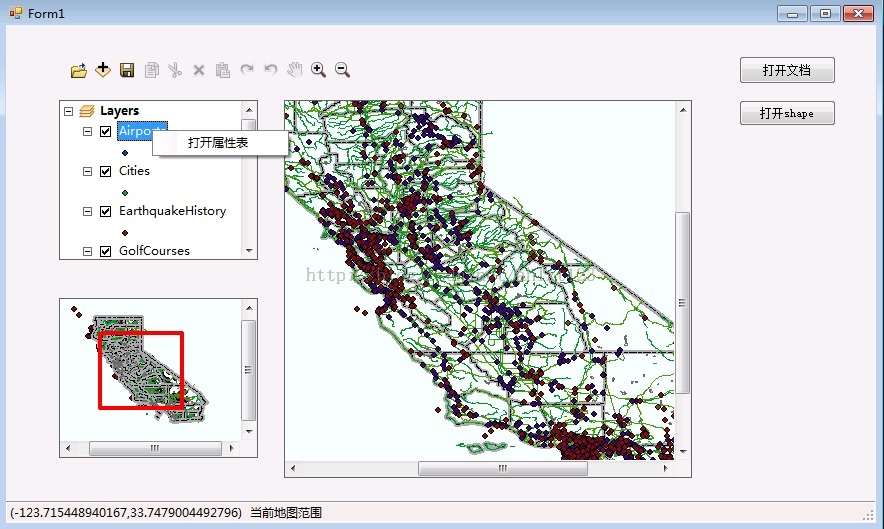
运行结果如下:
右击显示属性表:
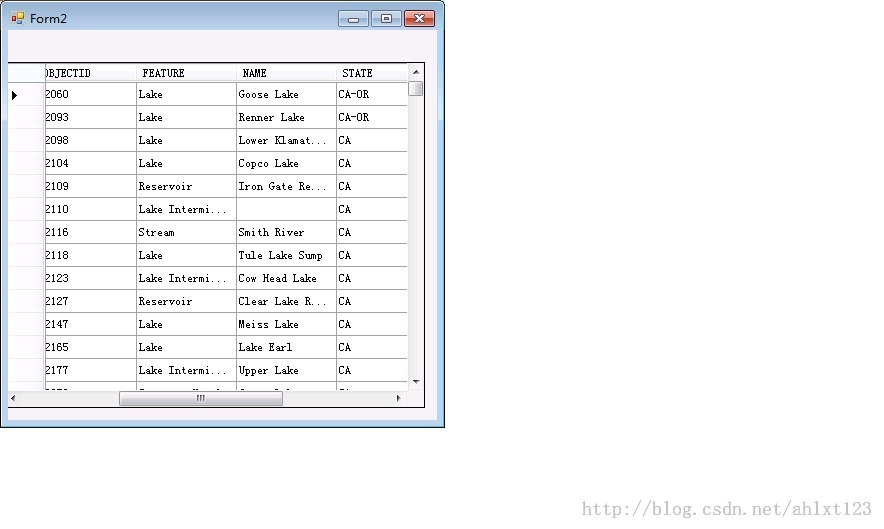
点击后出现属性表~~~:
 What is Python Switch Statement?Apr 30, 2025 pm 02:08 PM
The article discusses Python's new "match" statement introduced in version 3.10, which serves as an equivalent to switch statements in other languages. It enhances code readability and offers performance benefits over traditional if-elif-el
 What are Exception Groups in Python?Apr 30, 2025 pm 02:07 PM
Exception Groups in Python 3.11 allow handling multiple exceptions simultaneously, improving error management in concurrent scenarios and complex operations.
 What are Function Annotations in Python?Apr 30, 2025 pm 02:06 PM
Function annotations in Python add metadata to functions for type checking, documentation, and IDE support. They enhance code readability, maintenance, and are crucial in API development, data science, and library creation.
 What are unit tests in Python?Apr 30, 2025 pm 02:05 PM
The article discusses unit tests in Python, their benefits, and how to write them effectively. It highlights tools like unittest and pytest for testing.
 What are Access Specifiers in Python?Apr 30, 2025 pm 02:03 PM
Article discusses access specifiers in Python, which use naming conventions to indicate visibility of class members, rather than strict enforcement.
 What is __init__() in Python and how does self play a role in it?Apr 30, 2025 pm 02:02 PM
Article discusses Python's \_\_init\_\_() method and self's role in initializing object attributes. Other class methods and inheritance's impact on \_\_init\_\_() are also covered.
 What is the difference between @classmethod, @staticmethod and instance methods in Python?Apr 30, 2025 pm 02:01 PM
The article discusses the differences between @classmethod, @staticmethod, and instance methods in Python, detailing their properties, use cases, and benefits. It explains how to choose the right method type based on the required functionality and da
 How do you append elements to a Python array?Apr 30, 2025 am 12:19 AM
InPython,youappendelementstoalistusingtheappend()method.1)Useappend()forsingleelements:my_list.append(4).2)Useextend()or =formultipleelements:my_list.extend(another_list)ormy_list =[4,5,6].3)Useinsert()forspecificpositions:my_list.insert(1,5).Beaware


Hot AI Tools

Undresser.AI Undress
AI-powered app for creating realistic nude photos

AI Clothes Remover
Online AI tool for removing clothes from photos.

Undress AI Tool
Undress images for free

Clothoff.io
AI clothes remover

Video Face Swap
Swap faces in any video effortlessly with our completely free AI face swap tool!

Hot Article

Hot Tools

Dreamweaver CS6
Visual web development tools

EditPlus Chinese cracked version
Small size, syntax highlighting, does not support code prompt function

SAP NetWeaver Server Adapter for Eclipse
Integrate Eclipse with SAP NetWeaver application server.

ZendStudio 13.5.1 Mac
Powerful PHP integrated development environment

Zend Studio 13.0.1
Powerful PHP integrated development environment


