


公司大牛让用keepalived构建高可用的MySQL,在网上看到一篇很完整的文章,于是乎照着前辈的足迹,加上自己补充。如上述均正确配置
前言:公司大牛让用keepalived构建高可用的MySQL,在网上看到一篇很完整的文章,于是乎照着前辈的足迹,加上自己补充。
环境拓扑如下:
MySQL-VIP:192.168.1.150
MySQL-master1:192.168.1.151
MySQL-master2:192.168.1.152
OS版本:RedHat 5.4
MySQL版本:5.0.77
Keepalived版本:1.1.20
一、MySQL master-master的安装及配置
1、安装mysql
#yum install mysql-server -y \\为了节省时间,这里两台server都直接yum装,希望你配好了yum源。
2、修改配置文件
On server1:
#vim /etc/my.cnf
[mysqld]
server-id = 10
log-bin = mysql-bin
replicate-do-db = ccledb
auto-increment-increment = 2
auto-increment-offset = 1
On server2 :
#vim /etc/my.cnf
[mysqld]
server-id = 20
log-bin = mysql-bin
replicate-do-db = ccledb
auto-increment-increment = 2
auto-increment-offset = 2
3、建立授权用户
On server1:
mysql> grant replication client,replication slave on *.* to cclo1@’192.168.1.%’ identified by ‘123456’;
On server2:
mysql> grant replication client,replication slave on *.* to cclo2@’192.168.1.%’ identified by ‘123456’;
4、指定主服务器
On server1
mysql> show master status;
+------------------+----------+--------------+------------------+
| File | Position | Binlog_Do_DB | Binlog_Ignore_DB |
+------------------+----------+--------------+------------------+
| MySQL-bin.000003 | 374 | | |
+------------------+----------+--------------+------------------+
1 row in set (0.00 sec)
mysql> change master to master_host='192.168.1.152',master_user='cclo2',master_password='123456',master_log_file='mysql-bin.000003',master_log_pos=374;
Query OK, 0 rows affected (0.05 sec)
On server2
mysql> show master status;
+------------------+----------+--------------+------------------+
| File | Position | Binlog_Do_DB | Binlog_Ignore_DB |
+------------------+----------+--------------+------------------+
| MySQL-bin.000003 | 374 | | |
+------------------+----------+--------------+------------------+
1 row in set (0.00 sec)
mysql> change master to master_host='192.168.1.151',master_user='cclo1',master_password='123456',master_log_file='mysql-bin.000003',master_log_pos=374;
Query OK, 0 rows affected (0.05 sec)
5、开启主主服务
mysql> start slave; \\两台server分别执行
MySQL> show slave status\G \\查看主主状态
Slave_IO_Running: Yes
Slave_SQL_Running: Yes \\如果此2项都为yes,master-master配置即成功
如上述均正确配置,现在在任何一台MySQL上更新数据都会同步到另一台MySQL。
二、keepalived安装及配置
1、192.168.1.151服务器上keepalived安装及配置
安装keepalived
#tar zxvf keepalived-1.1.20.tar.gz
#cd keepalived-1.1.20
#./configure --prefix=/usr/local/keepalived --with-kernel-dir=/usr/src/kernels/2.6.18-164.el5-i686
\\此处一定确保你的linux中有/usr/src/kernels/2.6.18-164.el5-i686这个目录,如果没有请安装kernel- devel包,建议最好是下载和你的linux系统内核版本相同的devel包安装(一般安装镜像有),此处直接#yum install -y kernel-devel
#make && make install
配置keepalived
此处需新建一个配置文件,默认情况下keepalived启动时会去/etc/keepalived目录下找配置文件
#mkdir /etc/keepalived
#vim /etc/keepalived/keepalived.conf \\配置文件内容如下:
! Configuration File for keepalived
global_defs {
notification_email {
cclo@cer.cn
}
notification_email_from cclo@cer.cn
smtp_server 127.0.0.1
smtp_connect_timeout 30
router_id MySQL-ha
}
vrrp_instance VI_1 {
state BACKUP #两台配置此处均是BACKUP
interface eth0
virtual_router_id 51
priority 100 #优先级,另一台改为90
advert_int 1
nopreempt #不主动抢占资源,只在优先级高的机器上设置即可,优先级低的机器不设置
authentication {
auth_type PASS
auth_pass 1111
}
virtual_ipaddress {
192.168.1.150
}
}
virtual_server 192.168.1.150 3306 {
delay_loop 2 #每个2秒检查一次real_server状态
lb_algo wrr #LVS算法
lb_kind DR #LVS模式
persistence_timeout 60 #会话保持时间
protocol TCP
real_server 192.168.1.151 3306 {
weight 3
notify_down /usr/local/my/my.sh #检测到服务down后执行的脚本
TCP_CHECK {
connect_timeout 10 #连接超时时间
nb_get_retry 3 #重连次数
delay_before_retry 3 #重连间隔时间
connect_port 3306 #健康检查端口
}
}
编写检测服务down后所要执行的脚本:
#vim /usr/local/my/my.sh
#!/bin/sh
pkill keepalived
#chmod +x /usr/local/my/my.sh
注:此脚本是上面配置文件notify_down选项所用到的,keepalived使用notify_down选项来检查real_server的服务状态,当发现real_server服务故障时,便触发此脚本;我们可以看到,脚本就一个命令,通过pkill keepalived强制杀死keepalived进程,从而实现了MySQL故障自动转移。另外,,我们不用担心两个MySQL会同时提供数据更新操作,因为每台MySQL上的keepalived的配置里面只有本机MySQL的IP+VIP,而不是两台MySQL的IP+VIP
启动keepalived:
#/usr/local/keepalived/sbin/keepalived –D
#ps -aux | grep keepalived
测试
找一台局域网PC,然后去ping MySQL的VIP,这时候MySQL的VIP是可以ping的通的
停止MySQL服务,#ps -aux | grep keepalived 看keepalived健康检查程序是否会触发我们编写的脚本
![]()

 MySQL连接离奇挂死,竟不是连接池的锅……Apr 14, 2023 pm 04:28 PM
一、背景近期由测试反馈的问题有点多,其中关于系统可靠性测试提出的问题令人感到头疼,一来这类问题有时候属于“偶发”现象,难以在环境上快速复现;二来则是可靠性问题的定位链条有时候变得很长,极端情况下可能要从A服务追踪到Z服务,或者是从应用代码追溯到硬件层面。本次分享的是一次关于MySQL高可用问题的定位过程,其中曲折颇多但问题本身却比较有些代表性,遂将其记录以供参考。1、架构首先,本系统以MySQL作为主要的数据存储部件。整一个是典型的微服务架构(SpringBoot+SpringClou
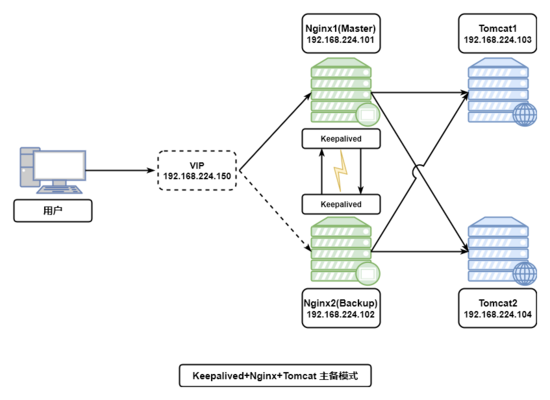 如何用Keepalived+Nginx+Tomcat实现高可用Web集群May 19, 2023 am 10:01 AM
keepalived+nginx+tomcat实现高可用web集群一、nginx的安装过程1.下载nginx安装包,安装依赖环境包(1)安装c++编译环境yum-yinstallgcc#c++(2)安装pcreyum-yinstallpcre-devel(3)安装zlibyum-yinstallzlib-devel(4)安装nginx定位到nginx解压文件位置,执行编译安装命令[root@localhostnginx-1.12.2]#pwd/usr/local/nginx/nginx-1.12
 nginx+keepalived高可用主从配置的方法May 29, 2023 pm 02:16 PM
一、系统环境及软件版本centos6.6x64keepalived-1.2.18.tar.gznginx-1.6.2.tar.gz主服务器:192.168.38.64从服务器:192.168.38.66vip:192.168.38.100二、nginx安装(主从安装一致)1.安装依赖环境复制代码代码如下:yuminstallgccgcc-c++makeautomakeautoconflibtoolpcrepcre-develzlibzlib-developensslopenssl-devel2.
 Nginx+Keepalived怎么实现双机热备May 29, 2023 pm 08:29 PM
一.keepalivedkeepalived是保证集群高可用的服务软件,网络中优先级高的节点为master负责响应vip的arp包,将vip和mac地址映射关系告诉网络内其他主机,还会以多播的形式向网络中发送vrrp通告,告知自己的优先级。backup节点只负责处理master发出的多播包,当发现master的优先级没自己高,或者没收到master的vrrp通告时,backup将自己切换到master状态。二.环境搭建环境:qemu-kvm、客户机debian(9.4.0)虚拟机qemu-kvm
 使用Go语言构建高可用的消息队列系统Jun 18, 2023 am 09:31 AM
随着在现代化的IT架构中,各种组件之间的通信和协调变得越来越重要。当应用程序需要向其他应用程序或处理器发送消息时,消息队列系统已经成为了重要的设施之一。Go是一种越来越受欢迎的编程语言,它的高效性能和并发性质使其成为开发高可用消息队列系统的理想工具。本文将介绍如何使用Go语言构建高可用的消息队列系统,并探讨实现高可用性的最佳实践。消息队列系统简介在编写一个高
 Go语言中的高可用分布式系统实现策略Jun 30, 2023 pm 05:06 PM
如何在Go语言开发中实现高可用的分布式系统摘要:随着互联网的快速发展,分布式系统的需求越来越大。如何在Go语言开发中实现高可用的分布式系统成为了一个重要的问题。本文将介绍如何使用Go语言开发高可用的分布式系统。一、介绍分布式系统是由多个独立的节点组成的,节点之间通过网络进行通信和协调。高可用是分布式系统的核心要求之一,它能够保证系统在面对各种异常和故障时仍能
 如何在Linux上配置高可用的NAT网关Jul 05, 2023 am 11:03 AM
如何在Linux上配置高可用的NAT网关摘要:网络地址转换(NAT)是一种常用的网络技术,用于将私有网络的IP地址转换为公共网络的IP地址。在Linux系统上,配置高可用的NAT网关可以提高网络的可用性和可靠性。本文将介绍如何使用Keepalived和iptables工具,在Linux上配置高可用的NAT网关。关键词:NAT、高可用、Keepalived、i
 Go语言分布式缓存存储系统的高可用性实现Jun 30, 2023 am 11:40 AM
随着互联网的快速发展,对于大规模应用程序的性能需求也越来越高。分布式缓存存储系统是一种常见的解决方案,它可以提高应用程序的性能、可扩展性和可靠性。在本文中,我们将探讨如何在Go语言开发中实现高可用的分布式缓存存储系统。一、背景介绍分布式缓存存储系统是一个面向大规模应用程序的关键基础设施。它通过将数据存储在内存中,加速读取速度,并通过数据复制和数据分片等技术,


Hot AI Tools

Undresser.AI Undress
AI-powered app for creating realistic nude photos

AI Clothes Remover
Online AI tool for removing clothes from photos.

Undress AI Tool
Undress images for free

Clothoff.io
AI clothes remover

AI Hentai Generator
Generate AI Hentai for free.

Hot Article
Hot Tools

Dreamweaver Mac version
Visual web development tools

mPDF
mPDF is a PHP library that can generate PDF files from UTF-8 encoded HTML. The original author, Ian Back, wrote mPDF to output PDF files "on the fly" from his website and handle different languages. It is slower than original scripts like HTML2FPDF and produces larger files when using Unicode fonts, but supports CSS styles etc. and has a lot of enhancements. Supports almost all languages, including RTL (Arabic and Hebrew) and CJK (Chinese, Japanese and Korean). Supports nested block-level elements (such as P, DIV),

PhpStorm Mac version
The latest (2018.2.1) professional PHP integrated development tool

SublimeText3 Chinese version
Chinese version, very easy to use

MinGW - Minimalist GNU for Windows
This project is in the process of being migrated to osdn.net/projects/mingw, you can continue to follow us there. MinGW: A native Windows port of the GNU Compiler Collection (GCC), freely distributable import libraries and header files for building native Windows applications; includes extensions to the MSVC runtime to support C99 functionality. All MinGW software can run on 64-bit Windows platforms.

