操作系统CentOS,apache2.2.4,数据库Mysql-5.0.18。使用mysql源码包进行安装,也可以使用mysql二进制包安装或者rpm包安装。
操作系统CentOS,apache2.2.4,,数据库Mysql-5.0.18。使用mysql源码包进行安装,也可以使用mysql二进制包安装或者rpm包安装。
1。增加一个登录用户和群组:
# groupadd mysql
#useradd -g mysql mysql
2。解压mysql-5.0.18.tar.gz到/usr/local/mysql
#tar -zvxf mysql-5.0.18,tar.gz
3。进入mysql-5.0.18目录
#cd mysql-5.0.18
4。运行configure编译mysql源码
#./configure --prefix=/usr/local/mysql/
5。安装mysql到指定的目录
#make;make install
6。把/support-files/my-medium.cnf复制到/etc/下
#cp ./support-files/my-medium.cnf /etc/my.cnf
7。在还没有安装mysql数据库之前,还必须为mysql建立授权表:
#/scripts/mysql_install_db --user=mysql&
注:也可以使用root,但是--user须改为-user
8。修改相应文件的权限(/usr/local/mysql/)
#chown -R root /usr/local/mysql
#chown -R mysql /usr/local/mysql
#chown -R mysql /usr/local/mysql/var
9。启动mysql:(/usr/local/mysql/)
# ./bin/mysqld_safe --user=mysql&
10。安装后mysql数据库的root帐户密码默认为空,可以这样修改:
# /usr/local/mysql/bin/mysqladmin -u root -password 'new-password'
11。把mysql命令加入到环境变量
# echo "export PATH=$PATH:/usr/local/mysql/bin">>/etc/profile
#source /etc/profile //使环境变量生效
#echo $PATH //输出环境变量
/usr/kerberos/sbin:/usr/kerberos/bin:/usr/local/sbin:/usr/local/bin:/sbin:/bin:/usr/sbin:/usr/bin:/usr/X11R6/bin:/root/bin:/usr/local/mysql/bin
12。开机时启动mysql,把mysql.server放到开机启动的文件中/etc/init.d/mysql:(/usr/local/src/目录下)
#cp ./mysql-5.0.18/support-fiels/mysql.server /etc/init.d/mysql
#chkconfig --add mysql
#chkconfig mysql on
13。登录mysql:(必须把mysql命令加入到环境变量中)
# mysql -u root -p12345
Welcome to the MySQL monitor. Commands end with ; or \g.
Your MySQL connection id is 4 to server version: 5.0.18-log
Type 'help;' or '\h' for help. Type '\c' to clear the buffer.
mysql>show databases;
+--------------------+
| Database |
+--------------------+
| information_schema |
| mysql |
| test |
+--------------------+
3 rows in set (0.02 sec)

 解读CRISP-ML(Q):机器学习生命周期流程Apr 08, 2023 pm 01:21 PM
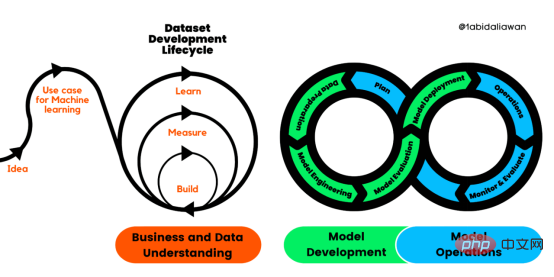
译者 | 布加迪审校 | 孙淑娟目前,没有用于构建和管理机器学习(ML)应用程序的标准实践。机器学习项目组织得不好,缺乏可重复性,而且从长远来看容易彻底失败。因此,我们需要一套流程来帮助自己在整个机器学习生命周期中保持质量、可持续性、稳健性和成本管理。图1. 机器学习开发生命周期流程使用质量保证方法开发机器学习应用程序的跨行业标准流程(CRISP-ML(Q))是CRISP-DM的升级版,以确保机器学习产品的质量。CRISP-ML(Q)有六个单独的阶段:1. 业务和数据理解2. 数据准备3. 模型
 人工智能的环境成本和承诺Apr 08, 2023 pm 04:31 PM
人工智能(AI)在流行文化和政治分析中经常以两种极端的形式出现。它要么代表着人类智慧与科技实力相结合的未来主义乌托邦的关键,要么是迈向反乌托邦式机器崛起的第一步。学者、企业家、甚至活动家在应用人工智能应对气候变化时都采用了同样的二元思维。科技行业对人工智能在创建一个新的技术乌托邦中所扮演的角色的单一关注,掩盖了人工智能可能加剧环境退化的方式,通常是直接伤害边缘人群的方式。为了在应对气候变化的过程中充分利用人工智能技术,同时承认其大量消耗能源,引领人工智能潮流的科技公司需要探索人工智能对环境影响的
 找不到中文语音预训练模型?中文版 Wav2vec 2.0和HuBERT来了Apr 08, 2023 pm 06:21 PM
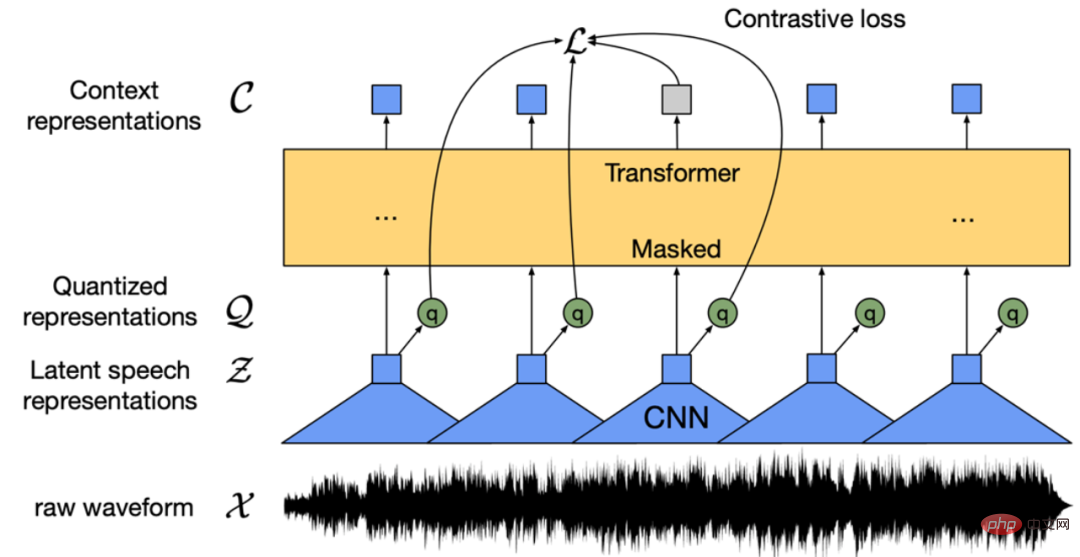
Wav2vec 2.0 [1],HuBERT [2] 和 WavLM [3] 等语音预训练模型,通过在多达上万小时的无标注语音数据(如 Libri-light )上的自监督学习,显著提升了自动语音识别(Automatic Speech Recognition, ASR),语音合成(Text-to-speech, TTS)和语音转换(Voice Conversation,VC)等语音下游任务的性能。然而这些模型都没有公开的中文版本,不便于应用在中文语音研究场景。 WenetSpeech [4] 是
 条形统计图用什么呈现数据Jan 20, 2021 pm 03:31 PM
条形统计图用“直条”呈现数据。条形统计图是用一个单位长度表示一定的数量,根据数量的多少画成长短不同的直条,然后把这些直条按一定的顺序排列起来;从条形统计图中很容易看出各种数量的多少。条形统计图分为:单式条形统计图和复式条形统计图,前者只表示1个项目的数据,后者可以同时表示多个项目的数据。
 自动驾驶车道线检测分类的虚拟-真实域适应方法Apr 08, 2023 pm 02:31 PM
arXiv论文“Sim-to-Real Domain Adaptation for Lane Detection and Classification in Autonomous Driving“,2022年5月,加拿大滑铁卢大学的工作。虽然自主驾驶的监督检测和分类框架需要大型标注数据集,但光照真实模拟环境生成的合成数据推动的无监督域适应(UDA,Unsupervised Domain Adaptation)方法则是低成本、耗时更少的解决方案。本文提出对抗性鉴别和生成(adversarial d
 数据通信中的信道传输速率单位是bps,它表示什么Jan 18, 2021 pm 02:58 PM
数据通信中的信道传输速率单位是bps,它表示“位/秒”或“比特/秒”,即数据传输速率在数值上等于每秒钟传输构成数据代码的二进制比特数,也称“比特率”。比特率表示单位时间内传送比特的数目,用于衡量数字信息的传送速度;根据每帧图像存储时所占的比特数和传输比特率,可以计算数字图像信息传输的速度。
 数据分析方法有哪几种Dec 15, 2020 am 09:48 AM
数据分析方法有4种,分别是:1、趋势分析,趋势分析一般用于核心指标的长期跟踪;2、象限分析,可依据数据的不同,将各个比较主体划分到四个象限中;3、对比分析,分为横向对比和纵向对比;4、交叉分析,主要作用就是从多个维度细分数据。
 聊一聊Python 实现数据的序列化操作Apr 12, 2023 am 09:31 AM
在日常开发中,对数据进行序列化和反序列化是常见的数据操作,Python提供了两个模块方便开发者实现数据的序列化操作,即 json 模块和 pickle 模块。这两个模块主要区别如下:json 是一个文本序列化格式,而 pickle 是一个二进制序列化格式;json 是我们可以直观阅读的,而 pickle 不可以;json 是可互操作的,在 Python 系统之外广泛使用,而 pickle 则是 Python 专用的;默认情况下,json 只能表示 Python 内置类型的子集,不能表示自定义的


Hot AI Tools

Undresser.AI Undress
AI-powered app for creating realistic nude photos

AI Clothes Remover
Online AI tool for removing clothes from photos.

Undress AI Tool
Undress images for free

Clothoff.io
AI clothes remover

AI Hentai Generator
Generate AI Hentai for free.

Hot Article

Hot Tools

EditPlus Chinese cracked version
Small size, syntax highlighting, does not support code prompt function

VSCode Windows 64-bit Download
A free and powerful IDE editor launched by Microsoft

Dreamweaver Mac version
Visual web development tools

MinGW - Minimalist GNU for Windows
This project is in the process of being migrated to osdn.net/projects/mingw, you can continue to follow us there. MinGW: A native Windows port of the GNU Compiler Collection (GCC), freely distributable import libraries and header files for building native Windows applications; includes extensions to the MSVC runtime to support C99 functionality. All MinGW software can run on 64-bit Windows platforms.

PhpStorm Mac version
The latest (2018.2.1) professional PHP integrated development tool


