


本文实例讲述了yii实现使用CUploadedFile上传文件的方法。分享给大家供大家参考,具体如下:
一、前端代码
Html代码:
<form action="<?php echo $this->createUrl('/upload/default/upload/');?>" method="post" enctype="multipart/form-data">
<input type="file" name="file"/>
<input type="hidden" name="dir" value="<?php echo Yii::app()->controller->currentDir?>"/>
<input type="submit" value="Upload Image"/>
</form>
二、后端代码
Php代码:
public function actionUpload()
{
$this->currentDir = isset($_REQUEST['dir']) ? $_REQUEST['dir'] : '';
$image = CUploadedFile::getInstanceByName('file');
$name = $this->uploadPath.'/'.$this->currentDir.'/'.$image->name;
$image->saveAs($name);
$this->redirect(array('index','dir'=>$this->currentDir));
}
关于CUploadedFile类的使用:
通过
或
获取的对象$attach对象,有以下几个属性:
name
size
type
tempName
error
extensionName
hasError
希望本文所述对大家基于Yii框架的PHP程序设计有所帮助。

 123云盘怎么上传文件Feb 24, 2024 pm 05:30 PM
123云盘怎么上传文件?123云盘中是可以上传文件来储存,但是多数的小伙伴不知道123云盘如何上传文件,接下来就是小编为玩家带来的123云盘上传文件方法图文教程,感兴趣的用户快来一起看看吧!123云盘怎么上传文件1、首先打开123云盘进入到主页面,注册或者登陆账号;2、然后进入到如下图所示的页面,点击箭头指引的【上传】按钮;3、接着下方会展开功能栏窗口,【选择文件】功能点击;4、最后选择需要上传的文件,耐心等待上传完成即可。
 如何使用PHP框架Yii开发一个高可用的云备份系统Jun 27, 2023 am 09:04 AM
随着云计算技术的不断发展,数据的备份已经成为了每个企业必须要做的事情。在这样的背景下,开发一款高可用的云备份系统尤为重要。而PHP框架Yii是一款功能强大的框架,可以帮助开发者快速构建高性能的Web应用程序。下面将介绍如何使用Yii框架开发一款高可用的云备份系统。设计数据库模型在Yii框架中,数据库模型是非常重要的一部分。因为数据备份系统需要用到很多的表和关
 Yii2 vs Phalcon:哪个框架更适合开发显卡渲染应用?Jun 19, 2023 am 08:09 AM
在当前信息时代,大数据、人工智能、云计算等技术已经成为了各大企业关注的热点。在这些技术中,显卡渲染技术作为一种高性能图形处理技术,受到了越来越多的关注。显卡渲染技术被广泛应用于游戏开发、影视特效、工程建模等领域。而对于开发者来说,选择一个适合自己项目的框架,是一个非常重要的决策。在当前的语言中,PHP是一种颇具活力的语言,一些优秀的PHP框架如Yii2、Ph
 php如何使用Yii3框架?May 31, 2023 pm 10:42 PM
随着互联网的不断发展,Web应用程序开发的需求也越来越高。对于开发人员而言,开发应用程序需要一个稳定、高效、强大的框架,这样可以提高开发效率。Yii是一款领先的高性能PHP框架,它提供了丰富的特性和良好的性能。Yii3是Yii框架的下一代版本,它在Yii2的基础上进一步优化了性能和代码质量。在这篇文章中,我们将介绍如何使用Yii3框架来开发PHP应用程序。
 Yii框架中的数据查询:高效地访问数据Jun 21, 2023 am 11:22 AM
Yii框架是一个开源的PHPWeb应用程序框架,提供了众多的工具和组件,简化了Web应用程序开发的流程,其中数据查询是其中一个重要的组件之一。在Yii框架中,我们可以使用类似SQL的语法来访问数据库,从而高效地查询和操作数据。Yii框架的查询构建器主要包括以下几种类型:ActiveRecord查询、QueryBuilder查询、命令查询和原始SQL查询
 Symfony vs Yii2:哪个框架更适合开发大型Web应用?Jun 19, 2023 am 10:57 AM
随着Web应用需求的不断增长,开发者们在选择开发框架方面也越来越有选择的余地。Symfony和Yii2是两个备受欢迎的PHP框架,它们都具有强大的功能和性能,但在面对需要开发大型Web应用时,哪个框架更适合呢?接下来我们将对Symphony和Yii2进行比较分析,以帮助你更好地进行选择。基本概述Symphony是一个由PHP编写的开源Web应用框架,它是建立
 yii如何将对象转化为数组或直接输出为json格式Jan 08, 2021 am 10:13 AM
yii框架:本文为大家介绍了yii将对象转化为数组或直接输出为json格式的方法,具有一定的参考价值,希望能够帮助到大家。
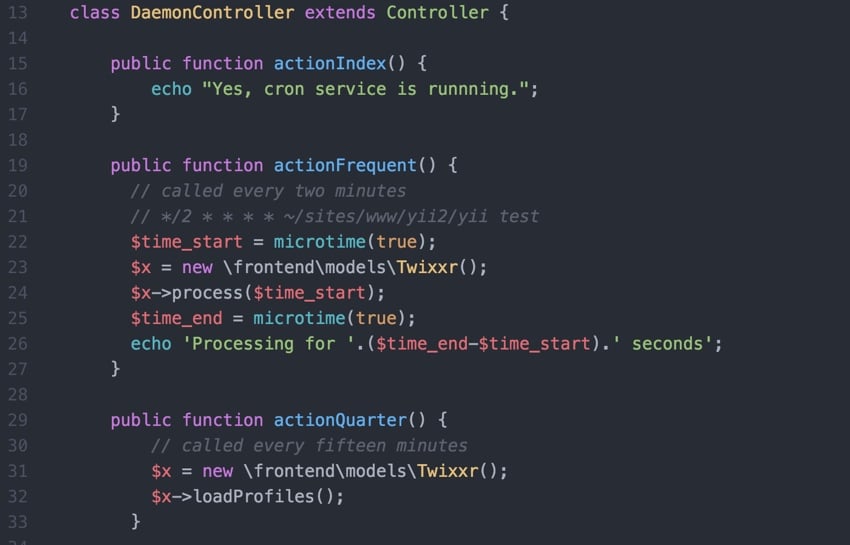 Yii2编程指南:运行Cron服务的方法Sep 01, 2023 pm 11:21 PM
如果您问“Yii是什么?”查看我之前的教程:Yii框架简介,其中回顾了Yii的优点,并概述了2014年10月发布的Yii2.0的新增功能。嗯>在这个使用Yii2编程系列中,我将指导读者使用Yii2PHP框架。在今天的教程中,我将与您分享如何利用Yii的控制台功能来运行cron作业。过去,我在cron作业中使用了wget—可通过Web访问的URL来运行我的后台任务。这引发了安全问题并存在一些性能问题。虽然我在我们的启动系列安全性专题中讨论了一些减轻风险的方法,但我曾希望过渡到控制台驱动的命令


Hot AI Tools

Undresser.AI Undress
AI-powered app for creating realistic nude photos

AI Clothes Remover
Online AI tool for removing clothes from photos.

Undress AI Tool
Undress images for free

Clothoff.io
AI clothes remover

AI Hentai Generator
Generate AI Hentai for free.

Hot Article
Hot Tools

Dreamweaver CS6
Visual web development tools

ZendStudio 13.5.1 Mac
Powerful PHP integrated development environment

Atom editor mac version download
The most popular open source editor

SublimeText3 Mac version
God-level code editing software (SublimeText3)

Safe Exam Browser
Safe Exam Browser is a secure browser environment for taking online exams securely. This software turns any computer into a secure workstation. It controls access to any utility and prevents students from using unauthorized resources.

