


The principle of using DIV pop-up windows to dynamically display content: first use CSS and HTML to hide the content in the pop-up window, and then use JavaScript (JQuery in this tutorial) to dynamically display them. This effect can not only make full use of the limited layout space, but also improve the user experience; more importantly, it does not affect the SEO effect (because it actually exists on the page, but is initially invisible)
1. Define a div in the html page and implement the content we need to display in the div.
 Website login
 Website login
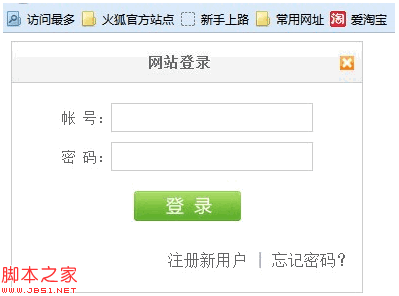
A picture is worth a thousand words. Let’s take a look at the screenshot of this DIV pop-up window:
2. The CSS style I used
#login {
width:350px;
height:250px;
border:1px solid #ccc;
position:absolute;
display:block;
z-index:9999;
background:#fff;
}
#login h2 {
height:40px;
line-height:40px ;
text-align:center;
font-size:14px;
letter-spacing:1px;
color:#666;
background:url(images/login_header.png) repeat -x;
margin:0;
padding:0;
border-bottom:1px solid #ccc;
cursor:move;
}
#login h2 img {
float:right;
position:relative;
top:14px;
right:8px;
cursor:pointer;
}
#login div.info {
padding :10px 0 5px 0;
text-align:center;
color:maroon;
}
#login div.user, #login div.pass {
font-size:14px;
color:#666;
padding:5px 0;
text-align:center;
}
#login input.text {
width:200px;
height: 25px;
border:1px solid #ccc;
background:#fff;
font-size:14px;
}
#login .button {
text-align:center;
padding:15px 0;
}
#login input.submit {
width:107px;
height:30px;
background:url(images/login_button.png) no- repeat;
border:none;
cursor:pointer;
}
#login .other {
text-align:right;
padding:15px 10px;
color: #666;
}
The main thing to note here is the definition of div style. Because it needs to be displayed in the center, we use absolute positioning position:absolute; secondly, because it is a pop-up layer, the div must be at the end Peripheral, so the z-index is usually set very large. Here we set it to z-index:9999; another point is that the div itself is hidden and needs to be set to display:none, but here we need to see the effect directly, so we directly let It displays using display:block;
3. We need to center it for display, so first we must get the height and width of the browser. If there is a horizontal or vertical offset of the scroll bar, we also need to get that The length is calculated to obtain the browser position of the div.
$(document).ready(function()
{
jQuery.fn.extend({
center:function(width,height)
{
return $(this).css("left", ($(window).width( )-width)/2 $(window).scrollLeft()).
css("top", ($(window).height()-height)/2 $(window).scrollTop()).
css("width",width).
css("height",height);
}
});
});
By clicking The button makes it display
$(".login"). click(function ()
{
$("#login").show().center(350,250);//Show login box
});
Rendering

4. Able to drag the pop-up box
Code implementation
$(document).ready(function()
{
jQuery.fn.extend({
//Drag and drop Function
drag:function(){
var $tar = $(this);
return $(this).mousedown(function(e){
if(e.target.tagName == "H2"){
var diffX = e.clientX - $tar.offset().left;
var diffY = e.clientY - $tar.offset().top;
$(document) .mousemove(function(e){
var left = e.clientX - diffX;
var top = e.clientY - diffY;
if (left left = 0;
}
else if (left left = $(window).scrollLeft();
}
else if (left > ; $(window).width() $(window).scrollLeft() - $tar.width()){
left = $(window).width() $(window).scrollLeft() -$tar .width();
}
if (top top = 0;
}
else if (top top = $(window).scrollTop();
}
else if (top > $(window).height() $(window).scrollTop() - $tar.height( )){
top = $(window).height() $(window).scrollTop() - $tar.height();
}
$tar.css("left",left ' px').css("top",top 'px');
});
}
$(document).mouseup(function(){
$(this).unbind( "mousemove");
$(this).unbind("mouseup")
});
});
}
});
});
Here we only focus on the H2 element in the div content that can be clicked and dragged. If the global div is needed, it can be modified. The drag and drop principle: when the mouse is pressed on the specified element, the The coordinates of the mouse point are calculated and the picture is moved to the corresponding position. Once the mouse click is cancelled, the corresponding press event is also cancelled, and the page remains static.
Call the drag method
$( "#login").drag();
Now we can click on the title bar of the pop-up box and drag it in the browser at will.

 Microsoft Edge 测试了一项新功能,以整理其在 Windows 11 上的体验Nov 07, 2023 pm 11:13 PM
Windows11上带有FluentDesign菜单的MicrosoftEdgeMicrosoft正在添加一项新功能…整理Edge有争议的功能之一——侧边栏,它可以停靠在Windows11和Windows10的右侧。MicrosoftEdgeCanary正在测试一项新功能或弹出窗口,该功能或弹出窗口会自动检测边栏中未使用的项目。Microsoft2022年11月将侧边栏添加到Edge,并承诺此功能可以提高您在Windows10上的工作效率,尤其是Copilot不附带的Wind
![如何禁用媒体音量控制弹出窗口[永久]](https://img.php.cn/upload/article/000/000/164/168493981948502.png) 如何禁用媒体音量控制弹出窗口[永久]May 24, 2023 pm 10:50 PM
如何禁用媒体音量控制弹出窗口[永久]May 24, 2023 pm 10:50 PM当您使用相应的快捷键微调音量级别时,屏幕上会出现一个媒体音量控制弹出窗口。这可能很烦人,因此请继续阅读以找出永久禁用媒体音量控制弹出窗口的不同方法。如何禁用媒体音量控制弹出窗口?1.在谷歌浏览器中单击任务栏上的Windows图标,在顶部的搜索栏中键入chrome,然后选择相关搜索结果以启动谷歌浏览器。在地址栏中键入或复制粘贴以下内容,然后按键。Enterchrome://flags在顶部的搜索框中键入媒体密钥,然后在硬件媒体密钥处理下拉列表中选择禁用。现在退出谷歌浏览器应用程序并重新启动它。谷歌
 如何利用Layui实现可拖拽的数据可视化仪表盘功能Oct 26, 2023 am 11:27 AM
如何利用Layui实现可拖拽的数据可视化仪表盘功能导语:数据可视化在现代生活中的应用越来越广泛,而仪表盘的开发是其中重要的一环。本文主要介绍如何利用Layui框架实现一个可拖拽的数据可视化仪表盘功能,让用户能够灵活定制自己的数据展示模块。一、前期准备下载Layui框架首先,我们需要下载并配置Layui框架。你可以在Layui的官方网站(https://www
 WPS表格居中怎么设置Mar 19, 2024 pm 09:34 PM
随着WPS的功能越来越强大,我们遇到的关于功能使用的问题也越来越多。在WPS中,我们经常会使用到WPS表格,如果我们需要打印WPS表格,为了让表格看起来美观,这时候我们需要让表格居中。那么,问题来了,我们该如何让WPS表格居中呢?今天我在这里分享一下教程,希望能够帮到你们哦!步骤详情:1、我以实战操作来讲解,以下是我用WPS表格制作了一个简单的表格。2、通过打印预览,我们可以发现,WPS表格默认是居左的。如果我们要是想把表格居中的话该怎么办呢?3、这时候,我们需要点击【工具栏】中的【页面布局】的
 如何利用Layui实现可拖拽的选项卡组件功能Oct 26, 2023 pm 01:05 PM
如何利用Layui实现可拖拽的选项卡组件功能Layui是一款轻量级的前端UI框架,提供了丰富的组件和便捷的API,使得前端开发更加简单高效。其中,选项卡组件是Layui中常用的功能之一。在实际开发中,我们经常会遇到需要对选项卡进行拖拽排序或者拖动换位的需求。本文将以实例的形式介绍如何利用Layui实现可拖拽的选项卡组件功能。首先,我们需要引入Layui的相关
 如何使用 Vue 实现可拖拽的可视化编辑器?Jun 25, 2023 pm 08:22 PM
Vue是一款现代化的JavaScript框架,在实现可视化编辑器时,它能够提供丰富的组件、指令和生命周期钩子等功能,同时对于拖拽交互的实现也提供了一些方便的API。在本文中,我们将介绍如何使用Vue2.x实现一款可拖拽的可视化编辑器,以方便Web开发者在项目中快速实现相应的功能。组件结构首先,我们需要拆分可视化编辑器的组件结构,它通常由以下
 如何利用Layui实现可拖拽的分页功能Oct 25, 2023 pm 12:46 PM
如何利用Layui实现可拖拽的分页功能引言:在网页开发中,分页功能是非常常见的需求之一。而Layui是一款轻量级的前端UI框架,其提供了丰富的组件和功能,可以极大地简化我们的开发工作。在本文中,将介绍如何利用Layui实现可拖拽的分页功能,并提供具体的代码示例供参考。一、Layui的基本使用在开始之前,首先需要了解一些Layui的基本使用方法。Layui的核
 如何将一个div居中在另一个div中?Sep 08, 2023 am 11:13 AM
简介div的居中对齐是前端开发最重要的方面之一。在本文中,我们将了解使用HTML和CSS将一个div置于另一个div中的技术。在本教程中,我们将有一个父div,它应具有子div。我们的任务是将子div放置在父div的中心。使用Transform翻译和位置语法这不是一种非常流行的将一个div居中对齐到另一个div中的方法语法left:50%;top:50%;Transform:translate(-50%,-50%);上面的语法执行以下操作-CSS规则“left:50%;”将元素的水平位置设置为其


Hot AI Tools

Undresser.AI Undress
AI-powered app for creating realistic nude photos

AI Clothes Remover
Online AI tool for removing clothes from photos.

Undress AI Tool
Undress images for free

Clothoff.io
AI clothes remover

AI Hentai Generator
Generate AI Hentai for free.

Hot Article
Hot Tools

PhpStorm Mac version
The latest (2018.2.1) professional PHP integrated development tool

Safe Exam Browser
Safe Exam Browser is a secure browser environment for taking online exams securely. This software turns any computer into a secure workstation. It controls access to any utility and prevents students from using unauthorized resources.

SublimeText3 English version
Recommended: Win version, supports code prompts!

Dreamweaver CS6
Visual web development tools

SublimeText3 Mac version
God-level code editing software (SublimeText3)

