Foreword
We will make a simple news release system today. The first stage of the system does not need to be too difficult. It mainly has the following functions
① News type management
② News management (with image upload function)
③ News browsing
Although there are not many functions, it also covers many basic operations. The program only adds, deletes, checks, and uploads attachments, which is enough. So let’s start our study today
Preparation
After yesterday’s troubles, we already have nodeJS and mongoDB environments. Now we can directly create new project files and database files
The first step is to open the command prompt and switch to the D drive and enter
Then the system will automatically build the basic environment happily

Obviously, many module dependencies are not there. At this time, just take the test of yesterday’s package.json:
{
"name": "application-name",
"version": "0.0.1",
"private": true,
"scripts": {
"start": "node app.js"
},
"dependencies": {
"express": "3.4.8",
"ejs": "*",
"mongodb": "*"
}
}
Then switch to the project directory:
After all the dependent files are downloaded, we enter
D:news>node app
Express server listening on port 3000
So, our program ran happily. When we opened the URL, we found that there was indeed no problem
PS: There is a problem that needs attention here. The file we downloaded is not UTF-8 encoded, so the Chinese may be garbled. The file encoding needs to be unified by yourself
When the program is running, database-related configuration is required
① First create a new news folder in the mongoDB directory
② Add configuration file settings.js to the project
module.exports = {
cookieSecret: 'myNews',
db: 'news',
host: 'localhost'
};
③ Create a new models directory and create a new db.js
var settings = require('../settings'),
Db = require('mongodb').Db,
Connection = require('mongodb').Connection,
Server = require('mongodb').Server;
module.exports = new Db(settings.db, new Server(settings.host, Connection.DEFAULT_PORT), { safe: true });
④ Create a new news.bat program on the desktop
To start the database in the future, we only need to run it. In this way, our preliminary preparations are basically completed
But there are two annoying things here. One is that it is annoying to start the news program every time, and the other is that you need to restart to modify anything, so we will solve these two problems here first
① Create new news_app.bat on the desktop and run it later to start the program
② Supervisor is a process protection program. We can use him to help us restart the program. First follow, and then adjust our node_app.bat
Of course you need to install it before:
After this, there is no need to manually restart after modifying the file (news_app needs to be placed in the project directory), so the preparation work ends here
Project Structure
After the first step, we need to think about the project structure
① The home page is index, where all news types and news items will be listed
② Each news item has three buttons: edit/delete/view
③ The homepage has a button to add news (you can upload pictures when adding)
Basic functions are as above
So, we removed the routing function in the app and put all the routes in the index
//Put the routing function into index
//app.get('/', routes.index);
//app.get('/users', user.list);
routes(app);
module.exports = function (app) {
//Homepage, now also the homepage
app.get('/', function (req, res) {
res.render('index', { title: 'Express' });
});
app.get('/add', function (req, res) {
res.send('Add news request');
});
app.get('/delete', function (req, res) {
res.send('Delete news request');
});
app.get('/view', function (req, res) {
res.send('View news request');
});
app.get('/update', function (req, res) {
res.send('Modify news request');
});
};
The first step is as simple as this, because adding news should have a separate page, and clicking the add button will have other processing, so each request must be broken down internally. The current regulations are as follows:
/ Default page, which displays all genres and news, with a delete button
/add Enter the add news page
/addNews Add news specific post request address (response when clicking the button)
/delete Delete news request
/view specific news query
So I slightly modified the above route:
module.exports = function (app) {
//Homepage, now also the homepage
app.get('/', function (req, res) {
res.render('index', { title: 'Express' });
});
app.get('/add', function (req, res) {
res.send('Add news page');
});
app.post('/addNews', function (req, res) {
res.send('Processing request to add news');
});
app.get('/delete', function (req, res) {
res.send('Delete news request');
});
app.get('/view', function (req, res) {
res.send('View news request');
});
};
So we need to create several new templates to organize our web pages. Here we do not separate the head and tail, just the simplest page
Added two template files, add and view, which temporarily behave the same as index.ejs, and modified navigation
module.exports = function (app) {
//Homepage, now also the homepage
app.get('/', function (req, res) {
res.render('index', { title: 'Express' });
});
app.get('/add', function (req, res) {
res.render('add', { title: 'Add news page' });
});
app.post('/addNews', function (req, res) {
res.send('Processing request to add news');
});
app.get('/delete', function (req, res) {
res.send('Delete news request');
});
app.get('/view', function (req, res) {
res.render('view', { title: 'View News Request' });
});
};
This is the end of the project structure
Data Operation
After the overall structure is out, we need to perform data operations:
① Add data (add news)
② Display data (display news)
③ Delete data (delete news)
Originally, it also involved type operations, but I couldn’t figure it out while doing it. I’ll leave it alone for the time being, because it’s easy to get confused when doing it for the first time
Add news
Here, we don’t use form submission, we use ajax... Here we introduce the zepto library, so our page becomes like this
Title:
Content:
Title:
Content:

 Although there is no request response program yet, so the data will not be processed, and we do not have attachments here (only one attachment is allowed now), so we modify the code and add pictures:
PS: The more troublesome thing is that the ajax processing of the image is a bit troublesome, so we just change back to the form operation, otherwise it will take a long time...
这个样子就不需要过多的考虑附件问题,先暂时如此吧,现在先处理请求程序,这里先在public里面新建news文件夹用于存储其图片
model
在models文件夹新增news.js文件,为其构建实体,并赋予新增查询相关操作:
var mongodb = require('./db');
function News(title, content, pic) {
this.title = title;
this.content = content;
this.pic = pic;//保存存储路径
};
module.exports = News;
//存储数据
News.prototype = {
save: function (callback) {
var date = new Date();
var time = {
date: date,
year: date.getFullYear(),
month: date.getFullYear() "-" (date.getMonth() 1),
day: date.getFullYear() "-" (date.getMonth() 1) "-" date.getDate(),
minute: date.getFullYear() "-" (date.getMonth() 1) "-" date.getDate() " "
date.getHours() ":" (date.getMinutes()
}
//数据存储对象
var news = {
title: this.title,
content: this.content,
pic: this.pic, //图片处理最后来说,现在先乱存
time: time
};
//打开数据连接,打开就是一个回调......
mongodb.open(function (err, db) {
//错误就退出
if (err) {
return callback(err);
}
//打开news集合
db.collection('news', function (err, collection) {
if (err) {
mongodb.close();
return callback(err);
}
//写入集合(写入数据库)
collection.insert(news, { safe: true }, function (err) {
return callback(err);
});
callback(null);//err为null
});
});
}
};
So, the program to write to the database is there. Here we try to see if we can insert it into the database. Of course, we need to modify the routing program
PS: Of course you cannot write too much logic code in the routing department. This file will have to be separated in the future
At this time, the logic in /addNews needs to be changed
app.post('/addNews', function (req, res) {
var title = req.body.title;
var content = req.body.content;
var pic = req.body.pic;
var news = new News(title, content, pic)
news.save(function (err, data) {
res.send(data);
})
});

After checking, the problem is not big. What needs to be solved now is the attachment problem
Upload pictures
Express itself supports the image upload function. Express parses the request body through bodyParser, and then uploads files through it. It uses formidable
internally.Here, change app.use(express.bodyParser()) in app.js to:
Open index.js and add a line of code in front:
Modify the index file:
app.post('/addNews', function (req, res) {
for (var i in req.files) {
If (req.files[i] == 0) {
//Delete a file synchronously
fs.unlinkSync(req.files[i].path);
console.log('success removed an empty file');
} else {
var path = './public/news/' req.files[i].name;
//Rename a file using synchronous method
fs.renameSync(req.files[i].path, path);
console.log('suncess renamed a file');
}
}
// var title = req.body.title;
// var content = req.body.content;
// var pic = req.body.pic;
// var news = new News(title, content, pic)
// news.save(function (err, data) {
// res.send(data);
// })
});
At this time, select the file and click Add News, and our file will be uploaded

At this time, I only need to record the file name in the database, and there will be pictures in the file directory
app.post('/addNews', function (req, res) {
var pic = null;
for (var i in req.files) {
If (req.files[i] == 0) {
//Delete a file synchronously
fs.unlinkSync(req.files[i].path);
console.log('success removed an empty file');
} else {
var path = './public/news/' req.files[i].name;
//Rename a file using synchronous method
fs.renameSync(req.files[i].path, path);
console.log('suncess renamed a file');
}
Pic = req.files[i].name;
}
var title = req.body.title;
var content = req.body.content;
var news = new News(title, content, pic)
news.save(function (err, data) {
res.send(data);
})
res.send('Request successful, return to home page');
});

There is data in the database and there are files in our directory. Now we just need to read the data out
PS: Brothers are urging me to go out for a drink during the holiday
Read data
The second step is of course to read the data. The first is to read the data on the home page:
var mongodb = require('./db');
function News(title, content, pic) {
this.title = title;
this.content = content;
this.pic = pic;//Save storage path
};
module.exports = News;
//Storage data
News.prototype = {
save: function (callback) {
var date = new Date();
//Data storage object
var news = {
title: this.title,
Content: this.content,
Pic: this.pic, //Finally, image processing, now save it randomly
date: date
};
//Open the data connection, opening is a callback...
mongodb.open(function (err, db) {
//Exit if error occurs
If (err) {
return callback(err);
}
//Open the news collection
db.collection('news', function (err, collection) {
If (err) {
mongodb.close();
return callback(err);
}
//Write collection (write to database)
collection.insert(news, { safe: true }, function (err) {
return callback(err);
});
callback(null); //err is null
});
});
}
};
//Read the article and its related information
News.get = function (id, callback) {
//Open database
mongodb.open(function (err, db) {
If (err) {
Return callback(err);
}
db.collection('news', function (err, collection) {
If (err) {
mongodb.close();
return callback(err);
}
var query = {};
If (id) {
query.id = id;
}
//Query articles based on query object
Collection.find(query).sort({
date: -1
}).toArray(function (err, data) {
mongodb.close();
If (err) {
return callback(err); //Failed! Return err
}
callback(null, data); //Success! Return the results of the query in the form of an array
});
});
});
};
news.js
-
标题:
内容:
附件:

结语
好了,文章发布系统的制作就先到这里了,以后我们再慢慢增加功能,慢慢做美化。
 Vercel是什么?怎么部署Node服务?May 07, 2022 pm 09:34 PM
Vercel是什么?本篇文章带大家了解一下Vercel,并介绍一下在Vercel中部署 Node 服务的方法,希望对大家有所帮助!
 node.js gm是什么Jul 12, 2022 pm 06:28 PM
gm是基于node.js的图片处理插件,它封装了图片处理工具GraphicsMagick(GM)和ImageMagick(IM),可使用spawn的方式调用。gm插件不是node默认安装的,需执行“npm install gm -S”进行安装才可使用。
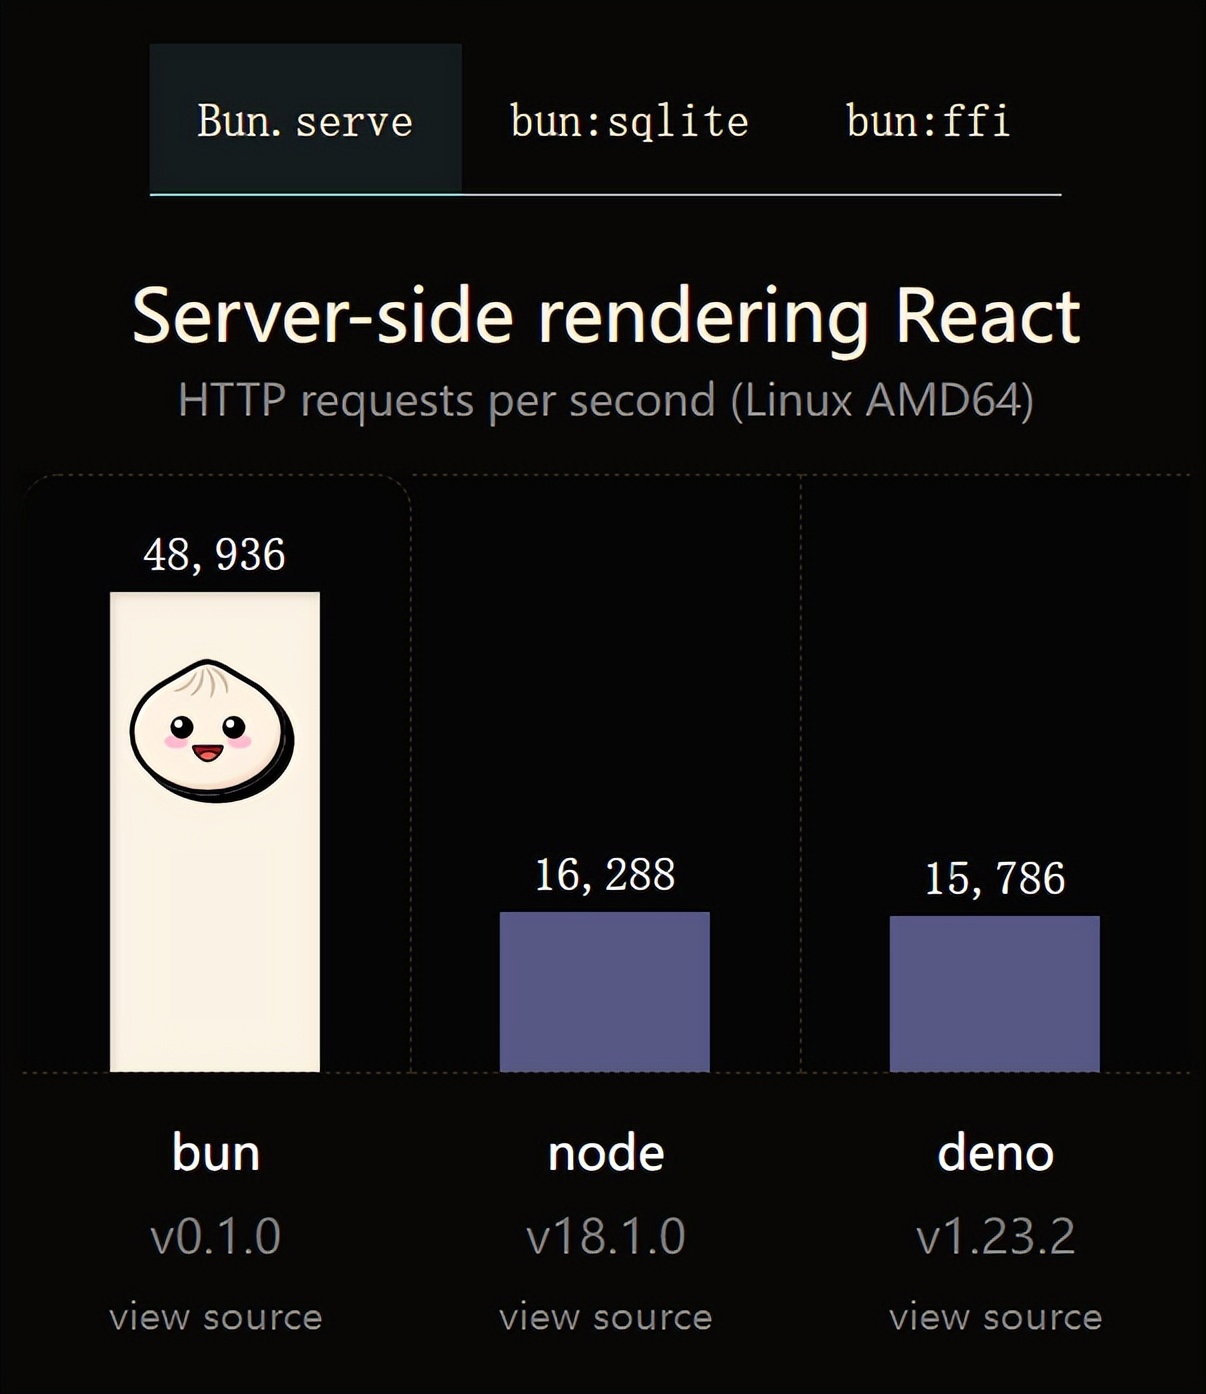 火了!新的JavaScript运行时:Bun,性能完爆NodeJul 15, 2022 pm 02:03 PM
今天跟大家介绍一个最新开源的 javaScript 运行时:Bun.js。比 Node.js 快三倍,新 JavaScript 运行时 Bun 火了!
 聊聊Node.js中的多进程和多线程Jul 25, 2022 pm 07:45 PM
大家都知道 Node.js 是单线程的,却不知它也提供了多进(线)程模块来加速处理一些特殊任务,本文便带领大家了解下 Node.js 的多进(线)程,希望对大家有所帮助!
 nodejs中lts是什么意思Jun 29, 2022 pm 03:30 PM
在nodejs中,lts是长期支持的意思,是“Long Time Support”的缩写;Node有奇数版本和偶数版本两条发布流程线,当一个奇数版本发布后,最近的一个偶数版本会立即进入LTS维护计划,一直持续18个月,在之后会有12个月的延长维护期,lts期间可以支持“bug fix”变更。
 node爬取数据实例:聊聊怎么抓取小说章节May 02, 2022 am 10:00 AM
node怎么爬取数据?下面本篇文章给大家分享一个node爬虫实例,聊聊利用node抓取小说章节的方法,希望对大家有所帮助!


Hot AI Tools

Undresser.AI Undress
AI-powered app for creating realistic nude photos

AI Clothes Remover
Online AI tool for removing clothes from photos.

Undress AI Tool
Undress images for free

Clothoff.io
AI clothes remover

AI Hentai Generator
Generate AI Hentai for free.

Hot Article

Hot Tools

Atom editor mac version download
The most popular open source editor

mPDF
mPDF is a PHP library that can generate PDF files from UTF-8 encoded HTML. The original author, Ian Back, wrote mPDF to output PDF files "on the fly" from his website and handle different languages. It is slower than original scripts like HTML2FPDF and produces larger files when using Unicode fonts, but supports CSS styles etc. and has a lot of enhancements. Supports almost all languages, including RTL (Arabic and Hebrew) and CJK (Chinese, Japanese and Korean). Supports nested block-level elements (such as P, DIV),

SublimeText3 Linux new version
SublimeText3 Linux latest version

VSCode Windows 64-bit Download
A free and powerful IDE editor launched by Microsoft

ZendStudio 13.5.1 Mac
Powerful PHP integrated development environment


