


本教程主要使用Photoshop设计蓝色立体效果的圆形图标,经常看到有人问这种圆型icon要怎么做,觉得很有趣稍微思考一下原理,做了个简易快速版本。
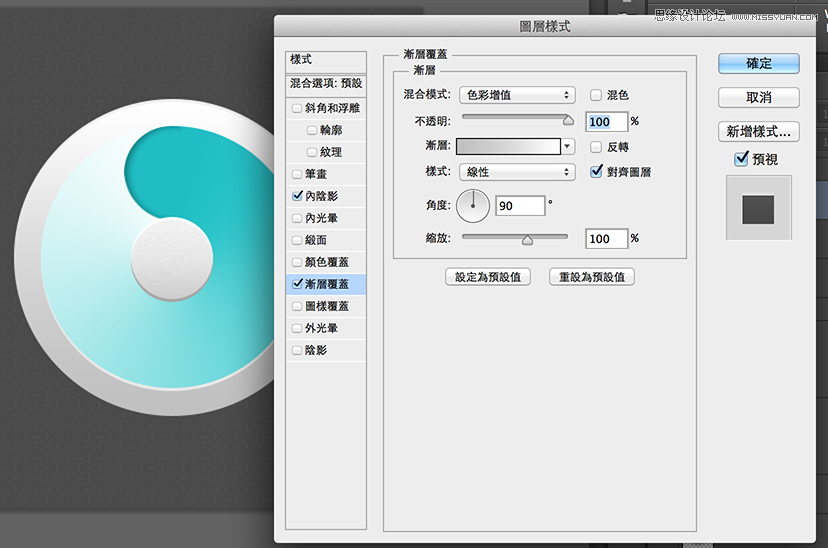
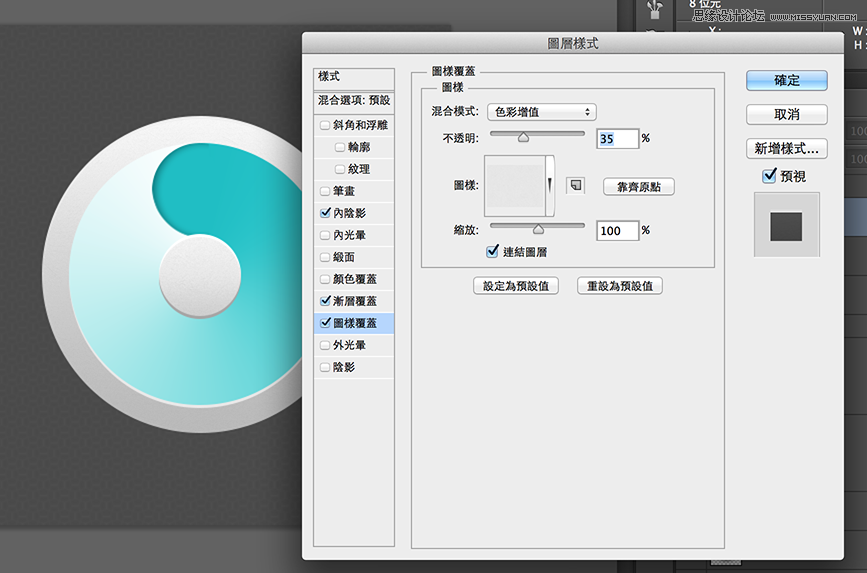
中间的渐层色
画一个圆,设图层样式,角度。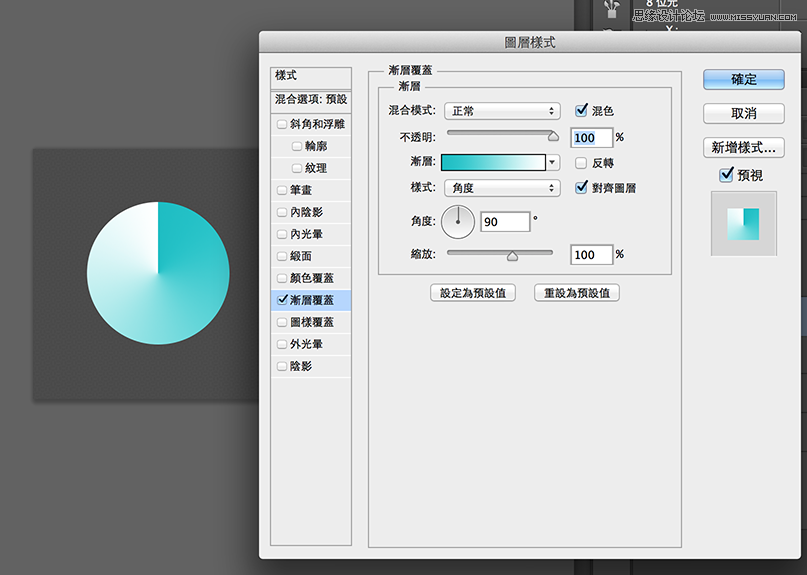
凹进去的部份
其实是用迭的,再画一个半圆,设内阴影。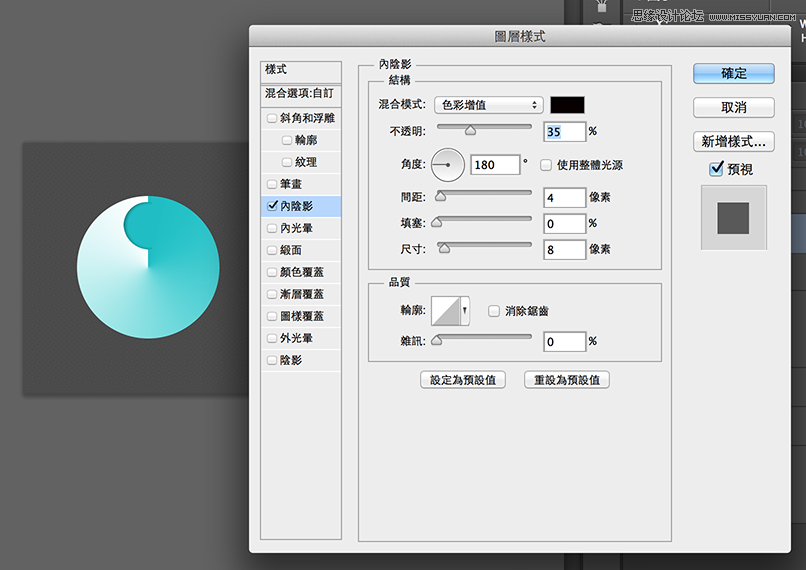
中心
画一个圆,用图层样式设定,一层就能解决厚度和高光问题。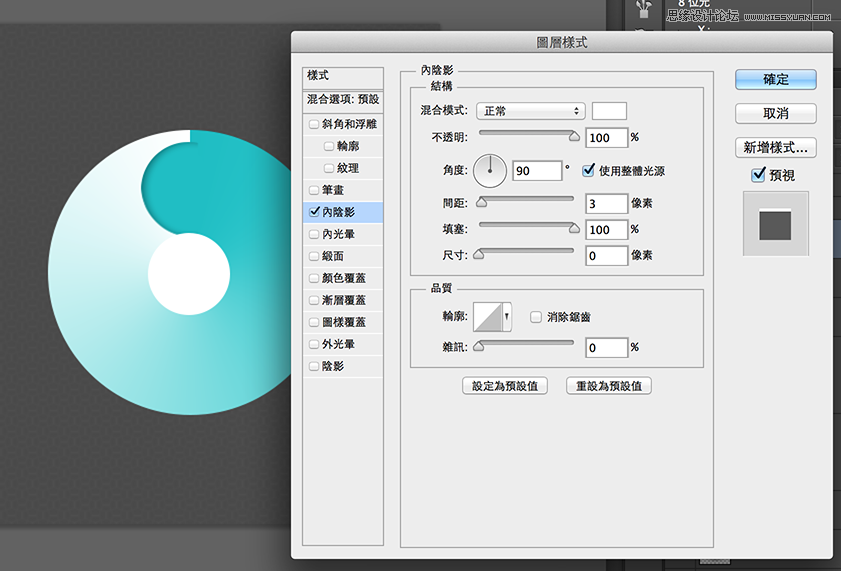
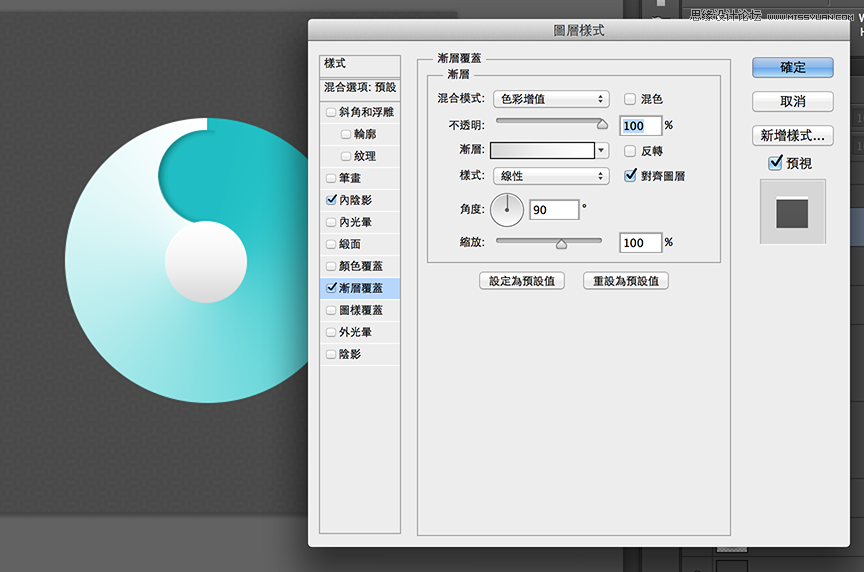
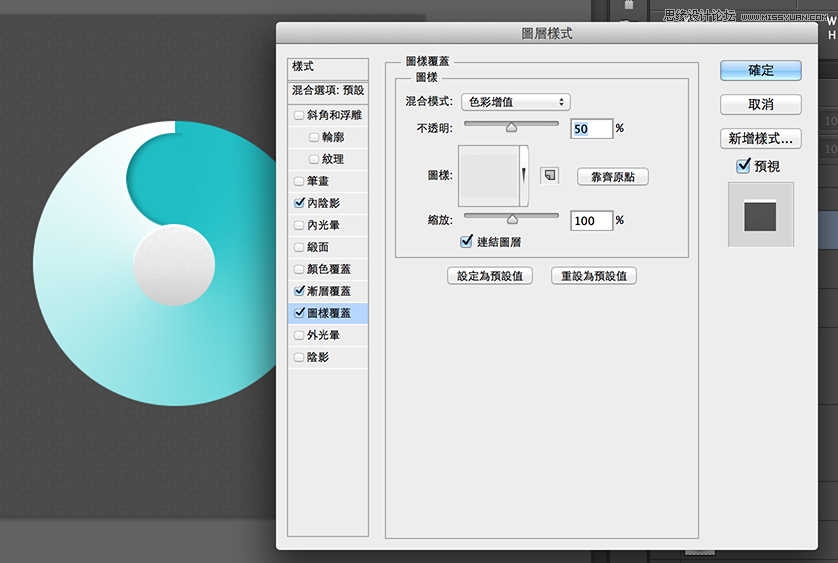
外框
用形状工具、重迭两个圆画出圆环。同样用图层样式设定,一层就解决厚度和高光。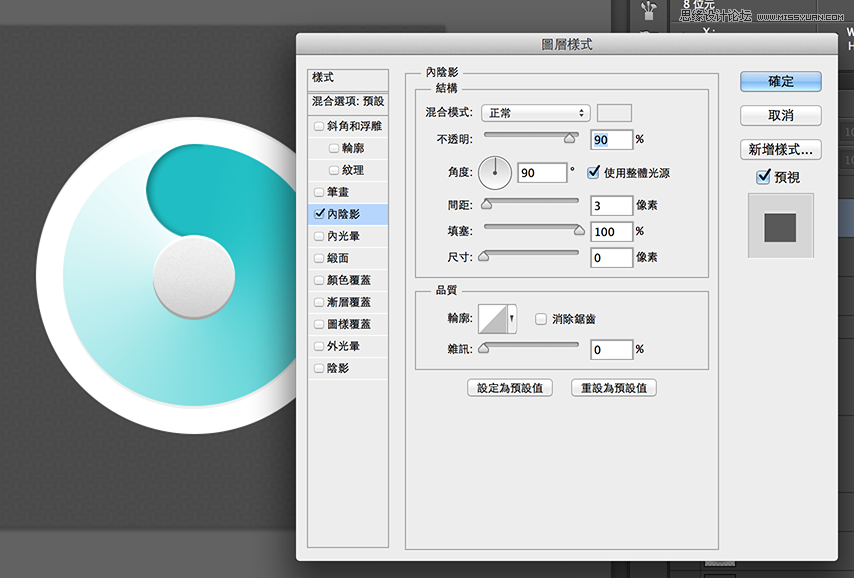
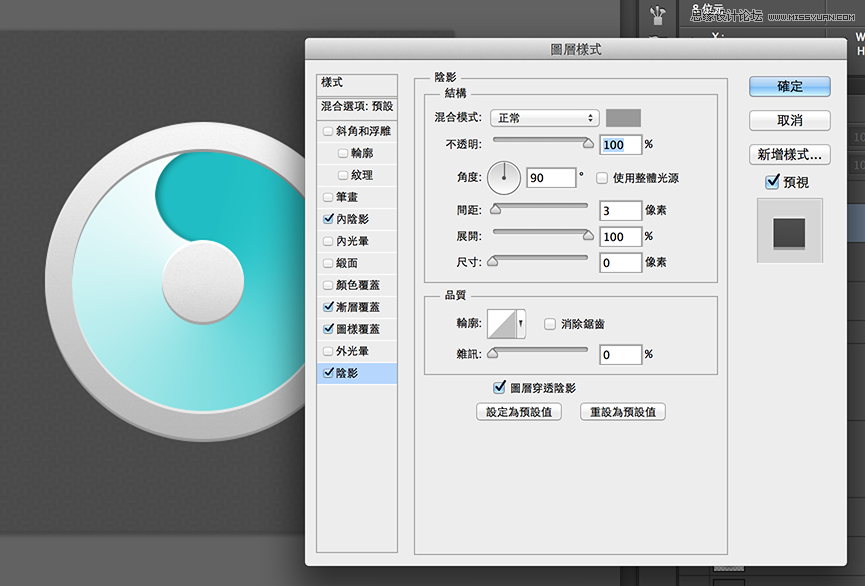
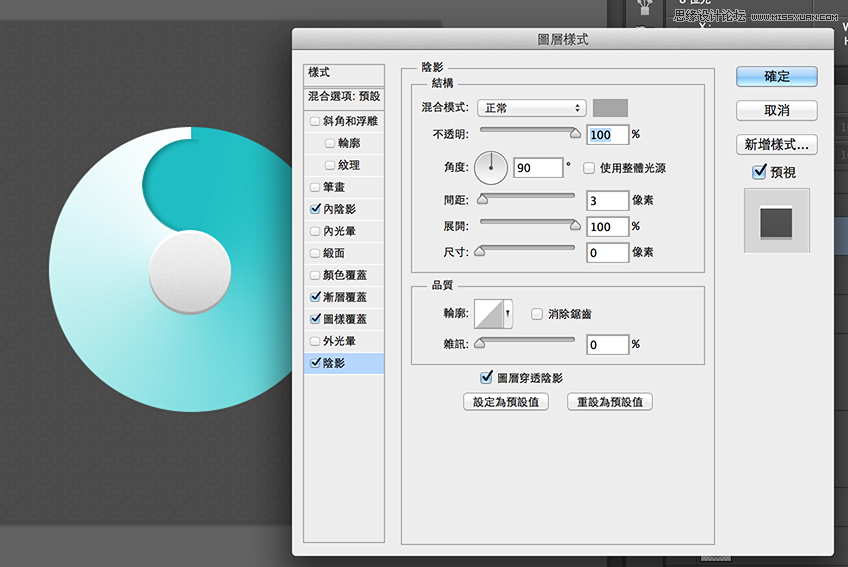
阴影
复制需要阴影的那个图层、高斯模糊,复制一层略缩小85%,调整透明度和重迭部份,阴影会比较立体。共有外框、中心、整体这 3 个部份要处理。


如果这颗ICON小于300x300px 、又不是主力ICON只是个配角、且走扁平化风格的话,用图层样式一层解决高光和厚度是很方便快速的作法。但如果是拟物风就得把这几层拆开独立制作。比较有趣的部份是「角度渐层」,平时很少使用这种渐层方式、明明是凹陷的部份却以迭加一个圆的方式制造假阴影也扭转平时的作图想法。果然多临摹大师作品可以学到很多不同的思维方式。

 Das Abonnementmodell von Photoshop: Was Sie für Ihr Geld erhaltenApr 15, 2025 am 12:17 AM
Das Abonnementmodell von Photoshop lohnt sich zu kaufen. 1) Benutzer können jederzeit auf die neueste Version zugreifen und über Geräte hinweg verwenden. 2) Die Abonnementgebühr ist niedrig, und es werden kontinuierliche Aktualisierungen und technische Unterstützung bereitgestellt. 3) Fortgeschrittene Funktionen wie neuronale Filter können für die komplexe Bildverarbeitung verwendet werden. Trotz der hohen langfristigen Kosten sind die Bequemlichkeits- und Feature-Updates für professionelle Benutzer wertvoll.
 Photoshop: Untersuchung kostenloser Versuche und RabattoptionenApr 14, 2025 am 12:06 AM
Sie können den Zugriff auf Photoshop auf die wirtschaftlichste Weise erhalten: 1. Erleben Sie die Softwarefunktionen mit einer 7-tägigen kostenlosen Testversion; 2. Finden Sie Rabatte für Schüler oder Lehrer sowie saisonale Aktionen; 3. Verwenden Sie Gutscheine auf Websites von Drittanbietern. V.
 Photoshop für Designer: Erstellen visueller KonzepteApr 13, 2025 am 12:09 AM
Das Erstellen von visuellen Konzepten in Photoshop kann in den folgenden Schritten erreicht werden: 1. Erstellen Sie ein neues Dokument, 2. Fügen Sie eine Hintergrundschicht hinzu, 3. Zeichnen Sie das Pinsel -Tool, um grundlegende Formen zu zeichnen. Anpassen Sie Farben und Helligkeit, 5. Text und Grafiken hinzufügen, 6. Verwenden Sie Masken für lokale Bearbeitung.
 Ist Photoshop kostenlos? Abonnementpläne verstehenApr 12, 2025 am 12:11 AM
Photoshop ist nicht kostenlos, aber es gibt verschiedene Möglichkeiten, es zu kostengünstig oder kostenlos zu verwenden: 1. Die kostenlose Testzeit beträgt 7 Tage, und Sie können alle Funktionen in diesem Zeitraum erleben. 2. Rabatte für Schüler und Lehrer können die Kosten um die Hälfte senken, und schulischer Beweis ist erforderlich. 3. Das CreativeCloud -Paket ist für professionelle Benutzer geeignet und enthält eine Vielzahl von Adobe -Tools. 4. Photoshopelements und Lightroom sind kostengünstige Alternativen mit weniger Funktionen, aber niedrigeren Preisen.
 Der Wert von Photoshop: Abwägung der Kosten gegen seine FunktionenApr 11, 2025 am 12:02 AM
Photoshop ist die Investition wert, da sie leistungsstarke Funktionen und eine breite Palette von Anwendungsszenarien bietet. 1) Zu den Kernfunktionen gehören Bildbearbeitung, Schichtmanagement, Produktion von Spezialeffekten und Farbanpassungen. 2) Geeignet für professionelle Designer und Fotografen, aber Amateure können Alternativen wie GIMP in Betracht ziehen. 3) Abonnieren Sie AdobecreativeCloud können nach Bedarf verwendet werden, um hohe einmalige Ausgaben zu vermeiden.
 Der Kernzweck von Photoshop: Kreatives BilddesignApr 10, 2025 am 09:29 AM
Die Kernverwendung von Photoshop im kreativen Bilddesign ist seine leistungsstarke Funktionalität und Flexibilität. 1) Es ermöglicht Designer, Kreativität in visuelle Realität durch Schichten, Masken und Filter zu verwandeln. 2) Zu den grundlegenden Verwendungen gehören die Anbaus, Größe und Farbkorrektur. 3) Fortgeschrittene Verwendungen wie Ebenenstile, Mischmodi und intelligente Objekte können komplexe Effekte erzielen. 4) Zu den häufigen Fehlern gehören eine unsachgemäße Schichtverwaltung und eine übermäßige Verwendung von Filtern, die durch das Organisieren von Schichten und die Verwendung von Filtern angemessen gelöst werden können. 5) Leistungsoptimierung und Best Practices umfassen die rationale Verwendung von Ebenen, regelmäßiges Speichern von Dateien und die Verwendung von Abkürzungsschlüssel.
 Photoshop für Webdesign: Erweiterte Techniken für UI/UXApr 08, 2025 am 12:19 AM
Photoshop kann im Webdesign verwendet werden, um Prototypen mit hohem Fidelity, Design-UI-Elemente und Simulation von Benutzerinteraktionen zu erstellen. 1. Verwenden Sie Schichten, Masken und intelligente Objekte für das grundlegende Design. 2. Simulieren Sie die Benutzerinteraktion durch Animations- und Timeline -Funktionen. 3.. Verwenden Sie Skripte, um den Entwurfsprozess zu automatisieren und die Effizienz zu verbessern.
 Neulingsartikel: Verwenden Sie die PS -Pinsel, um der Schriftzündung Crackeffekte hinzuzufügen (Share)Apr 07, 2025 am 06:21 AM
Im vorherigen Artikel "Unterrichten Sie Schritt für Schritt, um Plattenbildern mit PS (Favoriten) Druckeffekte hinzuzufügen, habe ich einen kleinen Trick eingeführt, um PS zu verwenden, um Plattenbilder mit PS zu Druckeffekten zu hindern. In dem folgenden Artikel wird Ihnen vorgestellt, wie Sie die PS -Pinsel verwenden, um der Schriftrisseffekte Risseffekte zu verleihen. Schauen wir uns an, wie es geht.


Heiße KI -Werkzeuge

Undresser.AI Undress
KI-gestützte App zum Erstellen realistischer Aktfotos

AI Clothes Remover
Online-KI-Tool zum Entfernen von Kleidung aus Fotos.

Undress AI Tool
Ausziehbilder kostenlos

Clothoff.io
KI-Kleiderentferner

AI Hentai Generator
Erstellen Sie kostenlos Ai Hentai.

Heißer Artikel
Heiße Werkzeuge

Senden Sie Studio 13.0.1
Leistungsstarke integrierte PHP-Entwicklungsumgebung

DVWA
Damn Vulnerable Web App (DVWA) ist eine PHP/MySQL-Webanwendung, die sehr anfällig ist. Seine Hauptziele bestehen darin, Sicherheitsexperten dabei zu helfen, ihre Fähigkeiten und Tools in einem rechtlichen Umfeld zu testen, Webentwicklern dabei zu helfen, den Prozess der Sicherung von Webanwendungen besser zu verstehen, und Lehrern/Schülern dabei zu helfen, in einer Unterrichtsumgebung Webanwendungen zu lehren/lernen Sicherheit. Das Ziel von DVWA besteht darin, einige der häufigsten Web-Schwachstellen über eine einfache und unkomplizierte Benutzeroberfläche mit unterschiedlichen Schwierigkeitsgraden zu üben. Bitte beachten Sie, dass diese Software

EditPlus chinesische Crack-Version
Geringe Größe, Syntaxhervorhebung, unterstützt keine Code-Eingabeaufforderungsfunktion

SublimeText3 Mac-Version
Codebearbeitungssoftware auf Gottesniveau (SublimeText3)

Sicherer Prüfungsbrowser
Safe Exam Browser ist eine sichere Browserumgebung für die sichere Teilnahme an Online-Prüfungen. Diese Software verwandelt jeden Computer in einen sicheren Arbeitsplatz. Es kontrolliert den Zugriff auf alle Dienstprogramme und verhindert, dass Schüler nicht autorisierte Ressourcen nutzen.

