这篇教程是向脚本之家的朋友分享Photoshop制作简易的搜索放大镜图标方法,教程制作出来的放大镜图标非常不错,方法很简单的,推荐过来,一起来学习吧
今天为大家分享Photoshop制作简易的搜索放大镜图标方法,教程很不错,很值得大家学习,推荐过来,一起来学习吧!
效果图

方法/步骤
1、打开ps 新建一个文档,大小自定,单击确定按钮


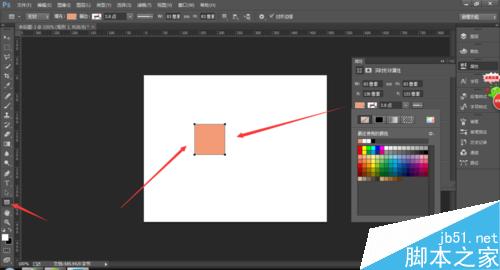
2、用矩形工具在文档中按住shift键画一个正的矩形 颜色找一个自己喜欢的

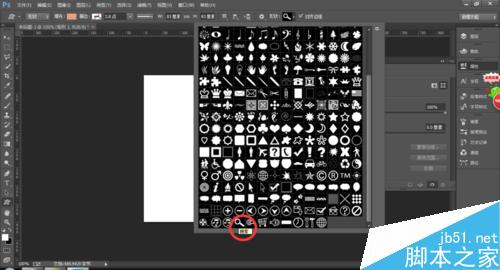
3、在自定义形状工具中 找到搜索的形状

4、在文档中拖出一个搜索的形状 颜色选择白色 当然也可以选择你自己喜欢的颜色

5、给形状1的图层加投影效果


6、最终效果

以上就是Photoshop制作简易的搜索放大镜图标方法介绍,操作很简单的,大家学会了吗?希望这篇文章能对大家有所帮助!
 Der Wert von Photoshop: Abwägung der Kosten gegen seine FunktionenApr 11, 2025 am 12:02 AM
Photoshop ist die Investition wert, da sie leistungsstarke Funktionen und eine breite Palette von Anwendungsszenarien bietet. 1) Zu den Kernfunktionen gehören Bildbearbeitung, Schichtmanagement, Produktion von Spezialeffekten und Farbanpassungen. 2) Geeignet für professionelle Designer und Fotografen, aber Amateure können Alternativen wie GIMP in Betracht ziehen. 3) Abonnieren Sie AdobecreativeCloud können nach Bedarf verwendet werden, um hohe einmalige Ausgaben zu vermeiden.
 Der Kernzweck von Photoshop: Kreatives BilddesignApr 10, 2025 am 09:29 AM
Die Kernverwendung von Photoshop im kreativen Bilddesign ist seine leistungsstarke Funktionalität und Flexibilität. 1) Es ermöglicht Designer, Kreativität in visuelle Realität durch Schichten, Masken und Filter zu verwandeln. 2) Zu den grundlegenden Verwendungen gehören die Anbaus, Größe und Farbkorrektur. 3) Fortgeschrittene Verwendungen wie Ebenenstile, Mischmodi und intelligente Objekte können komplexe Effekte erzielen. 4) Zu den häufigen Fehlern gehören eine unsachgemäße Schichtverwaltung und eine übermäßige Verwendung von Filtern, die durch das Organisieren von Schichten und die Verwendung von Filtern angemessen gelöst werden können. 5) Leistungsoptimierung und Best Practices umfassen die rationale Verwendung von Ebenen, regelmäßiges Speichern von Dateien und die Verwendung von Abkürzungsschlüssel.
 Photoshop für Webdesign: Erweiterte Techniken für UI/UXApr 08, 2025 am 12:19 AM
Photoshop kann im Webdesign verwendet werden, um Prototypen mit hohem Fidelity, Design-UI-Elemente und Simulation von Benutzerinteraktionen zu erstellen. 1. Verwenden Sie Schichten, Masken und intelligente Objekte für das grundlegende Design. 2. Simulieren Sie die Benutzerinteraktion durch Animations- und Timeline -Funktionen. 3.. Verwenden Sie Skripte, um den Entwurfsprozess zu automatisieren und die Effizienz zu verbessern.
 Neulingsartikel: Verwenden Sie die PS -Pinsel, um der Schriftzündung Crackeffekte hinzuzufügen (Share)Apr 07, 2025 am 06:21 AM
Im vorherigen Artikel "Unterrichten Sie Schritt für Schritt, um Plattenbildern mit PS (Favoriten) Druckeffekte hinzuzufügen, habe ich einen kleinen Trick eingeführt, um PS zu verwenden, um Plattenbilder mit PS zu Druckeffekten zu hindern. In dem folgenden Artikel wird Ihnen vorgestellt, wie Sie die PS -Pinsel verwenden, um der Schriftrisseffekte Risseffekte zu verleihen. Schauen wir uns an, wie es geht.
 Photoshop Erweiterte Typografie: Erstellen atemberaubender TexteffekteApr 07, 2025 am 12:15 AM
In Photoshop können Sie Texteffekte über Ebenenstile und Filter erstellen. 1. Erstellen Sie ein neues Dokument und fügen Sie Text hinzu. 2. Tragen Sie Ebenenstile wie Schatten und äußeres Glühen auf. 3. Verwenden Sie Filter wie Welleneffekte und fügen Sie Kegel- und Entlastungseffekte hinzu. 4. Verwenden Sie Masken, um den Effektbereich und die Intensität anzupassen, um die visuelle Auswirkung des Texteffekts zu optimieren.
 Wie man Bilder schneidetApr 06, 2025 pm 10:27 PM
Durch Schneiden wird der Hintergrundteil im Bild entfernt und das Thema zurückgelassen. Zu den gängigen Ausschnitten gehören: Manuelles Ausschnitt: Verwenden Sie die Bildbearbeitungssoftware, um den Rand des Motivs manuell zu skizzieren. Automatische Ausschnitte: Verwenden Sie Software, um das Thema automatisch zu identifizieren und vom Hintergrund zu trennen. Verwenden Sie Cutout-Tools von Drittanbietern: Verwenden Sie spezielle Tools, um Bilder auszuschneiden. Kanalausschnitt: Verwenden Sie den Kanal des Bildes, um Kanäle mit offensichtlichen Unterschieden von der Subjektfarbe für den Betrieb auszuwählen.
 Wie man Wasserzeichen von PS bekommtApr 06, 2025 pm 10:24 PM
Sie können Online -Tools, Bildbearbeitungssoftware, Videobearbeitungssoftware und Watermark -Entfernungsanwendungen verwenden. Zu den spezifischen Methoden gehören: Verwenden von Online-Tools, Verwenden von Stempelwerkzeugen, Kopieren von Stempelwerkzeugen und Reparatur von Pinselwerkzeugen, Verwendung von Unschärfewerkzeugen, Anbaus Tools und inhaltsbewussten Füllwerkzeugen sowie Verwendung von Watermark-Entfernungsanwendungen. Stellen Sie sicher, dass Sie das Recht haben, dies zu tun, bevor Sie das Wasserzeichen entfernen.
 Wie man Schichten in PS zusammenfasstApr 06, 2025 pm 10:21 PM
Wie fusioniere ich Schichten? Sie können Schichten zusammenführen, indem Sie die Ebene auswählen, um sie im Schichtfeld zusammenzuführen. Verwenden Sie Ebenen> Schichten in der Menüleiste zusammen oder drücken Sie Strg E (Windows) oder CMD E (MAC), um den Zusammenführungsvorgang durchzuführen. Erstellt Elemente, die die ursprüngliche Ebene enthalten.


Heiße KI -Werkzeuge

Undresser.AI Undress
KI-gestützte App zum Erstellen realistischer Aktfotos

AI Clothes Remover
Online-KI-Tool zum Entfernen von Kleidung aus Fotos.

Undress AI Tool
Ausziehbilder kostenlos

Clothoff.io
KI-Kleiderentferner

AI Hentai Generator
Erstellen Sie kostenlos Ai Hentai.

Heißer Artikel

Heiße Werkzeuge

Senden Sie Studio 13.0.1
Leistungsstarke integrierte PHP-Entwicklungsumgebung

Herunterladen der Mac-Version des Atom-Editors
Der beliebteste Open-Source-Editor

Dreamweaver CS6
Visuelle Webentwicklungstools

ZendStudio 13.5.1 Mac
Leistungsstarke integrierte PHP-Entwicklungsumgebung

EditPlus chinesische Crack-Version
Geringe Größe, Syntaxhervorhebung, unterstützt keine Code-Eingabeaufforderungsfunktion


