Heim >Web-Frontend >js-Tutorial >So verwenden Sie die jQuery-Technologie, um eine Seitennavigation im iOS-Stil zu entwickeln menu_jquery
So verwenden Sie die jQuery-Technologie, um eine Seitennavigation im iOS-Stil zu entwickeln menu_jquery
- WBOYWBOYWBOYWBOYWBOYWBOYWBOYWBOYWBOYWBOYWBOYWBOYWBOriginal
- 2016-05-16 15:48:131032Durchsuche
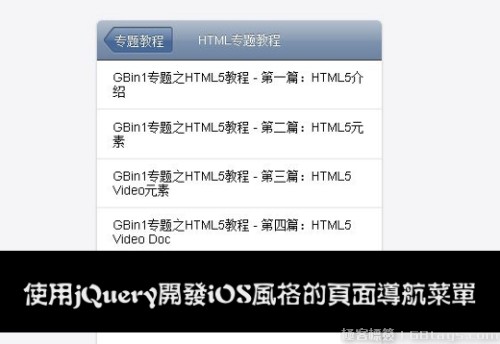
Rendering:


Betriebssysteme und Navigationsmethoden im iOS-Stil werden auf dem Markt immer beliebter. Im heutigen jQuery-Tutorial stellen wir vor, wie man eine Menünavigation im iPhone-Stil erstellt.
HTML-Code
Wir verwenden eingebettetes 25edfb22a4f469ecb59f1190150159c6, um Menüinhalte zu generieren und diese wie folgt in c787b9a589a3ece771e842a6176cf8e9 einzubinden:
<nav>
<h1>导航菜单</h1>
<ul>
<li>
<h2>专题教程</h2>
<ul>
<li>
<h3>HTML专题教程</h3>
<ul>
<li><a href="http://www.gbin1.com/tutorials/html5-tutorial/html5-introduction">GBin1专题之HTML5教程 - 第一篇:HTML5介绍</a></li>
<li><a href="http://www.gbin1.com/tutorials/html5-tutorial/html5-new-elements">GBin1专题之HTML5教程 - 第二篇:HTML5元素</a></li>
<li><a href="http://www.gbin1.com/tutorials/html5-tutorial/html5-video">GBin1专题之HTML5教程 - 第三篇:HTML5 Video元素</a></li>
<li><a href="http://www.gbin1.com/tutorials/html5-tutorial/html5-video-doc">GBin1专题之HTML5教程 - 第四篇:HTML5 Video Doc</a></li>
<li><a href="http://www.gbin1.com/tutorials/html5-tutorial/html5-audio">GBin1专题之HTML5教程 - 第五篇:HTML5 Audio元素</a></li>
</ul>
<li>
<h3>GBin1热点秀</h3>
<ul>
<li><a href="http://www.gbin1.com/tutorials/hotspot/hotspot1/">GBin1专题之Web热点秀#1</a>
<li><a href="http://www.gbin1.com/tutorials/hotspot/hotspot2/">GBin1专题之Web热点秀#2</a>
<li><a href="http://www.gbin1.com/tutorials/hotspot/hotspot3/">GBin1专题之Web热点秀#3</a>
</ul>

</ul>
. . . . . .
Javascript
Verwenden Sie jQuery, um li abzufragen und zu durchlaufen und Menüelemente wie folgt zu generieren:
$(function(){

var nav = $("nav"),
navTitle = nav.children().first(),
navTitleLabel = navTitle.text(),
mainList = navTitle.next(),
subLevels = mainList.find("ul"),
hiddenClass = "hidden";

nav.addClass("js");
mainList.find("a:last-child").addClass("files");
subLevels.addClass(hiddenClass);

navTitle.wrap($("<div/>")).before($("<a/>", {
href: "#",
className: hiddenClass,
click: function(e){
var $this = $(this),
activeList = subLevels.filter(":visible:last"),
activeListParents = activeList.parents("ul");
navTitle.text($this.text());
if(activeListParents.length > 2)
$this.text(activeListParents.eq(1).prev().text());
else if (activeListParents.length > 1)
$this.text(navTitleLabel)
else
$this.addClass(hiddenClass).empty();
setTimeout(
function(){
activeList.addClass(hiddenClass);
}, slideDuration - 100
);
mainList.css("left", parseInt(mainList.css("left")) + navWidth + "px");
e.preventDefault();
}
}));

subLevels.prev().wrap($("<a/>", {
href:"#",
click: function(e){
var $this = $(this);
backArrow.removeClass(hiddenClass).text(navTitle.text());
navTitle.text($this.text());
$this.next().removeClass(hiddenClass);
mainList.css("left", parseInt(mainList.css("left")) - navWidth + "px");
e.preventDefault();
}
}));

var backArrow = navTitle.prev(),
navWidth = nav.width(),
firstSubLevel = subLevels.eq(0),
docStyle = document.documentElement.style,
slideDuration = 0,
timingRatio = 1000;

if(docStyle.WebkitTransition !== undefined)
slideDuration = parseFloat(
firstSubLevel.css("-webkit-transition-duration")
) * timingRatio;

if(docStyle.MozTransition !== undefined)
slideDuration = parseFloat(
firstSubLevel.css("-moz-transition-duration")
) * timingRatio;

if(docStyle.OTransition !== undefined)
slideDuration = parseFloat(
firstSubLevel.css("-o-transition-duration")
) * timingRatio;

});
CSS
Verwenden Sie ein Bild, um die Schaltfläche oben auf der Seite zu generieren:
body {
font-size: 14px;
font-family: Arial;
background:#f5f5f8;
}
.js {
position:absolute;
width:320px;
height:480px;
top:50%;
left:50%;
margin:-280px 0 0 -160px;
overflow:hidden;
-webkit-border-radius:5px;
-moz-border-radius:5px;
border-radius:5px;
background:#fff;
-webkit-box-shadow:0 1px 2px rgba(0,0,0,.25);
-moz-box-shadow:0 1px 2px rgba(0,0,0,.25);
box-shadow:0 1px 2px rgba(0,0,0,.25);
}
.js .files {
background-image:none;
}
.js .hidden {
display:none;
}
.js * {
font-size:14px;
font-weight:400;
margin:0;
padding:0;
list-style:none;
}
.js > div {
position:relative;
z-index:1;
height:44px;
text-align:center;
font-size:14px;
line-height:44px;
color:#fff;
text-shadow:0 -1px 0 rgba(0,0,0,.4);
background:#7f94b0;
background:-webkit-gradient(
linear,
0 0,
0 100%,
color-stop(0,#b5c0ce),
color-stop(0.5,#889bb3),
color-stop(0.51,#7f94b0),
color-stop(1,#6d83a1)
);
background:-moz-linear-gradient(
top center,
#b5c0ce,
#889bb3 22px,
#7f94b0 23px,
#6d83a1
);
border-bottom:1px solid #2d3033;
-webkit-border-top-left-radius:5px;
-webkit-border-top-right-radius:5px;
-moz-border-radius-topleft:5px;
-moz-border-radius-topright:5px;
border-top-left-radius:5px;
border-top-right-radius:5px;
}
.js > div a {
height:31px;
top:7px;
left:20px;
font-size:14px;
line-height:31px;
color:#fff;
background:url('../images//center.png');
}
.js > div a, .js > div a:before, .js > div a:after {
position:absolute;
}
.js > div a:before {
left:-13px;
content:url('../images//left.png');
}
.js > div a:after {
right:-10px;
top:0;
content:url('../images//right.png');
}
.js > div a:active {
opacity:.65;
}
.js a {
text-decoration:none;
}
.js ul a {
display:block;
color:#000;
padding:.8em 18px;
border-bottom:1px solid #e0e0e0;
background:url('images/next.png') no-repeat 94% 50%;
}
.js ul a:hover {
background-color:#edf3fe;
}
.js a:focus {
outline:none;
}
.js ul {
position:absolute;
top:0;
padding-top:45px;
width:100%;
-webkit-transition:left .4s ease-out;
-moz-transition:left .4s ease-out;
-o-transition:left .4s ease-out;
}
.js ul {
left:0;
}
.js ul ul {
left:320px;
}
Es gibt Renderings und Code, die sehr klar aussehen. Ich hoffe, es gefällt Ihnen.
In Verbindung stehende Artikel
Mehr sehen- Eine eingehende Analyse der Bootstrap-Listengruppenkomponente
- Detaillierte Erläuterung des JavaScript-Funktions-Curryings
- Vollständiges Beispiel für die Generierung von JS-Passwörtern und die Erkennung der Stärke (mit Download des Demo-Quellcodes)
- Angularjs integriert WeChat UI (weui)
- Wie man mit JavaScript schnell zwischen traditionellem Chinesisch und vereinfachtem Chinesisch wechselt und wie Websites den Wechsel zwischen vereinfachtem und traditionellem Chinesisch unterstützen – Javascript-Kenntnisse

