Heim >Web-Frontend >js-Tutorial >Erstellen Sie einen unglaublichen jQuery-Stil-Umschalter: Eine Schritt-für-Schritt-Anleitung
Erstellen Sie einen unglaublichen jQuery-Stil-Umschalter: Eine Schritt-für-Schritt-Anleitung
- WBOYWBOYWBOYWBOYWBOYWBOYWBOYWBOYWBOYWBOYWBOYWBOYWBOriginal
- 2023-09-02 10:13:05785Durchsuche
In diesem Tutorial zeige ich Ihnen, wie Sie mit jQuery und PHP einen Style-Switcher erstellen. Das Endergebnis wird ein unauffälliger und vollständig abbaubarer dynamischer Stilwechsel sein, der schnell und einfach zu implementieren ist.

Schritt 1: HTML
Zuerst müssen wir eine einfache HTML-Datei erstellen und diese als index.php speichern:
<!DOCTYPE html PUBLIC "-//W3C//DTD XHTML 1.0 Strict//EN" "http://www.w3.org/TR/xhtml1/DTD/xhtml1-strict.dtd">
<html xmlns="http://www.w3.org/1999/xhtml">
	<head>
		<meta http-equiv="Content-Type" content="text/html; charset=utf-8" />
		<title>Style Switcher</title>
		<?php
			// Checks for, and assigns cookie to local variable:
			if(!empty($_COOKIE['style'])) $style = $_COOKIE['style'];
			// If no cookie is present then set style as "day" (default):
			else $style = 'day';
		?>

		<!-- StyleSheet -->
		<link id="stylesheet" type="text/css" href="css/<?php echo $style ?>.css" rel="stylesheet" />

		<!-- jQuery -->
		<script type="text/javascript" src="js/jquery.js"></script>

		<!-- Our plugin -->
		<script type="text/javascript" src="js/styleswitcher.jquery.js"></script>

	</head>
	<body>
		<div id="container">
			<h1>Style-Switcher Example</h1>
			<ul id="nav">
				<li><a href="#">Home</a></li>
				<li><a href="#">About</a></li>
				<li><a href="#">Services</a></li>
				<li><a href="#">Products</a></li>
				<li><a href="#">Links</a></li>
				<li><a href="#">Contact</a></li>
			</ul>
			<div id="banner"></div>
			<div id="content">
				<h2>NETTUTS Tutorial Example</h2>
				<p>Page content...</p>
			</div>
			<div id="foot">
				<p>Footer stuff...</p>
			</div>

			<!-- StyleSheet selection: -->
			<div id="style-switcher">
				<h4>Choose your style:</h4>
				<ul>
					<li id="day"><a href="style-switcher.php?style=day">Day</a></li>
					<li id="night"><a href="style-switcher.php?style=night">Night</a></li>
				</ul>
			</div>

		</div>

		<script type="text/javascript">
			$('#style-switcher a').styleSwitcher(); // Calling the plugin...
		</script>

	</body>
</html>
Unterhalb des Header-Titelattributs sehen Sie etwas PHP. Es ist ganz einfach – es sucht lediglich nach einem Cookie namens „style“ – wenn es existiert, weist es es einer lokalen Variablen (auch „style“ genannt) zu, wenn das Cookie nicht existiert, wird es standardmäßig verwendet Thema („Tag“) ist $style 变量。然后,该变量在链接元素的 href 属性中回显(href="css/<?php echo $style ?>.css" zugeordnet).
Sie sehen das im HTML oben enthaltene Style-Switcher-Div. Es ist nicht erforderlich, JavaScript zu verwenden, um dies hinzuzufügen, da die von uns verwendete Methode es dem Stilumschalter ermöglicht, zu funktionieren, wenn JavaScript deaktiviert ist. Beide Links (Nacht und Tag) führen den Benutzer zu einer Datei namens style-switcher.php, an die eine Abfragezeichenfolge angehängt ist, die das entsprechende Thema angibt (z. B. href="style-switcher.php?style=day").
Ich habe auch ein jQuery-Plugin namens styleSwitcher aufgerufen. Dies ist noch nicht entwickelt (nun ja, das wird der Fall sein, wenn Sie dies lesen), also warten Sie! ...wir werden dieses Plugin in Schritt 4 dieses Tutorials schreiben.
Schritt 2: CSS
Jetzt müssen wir ein paar CSS-Stylesheets für den HTML-Code erstellen. Ich habe beschlossen, nur zwei Stylesheets zu erstellen – eines mit dem Thema „Tag“ und eines mit dem Thema „Nacht“, und ich habe sie entsprechend benannt. (Day.css und Night.css)
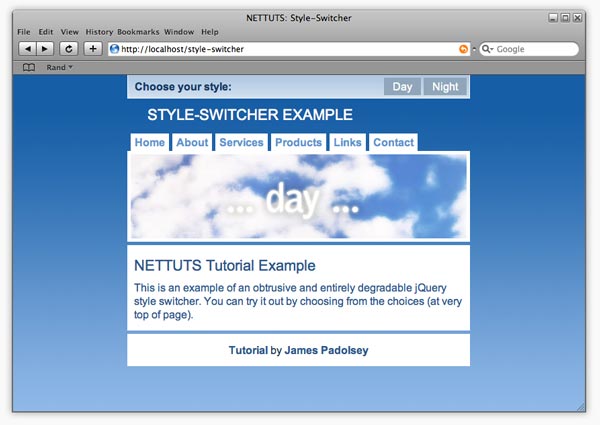
Das heutige Thema:

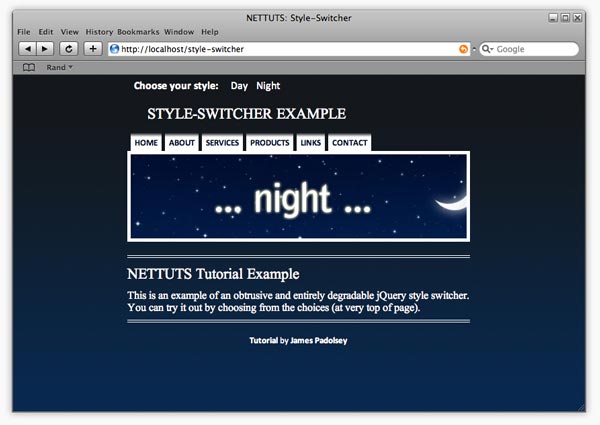
Nachtthema:

Es ist besser, mit einem Stil zu beginnen und dann alle Selektoren in das alternative Stylesheet zu kopieren – dann müssen nur noch die verschiedenen CSS-Regeln und -Deklarationen geändert werden. Natürlich können Sie so viele Stylesheets haben, wie Sie möchten, aber in diesem Tutorial verwenden wir zur Veranschaulichung zwei. Und als Duo Tag und Nacht gut miteinander auskommen!
day.css:
#dummy-element{width:2px;} /* Necessary to check if StyleSheet has loaded */

/* Quick Reset */
body,ul,ol,li,img,form,p,h1,h2,h3,h4,h5,h6,blockquote {
	margin: 0;
	padding: 0;
	border: none;
	list-style: none;
	font-weight: normal;
}

/* General / Header */
body {background: #98beeb url(../img/day-body-bg.jpg) repeat-x; }
#container {
	width: 60%;
	margin: 0 auto;
	min-width: 400px;
	max-width: 800px;
	position: relative;
}
h1 {
	text-align: left;
	text-transform: uppercase;
	color: white;
	font-size: 1.4em;
	padding: 45px 30px 10px 30px;
}

/* Navigation */
#nav {
	padding: 5px 5px 0 0;
	overflow: hidden;
}
#nav li {display: inline;}
#nav a {
	float: left;
	color: #6195ce;
	font-weight: bold;
	text-decoration: none;
	padding: 3px 6px;
	margin-left: 5px;
	background: white;
}
#nav a:hover {color: #2c5a8c;}

/* Banner */
#banner {
	height: 125px;
	background: url(../img/day-banner.jpg) center;
	border: 5px solid white;
	clear: both;
}

/* Content Area */
#content {
	border: 10px solid white;
	background: white;
	color: #2c5a8c;
	margin: 5px 0;
}
#content a {font-weight: bold;}
#content a:hover {text-decoration: underline;}
h2 {
	padding: 0.3em 0;
	font-size: 1.4em;
}
p {padding: 0.3em 0;}

/* Footer */
#foot {
	background: white;
	color: #1f3a57;
	text-align: center;
	border: 10px solid white;
	clear: both;
}
#foot a {
	text-decoration: none;
	font-weight: bold;
	color: #2c5a8c;
}
#foot a:hover {text-decoration: underline;}

/* Style-Switcher */
#style-switcher {
	position: absolute;
	width: 100%;
	top: 0;
	left: 0;
	right: 0;
	height: 34px;
	background: #79a3cc url(../img/day-ss-bg.jpg);
	border-bottom: 1px solid white;
}
#style-switcher ul {
	border-right: 1px solid white;
	float: right;
}
#style-switcher h4 {
	display: inline;
	color: #153c67;
	font-weight: bold;
	line-height: 34px;
	padding: 0 10px;
	float: left;
	border-left: 1px solid white;
}
#style-switcher li {display: inline;}
#style-switcher li a {
	float: left;
	line-height: 26px;
	color: white;
	background: #90a6bb;
	text-decoration: none;
	padding: 0 13px;
	display: inline;
	margin: 4px 4px 4px 0;
}
#style-switcher li a:hover {background: #3a5a7c;}
night.css:
#dummy-element{width:2px;} /* Necessary to check if StyleSheet has loaded */

/* Quick Reset */
body,ul,ol,li,img,form,p,h1,h2,h3,h4,h5,h6,blockquote {
	margin: 0;
	padding: 0;
	border: none;
	list-style: none;
	font-weight: normal;
}

/* General / Header */
body {
	font-family: Calibri,"Arial Narrow",Arial,Sans-Serif;
	background: #072952 url(../img/night-body-bg.jpg) repeat-x;
}
#container {
	width: 60%;
	margin: 0 auto;
	min-width: 400px;
	max-width: 800px;
	position: relative;
}
h1 {
	text-align: left;
	text-transform: uppercase;
	color: white;
	font-size: 1.4em;
	padding: 45px 30px 10px 30px;
	font-family: "Times New Roman", Times, serif;
}

/* Navigation */
#nav {
	padding: 5px 5px 0 0;
	overflow: hidden;
}
#nav li {display: inline;}
#nav a {
	float: left;
	color: #010e2e;
	font-weight: bold;
	text-decoration: none;
	padding: 8px 6px 3px 6px;
	font-size: 0.8em;
	text-transform: uppercase;
	font-weight: 700;
	margin-left: 5px;
	background: white url(../img/night-nav-bg2.jpg) repeat-x;
}
#nav a:hover {color: #2c5a8c;}

/* Banner */
#banner {
	height: 125px;
	background: url(../img/night-banner.jpg) center;
	border: 5px solid white;
	clear: both;
}

/* Content Area */
#content {
	color: white;
	margin: 20px 0;
	padding: 5px 0;
	border-top: 4px double white;
	border-bottom: 4px double white;
	font-family: "Times New Roman", Times, serif;
}
#content a {font-weight: bold;}
#content a:hover {text-decoration: underline;}
h2 {
	padding: 0.3em 0;
	font-size: 1.4em;
}
p {padding: 0.3em 0;}

/* Footer */
#foot {
	color: white;
	font-size: 0.8em;
	clear: both;
}
#foot p {
	text-align: center;
	padding: 0;
}
#foot a {
	text-decoration: none;
	font-weight: bold;
	color: white;
}
#foot a:hover {text-decoration: underline;}

/* Style-Switcher */
#style-switcher {
	position: absolute;
	width: 100%;
	top: 0;
	left: 0;
	right: 0;
	height: 34px;
}
#style-switcher ul {float: left;}
#style-switcher h4 {
	display: inline;
	color: white;
	font-weight: bold;
	line-height: 34px;
	padding: 0 10px;
	float: left;
}
#style-switcher li {display: inline;}
#style-switcher li a {
	float: left;
	line-height: 34px;
	color: white;
	text-decoration: none;
	padding: 0 4px;
	margin-left: 5px;
	display: inline;
}
#style-switcher li a:hover {
	background: white;
	color: #13181c;
	background: white url(../img/night-ss-bg.jpg) repeat-x left bottom;
}
Da es sich nicht wirklich um ein CSS-Tutorial handelt, werde ich mich nicht näher mit den oben genannten Themen befassen. Wenn Sie jedoch Fragen haben, können Sie diese gerne im Kommentarbereich stellen. Ja, ich weiß, dass ältere Browser die Mindestbreite nicht unterstützen! ;)
Schritt 3: style switcher.php
Hier schreiben wir die Kernfunktionalität des Style Switchers. Es sind eigentlich nur ein paar Zeilen sehr einfacher PHP-Code. Sie sollten eine neue Datei mit dem Namen „style-switcher.php“ erstellen und den folgenden Inhalt hineinkopieren:
<?php
	$style = $_GET['style'];
	setcookie("style", $style, time()+604800); // 604800 = amount of seconds in one week
	if(isset($_GET['js'])) {
		echo $style;
	} else {
		header("Location: ".$_SERVER['HTTP_REFERER']);
	}
?>
Der obige Code weist also die GET-Variable „style“ der lokalen Variablen $style zu. Mit anderen Worten: Es wird der Wert des Stilattributs in der Abfragezeichenfolge (style-switcher.php?style=$style 变量。换句话说,它将采用查询字符串中样式属性的值 (style-switcher.php?style=day)。然后它设置一个名为“style”的 cookie(持续一周) - 我们将能够使用步骤 1 中显示的代码在主 index.php 上检索此 cookie(还记得 headday
head). > Ein kleines Stück PHP?). Als nächstes prüft es, ob „js“ an die Abfragezeichenfolge angehängt ist. Wenn ja, dann wissen wir, dass JavaScript (das wir noch nicht geschrieben haben) dieses PHP-Skript angefordert hat. Die else-Bedingung tritt auf, wenn der Benutzer kein JavaScript aktiviert hat und den Benutzer zum Referrer (d. h. der Seite, von der er gerade kam) weiterleitet. Dies wird klarer, sobald wir den jQuery-Inhalt schreiben! Schritt 4: jQuery-Inhalt
Du kannst hier aufhören, wenn du möchtest! ...die bisherige Lösung wird perfekt funktionieren, aber wie ich in der Einleitung sagte, werden wir sie mit etwas jQuery-Power noch cooler machen! Wir werden Benutzern nicht nur ermöglichen, Themen zu ändern, ohne die Seite zu aktualisieren, sondern wir werden auch einen wirklich coolen Fade-Effekt hinzufügen ... Ich meine, was wäre das für ein jQuery-Tutorial ohne Fade! ? ! ?
Natürlich ist das alles möglich, ohne ein Plugin zu erstellen, aber ich denke, es wird eine großartige Lernerfahrung für Sie alle sein und es uns ermöglichen, Code schnell und einfach anzupassen oder zu übertragen.
Erstellen wir zunächst eine Datei mit dem Namen „styleswitcher.jquery.js“.
Das Erstellen eines neuen Plugins in jQuery ist sehr einfach; es ist lediglich der folgende Code erforderlich:
jQuery.fn.styleSwitcher = function(){
	// The code goes here...
}
div#style-switcherAlso möchten wir zunächst angeben, was passiert, wenn auf einen der Stylesheet-Links (der in ) geklickt wird: 🎜
/* "this" refers to each instance of the selected element,
 * So, if you were to call the plugin like this:
 * $('a').styleSwitcher(); then the following would occur
 * when clicking on any anchor within the document:
 */

$(this).click(function(){
	// We're passing this element object through to the
	// loadStyleSheet function.
	loadStyleSheet(this);
	// And then we're returning false.
	return false;
});
加载样式表:
现在我们需要编写loadStyleSheet函数:
function loadStyleSheet(obj) {

	// Append new div to body:
	$('body').append('<div id="overlay" />');

	// Give body a height of 100% (to fix IE6 issue):
	$('body').css({height:'100%'});

	// Select newly created div and apply some styles:
	$('#overlay')
		.css({
			display: 'none',
			position: 'absolute',
			top:0,
			left: 0,
			width: '100%',
			height: '100%',
			zIndex: 1000,
			background: 'black url(img/loading.gif) no-repeat center'
		})

		// Now fade in the div (#overlay):
		.fadeIn(500,function(){

			// The following will happen when the div has finished fading in:

			// Request PHP script (obj.href) with appended "js" query string item:
			$.get( obj.href+'&js',function(data){

				// Select link element in HEAD of document (#stylesheet) and change href attribute:
				$('#stylesheet').attr('href','css/' + data + '.css');

				// Check if new CSS StyleSheet has loaded:
				cssDummy.check(function(){

					// When StyleSheet has loaded, fade out and remove the #overlay div:
					$('#overlay').fadeOut(500,function(){
						$(this).remove();
					});
				});
			});
		});
}
我希望评论能充分解释这一点。细心的你会注意到我们正在调用一个当前未定义的函数(cssDummy.check())。别担心,因为这是下一步......
cssDummy:
我们需要一种方法来测试样式表是否已加载。如果它已经加载,那么我们可以让覆盖层 div 消失,但如果它没有加载,我们必须继续检查,直到它加载。我在网上进行了一些搜索,找到了测试此类事情的可靠方法。它涉及测试虚拟元素的计算宽度。该元素的宽度将在 CSS 中定义 - 因此,当样式表加载时,计算出的元素宽度将仅等于 CSS 中定义的宽度。我希望您现在明白为什么我们必须在每个 CSS 文件中包含“#dummy-element”规则...
所以,这里是:
var cssDummy = {
	init: function(){
		// Appends "dummy-element" div to body:
		$('<div id="dummy-element" style="display:none" />').appendTo('body');
	},
	check: function(callback) {

		// Checks if computed with equals that which is defined in the StyleSheets (2px):
		if ($('#dummy-element').width()==2) callback();

		// If it has not loaded yet then simple re-initiate this
		// function every 200 milliseconds until it had loaded:
		else setTimeout(function(){cssDummy.check(callback)}, 200);
	}
}
并且,在插件的最后,我们将调用 cssDummy.init 函数:
cssDummy.init();
我们完成了!整个插件现在看起来像这样:
jQuery.fn.styleSwitcher = function(){
	$(this).click(function(){
		loadStyleSheet(this);
		return false;
	});
	function loadStyleSheet(obj) {
		$('body').append('<div id="overlay" />');
		$('body').css({height:'100%'});
		$('#overlay')
			.css({
				display: 'none',
				position: 'absolute',
				top:0,
				left: 0,
				width: '100%',
				height: '100%',
				zIndex: 1000,
				background: 'black url(img/loading.gif) no-repeat center'
			})
			.fadeIn(500,function(){
				$.get( obj.href+'&js',function(data){
					$('#stylesheet').attr('href','css/' + data + '.css');
					cssDummy.check(function(){
						$('#overlay').fadeOut(500,function(){
							$(this).remove();
						});
					});
				});
			});
	}
	var cssDummy = {
		init: function(){
			$('<div id="dummy-element" style="display:none" />').appendTo('body');
		},
		check: function(callback) {
			if ($('#dummy-element').width()==2) callback();
			else setTimeout(function(){cssDummy.check(callback)}, 200);
		}
	}
	cssDummy.init();
}
我们现在可以像这样调用 jQuery 插件:
$('#style-switcher a').styleSwitcher();
完成!
如果您不确定文件结构,请下载 src 文件来查看。我希望您喜欢阅读本教程。一如既往,如果您有任何疑问,请随时在下面提问!如果您喜欢这篇文章,请挖掘它!
Das obige ist der detaillierte Inhalt vonErstellen Sie einen unglaublichen jQuery-Stil-Umschalter: Eine Schritt-für-Schritt-Anleitung. Für weitere Informationen folgen Sie bitte anderen verwandten Artikeln auf der PHP chinesischen Website!
In Verbindung stehende Artikel
Mehr sehen- Eine eingehende Analyse der Bootstrap-Listengruppenkomponente
- Detaillierte Erläuterung des JavaScript-Funktions-Curryings
- Vollständiges Beispiel für die Generierung von JS-Passwörtern und die Erkennung der Stärke (mit Download des Demo-Quellcodes)
- Angularjs integriert WeChat UI (weui)
- Wie man mit JavaScript schnell zwischen traditionellem Chinesisch und vereinfachtem Chinesisch wechselt und wie Websites den Wechsel zwischen vereinfachtem und traditionellem Chinesisch unterstützen – Javascript-Kenntnisse

