Heim >Java >javaLernprogramm >So starten Sie einen Listening-Thread, um Aufgaben in Springboot auszuführen
So starten Sie einen Listening-Thread, um Aufgaben in Springboot auszuführen
- WBOYWBOYWBOYWBOYWBOYWBOYWBOYWBOYWBOYWBOYWBOYWBOYWBnach vorne
- 2023-05-21 20:28:121465Durchsuche
springboot startet einen Listening-Thread, um Aufgaben auszuführen
public class StartApplicationListener implements ApplicationListener<ContextRefreshedEvent> {

    @Override
    public void onApplicationEvent(ContextRefreshedEvent contextRefreshedEvent) {
        ApplicationContext applicationContext = contextRefreshedEvent.getApplicationContext();
        ApplicationContext parent = applicationContext.getParent();
        if (parent == null) {
            CacheManager cacheManager = applicationContext.getBean(CacheManager.class);
            Cache cache = cacheManager.getCache(MsConstants.NODE_CACHE_NAME);
           new Thread(new Runnable() {
               @Override
               public void run() {
                  //代码

               }
           }).start();
        }
    }
public static void main(String[] args) {
SpringApplication app = new SpringApplication(FigureServerApplication.class);
app.addListeners(new StartApplicationListener());
app.run(args);
}Erstellungsprozess von Listening-Ereignissen in Springboot
Im Spring Boot-Projekt können Sie die Annotation @Async verwenden, um eine asynchrone Verarbeitung zu implementieren. Es gibt zwei Arten der Ereignisüberwachung: Es stehen synchrone und asynchrone Methoden zur Verfügung.
Allgemeine Schritte von Ereignissen
1: Definieren Sie ein Ereignis.
2: Erstellen Sie einen Zuhörer.
3: Stellen Sie sicher, dass sich der Zuhörer im Container befindet.
4: Veröffentlichen Sie die Veranstaltung zum Testen.
Lassen Sie uns ohne weitere Umschweife kurz die Demos verschiedener Methoden beschreiben.
Erstellen wir zunächst ein Springboot-Projekt.
Erster Typ
1: Definieren Sie ein Ereignis und müssen Sie ApplicationEvent erben.
public class MyEvent extends ApplicationEvent {
    public MyEvent(Object source) {
        super(source);
        System.out.println("我是一个事件,目前在事件的构造器内");
    }
}
2: Erstellen Sie einen Listener. Implementieren Sie die ApplicationListener-Schnittstelle direkt und schreiben Sie die onApplicationEvent-Methode neu.
public class MyEventListener implements ApplicationListener<MyEvent> {
    @Override
    public void onApplicationEvent(MyEvent event) {
        System.out.println("现在开始执行监听器中的内容,我是直接实现ApplicationListener接口的方式进行的");
        System.out.println("event.getSource() = " + event.getSource());
    }
}
3: Fügen Sie den Listener manuell zum Anwendungscontainer hinzu und veröffentlichen Sie das Ereignis.
@SpringBootApplication
public class EventTestApplication {
    public static void main(String[] args) {
//        SpringApplication.run(EventTestApplication.class, args);
        //第一种:自己手动将监听器添加到application中
        SpringApplication application = new SpringApplication(EventTestApplication.class);
        //添加监听器
        application.addListeners(new MyEventListener());
        ConfigurableApplicationContext context = application.run(args);
        //进行发布事件
        context.publishEvent(new MyEvent("Event数据源"));
        context.close();
    }
}
4: Starten Sie den Hauptstartkurs und führen Sie Drucktests durch.
Der zweite Typ
1: Gleich wie der erste Typ 1
2: Erstellen Sie einen Listener.
/**
 *第二种:打上Compoent注解,  将事件监听器自动加入到应用容器中
 * 这种方式不需要手动加入到容器中。
 * */
@Component
public class MyEventListener2 implements ApplicationListener<MyEvent> {
    @Override
    public void onApplicationEvent(MyEvent event) {
        System.out.println("现在开始执行监听器中的内容,我是打Compoent注解的方式进行的");
        System.out.println("event.getSource() = " + event.getSource());
    }
}
3: Veröffentlichen Sie das Ereignis und führen Sie dann Startup-Tests durch.
@SpringBootApplication
public class EventTestApplication {
    public static void main(String[] args) {
        ConfigurableApplicationContext context = SpringApplication.run(EventTestApplication.class, args);
        //发布事件
        context.publishEvent(new MyEvent("source"));
        context.close();
    }
}
Der dritte Typ
alle verwenden Anmerkungen
1: Gleich wie der erste Typ 1
2: Erstellen Sie einen Listener.
/**
 *第三种:采用@EventListener注解的方式,不需要在类上实现ApplicationListener接口。
 * 直接采用的是通过注解,将方法标识为一个监听器。
 * */
@Component
public class MyEventListener3 {
    @Async//异步注解。开启一个新线程。 去掉此注解则会变成同步监听。
    @EventListener(classes = MyEvent.class)
    public void TestListener(MyEvent myEvent){
        System.out.println("我是@EventListener注解的方式实现的监听器");
        System.out.println("myEvent.getSource() = " + myEvent.getSource());
    }
}
3: Veröffentlichen Sie das Ereignis und führen Sie dann Startup-Tests durch.
@SpringBootApplication
public class EventTestApplication {
    public static void main(String[] args) {
        ConfigurableApplicationContext context = SpringApplication.run(EventTestApplication.class, args);
        //发布事件
        context.publishEvent(new MyEvent("source"));
        context.close();
    }
}
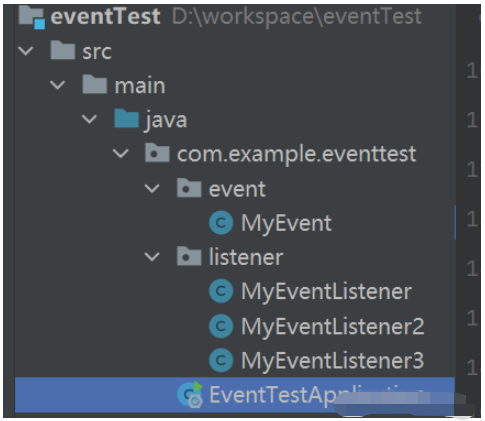
Das Folgende ist das Strukturdiagramm des Codes:

Das obige ist der detaillierte Inhalt vonSo starten Sie einen Listening-Thread, um Aufgaben in Springboot auszuführen. Für weitere Informationen folgen Sie bitte anderen verwandten Artikeln auf der PHP chinesischen Website!
In Verbindung stehende Artikel
Mehr sehen- Wie greife ich über die Aktivität auf ViewPager-Fragmentmethoden zu?
- Wie verpacke ich bestimmte Module in einem Maven-Projekt mit mehreren Modulen?
- Warum kann ich keine Bilder in mein exportiertes JAR aus Eclipse laden?
- Wie erkennt man die Ausrichtung im Quer- oder Hochformat in Android?
- Wie kann Java verwendet werden, um ein Bild in die Form eines Textes zu schneiden?

