Heim >Java >javaLernprogramm >So integrieren Sie Activemq in Springboot
So integrieren Sie Activemq in Springboot
- WBOYWBOYWBOYWBOYWBOYWBOYWBOYWBOYWBOYWBOYWBOYWBOYWBnach vorne
- 2023-05-21 13:13:061656Durchsuche
1 Importieren Sie die für die Integration erforderlichen Abhängigkeiten:
<dependency>
      <groupid>org.springframework.boot</groupid>
      <artifactid>spring-boot-starter-activemq</artifactid>
    </dependency>
2 Erstellen Sie die application.properties-Datei
spring.activemq.broker-url=tcp://127.0.0.1:61616
spring.activemq.user=admin
spring.activemq.password=admin
server.port=8080
queue=myqueue
3 Passen Sie den Warteschlangennamen der Konfigurationsdatei an und erstellen Sie eine Warteschlange basierend auf dem Warteschlangennamen
package com.example.demo;

import javax.jms.Queue;

import org.apache.activemq.ActiveMQConnectionFactory;
import org.apache.activemq.command.ActiveMQQueue;
import org.springframework.beans.factory.annotation.Value;
import org.springframework.context.annotation.Bean;
import org.springframework.context.annotation.Configuration;
import org.springframework.jms.config.DefaultJmsListenerContainerFactory;
import org.springframework.jms.core.JmsTemplate;

@Configuration
public class QueueConfig {

  @Value("${queue}")
  private String queue;

  @Bean
  public Queue logQueue() {
    return new ActiveMQQueue(queue);
  }}
4. Erstellen Sie einen Produzenten. Sie können die bereitgestellte Vorlage JmsMessagingTemplate direkt zum Senden von Nachrichten verwenden:
package com.example.demo.producter;

import javax.jms.Queue;

import org.slf4j.Logger;
import org.slf4j.LoggerFactory;
import org.springframework.beans.factory.annotation.Autowired;
import org.springframework.jms.core.JmsMessagingTemplate;
import org.springframework.stereotype.Component;

import com.example.demo.SpringbootActivemqApplication;

@Component
public class Producter {
  @Autowired
  private JmsMessagingTemplate jmsMessagingTemplate;
  @Autowired
  private Queue queue;
  private static Logger logger = LoggerFactory.getLogger(
Producter
.class); public void send() { String str = "生产者生产数据:" + System.currentTimeMillis(); jmsMessagingTemplate.convertAndSend(queue, str); logger.info("生产者数据:{}", str); } }
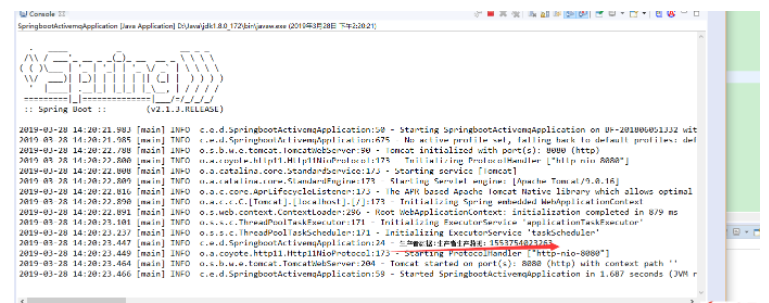
6. Starten Sie das Projekt, Konsolenausgabeinhalt:

 7 Verbraucher, Verbraucher erstellen Es ist einfacher, hören Sie sich einfach die Warteschlange an:
package com.example.demo;

import org.springframework.beans.factory.annotation.Autowired;
import org.springframework.boot.SpringApplication;
import org.springframework.boot.autoconfigure.SpringBootApplication;
import org.springframework.context.ApplicationListener;
import org.springframework.context.event.ContextRefreshedEvent;
import org.springframework.scheduling.annotation.EnableScheduling;

import com.example.demo.producter.Producter;
import com.example.demo.producter.consumer.Consumer;

@SpringBootApplication
@EnableScheduling
public class SpringbootActivemqApplication implements ApplicationListener<contextrefreshedevent> {
  @Autowired
  public Producter producter;
  @Autowired
  public Consumer consumer;

  public static void main(String[] args) {
    SpringApplication.run(SpringbootActivemqApplication.class, args);
    //onApplicationEvent方法 在启动springboot的时候 会运行该方法,可根据项目实际情况 选择合适调用消息发送方法

  }

  @Override
  public void onApplicationEvent(ContextRefreshedEvent event) {
    producter.send();
  }

}</contextrefreshedevent>
8. Endergebnis:
Das obige ist der detaillierte Inhalt vonSo integrieren Sie Activemq in Springboot. Für weitere Informationen folgen Sie bitte anderen verwandten Artikeln auf der PHP chinesischen Website!

