
Heim >Betrieb und Instandhaltung >Nginx >So konfigurieren Sie den Nginx-Reverse-Proxy unter CentOS
So konfigurieren Sie den Nginx-Reverse-Proxy unter CentOS

- WBOYWBOYWBOYWBOYWBOYWBOYWBOYWBOYWBOYWBOYWBOYWBOYWBnach vorne
- 2023-05-17 12:34:172184Durchsuche

1. Beschreibung der Reverse-Proxy- und Demonstrationsumgebung
1. Reverse-Proxy
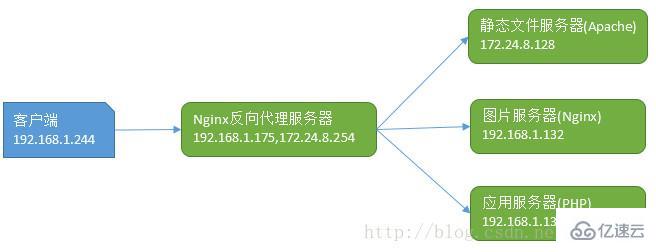
Ein Reverse-Proxy ist ein Proxy-Server, der im Namen des Clients Ressourcen von einem oder mehreren Servern abruft. Senden Sie diese Ressourcen erneut an den Client, als ob sie vom Webserver selbst zurückgegeben würden. Im Gegensatz zu einem Forward-Proxy, bei dem es sich um einen Vermittler handelt, über den mit ihm verbundene Clients jeden Server kontaktieren, ist ein Reverse-Proxy ein Vermittler, über den jeder Client mit dem zugehörigen Server Kontakt aufnimmt.
Informationen zum Forward-Proxy finden Sie unter: Konfigurieren des Nginx-Forward-Proxys auf Basis von CentOS 7
2. Allgemeine Reverse-Proxy-Konfiguration
Back-End-Apache-Server-Hostname und IP
# hostname centos7-web.example.com# more /etc/redhat-release CentOS Linux release 7.2.1511 (Core)# ip addr|grep inet|grep global inet 172.24.8.128/24 brd 172.24.8.255 scope global eno16777728# systemctl start httpd.service# echo "This is a httpd test page.">/var/www/html/index.html# curl http://localhost This is a httpd test page.
2, Front-End-Nginx-Reverse-Proxy-Server-Konfiguration
Front-End-Nginx-Server-Hostname und IP
# hostname centos7-router

 # more /etc/redhat-release CentOS Linux release 7.2.1511 (Core)
 # ip addr |grep inet|grep global inet 172.24.8.254/24 brd 172.24.8.255 scope global eno16777728
 inet 192.168.1.175/24 brd 192.168.1.255 scope global dynamic eno33554960
Nginx-Version# nginx -V nginx version: nginx/1.10.2
Hinzufügen a Die neue Konfigurationsdatei wird als Reverse-Proxy verwendet
# vim /etc/nginx/conf.d/reverse_proxy.conf server {
   listen 8090;
   server_name localhost;

 location / {
   proxy_pass http://172.24.8.128; ###反向代理核心指令   proxy_buffers 256 4k;
   proxy_max_temp_file_size 0;
   proxy_connect_timeout 30;

   proxy_cache_valid 200 302 10m;
   proxy_cache_valid 301 1h;
   proxy_cache_valid any 1m;
   }
 }# systemctl reload nginx# ss -nltp|grep nginx|grep 8090LISTEN 0 128 *:8090 *:* users:(("nginx",pid=78023,fd=8),("nginx",pid=78021,fd=8))# curl http://localhost:8090 ##基于本地测试This is a httpd test page.
Einstellung des Apache-Protokollformats für den Backend-Server # more /var/log/httpd/access_log ##请求IP地址为172.24.8.254,当从其他机器请求时也是172.24.8.254这个IP172.24.8.254 - - [30/Oct/2017:14:02:38 +0800] "GET / HTTP/1.0" 200 27 "-" "curl/7.29.0"3. Reverse-Proxy für den Verzeichnisabgleich Der Back-End-Server verwendet die Nginx-Konfiguration
# grep proxy_set_header -B2 /etc/nginx/conf.d/reverse_proxy.conf location / {
   proxy_pass http://172.24.8.128;
   proxy_set_header X-Real-IP $remote_addr;
   }# systemctl reload nginx.service
Front-End-Nginx-Konfiguration # vim /etc/http/conf/httpd.conf# LogFormat "%h %l %u %t \"%r\" %>s %b \"%{Referer}i\" \"%{User-Agent}i\"" combined #注释此行,添加下一行 LogFormat "%{X-Real-IP}i %l %u %t \"%r\" %>s %b \"%{Referer}i\" \"%{User-Agent}i\"" combined #关键描述 {X-Real-IP}i# ip addr|grep inet|grep global #从1.132主机访问 inet 192.168.1.244/24 brd 192.168.1.255 scope global eth0# curl http://192.168.1.175:8090 #从1.244主机访问 This is a httpd test page#再次查看apache访问日志,如下,不再是代理服务器IP地址,此时显示为1.244 192.168.1.244 - - [30/Oct/2017:15:49:07 +0800] "GET / HTTP/1.0" 200 27 "-" "curl/7.19.7 (x86_64-redhat-linux-gnu)
libcurl/7.19.7 NSS/3.14.0.0 zlib/1.2.3 libidn/1.18 libssh3/1.4.2"Überprüfen Sie die Proxy-Situation und testen Sie das JPG im Bildverzeichnis mit der IP 192.168.1.244 Dateianforderung# more /etc/redhat-release ##os平台及ip地址 CentOS release 6.7 (Final)# ip addr|grep eth0|grep global inet 192.168.1.132/24 brd 192.168.1.255 scope global eth0# nginx -v ##nginx版本 nginx version: nginx/1.10.2# mkdir -pv /usr/share/nginx/html/images ##创建图片目录 mkdir: created directory `/usr/share/nginx/html/images'
# cp /usr/share/backgrounds/nature/*.jpg /usr/share/nginx/html/images/. ##复制图片文件
# cp /etc/nginx/conf.d/default.conf /etc/nginx/conf.d/default.conf.bk
# vim /etc/nginx/conf.d/default.conf ##此处直接修改缺省配置文件
server {
listen 80 default_server;
listen [::]:80 default_server;
server_name _;
root /usr/share/nginx/html;
# Load configuration files for the default server block.
include /etc/nginx/default.d/*.conf;
location / {
}
location /images {
alias /usr/share/nginx/html/images; ##此处配置了别名
}
error_page 404 /404.html;
location = /40x.html {
}
error_page 500 502 503 504 /50x.html;
location = /50x.html {
}
}
# /etc/init.d/nginx reload
Reloading nginx: [ OK ]4. Reverse-Proxy-Konfiguration basierend auf bestimmten Dateitypenphp serverseitige Konfiguration (IP 192.168.1.132)# vim /etc/nginx/conf.d/reverse_proxy.conf server { listen 8090; server_name localhost; location / { proxy_pass http://172.24.8.128; proxy_set_header X-Real-IP $remote_addr; } location /images { ##将images目录下的文件代理至192.168.1.132 proxy_pass http://192.168.1.132; proxy_set_header X-Real-IP $remote_addr; } }# systemctl reload nginxNginx-Agent-seitige Konfiguration (IP 192.168.1.175)# ip addr|grep inet|grep global inet 192.168.1.244/24 brd 192.168.1.255 scope global eth0# curl -I http://192.168.1.175:8090/images/Garden.jpg HTTP/1.1 200 OK Server: nginx/1.12.2 Date: Tue, 31 Oct 2017 01:48:18 GMT Content-Type: image/jpeg Content-Length: 264831 Connection: keep-alive Last-Modified: Mon, 30 Oct 2017 08:21:28 GMT ETag: "59f6e108-40a7f" Accept-Ranges: bytesTesten Sie den Reverse-Proxy für PHP
# ss -nltp|grep php LISTEN 0 128 192.168.1.132:9000 *:* users:(("php-fpm",7147,8),("php-fpm",7148,0),("php-fpm",7149,0))# mkdir -pv /data ###存放php代码# echo "/data 192.168.1.0/24(rw)" >/etc/exports# /etc/init.d/rpcbind start# /etc/init.d/nfslock start# /etc/init.d/nfs start # echo "" > /data/index.php
5. Konfigurieren Sie den Reverse-Proxy für Tomcat basierend auf dem Upstream-Befehl Der Nginx-Upstream-Befehl kann die Anfrage auch an den Back-End-Server weiterleiten. Das folgende Beispiel wird mit dem Upstream-Befehl kombiniert, um das Proxying zu demonstrieren tomcat # mkdir /data# mount -t nfs 192.168.1.132:/data /data# ls /data index.php# vim /etc/nginx/conf.d/reverse_proxy.conf server { listen 8090; server_name localhost; location / { proxy_pass http://172.24.8.128; proxy_set_header X-Real-IP $remote_addr; } location /images { proxy_pass http://192.168.1.132; proxy_set_header X-Real-IP $remote_addr; } location ~ \.php$ { root /data; fastcgi_pass 192.168.1.132:9000; fastcgi_index index.php; fastcgi_param SCRIPT_FILENAME /scripts$fastcgi_script_name; include fastcgi_params; } }# systemctl restart nginx 6. Befehlsbeschreibung des Proxy-Moduls Für das Proxy-Modul stehen viele Konfigurationsanweisungen zur Verfügung, mit denen viele Eigenschaften des Proxy-Moduls definiert werden, wenn es funktioniert, z. B. das Verbindungszeitlimit und die verwendete HTTP-Protokollversion Proxy usw. Im Folgenden finden Sie eine kurze Erläuterung häufig verwendeter Anweisungen. proxy_read_timeout Das maximale Intervall zwischen zwei vom empfangenden Upstream-Server empfangenen Lesevorgängen, bevor die Verbindung getrennt wird: [root@ydq05 ~]# ip addr|grep inet|grep global inet 192.168.1.244/24 brd 192.168.1.255 scope global eth0 [root@ydq05 ~]# curl -I http://192.168.1.175:8090/index.php HTTP/1.1 200 OK Server: nginx/1.12.2 Date: Tue, 31 Oct 2017 03:22:59 GMT Content-Type: text/html; charset=UTF-8 Connection: keep-alive X-Powered-By: PHP/5.6.0
Das obige ist der detaillierte Inhalt vonSo konfigurieren Sie den Nginx-Reverse-Proxy unter CentOS. Für weitere Informationen folgen Sie bitte anderen verwandten Artikeln auf der PHP chinesischen Website!