
Heim >Web-Frontend >js-Tutorial >Die Maskenebene wird angezeigt, wenn auf die Schaltfläche geklickt wird, und hat Zieh- und Schließeffekte (zwei Methoden)_jquery
Die Maskenebene wird angezeigt, wenn auf die Schaltfläche geklickt wird, und hat Zieh- und Schließeffekte (zwei Methoden)_jquery

- WBOYWBOYWBOYWBOYWBOYWBOYWBOYWBOYWBOYWBOYWBOYWBOYWBOriginal
- 2016-05-16 15:44:041536Durchsuche
Lassen Sie mich zunächst den Demonstrationseffekt zeigen:
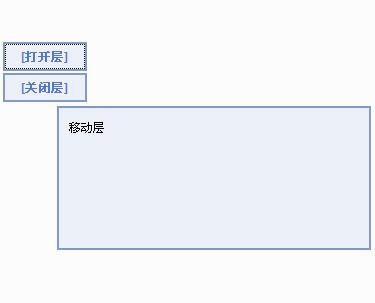
Webseiten-Popup-Ebene basierend auf JavaScript. Klicken Sie mit der Maus auf die Titelleiste der Popup-Ebene und Sie können die schwebende Ebene nach Belieben verschieben Die Bedienung ist komfortabel und die Kompatibilität ist gut. IE/Firefox und viele andere. Es läuft stabil und reagiert schnell unter dem Browser. In Bezug auf die Codeleistung ist er prägnant und pragmatisch, nicht leichtfertig und eignet sich recht gut zum Lernen.
JS-Code
Beispiel 1:
<!DOCTYPE html>
<html xmlns="http://www.w3.org/1999/xhtml">
<head>
<title>弹出层并可拖拽</title>
<style>
html,body{height:100%;overflow:hidden;}
body,div,h2{margin:0;padding:0;}
body{font:12px/1.5 Tahoma;}
li{ list-style-type:none}
center{padding-top:10px;}
button{cursor:pointer;}
#overlay{position:absolute;top:0;left:0;width:100%;height:100%;background:#000;opacity:0.5;filter:alpha(opacity=50);display:none;}
#win{position:absolute;top:50%;left:50%;width:400px;height:200px;background:#fff;border:4px solid #f90;margin:-102px 0 0 -202px;display:none;}
h2{font-size:12px;height:18px;text-align:right;background:#FC0;border-bottom:3px solid #f90;padding:5px;cursor:move;}
h2 span{color:#f90;cursor:pointer;background:#fff;border:1px solid #f90;padding:0 2px;}
</style>
<script>
window.onload = function ()
{
var oWin = document.getElementById("win");
var oLay = document.getElementById("overlay");
var oBtn = document.getElementsByTagName("button")[0];
var oClose = document.getElementById("close");
var oH2 = oWin.getElementsByTagName("h2")[0];
var bDrag = false;
var disX = disY = 0;
oBtn.onclick = function ()
{
oLay.style.display = "block";
oWin.style.display = "block"
};
oClose.onclick = function ()
{
oLay.style.display = "none";
oWin.style.display = "none"
};
oClose.onmousedown = function (event)
{
(event || window.event).cancelBubble = true;
};
oH2.onmousedown = function (event)
{
var event = event || window.event;
bDrag = true;
disX = event.clientX - oWin.offsetLeft;
disY = event.clientY - oWin.offsetTop;
this.setCapture && this.setCapture();
return false
};
document.onmousemove = function (event)
{
if (!bDrag) return;
var event = event || window.event;
var iL = event.clientX - disX;
var iT = event.clientY - disY;
var maxL = document.documentElement.clientWidth - oWin.offsetWidth;
var maxT = document.documentElement.clientHeight - oWin.offsetHeight;
iL = iL < 0 ? 0 : iL;
iL = iL > maxL ? maxL : iL;
iT = iT < 0 ? 0 : iT;
iT = iT > maxT ? maxT : iT;
oWin.style.marginTop = oWin.style.marginLeft = 0;
oWin.style.left = iL + "px";
oWin.style.top = iT + "px";
return false
};
document.onmouseup = window.onblur = oH2.onlosecapture = function ()
{
bDrag = false;
oH2.releaseCapture && oH2.releaseCapture();
};
};
</script>
<meta charset="utf-8">
</head>
<body>
<div id="overlay"></div>
<div id="win"><h2><span id="close">×</span></h2>
<li><a href='http://www.100sucai.com' target='_blank'>http://www.100sucai.com</a></li>
<li><a href="http://www.100sucai.com/web/jquerytexiao/CSS3heHtml5" title="CSS3和Html5">CSS3和Html5</a></li>
<li><a href="http://www.100sucai.com/web/jquerytexiao/tubiaoyutuxing" title="图表与图形">图表与图形</a></li>
</div>
<center><button>弹出层</button></center>
</body>
</html><br />
JQ-Code:
Codebeispiel zwei:
<!DOCTYPE html>
<html xmlns="http://www.w3.org/1999/xhtml">
<head>
<title>jQuery弹出层效果</title>
<meta content="网页特效,特效代码,jQuery,css特效,Js代码,广告幻灯,图片切换" name="keywords" />
<meta content="jQuery弹出层效果,有关闭按钮,代码简单易懂,你可以随意修改弹出层的参数。" name="description" />
<script src="/uploads/common/js/jquery-1.4.2.min.js" type="text/javascript"></script>
<style>
.black_overlay{
display: none;
position: absolute;
top: 0%;
left: 0%;
width: 100%;
height: 100%;
background-color: black;
z-index:1001;
-moz-opacity: 0.8;
opacity:.80;
filter: alpha(opacity=80);
}
.white_content {
display: none;
position: absolute;
top: 10%;
left: 10%;
width: 80%;
height: 80%;
border: 16px solid lightblue;
background-color: white;
z-index:1002;
overflow: auto;
}
.white_content_small {
display: none;
position: absolute;
top: 20%;
left: 30%;
width: 40%;
height: 50%;
border: 16px solid lightblue;
background-color: white;
z-index:1002;
overflow: auto;
}
</style>
<script type="text/javascript">
//弹出隐藏层
function ShowDiv(show_div,bg_div){
document.getElementById(show_div).style.display='block';
document.getElementById(bg_div).style.display='block' ;
var bgdiv = document.getElementById(bg_div);
bgdiv.style.width = document.body.scrollWidth;
// bgdiv.style.height = $(document).height();
$("#"+bg_div).height($(document).height());
};
//关闭弹出层
function CloseDiv(show_div,bg_div)
{
document.getElementById(show_div).style.display='none';
document.getElementById(bg_div).style.display='none';
};
</script>
</head>
<body>
<input id="Button1" type="button" value="点击弹出层" onclick="ShowDiv('MyDiv','fade')" />
<!--弹出层时背景层DIV-->
<div id="fade" class="black_overlay">
</div>
<div id="MyDiv" class="white_content">
<div style="text-align: right; cursor: default; height: 40px;">
<span style="font-size: 16px;" onclick="CloseDiv('MyDiv','fade')">关闭</span>
</div>
目前来说,我还是喜欢这个自己改造的弹出层。自己在项目中也用的是这个。
</div>
</body>
</html>
Das Obige verwendet jq und js, um zu erkennen, dass die Maskenebene auf die Schaltfläche zum Popup klickt und Drag-and-Close-Effekte hat. Ich hoffe, dass dies für alle hilfreich ist.
In Verbindung stehende Artikel
Mehr sehen- Eine eingehende Analyse der Bootstrap-Listengruppenkomponente
- Detaillierte Erläuterung des JavaScript-Funktions-Curryings
- Vollständiges Beispiel für die Generierung von JS-Passwörtern und die Erkennung der Stärke (mit Download des Demo-Quellcodes)
- Angularjs integriert WeChat UI (weui)
- Wie man mit JavaScript schnell zwischen traditionellem Chinesisch und vereinfachtem Chinesisch wechselt und wie Websites den Wechsel zwischen vereinfachtem und traditionellem Chinesisch unterstützen – Javascript-Kenntnisse