Heim >Java >javaLernprogramm >So verwenden Sie Springboot, um das Shiro-Sicherheitsframework schnell zu integrieren
So verwenden Sie Springboot, um das Shiro-Sicherheitsframework schnell zu integrieren
- WBOYWBOYWBOYWBOYWBOYWBOYWBOYWBOYWBOYWBOYWBOYWBOYWBnach vorne
- 2023-04-25 08:04:061263Durchsuche
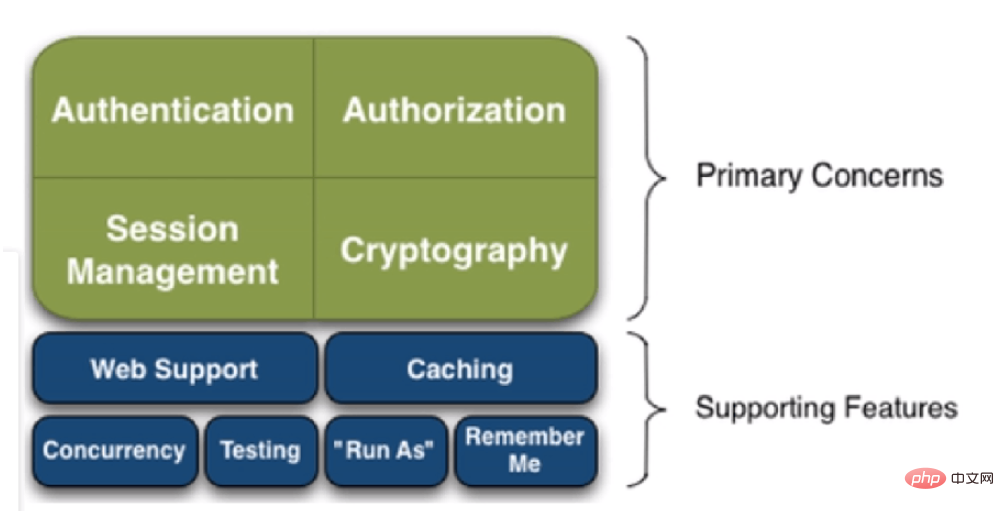
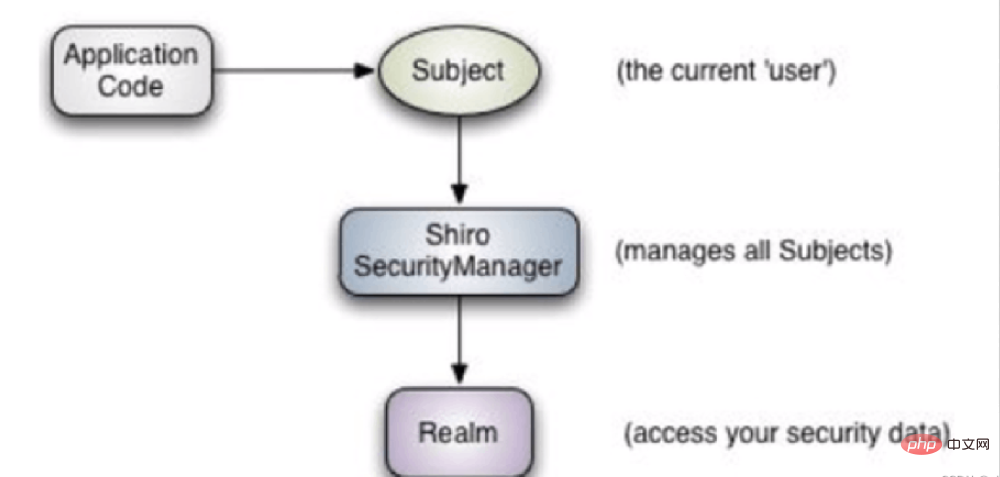
Lassen Sie uns zunächst bekannt machen, was Shiro ursprünglich heißt: Apache Shiro. Es handelt sich um ein Java-Sicherheits-(Berechtigungs-)Framework. Shiro macht es sehr einfach, ausreichend gute Anwendungen zu entwickeln, die nicht nur in der JavaSE-Umgebung, sondern auch in der JavaEE-Umgebung verwendet werden können. Shiro kann Authentifizierung, Autorisierung, Verschlüsselung, Sitzungsverwaltung, Webintegration, Caching und andere erweiterte Anwendungen durchführen. Sehen Sie sich das Funktions- und Architekturdiagramm von Shiro wie in der Abbildung gezeigt an: code>/*
 Quellserver:
Quellhost: localhost:3306 Quelldatenbank: mybatis
Zielservertyp: MYSQL
Zielserverversion: 80030Dateikodierung: 65001
Datum: 2023-03-14 18:00:05 /*
Navicat MySQL Data Transfer
Source Server :
Source Server Version : 80030
Source Host : localhost:3306
Source Database : mybatis
Target Server Type : MYSQL
Target Server Version : 80030
File Encoding : 65001
Date: 2023-03-14 18:00:05
*/
SET FOREIGN_KEY_CHECKS=0;
– Table structure for user
DROP TABLE IF EXISTS user;
CREATE TABLE user (id int NOT NULL AUTO_INCREMENT,name varchar(255) DEFAULT NULL,pwd varchar(255) DEFAULT NULL,perms varchar(100) DEFAULT NULL,
PRIMARY KEY (id)
) ENGINE=InnoDB AUTO_INCREMENT=4 DEFAULT CHARSET=utf8mb4 COLLATE=utf8mb4_0900_ai_ci;
– Records of user
INSERT INTO user VALUES (‘1’, ‘qin’, ‘d1b129656359e35e95ebd56a63d7b9e0’, ‘user:add’);
INSERT INTO user VALUES (‘2’, ‘hai’, ‘123’, ‘user:insert’);
INSERT INTO user*/
SET FOREIGN_KEY_CHECKS=0;
– Tabellenstruktur für Benutzer
DROP TABLE IF EXISTS user;
user (id int NOT NULL AUTO_INCREMENT,name varchar(255) DEFAULT NULL,
pwd varchar( 255) DEFAULT NULL,<p><code>perms varchar(100) DEFAULT NULL,PRIMARY KEY (id)) ENGINE=InnoDB AUTO_INCREMENT=4 DEFAULT CHARSET= utf8mb4 COLLATE=utf8mb4_0900_ai_ci; 0’, ‘user:add’);
INSERT INTO user VALUES (‘2’, ‘hai’, ‘123’, ‘user:insert’);
user VALUES (‘ 3’, „root“, „d1b129656359e35e95ebd56a63d7b9e0’, „user:update’); Benutzer<?xml version="1.0" encoding="UTF-8"?>
<project xmlns="http://maven.apache.org/POM/4.0.0" xmlns:xsi="http://www.w3.org/2001/XMLSchema-instance"
xsi:schemaLocation="http://maven.apache.org/POM/4.0.0 https://maven.apache.org/xsd/maven-4.0.0.xsd">
<modelVersion>4.0.0</modelVersion>
<parent>
<groupId>org.springframework.boot</groupId>
<artifactId>spring-boot-starter-parent</artifactId>
<version>2.6.11</version>
<relativePath/> <!-- lookup parent from repository -->
</parent>
<groupId>com.example</groupId>
<artifactId>demo02</artifactId>
<version>0.0.1-SNAPSHOT</version>
<name>demo02</name>
<description>demo02</description>
<properties>
<java.version>1.8</java.version>
</properties>
<dependencies>
<dependency>
<groupId>org.apache.shiro</groupId>
<artifactId>shiro-spring</artifactId>
<version>1.4.1</version>
</dependency>
<dependency>
<groupId>org.mybatis.spring.boot</groupId>
<artifactId>mybatis-spring-boot-starter</artifactId>
<version>2.1.0</version>
</dependency>
<dependency>
<groupId>mysql</groupId>
<artifactId>mysql-connector-java</artifactId>
<version>8.0.31</version>
</dependency>
<!-- https://mvnrepository.com/artifact/log4j/log4j -->
<dependency>
<groupId>log4j</groupId>
<artifactId>log4j</artifactId>
<version>1.2.17</version>
</dependency>
<!-- https://mvnrepository.com/artifact/com.alibaba/druid -->
<dependency>
<groupId>com.alibaba</groupId>
<artifactId>druid</artifactId>
<version>1.1.12</version>
</dependency>
<dependency>
<groupId>org.projectlombok</groupId>
<artifactId>lombok</artifactId>
<version>1.18.18</version>
<scope>compile</scope>
</dependency>
<dependency>
<groupId>org.springframework.boot</groupId>
<artifactId>spring-boot-starter-thymeleaf</artifactId>
</dependency>
<dependency>
<groupId>org.thymeleaf</groupId>
<artifactId>thymeleaf</artifactId>
</dependency>
<dependency>
<groupId>org.thymeleaf.extras</groupId>
<artifactId>thymeleaf-extras-java8time</artifactId>
</dependency>
<dependency>
<groupId>org.springframework.boot</groupId>
<artifactId>spring-boot-starter-web</artifactId>
</dependency>
<dependency>
<groupId>org.springframework.boot</groupId>
<artifactId>spring-boot-starter-test</artifactId>
<scope>test</scope>
</dependency>
<dependency>
<groupId>com.github.theborakompanioni</groupId>
<artifactId>thymeleaf-extras-shiro</artifactId>
<version>2.0.0</version>
</dependency>
</dependencies>
<build>
<plugins>
<plugin>
<groupId>org.apache.maven.plugins</groupId>
<artifactId>maven-compiler-plugin</artifactId>
<version>3.8.1</version>
<configuration>
<source>1.8</source>
<target>1.8</target>
<encoding>UTF-8</encoding>
</configuration>
</plugin>
<plugin>
<groupId>org.springframework.boot</groupId>
<artifactId>spring-boot-maven-plugin</artifactId>
</plugin>
</plugins>
</build>
</project>config-Ebene Konfigurieren Sie zwei KlassenDie erste Klasse ShiroConfig
spring:
   datasource:
      username: xxxx
      password: xxxxxxxxxxxx
      url: jdbc:mysql://localhost:3306/mybatis
      driver-class-name: com.mysql.cj.jdbc.Driver
      type: com.alibaba.druid.pool.DruidDataSource
mybatis:
mapper-locations: classpath:mapper/*tat.slowSqlMillis=500UserRealmpackage com.example.demo02.controller;
import lombok.extern.slf4j.Slf4j;
import org.apache.shiro.SecurityUtils;
import org.apache.shiro.authc.IncorrectCredentialsException;
import org.apache.shiro.authc.UnknownAccountException;
import org.apache.shiro.authc.UsernamePasswordToken;
import org.apache.shiro.subject.Subject;
import org.springframework.stereotype.Controller;
import org.springframework.ui.Model;
import org.springframework.web.bind.annotation.RequestMapping;
import org.springframework.web.bind.annotation.RequestParam;
import org.springframework.web.bind.annotation.ResponseBody;
@Controller
@Slf4j
public class MyController {
@RequestMapping("/")
public String toIndex(Model model){
model.addAttribute("msg","hello,shiro");
return "login";
}
@RequestMapping("/user/add")
public String add(){
return "user/add";
}
@RequestMapping("/user/update")
public String update(){
return "user/update";
}
@RequestMapping("/toLogin")
public String toLogin(){
return "login";
}
@RequestMapping("/noauth")
@ResponseBody
public String noAuth(){
return "未经授权不能访问此页面";
}
//登录操作
@RequestMapping("/login")
public String login(String username, String password, @RequestParam(defaultValue = "false")boolean rememberMe,Model model){
//使用shiro,编写认证操作
//1. 获取Subject
Subject subject = SecurityUtils.getSubject();
//2. 封装用户的数据
UsernamePasswordToken token = new UsernamePasswordToken(username, password,rememberMe);
//3. 执行登录的方法,只要没有异常就代表登录成功!
try {
subject.login(token); //登录成功!返回首页
System.out.println("输出认证成功跳转页面");
return "index";
} catch (UnknownAccountException e) { //用户名不存在
model.addAttribute("msg","用户名不存在");
return "login";
} catch (IncorrectCredentialsException e) { //密码错误
model.addAttribute("msg","密码错误");
return "login";
}
}
}Service-Schicht
Zuerst die Klasse UserServiceImpl
package com.example.demo02.pojo;

import lombok.AllArgsConstructor;
import lombok.Data;
import lombok.NoArgsConstructor;
@Data
@AllArgsConstructor
@NoArgsConstructor
public class User {
    private int id;
    private String name;
    private String pwd;
    private String perms;
}
Dann die Schnittstelle UserService
package com.example.demo02.config;

import at.pollux.thymeleaf.shiro.dialect.ShiroDialect;
import org.apache.shiro.authc.credential.HashedCredentialsMatcher;
import org.apache.shiro.spring.web.ShiroFilterFactoryBean;
import org.apache.shiro.web.mgt.DefaultWebSecurityManager;
import org.springframework.beans.factory.annotation.Qualifier;
import org.springframework.context.annotation.Bean;
import org.springframework.context.annotation.Configuration;

import java.util.LinkedHashMap;
import java.util.Map;

//声明为配置类
@Configuration
public class ShiroConfig {
    //创建 ShiroFilterFactoryBean
    @Bean
    public ShiroFilterFactoryBean
    getShiroFilterFactoryBean(@Qualifier("securityManager")DefaultWebSecurityManager securityManager){
        ShiroFilterFactoryBean shiroFilterFactoryBean = new ShiroFilterFactoryBean();
//设置安全管理器
        shiroFilterFactoryBean.setSecurityManager(securityManager);
/*
添加Shiro内置过滤器,常用的有如下过滤器:
anon: 无需认证就可以访问
authc: 必须认证才可以访问
user: 如果使用了记住我功能就可以直接访问
perms: 拥有某个资源权限才可以访问
role: 拥有某个角色权限才可以访问
*
/

 */
        //进行一个拦截
    Map<String,String> filterMap = new LinkedHashMap<String, String>();
//    filterMap.put("/user/add","authc");
//    filterMap.put("/user/update","authc");
        //授权
//        filterMap.put("/user/add","perms[user:add]"); //大家记得注意顺序!

        filterMap.put("/user/add","perms[user:add]");
        filterMap.put("/user/update","perms[user:update]");
        filterMap.put("/user/*","authc");
        shiroFilterFactoryBean.setFilterChainDefinitionMap(filterMap);


    shiroFilterFactoryBean.setLoginUrl("/toLogin");
    //未授权页面
        shiroFilterFactoryBean.setUnauthorizedUrl("/noauth");
        return shiroFilterFactoryBean;
}
    //创建 DefaultWebSecurityManager
    @Bean(name = "securityManager")
    public DefaultWebSecurityManager
    getDefaultWebSecurityManager(@Qualifier("userRealm")UserRealm userRealm){
        DefaultWebSecurityManager securityManager = new DefaultWebSecurityManager();
        //2创建加密对象,设置相关属性
        HashedCredentialsMatcher matcher = new HashedCredentialsMatcher();
        //2.1采用md5加密
        matcher.setHashAlgorithmName("md5");
        //2.2迭代加密次数
        matcher.setHashIterations(3);
        //3将加密对象存储到myRealm中
        userRealm.setCredentialsMatcher(matcher);


//关联Realm
        securityManager.setRealm(userRealm);
        return securityManager;
    }
    //创建 realm 对象
    @Bean
    public UserRealm userRealm(){
        return new UserRealm();
    }

    //配置ShiroDialect:方言,用于 thymeleaf 和 shiro 标签配合使用
    @Bean
    public ShiroDialect getShiroDialect(){
        return new ShiroDialect();
    }
}
Mapper-Schicht Interface Usermapper
package com.example.demo02.config;


import com.example.demo02.pojo.User;
import com.example.demo02.service.UserService;
import org.apache.shiro.SecurityUtils;
import org.apache.shiro.authc.*;
import org.apache.shiro.authz.AuthorizationInfo;
import org.apache.shiro.authz.SimpleAuthorizationInfo;
import org.apache.shiro.realm.AuthorizingRealm;
import org.apache.shiro.subject.PrincipalCollection;
import org.apache.shiro.subject.Subject;
import org.apache.shiro.util.ByteSource;
import org.springframework.beans.factory.annotation.Autowired;

import java.util.List;

//自定义得UserRaelm
public class UserRealm extends AuthorizingRealm {

    @Autowired
    UserService userService;
    //授权
    @Override
    protected AuthorizationInfo doGetAuthorizationInfo(PrincipalCollection principalCollection) {
        System.out.println("执行了=》授权doGetAuthorizationInfo");
        SimpleAuthorizationInfo info=new SimpleAuthorizationInfo();

//        info.addStringPermission("user:update");
        info.addStringPermission("user:add");
        //拿到当前用户登陆对象
        Subject subject= SecurityUtils.getSubject();
        User currentUser= (User) subject.getPrincipal();//拿到User对象
         info.addStringPermission(currentUser.getPerms());//设置当前用户对象

        return info;
    }

    //执行认证逻辑
    @Override
    protected AuthenticationInfo doGetAuthenticationInfo(AuthenticationToken token) throws AuthenticationException {
        System.out.println("执行了=>认证逻辑AuthenticationToken");
//假设数据库的用户名和密码
//        String name = "root";
//        String password = "123456";


//1.判断用户名
        UsernamePasswordToken userToken = (UsernamePasswordToken)token;
       //连接真实的数据库
        User user= userService.queryUserByName(userToken.getUsername());
//
        if(user==null){
            return  null;
        }
        Subject subject = SecurityUtils.getSubject();
        subject.getSession().setAttribute("loginUser",user);


//2. 验证密码,我们可以使用一个AuthenticationInfo实现类SimpleAuthenticationInfo
// shiro会自动帮我们验证!重点是第二个参数就是要验证的密码!
        return new SimpleAuthenticationInfo(user, user.getPwd(),ByteSource.Util.bytes("salt"),"");
//        if(user !=null){
//            AuthenticationInfo info = new SimpleAuthenticationInfo(
//                    token.getPrincipal(),
//                    user.getPwd(),
//                    ByteSource.Util.bytes("salt"),
//                    token.getPrincipal().toString()
//            );
//            return info;
//        }
//        return null;


    }
}
Dann gibt es die statischen und Vorlagen in den Front-End-Ressourcen

Das obige ist der detaillierte Inhalt vonSo verwenden Sie Springboot, um das Shiro-Sicherheitsframework schnell zu integrieren. Für weitere Informationen folgen Sie bitte anderen verwandten Artikeln auf der PHP chinesischen Website!

