Heim >Backend-Entwicklung >Python-Tutorial >Einführung in WSGI, uWSGI und uwsgi in Python
Einführung in WSGI, uWSGI und uwsgi in Python
- WBOYWBOYWBOYWBOYWBOYWBOYWBOYWBOYWBOYWBOYWBOYWBOYWBnach vorne
- 2023-04-12 09:25:091677Durchsuche
1. Übersicht
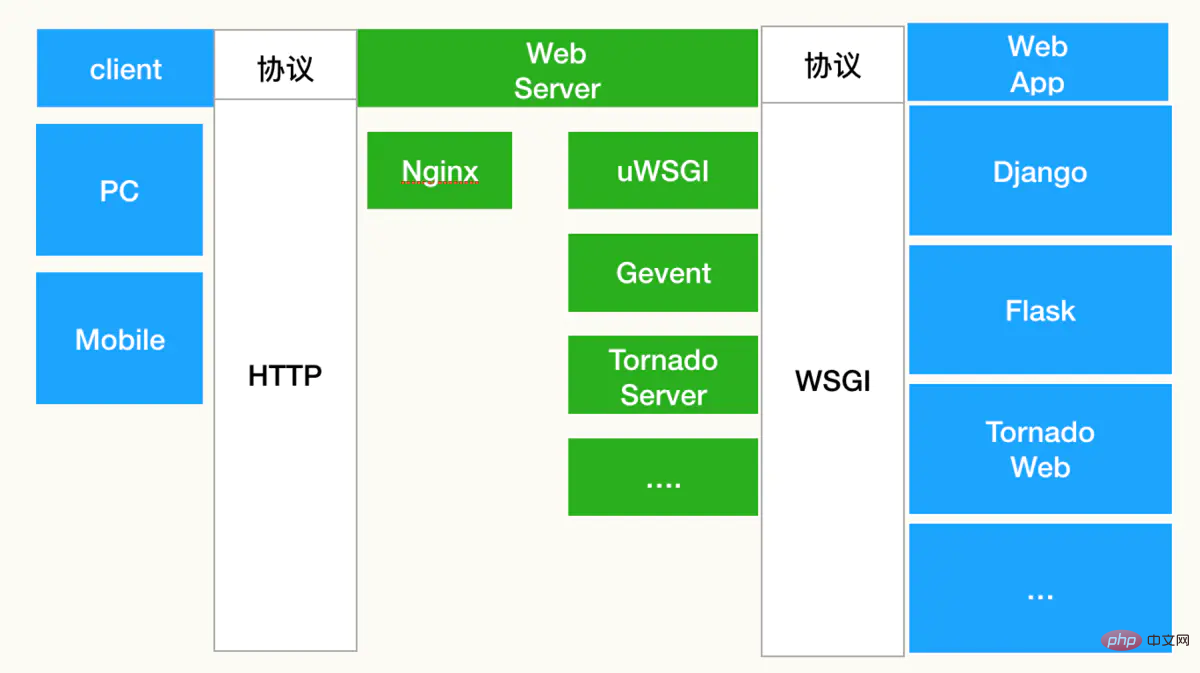
WSGI, uWSGI und uwsgi sind drei verwandte Konzepte. Es handelt sich um unterschiedliche Tools und Protokolle, die bei der Entwicklung von Webanwendungen verwendet werden. Hier ist ihre ausführliche Einführung:
- WSGI (Web Server Gateway Interface) : WSGI ist eine Schnittstellenspezifikation zwischen einer Python-Webanwendung und einem Webserver, die die Beziehung zwischen der Anwendung und dem Server A definiert Standardschnittstelle, die die Ausführung von Anwendungen auf verschiedenen Webservern ermöglicht. Die WSGI-Spezifikation gibt die Schnittstellenmethoden an, die Anwendungen implementieren müssen und die der Server unterstützen muss. Das WSGI-Protokoll ermöglicht die Ausführung verschiedener Python-Web-Frameworks (wie Flask, Django usw.) auf verschiedenen Webservern, bei denen es sich um Apache, Nginx usw. handeln kann.
- uWSGI: uWSGI ist ein Webserver, ein in C-Sprache geschriebener Webanwendungscontainer, der die Ausführung von Python, Ruby, Perl und anderen Programmiersprachen unterstützt. Der uWSGI-Server kann als eigenständiger Anwendungsserver dienen oder mit anderen Webservern (wie Nginx, Apache) verwendet werden, um über das WSGI-Protokoll mit Python-Anwendungen zu kommunizieren.
- uwsgi: uwsgi ist ein Protokoll im Zusammenhang mit dem uWSGI-Server. Das uwsgi-Protokoll ist ein Binärprotokoll, das das Kommunikationsprotokoll zwischen dem uWSGI-Server und Anwendungen definiert. Mithilfe des uwsgi-Protokolls kann ein uWSGI-Server mit Python-Anwendungen kommunizieren, ohne wie bei CGI einen neuen Prozess zur Bearbeitung jeder Anfrage zu starten. Das uwsgi-Protokoll ermöglicht eine bidirektionale Kommunikation zwischen dem uWSGI-Server und Anwendungen und verbessert dadurch die Leistung.
UWSGI ist also ein Webserver, der über das WSGI-Protokoll mit Python-Anwendungen kommunizieren und über das uwsgi-Protokoll kommunizieren kann. WSGI ist eine Schnittstellenspezifikation zwischen Python-Webanwendungen und Webservern, die eine Standardschnittstelle zwischen Anwendungen und Servern definiert. uwsgi ist ein binäres Kommunikationsprotokoll zwischen dem uWSGI-Server und Anwendungen.
2. Installieren Sie das uwsgi-Modul
uWSGI ist eine Webserver-Gateway-Schnittstelle (Web Server Gateway Interface), mit der Python-Webanwendungen in Webserver (wie Nginx oder Apache) integriert werden können.
- Wenn Sie das uWSGI-Modul verwenden, müssen Sie das uwsgi-Modul installieren, das uwsgi-Modul in die Python-Webanwendung importieren und die vom uwsgi-Modul bereitgestellten Funktionen zum Konfigurieren und verwenden Verwalten Sie die Webanwendung des Betriebs. Zu den allgemeinen uwsgi-Modulfunktionen gehören uwsgi.optin(), uwsgi.route(), uwsgi.applications() usw.
- Darüber hinaus bietet das uWSGI-Modul auch einige erweiterte Funktionen wie Master/Worker-Modus, Prozessverwaltung, Lastausgleich, automatische Erweiterung usw., sodass sich Webanwendungen besser an Situationen mit hoher Parallelität und großem Datenverkehr anpassen können.
1) Pip-Quelle konfigurieren
Inländische Quelladresse:
- pypi Tsinghua University Quelle: https://pypi.tuna.tsinghua.edu.cn/simple
- pypi Tencent Quelle: http ://mirrors.cloud.tencent.com/pypi/simple
- pypi Ali-Quelle: https://mirrors.aliyun.com/pypi/simple/
mkdir~/.pip/
cat >~/.pip/pip.conf<<EOF
[global]
index-url = https://repo.huaweicloud.com/repository/pypi/simple
trusted-host = repo.huaweicloud.com
timeout = 120
EOF
2) Installieren Sie das uwsgi-Modul
# 安装python3
yum -y install python3

yum -y install gcc-c++ -y
yum -y install python3-devel -y

# 安装 uwsgi flask 模块
pip3 install uwsgi flask

# 查看版本
uwsgi --version

3. Beispieldemonstration (uWSGI + Nginx-Konfiguration)
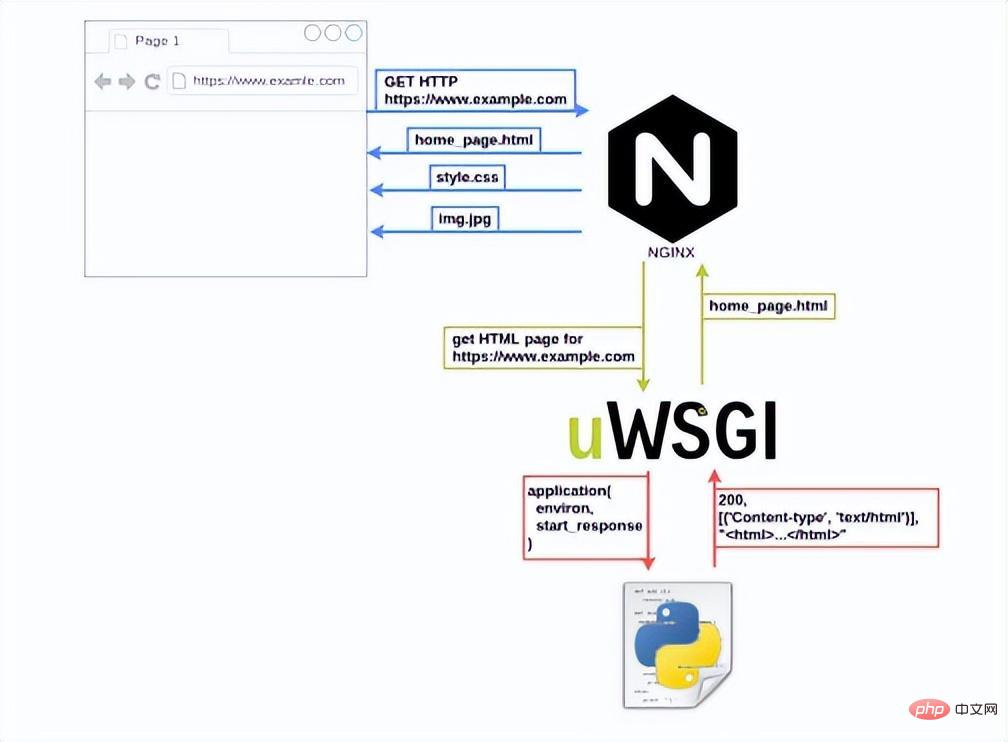
1) Nginx installieren
yum update -y
yum install epel-release
yum -y install nginx
2) App.py-Datei erstellen
Erstellen Sie eine Datei mit dem Namen app.py und fügen Sie Folgendes hinzu Code:
from flask import Flask
app = Flask(__name__)

@app.route('/')
def hello():
return 'Hello, World!'

if __name__ == '__main__':
app.run()
3) Erstellen Sie eine uWSGI-Konfigurationsdatei
Erstellen Sie eine uWSGI-Konfigurationsdatei, z. B. uwsgi.ini, die die folgenden Informationen enthält:
[uwsgi]
module = app:app
# 相当于命令下面两行
#wsgi-file = app.py # 项目入口文件
#callable = app #flask应用对象
# 支持http+socket两种方式,这里选用socket,也可以选择http-socket,下面会讲解这三种区别
# http = 127.0.0.1:8000
socket = 0.0.0.0:8000
# 也可以使用socket文件,在nginx配置文件中配置也对应,仅限本机通信,一般也很少使用
# socket = /app/myapp.sock

# 注意记得提前创建目录
chdir = /opt/myapp
pidfile=/opt/myapp/myapp.pid
processes = 4
threads = 2
master = true
vacuum = true
py-autoreload = 1
daemonize = /tmp/uwsgi.log
uwsgi.ini Detaillierte Erläuterung der allgemeinen Konfiguration Parameter:
- chdir=/xxx/xxx # 指定项目目录, 这里写上程序根目录(即app.py文件所在目录)对应上述目录结构为src
- home=/xxx/xxx # 指定虚拟环境变量
- wsgi-file=xxx # 指定加载WSGI文件
- socket=xxx # 指定uwsgi的客户端将要连接的socket的路径(使用UNIX socket的情况)或者地址(使用网络地址的情况)。#socket协议,用于和nginx通讯,端口可配置成别的端口;如果有nginx在uwsgi之前作为代理的话应该配socket 如:socket=0.0.0.0:5000。当然也可以使用http-socket #而如果客户端请求不经过(不搭建)Nginx代理服务器,服务请求直接到uwsgi服务器的话那么就配http。如:http=0.0.0.0:5000;IP和端口与项目启动文件app.py中一致; 127.0.0.1虽然是表示本地IP,但想要在网络上访问必须设置host=0.0.0.0才不受IP限制。
- callable=app # 这个 app 指的是 flask 项目启动程序中定义的 flask name 的名字,我的启动程序是 app.py , 里面定义的 flask 的名字是 app 。
- module = mysite.wsgi # 加载一个WSGI模块,这里加载mysite/wsgi.py这个模块
- `master=true # 指定启动主进程
- `processes=4 # 设置工作进程的数量
- threads=2 # 设置每个工作进程的线程数
- vacuum=true # 当服务器退出时自动删除unix socket文件和pid文件
- logfile-chmod=644 # 指定日志文件的权限
- daemonize=%(chdir)/xxx.log # 进程在后台运行,并将日志打印到指定文件
- pidfile=%(chdir)/xxx.pid # 在失去权限前,将主进程pid写到指定的文件
- uid=xxx # uWSGI服务器运行时的用户id
- gid=xxx # uWSGI服务器运行时的用户组id
- procname-prefix-spaced=xxx # 指定工作进程名称的前缀
- chdir=/xxx/xxx # 指定项目目录, 这里写上程序根目录(即app.py文件所在目录)对应上述目录结构为/opt/uwsgi/
- listen = 120 # 设置socket的监听队列大小(默认:100)
4)启动 uWSGI
在命令行中启动 uWSGI:
uwsgi --ini uwsgi.ini
###或者
uwsgi uwsgi.ini

### 重启
uwsgi --reload /opt/myapp/myapp.pid
###关闭
uwsgi --stop /opt/myapp/myapp.pid
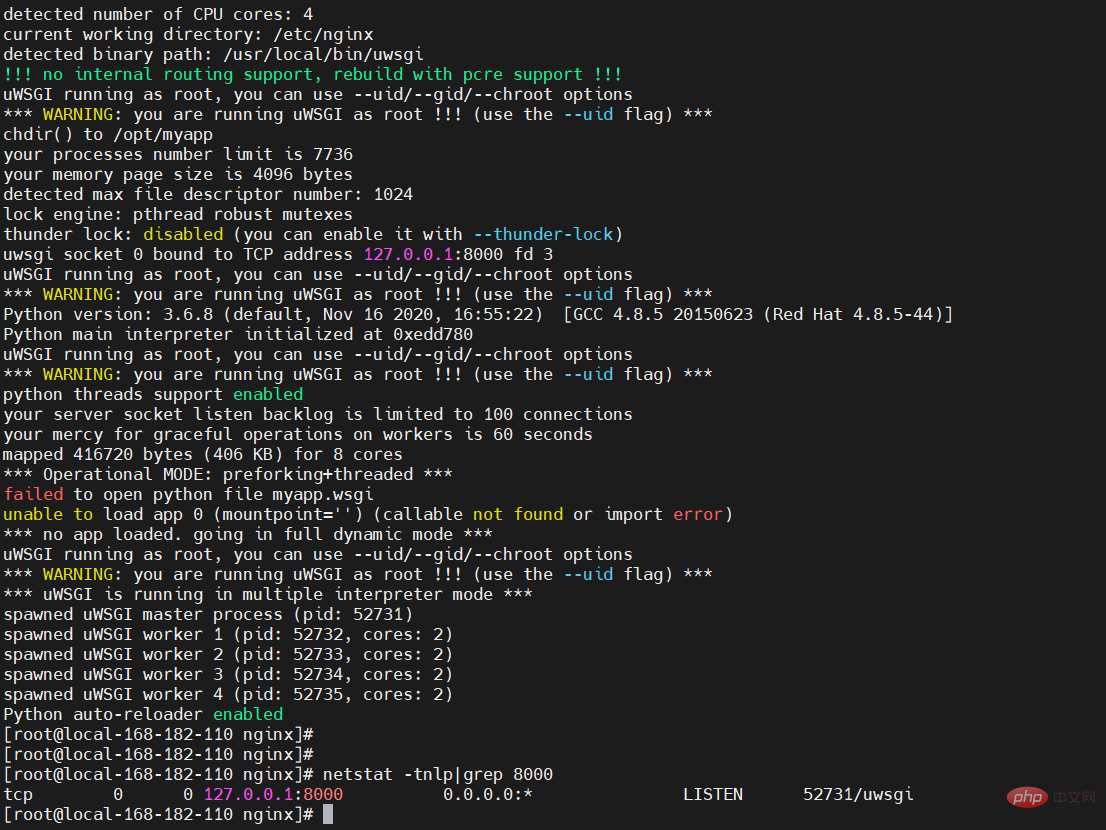
【温馨提示】其实也可以通过一条命令带上对应的参数即可启动,但是不推荐,测试可以。一般使用配置文件的方式启动服务。
使用http协议启动uwsgi的命令为:
uwsgi --http :8000 --ini uwsgi_conf.ini -d ./uwsgi.log --pidfile=uwsgi.pid
- --http 指定用5800端口启动http协议
- --ini 指定上述的启动配置文件
- -d 指定uwsgi的log,方便我们调试
- --pidfile 将启动的进程号写到uwsgi.pid文件中,方便我们在需要停止服务器时kill掉。
5)配置 Web 服务器
将 Web 服务器配置为反向代理 uWSGI,例如,在 Nginx 中,可以使用以下配置文件:
# vi /etc/nginx/conf.d/myapp.conf
server {
listen 8080;
server_name myapp.com;
location / {
 include uwsgi_params;
 uwsgi_pass 127.0.0.1:8000;
}
}其中,uwsgi_params 文件包含以下内容:
uwsgi_paramQUERY_STRING $query_string;
uwsgi_paramREQUEST_METHOD $request_method;
uwsgi_paramCONTENT_TYPE $content_type;
uwsgi_paramCONTENT_LENGTH $content_length;

uwsgi_paramREQUEST_URI$request_uri;
uwsgi_paramPATH_INFO$document_uri;
uwsgi_paramDOCUMENT_ROOT$document_root;
uwsgi_paramSERVER_PROTOCOL$server_protocol;
uwsgi_paramREQUEST_SCHEME $scheme;
uwsgi_paramHTTPS$https if_not_empty;

uwsgi_paramREMOTE_ADDR$remote_addr;
uwsgi_paramREMOTE_PORT$remote_port;
uwsgi_paramSERVER_PORT$server_port;
uwsgi_paramSERVER_NAME$server_name;
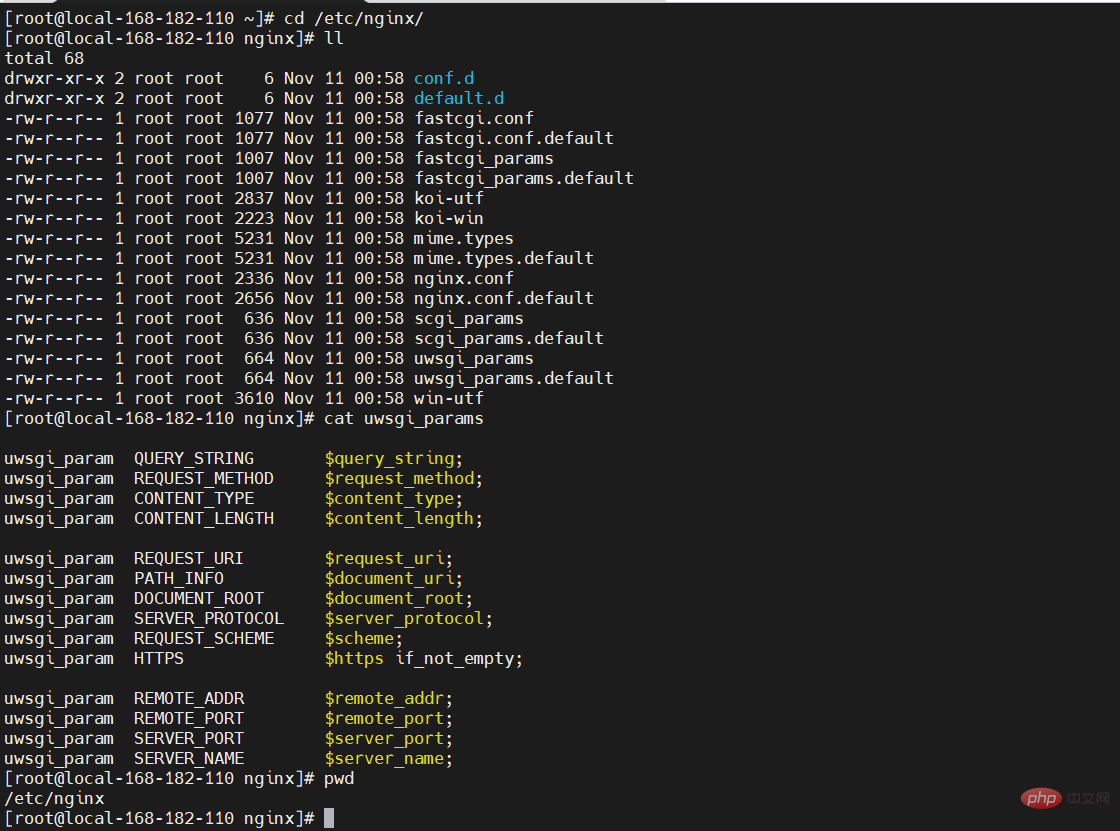
【特别注意】uwsgi_params 在nginx conf文件夹下自带,uwsgi_pass一定要跟uwsgi_conf.ini中写的地址完全一致。
6)重启 Web 服务器
重启 Web 服务器以使配置生效。
# 重启
systemctl restart nginx

# 如果是之前nginx服务已经存在,只是修改了配置,可建议使用reload加载
nginx -t && nginx -s reload
# 或者
systemctl reload nginx
访问(浏览器访问,curl访问也行)

7)Nginx upstream 负载均衡
Nginx上游(upstream)是指一组后端服务器,Nginx可以与其通信并将客户端请求转发到这些服务器。换句话说,上游服务器是Nginx代理请求的后端服务器。
Nginx的upstream支持5种 分配方式,其中 轮询(默认)、权重、IP散列这三种为Nginx原生支持的分配方式,fair 和 url_hash 为第三方支持的分配方式。
1、轮询(默认)
轮询是upstream的默认分配方式,即每个请求按照时间顺序轮流分配到不同的后端服务器,如果某个后端服务器 down 掉后,能自动剔除。
upstream backend {
server 192.168.182.110:8000;
server 192.168.182.111:8000;
}
2、权重(weight)
轮询的加强版,既可以指定轮询比率,weight 和访问几率成正比,主要应用于后端服务器异质的场景下。
upstream backend {
server 192.168.182.110:8000 weight=1;
server 192.168.182.111:8000 weight=2;
}
3、IP散列(ip_hash)
每个请求按照访问 Ip(即Nginx的前置服务器或客户端IP)的 hash结果分配,这样每个访客会固定访问一个后端服务器,可以解决 session 一致问题。
upstream backend {
ip_hash;
server 192.168.182.110:8000 weight=1;
server 192.168.182.111:8000 weight=2;
}
先在另外一个节点上再起一个uWSGI服务,将上面示例配置修改:
# vi /etc/nginx/conf.d/myapp.conf
upstream backend {
server 192.168.182.110:8000;
server 192.168.182.111:8000;
}

server {
listen 8080;
server_name myapp.com;
location / {
 include uwsgi_params;
 uwsgi_pass backend;
}
}
192.168.182.110 节点 app.py
from flask import Flask
app = Flask(__name__)

@app.route('/')
def hello():
return 'Hello, World 192.168.182.110!n'

if __name__ == '__main__':
app.run()
192.168.182.111 节点 app.py
from flask import Flask
app = Flask(__name__)

@app.route('/')
def hello():
return 'Hello, World 192.168.182.111!n'

if __name__ == '__main__':
app.run()
验证
curl127.0.0.1:8080
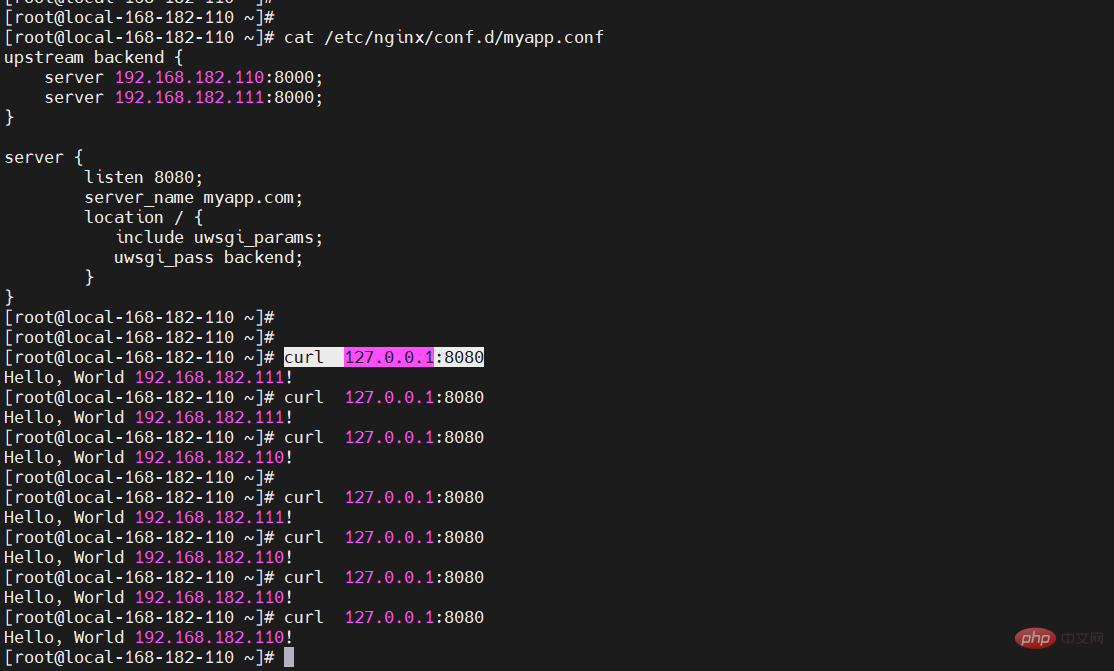
从上图可知,请求轮询调度,这才是企业一般想要的效果,负载均衡。
8)http、http-socket 和 socket 区别
- http和http-socket的区别在于,如果我们想直接将uwsgi用作服务器(例如Apache和nginx那样)直接暴露在公网那么就使用http;
- 如果有单独的服务器(例如Apache或者nginx),由服务器将请求转发给uwsgi处理,并且使用http协议,那么此时使用http-socket。
- http: 自己会产生一个http进程(可以认为与nginx同一层)负责路由http请求给worker, http进程和worker之间使用的是uwsgi协议。
- http-socket: 不会产生http进程, 一般用于在前端webserver不支持uwsgi而仅支持http时使用, 他产生的worker使用的是http协议。
- 因此, http 一般是作为独立部署的选项; http-socket 在前端webserver不支持uwsgi时使用, 如果前端webserver支持uwsgi, 则直接使用socket即可(tcp or unix)。
【1】socket 示例(uwsgi.ini):
[uwsgi]
module = app:app
#socket = 127.0.0.1:8000
socket = 0.0.0.0:8000

chdir = /opt/myapp
pidfile=/opt/myapp/myapp.pid
processes = 4
threads = 2
master = true
vacuum = true
py-autoreload = 1
daemonize = /tmp/uwsgi.log
nginx配置
upstream backend {
server 192.168.182.110:8000;
server 192.168.182.111:8000;
}

server {
listen 8080;
server_name myapp.com;
location / {
 include uwsgi_params;
 uwsgi_pass backend;
}
}【2】http 示例(uwsgi.ini):
[uwsgi]
module = app:app
socket = 0.0.0.0:8000

chdir = /opt/myapp
pidfile=/opt/myapp/myapp.pid
processes = 4
threads = 2
master = true
vacuum = true
py-autoreload = 1
daemonize = /tmp/uwsgi.log
nginx配置
upstream backend {
server 192.168.182.110:8000;
server 192.168.182.111:8000;
}

server {
listen 8080;
server_name myapp.com;
location / {
 include uwsgi_params;
 proxy_pass http://backend;
}
}【3】http-socket 示例(uwsgi.ini):
[uwsgi]
module = app:app
http = 0.0.0.0:8000

chdir = /opt/myapp
pidfile=/opt/myapp/myapp.pid
processes = 4
threads = 2
master = true
vacuum = true
py-autoreload = 1
daemonize = /tmp/uwsgi.log
nginx配置
upstream backend {
server 192.168.182.110:8000;
server 192.168.182.111:8000;
}

server {
listen 8080;
server_name myapp.com;
location / {
 include uwsgi_params;
 proxy_pass http://backend;
}
}
9)TCP 与 uinx 区别
TCP和Unix套接字(Unix domain socket)是两种不同类型的套接字。
- TCP套接字是基于TCP/IP协议的网络套接字,用于在网络上进行进程间通信。TCP套接字需要指定IP地址和端口号,以便其他进程可以连接到该套接字进行通信。TCP套接字是一种跨网络边界的套接字,可以在不同的计算机之间进行通信。TCP套接字常用于客户端/服务器架构中,如Web服务器、数据库服务器等。
- Unix套接字是基于Unix域套接字(Unix domain socket)的本地套接字,用于在同一台计算机上进行进程间通信。Unix套接字只需要指定一个文件路径,而不需要使用IP地址和端口号。Unix套接字是一种进程间通信(IPC)机制,它提供了高效、可靠和安全的进程间通信方式。Unix套接字通常用于本地服务器和本地客户端之间的通信,例如X Window系统中的客户端和服务器。
因此,TCP套接字用于在网络上进行通信,而Unix套接字用于在同一台计算机上进行通信。虽然TCP套接字可以通过网络连接到不同的计算机,但是Unix套接字提供了更高效的进程间通信机制,并且更适合于需要在同一台计算机上运行的进程间通信。
【TCP 示例】常用uwsgi.ini:
[uwsgi]
module = app:app
socket = 127.0.0.1:8000

chdir = /opt/myapp
pidfile=/opt/myapp/myapp.pid
processes = 4
threads = 2
master = true
vacuum = true
py-autoreload = 1
daemonize = /tmp/uwsgi.log
【unix 示例】仅限于本机通信,很少使用。uwsgi.ini:
[uwsgi]
module = app:app
socket = /opt/myapp/myapp.socket

chdir = /opt/myapp
pidfile=/opt/myapp/myapp.pid
processes = 4
threads = 2
master = true
vacuum = true
py-autoreload = 1
daemonize = /tmp/uwsgi.log
nginx配置
server {
listen 8080;
server_name myapp.com;
location / {
 include uwsgi_params;
 proxy_pass unix:///opt/myapp/myapp.sock;
}
}
Python 中 web开发中的 WSGI、uWSGI 和 uwsgi 三者介绍就先到这里了
Das obige ist der detaillierte Inhalt vonEinführung in WSGI, uWSGI und uwsgi in Python. Für weitere Informationen folgen Sie bitte anderen verwandten Artikeln auf der PHP chinesischen Website!

