Heim >WeChat-Applet >Mini-Programmentwicklung >Wie entwickle ich kleine Programme mit Taro + Vue3? (üben)
Wie entwickle ich kleine Programme mit Taro + Vue3? (üben)
- 青灯夜游nach vorne
- 2022-01-13 10:28:217119Durchsuche
Wie verwende ich Taro3 + Vue3, um kleine Programme zu entwickeln? Der folgende Artikel stellt Ihnen vor, wie Sie Taro3 + Vue3 zur Entwicklung des WeChat-Applets verwenden. Ich hoffe, er wird Ihnen hilfreich sein!

Das WeChat-Applet ist eine Anwendung, die WeChat als Betriebsumgebung verwendet. Ihr Kern ist die Anwendung der Hybrid-Technologie. Sie ist eine mobile Anwendung im gemischten Modus H5code> ist ähnlich, verfügt aber über viel mehr native Funktionen als H5, wie z. B. das Aufrufen von Standortinformationen und Kameras. Hybrid 技术的应用,Hybrid App 即混合模式移动应用,因此与 H5 类似,但又比 H5 拥有很多原生的能力,例如调用位置信息和摄像头等。
小程序的开发方式与 H5 十分相似,用的也是 JavaScript、HTML、CSS 语言。
因此,小程序开发可以说是一名前端工程师必须要掌握的技能。
原生小程序开发有一定的学习成本,现如今市面上有很多开发小程序的第三方多端框架,如果不是追求极致性能和稳定,还是不要用原生小程序开发了,开发效率太低。
第三方多端框架中,taro 和 uni-app 的使用度是最广的,一般来说,做技术选型时,团队用 react,就用 taro,团队用 vue,就用 uni-app,两者之间没有什么优劣之分,都挺好用的。
但很多开发者可能不知道,taro3.0 以上版本是支持使用 vue 的,本篇文章就来介绍一下如何使用 Taro3 + Vue3 开发微信小程序。
我根据网上的资料完成了本项目的搭建之后,用本项目开发过一个小程序,那种开发体验真的是超越了我以往开发过的所有项目,非常丝滑(可能是我第一次写 vue3 的 script setup 吧,用起来确实很舒服)。
可直接访问本项目 github 地址 clone 使用。
目标功能
- 集成 vue3,使用
script setup语法开发 - 集成
TypescriptDie Entwicklungsmethode kleiner Programme ist H5 sehr ähnlich und sie verwenden auch die Sprachen - Daher kann man sagen, dass die Entwicklung kleiner Programme eine Fähigkeit ist, die ein Front-End-Ingenieur beherrschen muss.
- Die Entwicklung nativer Miniprogramme ist mit einem gewissen Lernaufwand verbunden. Heutzutage gibt es viele Multi-Terminal-Frameworks von Drittanbietern für die Entwicklung von Miniprogrammen. Wenn Sie nicht die ultimative Leistung und Stabilität anstreben, ist es besser, nicht zu entwickeln Native Miniprogramme. Die Entwicklungseffizienz ist zu gering.
- Unter den Multi-Terminal-Frameworks von Drittanbietern werden
tarounduni-appam häufigsten verwendet. Bei der Technologieauswahl verwenden Teams im AllgemeinenFür Reactverwende ich Taro, für das Team verwende ichvueund ich verwende uni-app. Es gibt keinen Unterschied zwischen den beiden, sie sind beide sehr einfach zu verwenden. - Aber viele Entwickler wissen möglicherweise nicht, dass Taro3.0 oder höher die Verwendung von Vue unterstützt. In diesem Artikel wird erläutert, wie Sie Taro3 + Vue3 zum Entwickeln von WeChat-Applets verwenden.
- Nachdem ich die Konstruktion dieses Projekts auf der Grundlage der Informationen im Internet abgeschlossen hatte, entwickelte ich mit diesem Projekt ein kleines Programm. Die Entwicklungserfahrung übertraf wirklich alle Projekte, die ich in der Vergangenheit entwickelt hatte. Es ist sehr reibungslos (vielleicht mein erstes). Schreiben wir zum ersten Mal das Skript-Setup von vue3, es ist wirklich bequem zu verwenden.
JavaScript, HTML und CSS. Sie können direkt auf dieses Projekt zugreifen Github-Adresse
Verwendung von Klonen.- Vue3 integrieren,
script setupSyntaxentwicklung verwenden -
Typescriptintegrieren - Codeprüfung und Formatierung Optimierte
- Globale Statusverwaltung
Zielfunktion
Stilkapselung, kompatibel mit Notch-Screen und anderen Stilproblemenhttp-MethodenkapselungHaupttechnologie-Stack
Taro3TypeScript PiniaAls vue3 zum ersten Mal veröffentlicht wurde, wurde meine Begeisterung für das Erlernen von vue3 aufgrund des Mangels an geeigneter UI-Framework-Unterstützung direkt entmutigt. Bisher haben hervorragende Frameworks wie
Quasar,
Element-Plus🎜, 🎜Ant-Design-Vue🎜 und andere hervorragende Frameworks Vue3 sukzessive unterstützt, und viele Vue3-Projekte wurden in Produktionsumgebungen verwendet, nur um festzustellen, dass dies bei allen der Fall ist Ich benutze wirklich vue3. 🎜🎜Zum Beispiel hat das Projektteam nebenan bei unserem Unternehmen vue3 für das Refactoring-Projekt verwendet, als mir klar wurde, dass ich etwas spät dran war, vue3 zu lernen (Tipps: Das Frontend ist wirklich zu kompliziert) 🎜🎜🎜NutUI🎜 ist eine mobile Komponentenbibliothek im JD-Stil, die die Verwendung der Vue-Sprache zum Schreiben von Anwendungen unterstützt, die auf H5- und Mini-Programmplattformen verwendet werden können, und Entwicklern dabei hilft, die Entwicklungseffizienz und das Entwicklungserlebnis zu verbessern. 🎜🎜Ich habe NutUI aus der 🎜Taro-Dokumentation kennengelernt. Taro empfiehlt offiziell die Verwendung von NutUI für die Entwicklung. Sie scheinen alle vom selben Entwicklungsteam auf JD.com zu stammen, mit der Einstellung, es auszuprobieren Die Erfahrung ist nicht schlecht. 🎜🎜🎜Pinia🎜 ist eine Zustandsverwaltungsbibliothek für Vue, ähnlich wie Vuex, eine weitere Zustandsverwaltungslösung für Vue, die Vue2 und Vue3 unterstützt. 🎜🎜Das erste Mal, dass ich mit einem Front-End-Statusmanagement-Tool in Kontakt kam, war ein Back-End-Managementsystem des Unternehmens. Es war eine Tortur und hätte mich fast dazu gebracht, aufzuhören. Ich habe mich nach und nach damit vertraut gemacht, aber egal, ob ich Redux oder Vuex verwende, das Schreiben fällt mir immer noch schwer. 🎜这次尝试使用 Pinia,用起来确实很舒服,符合直觉,易于学习 ,有点类似于 recoil,但没有 recoil 那么多的概念和 API,主体非常精简,极易上手。Pinia 快速入门
vscode 需安装插件
- Eslint
- Prettier
- Volar
与vetur相同,volar是一个针对 vue 的 vscode 插件,不过与 vetur 不同的是,volar 提供了更为强大的功能。
搭建项目架构
初始化项目
初始化项目之前,需安装 taro,请参考 Taro 文档,完成 taro 安装
使用命令创建模板项目:
taro init myApp

安装 cli 用来执行构建等操作,之后启动项目,会生成一个 dist 目录
yarn add @tarojs/cli
yarn dev:weapp
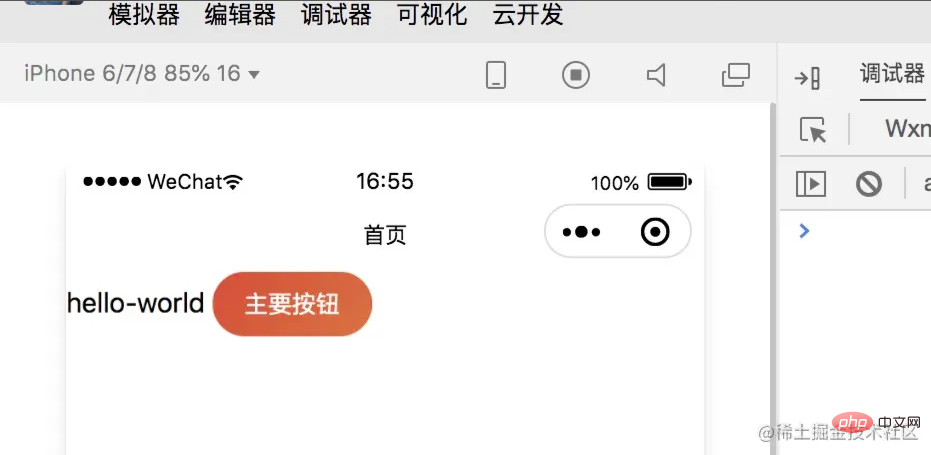
打开微信开发工具 工程目录需要指向构建出来的 dist 文件


Hello world 出现,项目成功跑起来了!
设置代码规范
- 代码规范 ESlint
- 代码格式化 Prettier
- 提交前检查 husky
个人认为,eslint + prettier 足以应付大部分前端代码规范问题了,且配置起来很简单,有特殊需求也可继续配置。
安装依赖
yarn add @vue/eslint-config-prettier @vue/eslint-config-typescript eslint-plugin-prettier vue-tsc husky -D
设置代码规范和格式化规则
.eslintrc.js
module.exports = {
  root: true,

  env: {
    node: true,
    'vue/setup-compiler-macros': true
  },

  extends: ['plugin:vue/vue3-essential', 'eslint:recommended', '@vue/prettier', '@vue/typescript'],

  parserOptions: {
    parser: '@typescript-eslint/parser'
  },

  rules: {
    'prettier/prettier': [
      'error',
      {
        singleQuote: true,
        semi: false,
        trailingComma: 'none',
        arrowParens: 'avoid',
        printWidth: 100
      }
    ],
    'no-console': process.env.NODE_ENV === 'production' ? 'warn' : 'off',
    'no-debugger': process.env.NODE_ENV === 'production' ? 'warn' : 'off'
  }
}
.prettierrc
{
  "tabWidth": 2,
  "singleQuote": true,
  "semi": false,
  "trailingComma": "none",
  "arrowParens": "avoid",
  "endOfLine": "auto",
  "printWidth": 100
}
在 package.json 中 script 添加 Ts 检查命令和 Eslint 检查命令
"scripts":{
  "tsc": "vue-tsc --noEmit --skipLibCheck",
  "lint": "eslint --ext .vue --ext .js --ext .ts src/"
}
添加 husky 触发 Git 钩子,代码提交前检查
npx husky install
编辑 pre-commit 执行 Eslint 检查和 Ts 检查
#!/bin/sh
. "$(dirname "$0")/_/husky.sh"

echo "---eslint start---"
npm run lint
echo "---eslint end---"

echo "---ts lint start---"
npm run tsc
echo "---ts lint end---"
至此,项目的代码规范和格式规范配置完毕,多人协作也不是问题了。
引入 NutUI
yarn add @nutui/nutui-taro
在 .babelrc 或 babel.config.js 中添加配置:
module.exports = {
  // ...
  plugins: [
    [
      'import',
      {
        libraryName: '@nutui/nutui',
        libraryDirectory: 'dist/packages/_es',
        camel2DashComponentName: false
      },
      'nutui3-vue'
    ],
    [
      'import',
      {
        libraryName: '@nutui/nutui-taro',
        libraryDirectory: 'dist/packages/_es',
        camel2DashComponentName: false
      },
      'nutui3-taro'
    ]
  ]
}
按需引入,安装插件 babel-plugin-import
yarn add babel-plugin-import -D
样式处理 因为 nutui 的设计稿是 375 的 所以将框架的设计尺寸调整为 375
项目配置文件 config/index.js 中配置:
designWidth: 375
app.ts
import { createApp } from 'vue'
import { Button } from '@nutui/nutui-taro'

const app = createApp()

app.use(Button)
index.vue 中,nut-button 组件直接在 template 中写,不用再引入
<template>
  <view class="index">
    <text>{{ msg }}</text>
    <nut-button type="primary">主要按钮</nut-button>
  </view>
</template>
说实话,配置起来还是有点麻烦,不过按照官网文档说明来配也没有踩坑,还行。
小程序分包配置
小程序主包超过 2M,就无法真机预览了,为了提前做好准备在一开始就进行分包处理。比如下面这个小程序的配置,分了四个包。
app.config.ts
pages: ['pages/create/index', 'pages/find/index', 'pages/my/index'],
subpackages: [
{
  root: 'pages/featureA',
  pages: ['index/index']
},
{
  root: 'pagesSub/search',
  pages: ['index']
},
{
  root: 'pagesSub/my',
  pages: ['detail/index', 'about/index']
},
{
  root: 'pagesSub/book',
  pages: ['detail/index', 'person/list/index', 'person/detail/index']
}
],
可以在小程序开发工具编辑器里的代码依赖分析,查看主包和分包的大小
使用 script setup 语法封装小程序页面生命周期方法
hooks/life.ts
import { getCurrentInstance } from '@tarojs/taro'
import { onMounted } from 'vue'

const Current = getCurrentInstance()

export function useDidShow(callback) {
    onMounted(callback) Current?.page?.onShow && (Current.page.onShow = callback)
}
export function usePullDownRefresh(callback) {
    Current?.page?.onPullDownRefresh && (Current.page.onPullDownRefresh = callback)
}
使用
import { useDidShow } from '@/hooks/life'

useDidShow(() => {
  // console.log('onShow')
})
安装 Pinia 进行状态管理
yarn add pinia
yarn add taro-plugin-pinia
项目配置文件 config/index.js 中配置:
plugins: ['taro-plugin-pinia']
以管理用户信息和用户登录状态为例,实现一个用户登录功能
需要处理的文件代码如下:
stores/auth.ts
import { defineStore } from 'pinia'

interface UserInfoProp {
  nickName: string
  avatarUrl: string
}

const useAuth = defineStore({
  id: 'authInfo',
  state: () => ({
    userInfo: {
      nickName: '',
      avatarUrl: ''
    },
    isLogin: false
  }),
  actions: {
    login() {
      this.isLogin = true
    },
    logout() {
      this.isLogin = false
    },
    setUserInfo(userInfo: UserInfoProp) {
      this.userInfo = userInfo
    }
  }
})
export { useAuth }
stores/index.ts
import { createPinia } from 'pinia'
import { useAuth } from './auth'

export const store = createPinia()

const storeObj = {
  auth: useAuth
}

// 封装成useStore的形式,这样一看引用就知道是store的数据
export function useStore(key: string) {
  return storeObj[key]()
}
个人中心 index.vue
<template>
<main v-if="isLogin">
<user-info />
</main>
<main v-else>
<nut-button type="primary" @click="handleLogin">微信一键登录</nut-button>
</main>
</template>
<script setup>
import Taro from '@tarojs/taro'
import { computed } from 'vue'
import { useStore } from '@/stores'
import UserInfo from './userInfo.vue'
const auth = useStore('auth')
const isLogin = computed(() => auth.isLogin)
const handleLogin = () => {
setTimeout(() => {
// 模拟后端请求得到token和userInfo
Taro.setStorageSync('token', 'xxxx')
auth.setUserInfo({
nickName: '林',
avatarUrl:
'https://img12.360buyimg.com/imagetools/jfs/t1/143702/31/16654/116794/5fc6f541Edebf8a57/4138097748889987.png'
})
auth.login()
}, 500)
}
</script>
</script>userInfo 组件
<template>
<article>
<nut-avatar size="large" :icon="userInfo.avatarUrl"></nut-avatar>
<span class="ellipsis name">{{ userInfo.nickName }}</span>
</article>
</template>
<script setup>
import Taro from '@tarojs/taro'
import { computed } from 'vue'
import { useStore } from '@/stores'
const auth = useStore('auth')
const userInfo = computed(() => auth.userInfo)
</script>总的来说, pinia 写起来是非常简洁的,这种类 react hooks 的写法,我是非常喜欢的
请求方法封装
http.ts
// 封装axios的请求,返回重新封装的数据格式
// 对错误的统一处理
import { HttpResponse } from '@/common/interface'
import Taro from '@tarojs/taro'
import publicConfig from '@/config/index'
import axios, {
AxiosInstance,
AxiosRequestConfig,
AxiosResponse,
Canceler
} from 'axios-miniprogram'
import errorHandle from '../common/errorHandle'
const CancelToken = axios.CancelToken
class HttpRequest {
private baseUrl: string
private pending: Record<string, Canceler>
constructor(baseUrl: string) {
this.baseUrl = baseUrl
this.pending = {}
}
// 获取axios配置
getInsideConfig() {
const config = {
baseURL: this.baseUrl,
headers: {
'Content-Type': 'application/json;charset=utf-8'
},
timeout: 10000
}
return config
}
removePending(key: string, isRequest = false) {
if (this.pending[key] && isRequest) {
this.pending[key]('取消重复请求')
}
delete this.pending[key]
}
// 设定拦截器
interceptors(instance: AxiosInstance) {
instance.interceptors.request.use(
config => {
console.log('config :>> ', config)
let isPublic = false
publicConfig.publicPath.map(path => {
isPublic = isPublic || path.test(config.url || '')
})
const token = Taro.getStorageSync('token')
if (!isPublic && token) {
config.headers.Authorization = 'Bearer ' + token
}
const key = config.url + '&' + config.method
this.removePending(key, true)
config.cancelToken = new CancelToken(c => {
this.pending[key] = c
})
return config
},
err => {
errorHandle(err)
return Promise.reject(err)
}
)
// 响应请求的拦截器
instance.interceptors.response.use(
res => {
const key = res.config.url + '&' + res.config.method
this.removePending(key)
if (res.status === 200) {
return Promise.resolve(res.data)
} else {
return Promise.reject(res)
}
},
err => {
errorHandle(err)
return Promise.reject(err)
}
)
}
// 创建实例
request(options: AxiosRequestConfig) {
const instance = axios.create()
const newOptions = Object.assign(this.getInsideConfig(), options)
this.interceptors(instance)
return instance(newOptions)
}
get(url: string, config?: AxiosRequestConfig): Promise<AxiosResponse> | Promise<HttpResponse> {
const options = Object.assign(
{
method: 'get',
url: url
},
config
)
return this.request(options)
}
post(url: string, data?: unknown): Promise<AxiosResponse> | Promise<HttpResponse> {
return this.request({
method: 'post',
url: url,
data: data
})
}
}
export default HttpRequestrequest.ts
import HttpRequest from './http'
import config from '@/config/index'
const baseUrl = process.env.NODE_ENV === 'development' ? config.baseUrl.dev : config.baseUrl.pro

const request = new HttpRequest(baseUrl)

export default request
以获取图书列表和图书详情为例
apis/book.ts
import request from '../request'

export function getBookList() {
  return request.get('books/getBookList')
}

export function getBookDetail(id: number) {
  return request.post('books/getBookDetail', {
    id
  })
}
请求方法封装还是用到了 axios,只是用的是 axios-miniprogram ,写法和 web 端基本一致,http.js 文件引用的一些模块太多,本文没有列出来,可以直接访问本项目 github 地址查看。
样式封装
iPhoneX 底部横线适配
assets/styles/common.scss
.safe-area-bottom {
  padding-bottom: constant(safe-area-inset-bottom);
  padding-bottom: env(safe-area-inset-bottom);
}
刘海儿屏适配
assets/styles/hairline.scss
@mixin hairline-common() {
  position: absolute;
  box-sizing: border-box;
  content: ' ';
  pointer-events: none;
}

@mixin hairline() {
  @include hairline-common();
  top: -50%;
  right: -50%;
  bottom: -50%;
  left: -50%;
  border: 0 solid #eaeaea;
  transform: scale(0.5);
}

@mixin hairline-top($color, $left: 0, $right: 0) {
  @include hairline-common();
  top: 0;
  right: $right;
  left: $left;
  border-top: 1px solid $color;
  transform: scaleY(0.5);
}

@mixin hairline-bottom($color, $left: 0, $right: 0) {
  @include hairline-common();
  right: $right;
  bottom: 0;
  left: $left;
  border-bottom: 1px solid $color;
  transform: scaleY(0.5);
}

[class*='van-hairline'] {
  &::after {
    @include hairline();
  }
}

.van-hairline {
  &,
  &--top,
  &--left,
  &--right,
  &--bottom,
  &--surround,
  &--top-bottom {
    position: relative;
  }

  &--top::after {
    border-top-width: 1px;
  }

  &--left::after {
    border-left-width: 1px;
  }

  &--right::after {
    border-right-width: 1px;
  }

  &--bottom::after {
    border-bottom-width: 1px;
  }

  &,
  &-unset {
    &--top-bottom::after {
      border-width: 1px 0;
    }
  }

  &--surround::after {
    border-width: 1px;
  }
}
多行文字省略
assets/styles/ellipsis.scss
@mixin multi-ellipsis($lines) {
  display: -webkit-box;
  overflow: hidden;
  text-overflow: ellipsis;
  -webkit-line-clamp: $lines;
  -webkit-box-orient: vertical;
}

@mixin ellipsis() {
  overflow: hidden;
  white-space: nowrap;
  text-overflow: ellipsis;
}

.ellipsis {
  @include ellipsis();
}

.multi-ellipsis--l2 {
  @include multi-ellipsis(2);
}

.multi-ellipsis--l3 {
  @include multi-ellipsis(3);
}
总结
至此,终于完成了 Taro + Vue3 的项目搭建,强烈建议直接访问项目 github 地址 clone 使用,有一些配置细节本文无法一一列举,就在项目中去发掘吧!
如果我的文章能帮助到你,那将是我的荣幸!
【相关学习推荐:小程序开发教程】
Das obige ist der detaillierte Inhalt vonWie entwickle ich kleine Programme mit Taro + Vue3? (üben). Für weitere Informationen folgen Sie bitte anderen verwandten Artikeln auf der PHP chinesischen Website!
In Verbindung stehende Artikel
Mehr sehen- Wie wechselt man vom WeChat-Kartenpaket zum Miniprogramm? Kurze Analyse der Implementierungsmethoden
- Was kann außer der Vergabe von Unteraufträgen noch getan werden, wenn die Größe des Miniprogramms das Limit überschreitet? Wie lassen sich Größenbeschränkungen vermeiden und lösen?
- Ein Postfach kann mehrere WeChat-Miniprogramme haben
- Wie verwende ich die Leinwand des Miniprogramms zum Zeichnen von QR-Codes?
- Erfahren Sie Schritt für Schritt, wie Sie im Miniprogramm den 3D-Karusselleffekt mit bloßem Auge erzielen


)
)