Heim >Web-Frontend >CSS-Tutorial >Tipps zum Optimieren des Scrollens: Verwenden Sie CSS Scroll Snap! !
Tipps zum Optimieren des Scrollens: Verwenden Sie CSS Scroll Snap! !
- 青灯夜游nach vorne
- 2021-01-18 09:30:313400Durchsuche

(Lernvideo-Sharing: CSS-Video-Tutorial)
Haben Sie sich schon oft gewünscht, dass es eine CSS-Funktion gäbe, mit der Sie ganz einfach einen scrollbaren Container erstellen können? In meinen frühen Tagen der Frontend-Entwicklung habe ich mich bei der Erstellung von Slider-Komponenten auf JS-Plugins verlassen. Manchmal benötigen wir eine einfache Möglichkeit, ein Element schnell in einen scrollbaren Container umzuwandeln. Dank des CSSS-Scroll-Snap können wir dies jetzt ganz einfach tun. Warum CSS Scroll Snap verwenden?
Mit der Verbreitung von Mobil- und Tablet-Geräten müssen wir Komponenten entwerfen und bauen, die genutzt werden können. Nehmen Sie als Beispiel die Galeriekomponente. Anstelle einer hierarchischen Struktur können Benutzer einfach nach links oder rechts wischen, um weitere Bilder anzuzeigen.
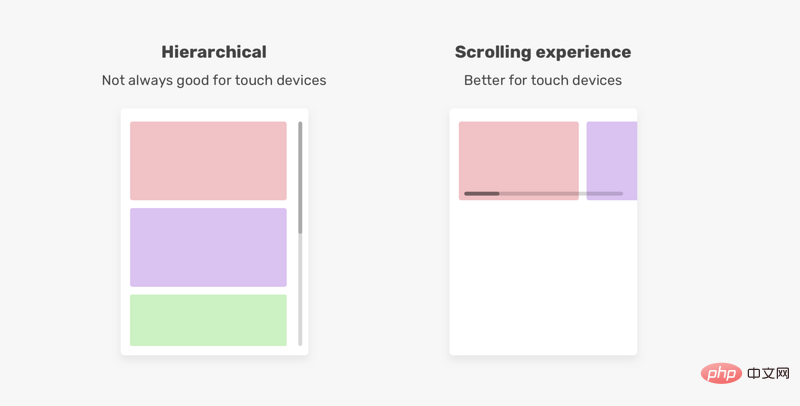 Entwicklern ein gut kontrolliertes Scroll-Erlebnis gemäß CSS-Spezifikationen zu bieten, ist einer der Hauptgründe für die Einführung von
. Es verbessert das Benutzererlebnis und erleichtert die Implementierung des Scroll-Erlebnisses. Grundlagen von Scroll-Containern
Um einen Scroll-Container zu erstellen, sind hier die Grundlagen dessen, was wir tun müssen
Verwenden Sieoverflow- Eine Möglichkeit, Elemente nebeneinander anzuzeigen (innerhalb von
overflow
举个例子:
<div>
  <div>Item 1</div>
  <div>Item 2</div>
  <div>Item 3</div>
  <div>Item 4</div>
  <div>Item 5</div>
</div>
.section {
  white-space: nowrap;
  overflow-x: auto;
}
多年来,使用white-space: nowrap是一种流行的CSS解决方案,用于强制元素保持内联。不过,现在我们基本都使用 Flexbox :
.section {
  display: flex;
  overflow-x: auto;
}
这是创建滚动容器的基本方法。然而,这还不够,这不是一个可用的滚动容器。
滚动容器有什么问题
问题是,与滑动相比,它们并不能提供良好的体验。在触摸屏上滑动手势的主要好处是,我们可以用一根手指水平或垂直滚动。
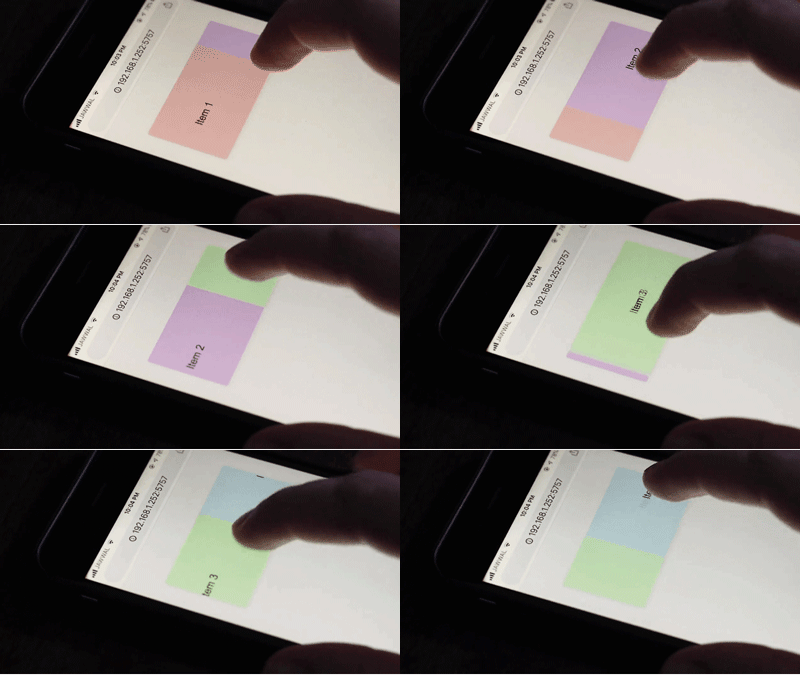
实际上需要将每个项目移动到它自己的位置。这并不是滑动,这是一种非常糟糕的体验,通过使用CSS scroll snap,我们可以通过简单地定义snap points来解决这个问题,它将使用户更容易地水平或垂直滚动。
接着,我们来看看如何使用CSS scroll snap。
CSS Scroll Snap 简介
要在容器上使用scroll snap,它的子项目应该内联显示,这可以用我上面解释的方法之一来实现。我选择CSS flexbox:
<div>
  <div>Item 1</div>
  <div>Item 2</div>
  <div>Item 3</div>
  <div>Item 4</div>
  <div>Item 5</div>
</div>
.section {
  display: flex;
  overflow-x: auto;
}
了这个,我们需要添加另外两个属性来让scroll snap工作。我们应该在哪里添加它们?
首先,我们需要将scroll-snap-type添加到滚动容器中。 在我们的示例中,是.section元素。 然后,我们需要向子项(即.section__item)添加scrolln-snap-align。
.section {
  display: flex;
  overflow-x: auto;
  scroll-snap-type: x mandatory;
}

.section__item {
  scroll-snap-align: start;
}
这里你可能想知道x mandatory和start是干嘛用的。 不用担心,这是本文的核心,下面会对其进行深入的讲解。
这一刻,我对CSS scroll snap非常兴奋,它使滚动更加自然。现在,让我们深入研究scroll snap 属性。
Scroll Snap Type
根据CSS规范,scroll-snap-type 属性定义在滚动容器中的一个临时点(snap point)如何被严格的执行。
滚动容器的轴线
滚动容器的轴表示滚动方向,它可以是水平或垂直的,x值表示水平滚动,而y表示垂直滚动。
/* 水平*/
.section {
  display: flex;
  overflow-x: auto;
  scroll-snap-type: x;
}

/* 垂直*/
.section {
  height: 250px;
  overflow-y: auto;
  scroll-snap-type: y;
}
Scroll Snap 容器的严格性
我们不仅可以定义Scroll Snap的方向,还可以定义它的严格程度。这可以通过使用scroll-snap-type值的andatory | proximity来实现。
mandatory:如果它当前没有被滚动,这个滚动容器的可视视图将静止在临时点上。意思是当滚动动作结束,如果可能,它会临时在那个点上。如果内容被添加、移动、删除或者重置大小,滚动偏移将被调整为保持静止在临时点上。
mandatory关键字意味着浏览器必须捕捉到每个滚动点。假设roll-snap-align属性有一个start
.section {
  display: flex;
  overflow-x: auto;
  scroll-snap-type: x mandatory;
}

.section__item {
  scroll-snap-align: start;
}
.section {
  display: flex;
  overflow-x: auto;
  /* proximity is the default value, I added it for clarity reasons */
  scroll-snap-type: x proximity;
}
Seit Jahren ist die Verwendung von white-space: nowrap eine beliebte CSS-Lösung, um zu erzwingen, dass Elemente inline bleiben. Jetzt verwenden wir jedoch grundsätzlich Flexbox:🎜.section__item {
scroll-snap-align: start;
scroll-snap-stop: normal;
}🎜 🎜🎜Dies ist die grundlegende Methode zum Erstellen eines Scroll-Containers. Dies reicht jedoch nicht aus, es handelt sich hierbei nicht um einen verwendbaren Scroll-Container. 🎜🎜Was ist falsch an Scrollcontainern?🎜🎜Das Problem ist, dass sie im Vergleich zum Schieben kein gutes Erlebnis bieten. Der Hauptvorteil von Wischgesten auf Touchscreens besteht darin, dass wir mit einem Finger horizontal oder vertikal scrollen können. 🎜🎜
 🎜🎜Tatsächlich Jedes Element muss an seinen eigenen Standort verschoben werden. Das ist kein Gleiten, es ist eine sehr schlechte Erfahrung, und durch die Verwendung von 🎜CSS Scroll Snap🎜 können wir dieses Problem lösen, indem wir einfach 🎜Snap-Punkte🎜 definieren, was es dem Benutzer erleichtert, horizontal oder vertikal zu scrollen. 🎜🎜Als nächstes sehen wir uns an, wie man 🎜CSS Scroll Snap🎜 verwendet. 🎜🎜Einführung in CSS Scroll Snap🎜🎜Um einen 🎜Scroll Snap🎜 für einen Container zu verwenden, sollten seine Unterelemente inline angezeigt werden. Dies kann mit einer der oben erläuterten Methoden erreicht werden. Ich habe dafür CSS flexbox:🎜
.section__item {
scroll-snap-align: start;
scroll-snap-stop: always;
}
.section {
overflow-y: auto;
scroll-snap-type: y mandatory;
scroll-padding: 50px 0 0 0;
}🎜 gewählt. Wir müssen zwei weitere Eigenschaften hinzufügen, damit 🎜Scroll Snap🎜 funktioniert. Wo sollen wir sie hinzufügen? 🎜🎜Zuerst müssen wir scroll-snap-type zum Scroll-Container hinzufügen. In unserem Beispiel ist es das Element .section. Dann müssen wir scrolln-snap-align zum untergeordneten Element hinzufügen (d. h. .section__item). 🎜.images-list {
display: flex;
overflow-x: auto;
scroll-snap-type: x;
gap: 1rem;
-webkit-overflow-scrolling: touch; /* Important for iOS devices */
}
.images-list img {
scroll-snap-align: start;
}🎜Hier möchten Sie vielleicht wissen, wofür x obligatorisch und start verwendet werden. Keine Sorge, dies ist der Kern dieses Artikels und wird im Folgenden ausführlich erläutert. 🎜🎜 🎜🎜Dies Im Moment bin ich total begeistert von 🎜CSS Scroll Snap🎜, der das Scrollen natürlicher macht. Schauen wir uns nun die Eigenschaften des 🎜Scroll Snap🎜 an. 🎜🎜Scroll Snap Type🎜🎜Gemäß der CSS-Spezifikation definiert das Attribut 🎜scroll-snap-type 🎜, wie ein temporärer Punkt (Snap-Punkt) im Scroll-Container strikt erzwungen wird. 🎜
Die Achse des Scroll-Containers
🎜Die Achse des Scroll-Containers stellt die Scroll-Richtung dar, sie kann horizontal oder vertikal sein, derx-Wert stellt horizontales Scrollen dar und y gibt vertikales Scrollen an. 🎜.list {
display: flex;
overflow-x: auto;
scroll-snap-type: x mandatory;
gap: 1rem;
scroll-padding: 48px;
padding-bottom: 32px;
-webkit-overflow-scrolling: touch;
}
.list-item {
scroll-snap-align: start;
}🎜 🎜Striktheit des Scroll Snap-Containers🎜Wir können nicht nur die Richtung des Scroll Snaps definieren, sondern auch seine Strenge. Dies kann durch die Verwendung von
 andatory |. Proximity mit dem Wert scroll-snap-type erreicht werden. 🎜
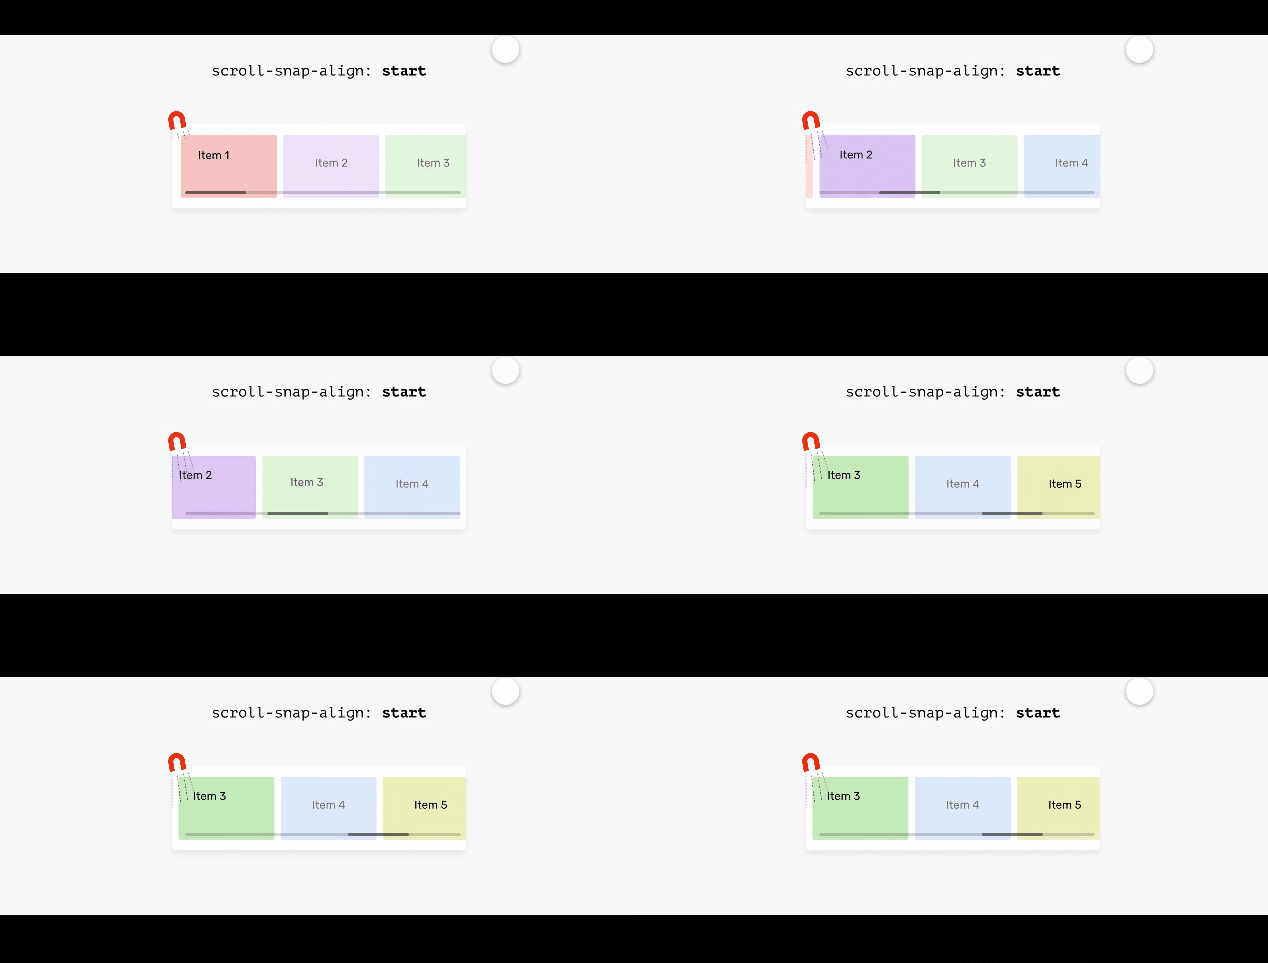
obligatorisch: Wenn derzeit nicht gescrollt wird, bleibt die visuelle Ansicht dieses Scroll-Containers am temporären Punkt. Das bedeutet, dass die Scroll-Aktion nach Möglichkeit vorübergehend an diesem Punkt endet. Wenn Inhalte hinzugefügt, verschoben, gelöscht oder in der Größe geändert werden, wird der Bildlaufversatz so angepasst, dass er am temporären Punkt stationär bleibt. Das Schlüsselwort 🎜mandatory bedeutet, dass der Browser jeden Scrollpunkt erfassen muss. Gehen Sie davon aus, dass das Attribut roll-snap-align einen start-Wert hat. Das bedeutet, dass der Scroll am Anfang des Scroll-Containers ausgerichtet sein muss. 🎜在下图中,每次用户向右滚动时,浏览器都会将项目捕捉到容器的开头。
.section {
display: flex;
overflow-x: auto;
scroll-snap-type: x mandatory;
}
.section__item {
scroll-snap-align: start;
}
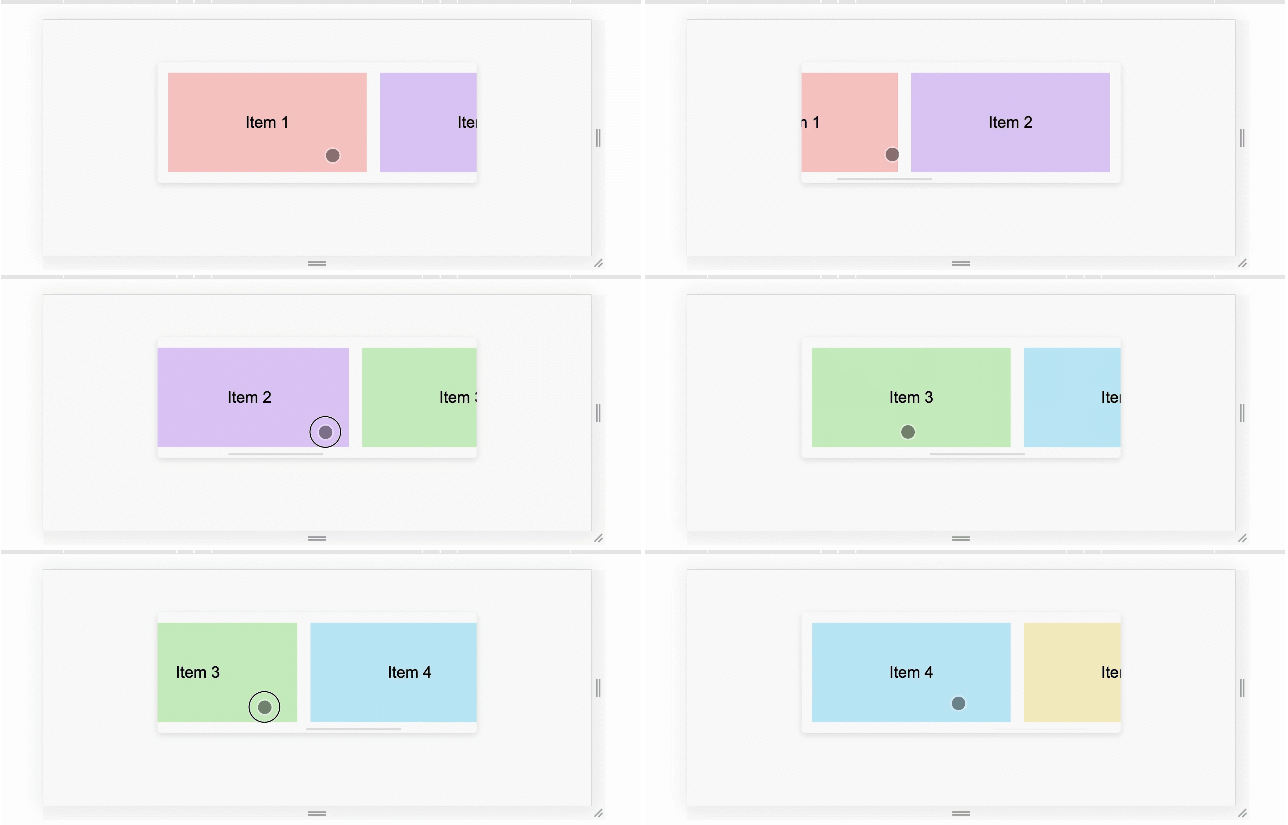
试着在下面的演示中向右滚动。如果你使用的是手机或平板电脑,可以向右移动滚动条或使用触摸。应该能感受到每个项目是如何从其容器的开始抓取的。
演示地址:https://codepen.io/shadeed/pen/RwGaXKB
但是,如果该值是proximity,则浏览器将完成这项工作,它可能会吸附到定义的点(在我们的例子中start)。注意,proximity 是默认值,但是为了清晰起见,我们这里还是声明一下它。
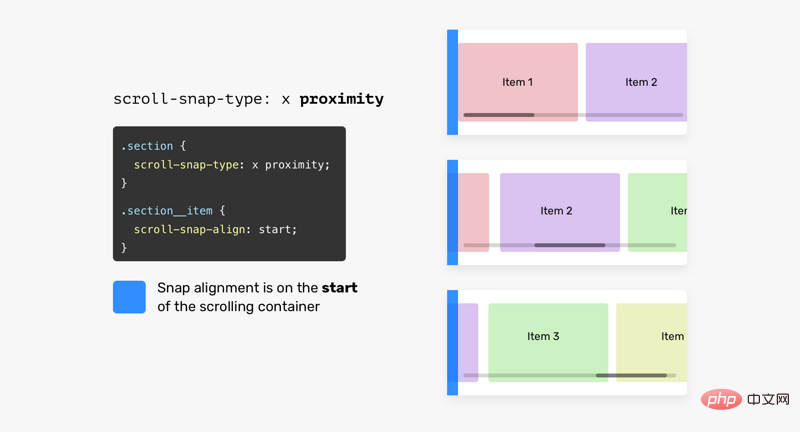
.section {
display: flex;
overflow-x: auto;
/* proximity is the default value, I added it for clarity reasons */
scroll-snap-type: x proximity;
}
Scroll Snapping Alignment
滚动容器的子项目需要一个对齐点,它们可以对齐到这个点。我们可以用start, center或end。
为了更容易理解,下面是它的工作原理。
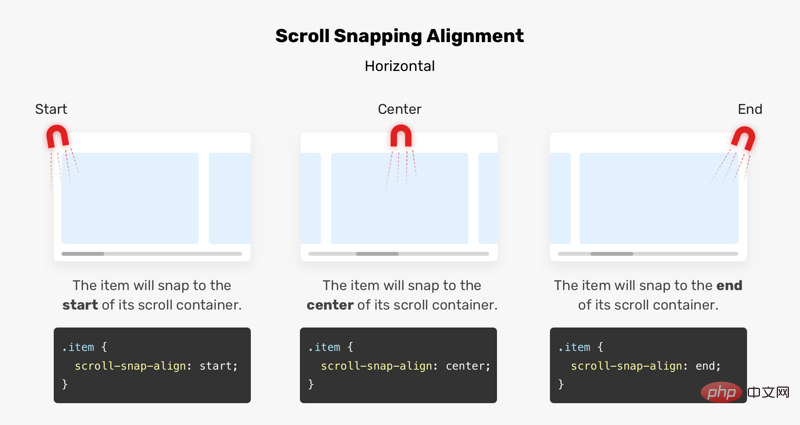
假设我们在滚动容器上有一块磁铁,这将有助于我们控制捕捉点。 如果scroll-snap-type是垂直的,则对齐对齐将是垂直的。 参见下图:
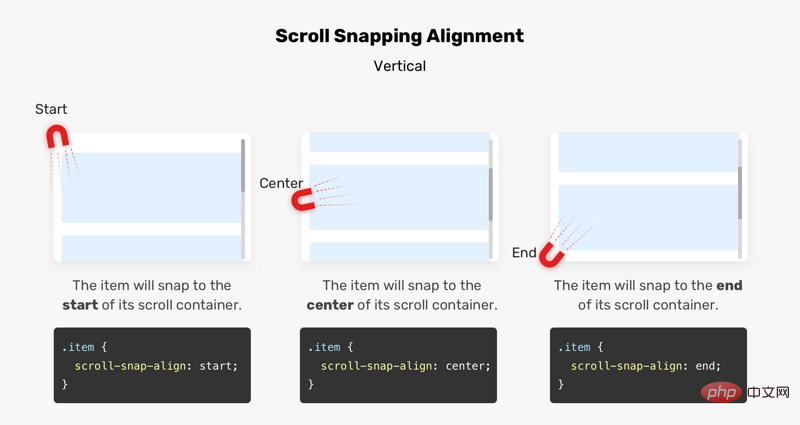
滚动容器的 start
子项目将吸附到其水平滚动容器的开始处。
滚动容器的 center
子项目将吸附到其滚动容器的中心。
滚动容器的 end
子项将对齐到其滚动容器的末尾。
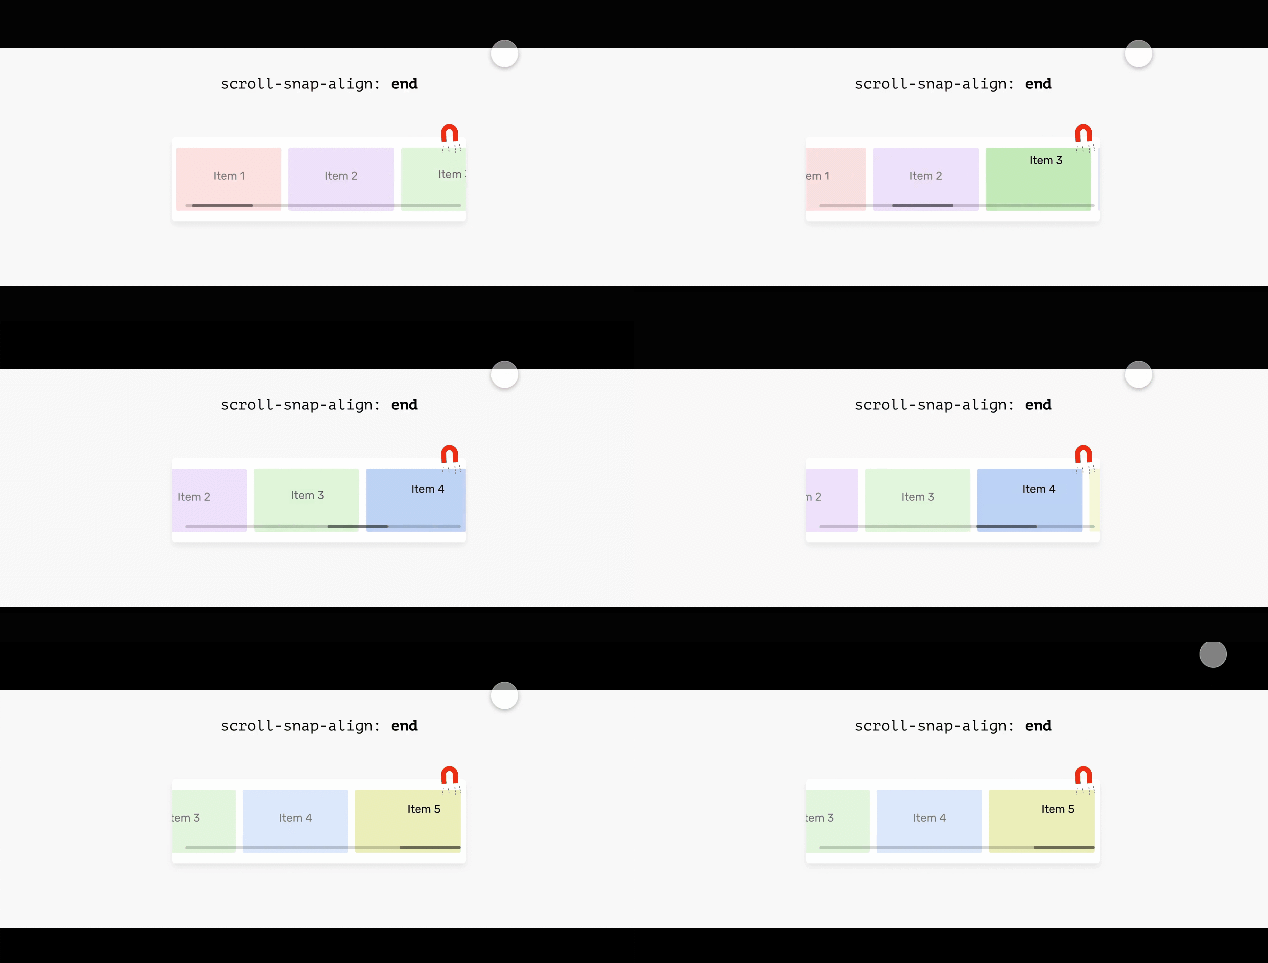
使用 Scroll-Snap-Stop
有时,我们可能需要一种方法来防止用户在滚动时意外跳过一些重要的项。如果用户滚动太快,就有可能跳过某些项。
.section__item {
  scroll-snap-align: start;
  scroll-snap-stop: normal;
}
法动太快可能会跳过三个或四个项目,如下所示:
scroll-snap-stop的默认值是normal,要强制滚动捕捉到每个可能的点,应使用always。
.section__item {
  scroll-snap-align: start;
  scroll-snap-stop: always;
}
这样,用户可以一次滚动到一个捕捉点,这种方式有助于避免跳过重要内容。 想象每个停止点都有一个停止标志,参见下面的动画:
演示地址:https://codepen.io/shadeed/pen/JjRbXza
Scroll Snap Padding
scroll-padding设置所有侧面的滚动边距,类似于padding属性的工作方式。 在下图中,滚动容器的左侧有50px的内边距。 结果,子元素将从左侧边缘捕捉到50px
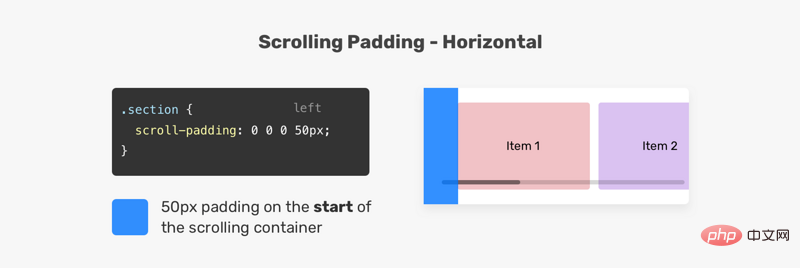
直滚动也是如此。参见下面的示例:
.section {
  overflow-y: auto;
  scroll-snap-type: y mandatory;
  scroll-padding: 50px 0 0 0;
}
Scroll Snap Margin
scroll-margin设置滚动容器的子项之间的间距。 在向元素添加边距时,滚动将根据边距对齐。 参见下图:
.item-2具有scroll-margin-left: 20px。 结果,滚动容器将在该项目之前对齐到20px。 请注意,当用户再次向右滚动时,.item-3会捕捉到滚动容器的开头,这意味着仅具有边距的元素将受到影响。
CSS Scroll Snap 用例
图片列表
scroll snap 的一个很好的用例是图像列表,使用 scroll snap 提供更好的滚动体验。
.images-list {
  display: flex;
  overflow-x: auto;
  scroll-snap-type: x;
  gap: 1rem;
  -webkit-overflow-scrolling: touch; /* Important for iOS devices */
}

.images-list img {
  scroll-snap-align: start;
}
注意,我使用x作为scroll-snap-type的值。

事例地址:https://codepen.io/shadeed/pe...
好友清单
滚动捕捉的另一个很好的用例是朋友列表。 下面的示例摘自Facebook(一个真实的示例)。
.list {
  display: flex;
  overflow-x: auto;
  scroll-snap-type: x mandatory;
  gap: 1rem;
  scroll-padding: 48px;
  padding-bottom: 32px;
  -webkit-overflow-scrolling: touch;
}

.list-item {
  scroll-snap-align: start;
}
请注意,滚动容器的padding-bottom:32px。 这样做的目的是提供额外的空间,以便box-shadow可以按预期显示。
头像列表
对于此用例,我感兴趣的是将center作为scroll-snap-align的值。
.list {
  display: flex;
  overflow-x: auto;
  scroll-snap-type: x mandatory;
  -webkit-overflow-scrolling: touch;
}

.list-item {
  scroll-snap-align: center;
}
这在一个角色列表中是很有用的,角色在滚动容器的中间是很重要的
演示地址:https://codepen.io/shadeed/pen/KKgMJWa
全屏展示
使用scroll snap也可以用于垂直滚动,全屏展示就是一个很好的例子。
<main>
  <section></section>
  <section></section>
  <section></section>
  <section></section>
  <section></section>
</main>
main {
  height: 100vh;
  overflow-y: auto;
  scroll-snap-type: y mandatory;
  -webkit-overflow-scrolling: touch;
}

.section {
  height: 100vh;
  scroll-snap-align: start;
}

块和内联
值得一提的是,对于scroll-snap-type,可以使用inline和block逻辑值。参见下面的示例
main {
  scroll-snap-type: inline mandatory;
}
可读性
使用 CSS scroll snap时,请确保可访问性。 这是滚动对齐的一种不好用法,它阻止用户自由滚动内容以读取内容。
.wrapper {
  scroll-snap-type: y mandatory;
}

h2 {
  scroll-snap-align: start;
}
请务必不要这样做。
总结
这是我刚刚学到的一个新的CSS特性的长篇文章。我希望它对你有用。
原文地址:https://ishade.com/article/css-scroll-snap/
作者:Ahmad
译文地址:https://segmentfault.com/a/1190000038459089
更多编程相关知识,请访问:编程入门!!
Das obige ist der detaillierte Inhalt vonTipps zum Optimieren des Scrollens: Verwenden Sie CSS Scroll Snap! !. Für weitere Informationen folgen Sie bitte anderen verwandten Artikeln auf der PHP chinesischen Website!


