Heim >PHP-Framework >Laravel >Integrieren Sie die neue Version der chinesischen Suche von Elasticsearch7.9 ganz einfach in das Laravel7-Projekt
Integrieren Sie die neue Version der chinesischen Suche von Elasticsearch7.9 ganz einfach in das Laravel7-Projekt
- 藏色散人nach vorne
- 2020-09-16 09:15:423668Durchsuche
In der folgenden Tutorial-Kolumne von Laravel erfahren Sie, wie Sie die neue Version der chinesischen Suche von Elasticsearch7.9 einfach in das Laravel7-Projekt integrieren können. Ich hoffe, dass es Freunden in Not hilfreich sein wird!

Nur fünf Schritte:
1. Starten Sie das Elasticsearch7.9 Docker-Image, das das IK-Plugin für die chinesische Wortsegmentierung integriert.
Kursempfehlung→: "Elasticsearch Volltext Suchpraxis" (Praktisches Kampfvideo)
Aus dem Kurs "Zehn-Millionen-Level-Daten-Parallelitätslösung (Theorie + Praxis)“
2, Laravel7-Konfigurations-Scout
3, Modellmodell konfigurieren
4, Import Daten
5, Suche
Demoadresse

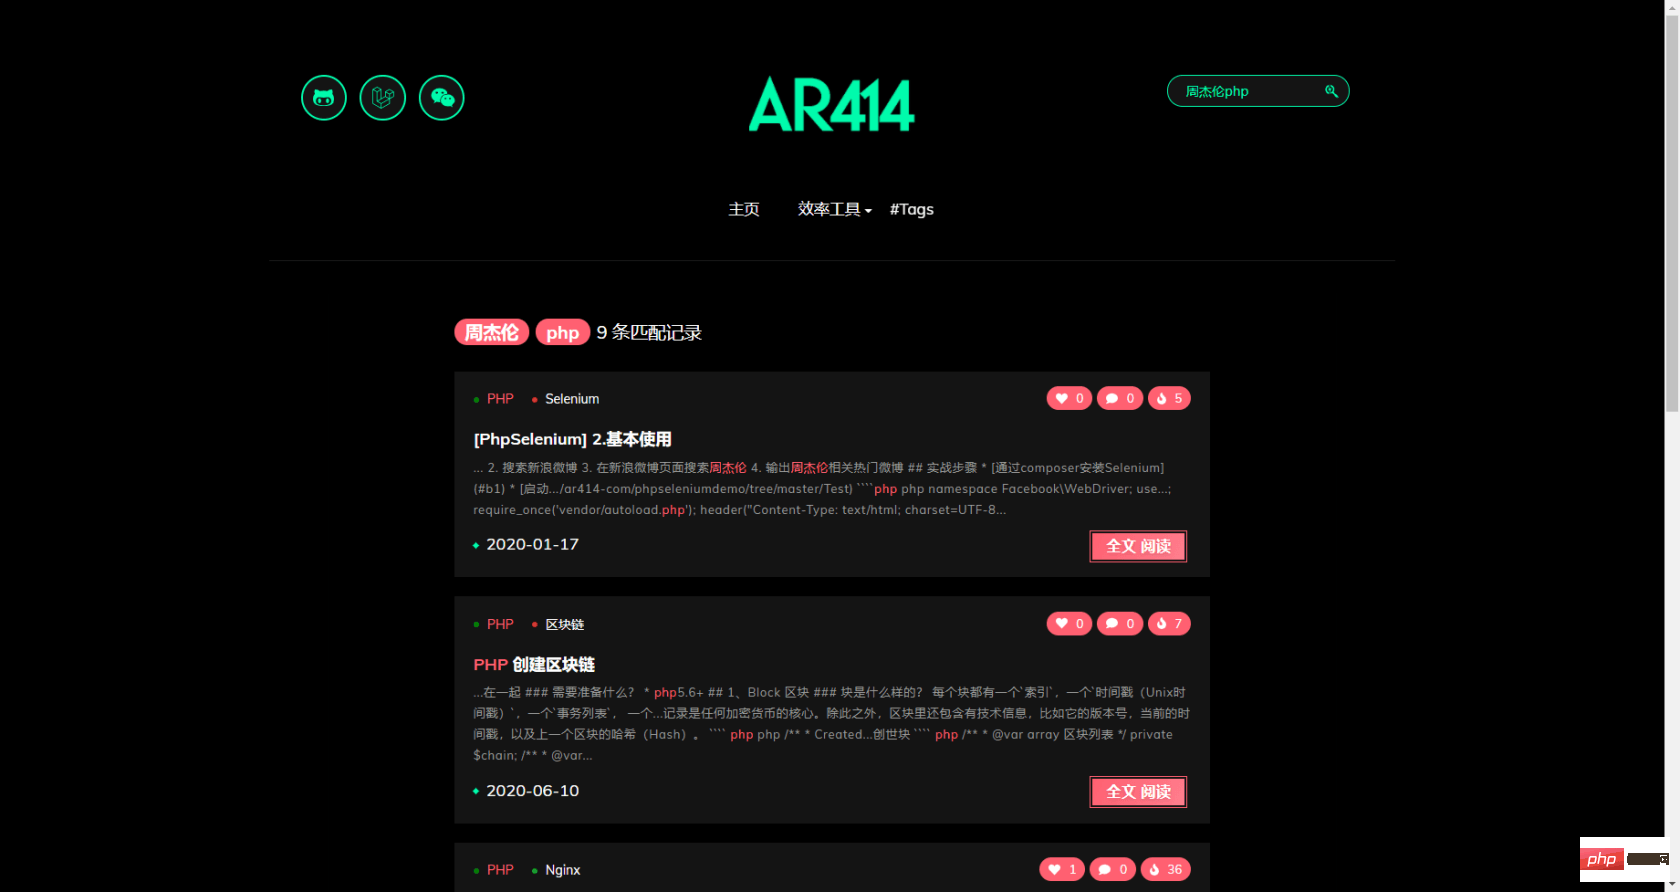
www.ar414.com/search?query=php%E5%...
Suchumfang
- Artikelinhalt
- Titel
- Tag
Ergebnisgewichtung
- Anzahl der angezeigten Schlüsselwörter
- Anzahl der angezeigten Schlüsselwörter
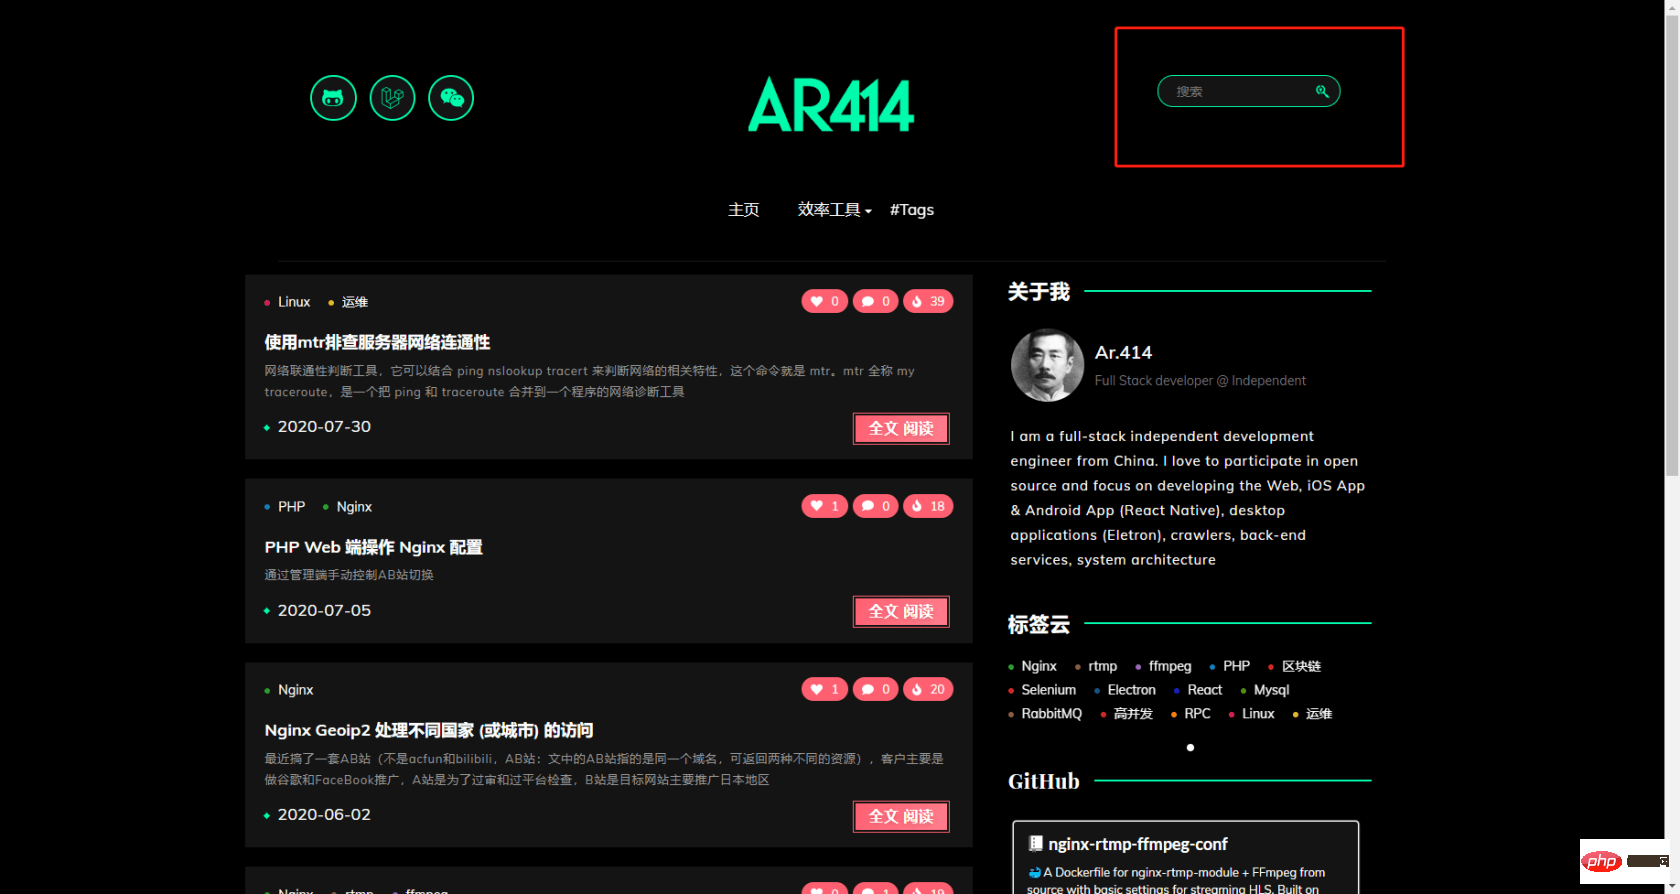
Suchseite
- Hervorhebung
- Wortsegmentierungsanzeige
- Ergebnisseite
Vorwort
Hauptsächlich wegen dem Blog Ich wollte übrigens nur eine Suche durchführen. In Artikeln organisiert
Laravel + Elasticsearch Viele Senioren haben Tutorials und Fälle geschrieben, aber mit dem Upgrade der Elasticsearch- und Laravel-Versionen sind viele der vorherigen Artikel nicht auf die neue Version anwendbar. Es wird empfohlen, die Dokumentation zu lesen, bevor Sie ein Open-Source-Projekt verwenden. Es werden hauptsächlich die aktuell verwendeten Versionsdokumente verwendet, ergänzt durch Tutorials
- Referenz
- ik-Plug-in zur chinesischen Wortsegmentierung
- Offizielle Dokumentation von Elasticsearch
Verwenden Sie Elasticsearch, das das Plugin ik-chinesische Wortsegmentierung integriert
- , um Docker
$ docker pull ar414/elasticsearch-7.9-ik-plugin
zu ziehen
Protokoll- und Datenspeicherverzeichnisse erstellenik中文分词插件的Elasticsearch
拉取docker
$ mkdir -p /data/elasticsearch/data
$ mkdir -p /data/elasticsearch/log
$ chmod -R 777 /data/elasticsearch/data
$ chmod -R 777 /data/elasticsearch/log
创建日志和数据存储目录
本地映射到docker容器内,防止docker重启数据丢失
docker run -d -p 9200:9200 -p 9300:9300 -e "discovery.type=single-node" -v /data/elasticsearch/data:/var/lib/elasticsearch -v /data/elasticsearch/log:/var/log/elasticsearch ar414/elasticsearch-7.9-ik-plugin
运行
$ curl http://localhost:9200{
  "name" : "01ac21393985",  "cluster_name" : "docker-cluster",  "cluster_uuid" : "h8L336qcRb2i1aydOv04Og",  "version" : {
    "number" : "7.9.0",    "build_flavor" : "default",    "build_type" : "docker",    "build_hash" : "a479a2a7fce0389512d6a9361301708b92dff667",    "build_date" : "2020-08-11T21:36:48.204330Z",    "build_snapshot" : false,    "lucene_version" : "8.6.0",    "minimum_wire_compatibility_version" : "6.8.0",    "minimum_index_compatibility_version" : "6.0.0-beta1"
  },  "tagline" : "You Know, for Search"}
验证
curl -X POST "http://localhost:9200/_analyze?pretty" -H 'Content-Type: application/json' -d'
{
  "analyzer": "ik_max_word",
  "text":     "laravel天下无敌"
}
'{
  "tokens" : [
    {
      "token" : "laravel",      "start_offset" : 0,      "end_offset" : 7,      "type" : "ENGLISH",      "position" : 0    },    {
      "token" : "天下无敌",      "start_offset" : 7,      "end_offset" : 11,      "type" : "CN_WORD",      "position" : 1    },    {
      "token" : "天下",      "start_offset" : 7,      "end_offset" : 9,      "type" : "CN_WORD",      "position" : 2    },    {
      "token" : "无敌",      "start_offset" : 9,      "end_offset" : 11,      "type" : "CN_WORD",      "position" : 3    }
  ]}
测试中文分词
$ composer require laravel/scout
$ composer require Integrieren Sie die neue Version der chinesischen Suche von Elasticsearch7.9 ganz einfach in das Laravel7-Projekt
Laravel 项目中使用 Elasticsearch

Elasticsearch官方有提供 SDK,在 Laravel 项目中可以更加优雅快速的接入 Elasticsearch,Laravel 本身有提供 Scout全文搜索 的解决方案,我们只需将默认的 Algolia 驱动 替换成ElasticSearch驱动。
安装
- laravel/scout
- Integrieren Sie die neue Version der chinesischen Suche von Elasticsearch7.9 ganz einfach in das Laravel7-Projekt
$ php artisan vendor:publish --provider="Laravel\Scout\ScoutServiceProvider"Copied File [\vendor\laravel\scout\config\scout.php] To [\config\scout.php]Publishing complete.
配置
-
生成 Scout 配置文件(config/scout.php)
SCOUT_DRIVER=Matchish\ScoutElasticSearch\Engines\ElasticSearchEngine
指定 Scout 驱动
- 第一种:在
.env文件中指定(建议)'driver' => env('SCOUT_DRIVER', 'algolia')改为'driver' => env('SCOUT_DRIVER', 'Matchish\ScoutElasticSearch\Engines\ElasticSearchEngine') - 第二种:在
config/scout.php直接修改默认驱动ELASTICSEARCH_HOST=172.17.0.1:9200
-
指定Elasticsearch服务IP端口
如果使用docker部署则使用
docker0的IP,Linux通过ifconfig查看在
.env中配置'providers' => [ // Other Service Providers \Matchish\ScoutElasticSearch\ElasticSearchServiceProvider::class],
-
注册服务
config/app.phpLokal im Docker-Container zuordnen, um zu verhindern, dass Docker Daten neu startet Segmentierung$ php artisan config:clear
-
Verwendung von Elasticsearch im Laravel-Projekt

ElasticsearchDas offizielle SDK kann schnell mit Elasticsearch verbunden werden und bietet eine Scout-Volltextsuchlösung, die wir nur ersetzen müssen den Standard-Algolia-Treiber mit dem ElasticSearch-Treiber. 🎜🎜Installation🎜🎜🎜laravel/scout🎜🎜Integrieren Sie die neue Version der chinesischen Suche von Elasticsearch7.9 ganz einfach in das Laravel7-Projekt$ touch config/elasticsearch.php🎜🎜🎜🎜🎜Konfiguration🎜🎜🎜🎜Scout-Konfigurationsdatei generieren. (config/scout.php)🎜
<?phpreturn [ 'indices' => [ 'mappings' => [ 'blog-articles' => [ "properties"=> [ "content"=> [ "type"=> "text", "analyzer"=> "ik_max_word", "search_analyzer"=> "ik_smart" ], "tags"=> [ "type"=> "text", "analyzer"=> "ik_max_word", "search_analyzer"=> "ik_smart" ], "title"=> [ "type"=> "text", "analyzer"=> "ik_max_word", "search_analyzer"=> "ik_smart" ] ] ] ] ],];🎜 🎜🎜Scout-Treiber angeben🎜 🎜🎜🎜🎜Der erste: Geben Sie (empfohlen)
 namespace App\Models\Blog;

 use Laravel\Scout\Searchable;

 class Article extends BlogBaseModel
 {
     use Searchable;
 }
in der Datei .env an. 🎜🎜Der zweite: Ändern Sie den Standardtreiber /**
* 指定索引
* @return string
*/
public function searchableAs()
{
return 'blog-articles';
} direkt in config/scout.php 🎜 🎜- 🎜🎜Geben Sie den IP-Port des Elasticsearch-Dienstes an🎜🎜🎜Wenn Sie die Docker-Bereitstellung verwenden, verwenden Sie die IP von
- 文章内容
- 文章标题
- 文章标签
- article
- title
- tags
- article_content
- content
-
创建索引配置文件(config/elasticsearch.php)
$ touch config/elasticsearch.php
-
elasticsearch.php 配置字段映射
<?phpreturn [ 'indices' => [ 'mappings' => [ 'blog-articles' => [ "properties"=> [ "content"=> [ "type"=> "text", "analyzer"=> "ik_max_word", "search_analyzer"=> "ik_smart" ], "tags"=> [ "type"=> "text", "analyzer"=> "ik_max_word", "search_analyzer"=> "ik_smart" ], "title"=> [ "type"=> "text", "analyzer"=> "ik_max_word", "search_analyzer"=> "ik_smart" ] ] ] ] ],];
- analyzer:字段文本的分词器
- search_analyzer:搜索词的分词器
- 根据具体业务场景选择(颗粒小占用资源多,一般场景analyzer使用ik_max_word,search_analyzer使用ik_smart):
- ik_max_word:ik中文分词插件提供,对文本进行最大数量分词
laravel天下无敌->laravel,天下无敌,天下,无敌 - ik_smart: ik中文分词插件提供,对文本进行最小数量分词
laravel天下无敌->laravel,天下无敌
- ik_max_word:ik中文分词插件提供,对文本进行最大数量分词
-
引入Laravel Scout
namespace App\Models\Blog; use Laravel\Scout\Searchable; class Article extends BlogBaseModel { use Searchable; } -
指定索引(刚刚配置文件中的elasticsearch.indices.mappings.blog-articles)
/** * 指定索引 * @return string */ public function searchableAs() { return 'blog-articles'; } -
设置导入索引的数据字段
/** * 设置导入索引的数据字段 * @return array */ public function toSearchableArray() { return [ 'content' => ArticleContent::query() ->where('article_id',$this->id) ->value('content'), 'tags' => implode(',',$this->tags), 'title' => $this->title ]; } -
指定 搜索索引中存储的唯一ID
/** * 指定 搜索索引中存储的唯一ID * @return mixed */ public function getScoutKey() { return $this->id; } /** * 指定 搜索索引中存储的唯一ID的键名 * @return string */ public function getScoutKeyName() { return 'id'; } - 一键自动导入:
php artisan scout:import - 导入指定模型:
php artisan scout:import ${model} - Unresolvable dependency resolving [Parameter #0 [ integer $retries ]] in class Elasticsearch\Transport
- 解决: 修改配置后,没有清除配置缓存
- invalid_index_name_exception
- 解决: searchableAs配置错误,为索引创建别名后,指定别名
-
创建一个测试命令行
$ php artisan make:command ElasticTest
代码
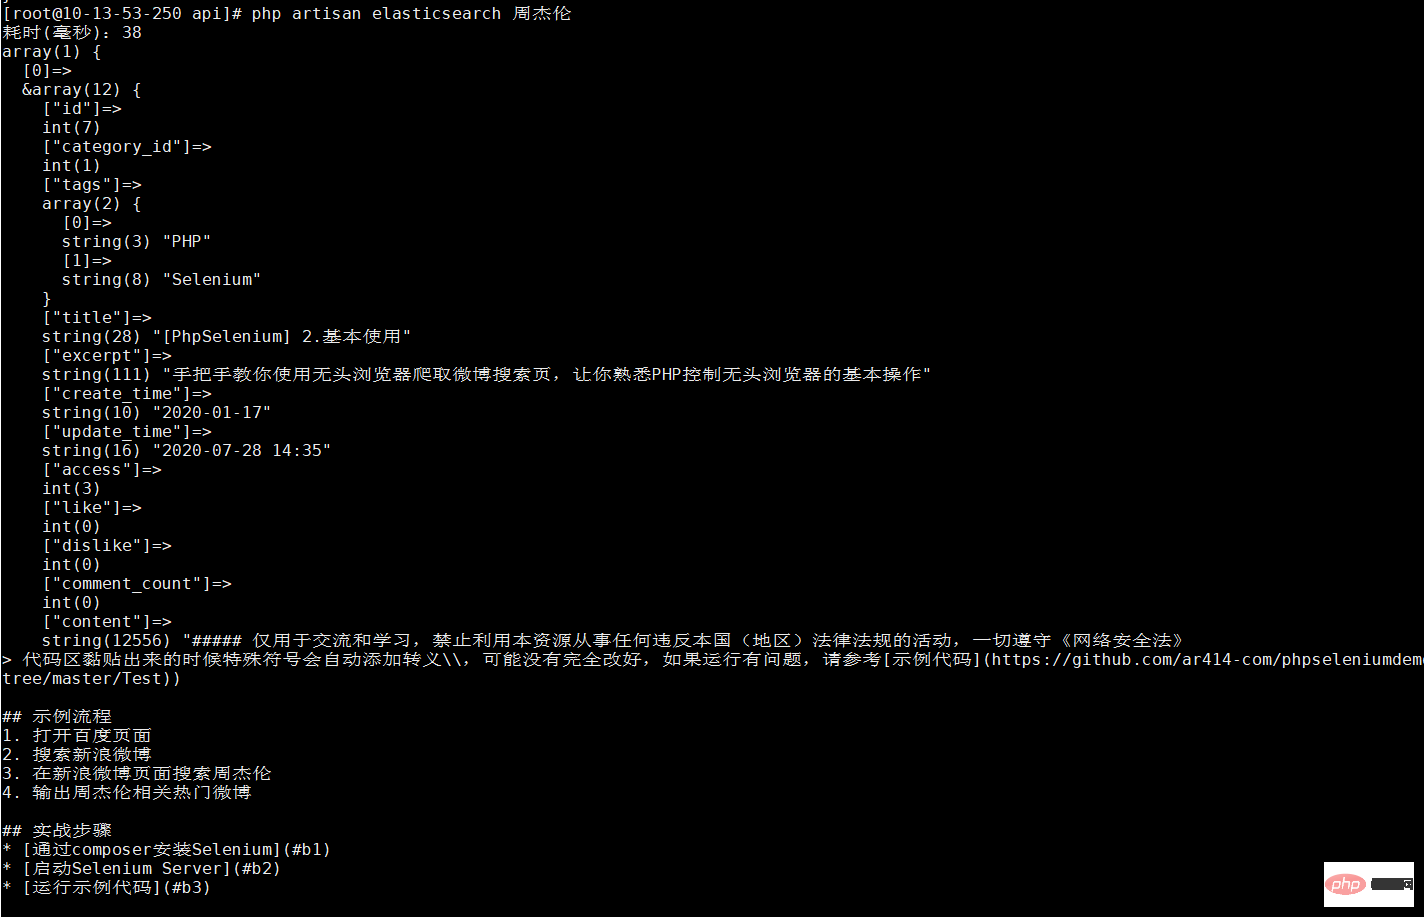
- 测试
$ php artisan elasticsearch 周杰伦
- 复杂查询
例如:自定义高亮显示//ONGR\ElasticsearchDSL\Highlight\Highlight ArticleModel::search($query,function($client,$body) { $higlight = new Highlight(); $higlight->addField('content',['type' => 'plain']); $higlight->addField('title'); $higlight->addField('tags'); $body->addHighlight($higlight); $body->setSource(['title','tags']); return $client->search(['index' => (new ArticleModel())->searchableAs(), 'body' => $body->toArray()]); })->raw();
docker0. Linux kann dies über ifconfig🎜🎜🎜in überprüfen .env /**
* 设置导入索引的数据字段
* @return array
*/
public function toSearchableArray()
{
return [
'content' => ArticleContent::query()
->where('article_id',$this->id)
->value('content'),
'tags' => implode(',',$this->tags),
'title' => $this->title
];
}🎜🎜🎜Registrierungsdienst in /code>🎜<code>config/app.php🎜 /**
* 指定 搜索索引中存储的唯一ID
* @return mixed
*/
public function getScoutKey()
{
return $this->id;
}
/**
* 指定 搜索索引中存储的唯一ID的键名
* @return string
*/
public function getScoutKeyName()
{
return 'id';
}🎜🎜🎜Konfigurationscache löschen🎜$ php artisan scout:import "App\Models\Blog\Article"Importing [App\Models\Blog\Article]Switching to the new index 5/5 [⚬⚬⚬⚬⚬⚬⚬⚬⚬⚬⚬⚬⚬⚬⚬⚬⚬⚬⚬⚬⚬⚬⚬⚬⚬⚬⚬⚬] 100%[OK] All [App\Models\Blog\Article] records have been imported.🎜🎜🎜Jetzt wurde Laravel mit verbunden Elasticsearch🎜
实际业务中使用
需求

通过博客右上角的搜索框可以搜索到与关键词相关的文章,从以下几点匹配
涉及到2张 Mysql表 以及字段
为文章配置 Elasticsearch 索引
配置文章模型
建议先看一遍 Laravel Scout 使用文档
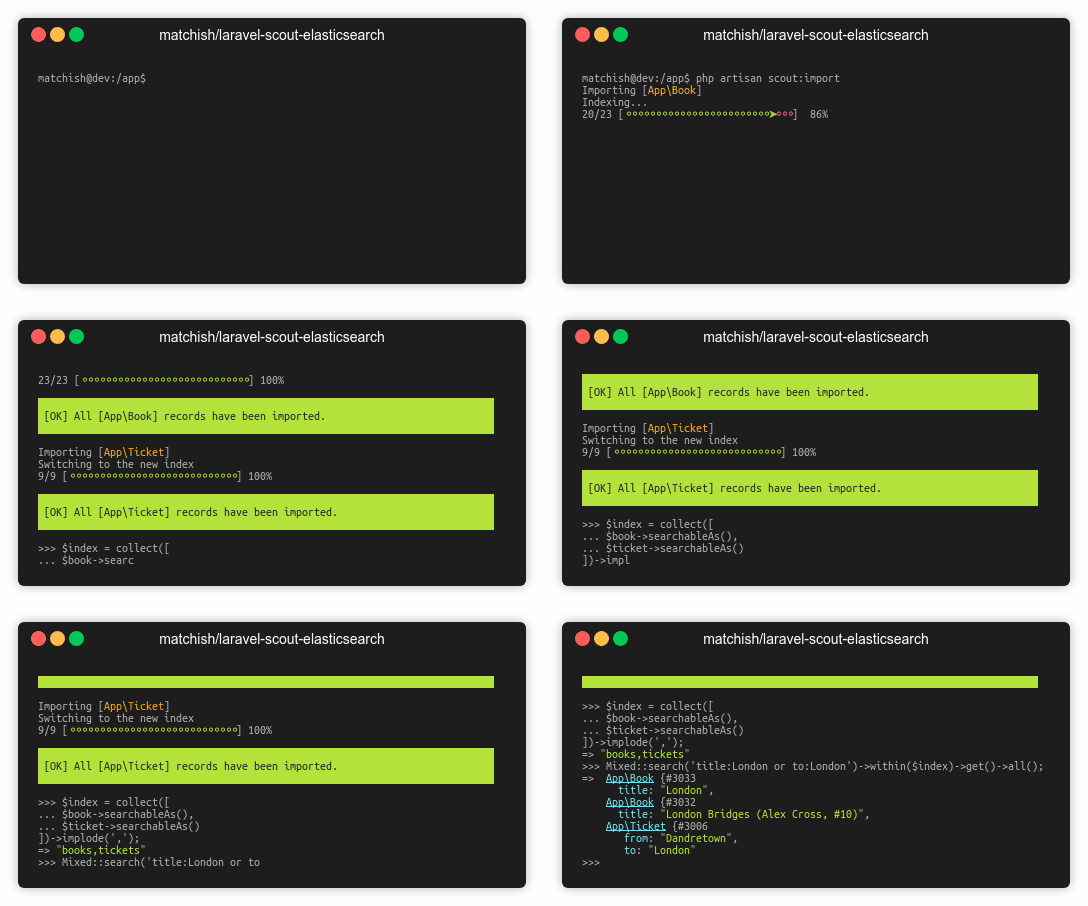
数据导入
其实是将数据表中的数据通过Elasticsearch导入到Lucene
Elasticsearch 是 Lucene 的封装,提供了 REST API 的操作接口
$ php artisan scout:import "App\Models\Blog\Article"Importing [App\Models\Blog\Article]Switching to the new index
5/5 [⚬⚬⚬⚬⚬⚬⚬⚬⚬⚬⚬⚬⚬⚬⚬⚬⚬⚬⚬⚬⚬⚬⚬⚬⚬⚬⚬⚬] 100%[OK] All [App\Models\Blog\Article] records have been imported.
导入失败,常见原因:
检查索引是否正确
$ curl -XGET http://localhost:9200/blog-articles/_mapping?pretty{
  "blog-articles_1598362919" : {
    "mappings" : {
      "properties" : {
        "__class_name" : {
          "type" : "text",          "fields" : {
            "keyword" : {
              "type" : "keyword",              "ignore_above" : 256            }
          }
        },        "content" : {
          "type" : "text",          "analyzer" : "ik_max_word",          "search_analyzer" : "ik_smart"
        },        "tags" : {
          "type" : "text",          "analyzer" : "ik_max_word",          "search_analyzer" : "ik_smart"
        },        "title" : {
          "type" : "text",          "analyzer" : "ik_max_word",          "search_analyzer" : "ik_smart"
        }
      }
    }
  }}
测试
<?phpnamespace App\Console\Commands;use App\Models\Blog\Article;use App\Models\Blog\ArticleContent;use Illuminate\Console\Command;use Illuminate\Support\Carbon;class ElasticTest extends Command{
/**
* The name and signature of the console command.
*
* @var string
*/
protected $signature = 'elasticsearch {query}';
/**
* The console command description.
*
* @var string
*/
protected $description = 'elasticsearch test';
/**
* Create a new command instance.
*
* @return void
*/
public function __construct()
{
parent::__construct();
}
/**
* Execute the console command.
*
* @return mixed
*/
public function handle()
{
//
$startTime = Carbon::now()->getPreciseTimestamp(3);
$articles = Article::search($this->argument('query'))->get()->toArray();
$userTime = Carbon::now()->getPreciseTimestamp(3) - $startTime;
echo "耗时(毫秒):{$userTime} \n";
//content在另外一张表中,方便观察测试 这里输出
if(!empty($articles)) {
foreach($articles as &$article) {
$article = ArticleContent::query()->where('article_id',$article['id'])->value('content');
}
}
var_dump($articles);
}}

复杂自定义查询回调中的$client和$body,可根据这两个包进行灵活操作
$client 官方 elasticsearch/elasticsearch package(https://packagist.org/packages/elasticsearch/elasticsearch)
$body ongr/elasticsearch-dsl package(https://packagist.org/packages/ongr/elasticsearch-dsl)
Das obige ist der detaillierte Inhalt vonIntegrieren Sie die neue Version der chinesischen Suche von Elasticsearch7.9 ganz einfach in das Laravel7-Projekt. Für weitere Informationen folgen Sie bitte anderen verwandten Artikeln auf der PHP chinesischen Website!
In Verbindung stehende Artikel
Mehr sehen- So verwenden Sie die eingeschränkte Methode zum Festlegen des Datenbankfremdschlüssels in Laravel7
- So lösen Sie das Problem der Cache-Penetration mithilfe der Redis-Sperre in Laravel
- Bringen Sie Ihnen bei, das Laravel-Installationsprogramm zu installieren und zu aktualisieren
- Installieren Sie das Laravel-Installationsprogramm mit Composer

