
Heim >Backend-Entwicklung >Python-Tutorial >Erstellen Sie Ihre eigene Blockchain mit Python
Erstellen Sie Ihre eigene Blockchain mit Python

- coldplay.xixinach vorne
- 2020-09-01 17:46:103827Durchsuche

【Verwandte Lernempfehlungen: Python-Tutorial】
Interessieren Sie sich wie ich sehr für die zugrunde liegende Blockchain-Technologie verschlüsselter digitaler Währungen und möchten insbesondere deren Funktionsweise verstehen?
Aber das Erlernen der Blockchain-Technologie ist nicht einfach. Ich habe mir viele Video-Tutorials und verschiedene Kurse angesehen. Das letzte Gefühl ist, dass es tatsächlich zu wenige praktische Kurse gibt.
Ich lerne gerne in der Praxis, besonders mag ich es, den gesamten Arbeitsmechanismus anhand eines Codes zu verstehen. Wenn Ihnen diese Art des Lernens genauso gut gefällt wie mir, wissen Sie nach Abschluss dieses Tutorials, wie die Blockchain-Technologie funktioniert.
SCHREIBEN SIE, BEVOR SIE BEGINNEN
Denken Sie daran, eine Blockchain ist eine unveränderliche, geordnete Kette von Datensätzen, die als Blöcke bezeichnet werden. Sie können Transaktionen, Dateien oder beliebige Daten enthalten. Wichtig ist jedoch, dass sie über Hash miteinander verknüpft sind.
Wenn Sie mit Hashes nicht vertraut sind, finden Sie hier eine Erklärung.
Was ist der Zweck dieses Leitfadens?
Sie können sich beim Lesen und Schreiben von grundlegendem Python wohlfühlen, da wir uns mit Blockchain über HTTP befassen werden, Sie müssen also auch verstehen, wie HTTP funktioniert.
Was muss ich vorbereiten?
Stellen Sie sicher, dass Sie Python 3.6+ installiert haben (und pip. Sie müssen auch Flask und die Requests-Bibliothek installieren: pip) ,你还需要安装 Flask、 Requests 库:
pip install Flask==0.12.2 requests==2.18.4
对了, 你还需要一个支持HTTP的客户端, 比如 Postman 或者 cURL,其他也可以。
源码在哪儿?
可以点击这里
Step 1: 创建一个区块链
打开你最喜欢的文本编辑器或者IDE, 我个人比较喜欢 PyCharm. 新建一个名为blockchain.py的文件。 我们将只用这一个文件就可以。但是如果你还是不太清楚, 你也可以参考 源码.
描述区块链
我们要创建一个 Blockchain 类 ,他的构造函数创建了一个初始化的空列表(要存储我们的区块链),并且另一个存储交易。下面是我们这个类的实例:
blockchain.py
class Blockchain(object):
    def __init__(self):
        self.chain = []
        self.current_transactions = []

    def new_block(self):
        # Creates a new Block and adds it to the chain
        pass

    def new_transaction(self):
        # Adds a new transaction to the list of transactions
        pass

    @staticmethod
    def hash(block):
        # Hashes a Block
        pass

    @property
    def last_block(self):
        # Returns the last Block in the chain
        pass
我们的 Blockchain 类负责管理链式数据,它会存储交易并且还有添加新的区块到链式数据的Method。让我们开始扩充更多Method。
块是什么样的 ?
每个块都有一个 索引,一个 时间戳(Unix时间戳),一个事务列表, 一个 校验(稍后详述) 和 前一个块的散列 。
下面是一个Block的例子 :
blockchain.py
block = {
    'index': 1,
    'timestamp': 1506057125.900785,
    'transactions': [
        {
            'sender': "8527147fe1f5426f9dd545de4b27ee00",
            'recipient': "a77f5cdfa2934df3954a5c7c7da5df1f",
            'amount': 5,
        }
    ],
    'proof': 324984774000,
    'previous_hash': "2cf24dba5fb0a30e26e83b2ac5b9e29e1b161e5c1fa7425e73043362938b9824"
}
在这一点上,一个 区块链 的概念应该是明显的 - 每个新块都包含在其内的前一个块的 散列 。 这是至关重要的,因为这是 区块链 不可改变的原因:如果攻击者损坏 区块链 中较早的块,则所有后续块将包含不正确的哈希值。
这有道理吗? 如果你还没有想通,花点时间仔细思考一下 - 这是区块链背后的核心理念。
添加交易到区块
我们将需要一个添加交易到区块的方式。我们的 new_transaction() 方法的责任就是这个, 并且它非常的简单:
blockchain.py
class Blockchain(object):
    ...

    def new_transaction(self, sender, recipient, amount):
        """
        Creates a new transaction to go into the next mined Block
        :param sender: <str> Address of the Sender
        :param recipient: <str> Address of the Recipient
        :param amount: <int> Amount
        :return: <int> The index of the Block that will hold this transaction
        """

        self.current_transactions.append({
            'sender': sender,
            'recipient': recipient,
            'amount': amount,
        })

        return self.last_block['index'] + 1</int></int></str></str>
new_transaction() 方法添加了交易到列表,它返回了交易将被添加到的区块的索引---讲开采下一个这对稍后对提交交易的用户有用。
创建新的区块
当我们的 Blockchain 被实例化后,我们需要将 创世 区块(一个没有前导区块的区块)添加进去进去。我们还需要向我们的起源块添加一个 证明,这是挖矿的结果(或工作证明)。 我们稍后会详细讨论挖矿。
除了在构造函数中创建 创世 区块外,我们还会补全 new_block() 、 new_transaction() 和 hash()
import hashlib
import json
from time import time

class Blockchain(object):
    def __init__(self):
        self.current_transactions = []
        self.chain = []

        # 创建创世区块
        self.new_block(previous_hash=1, proof=100)

    def new_block(self, proof, previous_hash=None):
        """
        创建一个新的区块到区块链中
        :param proof: <int> 由工作证明算法生成的证明
        :param previous_hash: (Optional) <str> 前一个区块的 hash 值
        :return: <dict> 新区块
        """

        block = {
            'index': len(self.chain) + 1,
            'timestamp': time(),
            'transactions': self.current_transactions,
            'proof': proof,
            'previous_hash': previous_hash or self.hash(self.chain[-1]),
        }

        # 重置当前交易记录
        self.current_transactions = []

        self.chain.append(block)
        return block

    def new_transaction(self, sender, recipient, amount):
        """
        创建一笔新的交易到下一个被挖掘的区块中
        :param sender: <str> 发送人的地址
        :param recipient: <str> 接收人的地址
        :param amount: <int> 金额
        :return: <int> 持有本次交易的区块索引
        """
        self.current_transactions.append({
            'sender': sender,
            'recipient': recipient,
            'amount': amount,
        })

        return self.last_block['index'] + 1

    @property
    def last_block(self):
        return self.chain[-1]

    @staticmethod
    def hash(block):
        """
        给一个区块生成 SHA-256 值
        :param block: <dict> Block
        :return: <str>
        """

        # 我们必须确保这个字典(区块)是经过排序的,否则我们将会得到不一致的散列
        block_string = json.dumps(block, sort_keys=True).encode()
        return hashlib.sha256(block_string).hexdigest()</str></dict></int></int></str></str></dict></str></int>
Übrigens). Sie benötigen außerdem einen unterstützenden HTTP-Client wie Postman oder cURL, andere sind ebenfalls verfügbar. Wo ist der Quellcode?
Sie können hier klickenSchritt 1: Erstellen Sie eine BlockchainÖffnen Sie Ihren bevorzugten Texteditor oder Ihre bevorzugte IDE. Ich persönlich bevorzuge PyCharm. Erstellen Sie einen neuen mit dem Namen
blockchain .py-Datei. Wir werden nur diese eine Datei verwenden. Wenn Sie sich jedoch immer noch nicht sicher sind, können Sie auch auf den Quellcode zurückgreifen werden in unserer Blockchain gespeichert) und die anderen speichern Transaktionen. Hier ist ein Beispiel unserer Klasse:
blockchain.py
🎜from hashlib import sha256
x = 5
y = 0 # We don't know what y should be yet...
while sha256(f'{x*y}'.encode()).hexdigest()[-1] != "0":
y += 1
print(f'The solution is y = {y}')🎜Unsere Blockchain-Klasse ist für die Verwaltung von Kettendaten verantwortlich, sie speichert Transaktionen und fügt der Datenkette neue Blöcke hinzu. Beginnen wir mit der Erweiterung um weitere Methoden. 🎜🎜Wie sieht ein Block aus? 🎜🎜Jeder Block hat einen Index, einen Zeitstempel (Unix-Zeitstempel) und eine Transaktionsliste , eine Überprüfung (mehr dazu später) und den Hash des vorherigen Blocks. 🎜🎜Hier ist ein Beispiel für einen Block: 🎜🎜🎜blockchain.py🎜🎜hash(5 * 21) = 1253e9373e...5e3600155e860🎜An diesem Punkt sollte das Konzept einer
Blockchain offensichtlich sein – jeder neue Block ist im enthalten Hash des vorherigen Blocks innerhalb. Dies ist von entscheidender Bedeutung, da dadurch blockchain unveränderlich wird: Wenn ein Angreifer einen früheren Block in blockchain beschädigt, enthalten alle nachfolgenden Blöcke einen falschen Hashwert. 🎜🎜🎜Ist das sinnvoll? Wenn Sie es noch nicht herausgefunden haben, nehmen Sie sich einen Moment Zeit, darüber nachzudenken – das ist die Kernidee hinter der Blockchain. 🎜🎜🎜Transaktionen zum Block hinzufügen🎜🎜Wir benötigen eine Möglichkeit, Transaktionen zum Block hinzuzufügen. Dafür ist unsere Methode new_transaction() verantwortlich, und das ist ganz einfach: 🎜🎜🎜blockchain.py🎜🎜import hashlib
import json
from time import time
from uuid import uuid4
class Blockchain(object):
...
def proof_of_work(self, last_proof):
"""
Simple Proof of Work Algorithm:
- Find a number p' such that hash(pp') contains leading 4 zeroes, where p is the previous p'
- p is the previous proof, and p' is the new proof
:param last_proof: <int>
:return: <int>
"""
proof = 0
while self.valid_proof(last_proof, proof) is False:
proof += 1
return proof
@staticmethod
def valid_proof(last_proof, proof):
"""
Validates the Proof: Does hash(last_proof, proof) contain 4 leading zeroes?
:param last_proof: <int> Previous Proof
:param proof: <int> Current Proof
:return: <bool> True if correct, False if not.
"""
guess = f'{last_proof}{proof}'.encode()
guess_hash = hashlib.sha256(guess).hexdigest()
return guess_hash[:4] == "0000"</bool></int></int></int></int>🎜 Die Methode new_transaction() fügt der Liste eine Transaktion hinzu , der den 🎜 Index 🎜 des Blocks zurückgibt, zu dem die Transaktion hinzugefügt wird --- 🎜 über das Mining des nächsten 🎜 Dies ist später für Benutzer nützlich, die Transaktionen übermitteln. 🎜🎜Erstellen Sie einen neuen Block🎜🎜Wenn unsere Blockchain instanziiert wird, müssen wir den 🎜Genesis🎜-Block (einen Block ohne vorhergehenden Block) hinzufügen. Wir müssen unserem Ursprungsblock auch einen 🎜Proof🎜 hinzufügen, der das Ergebnis des Minings (oder Proof of Work) ist. Wir werden den Bergbau später ausführlich besprechen. 🎜🎜Zusätzlich zur Erstellung des 🎜genesis🎜-Blocks im Konstruktor werden wir auch new_block() , new_transaction() und hash() Funktion: 🎜🎜🎜blockchain.py🎜🎜<pre class="brush:php;toolbar:false">import hashlib
import json
from textwrap import dedent
from time import time
from uuid import uuid4
from flask import Flask
class Blockchain(object):
...
# Instantiate our Node(实例化我们的节点)
app = Flask(__name__)
# Generate a globally unique address for this node(为这个节点生成一个全球唯一的地址)
node_identifier = str(uuid4()).replace('-', '')
# Instantiate the Blockchain(实例化 Blockchain类)
blockchain = Blockchain()
@app.route('/mine', methods=['GET'])
def mine():
return "We'll mine a new Block"
@app.route('/transactions/new', methods=['POST'])
def new_transaction():
return "We'll add a new transaction"
@app.route('/chain', methods=['GET'])
def full_chain():
response = {
'chain': blockchain.chain,
'length': len(blockchain.chain),
}
return jsonify(response), 200
if __name__ == '__main__':
app.run(host='0.0.0.0', port=5000)</pre>🎜Der obige Code sollte unkompliziert sein --- Ich habe einige Kommentare und Dokumentation hinzugefügt, um den Code klar zu machen. Wir sind fast fertig mit unserer Blockchain. Aber an diesem Punkt fragen Sie sich bestimmt, wie neue Blöcke erstellt, gefälscht oder abgebaut werden. 🎜🎜Proof-of-Work-Algorithmus🎜🎜Verwendet den Proof-of-Work (PoW)-Algorithmus, um zu beweisen, wie neue Blöcke auf der Blockchain erstellt oder abgebaut werden. Das Ziel von PoW besteht darin, eine Zahl zu berechnen, die bestimmte Bedingungen erfüllt. Diese müssen für jeden rechnerisch schwer zu überprüfen, aber leicht zu überprüfen sein. Dies ist die Kernidee des Arbeitsnachweises. 🎜🎜Wir sehen uns ein einfaches Beispiel an, das Ihnen das Verständnis erleichtert: 🎜<p>假设一个整数 <code>x 乘以另一个整数 y 的积的 Hash 值必须以 0 结尾,即 hash(x * y) = ac23dc...0。设 x = 5,求y 。
用 Python 实现:
from hashlib import sha256
x = 5
y = 0  # We don't know what y should be yet...
while sha256(f'{x*y}'.encode()).hexdigest()[-1] != "0":
    y += 1
print(f'The solution is y = {y}')
结果是:y = 21。因为,生成的 Hash 值结尾必须为 0。
hash(5 * 21) = 1253e9373e...5e3600155e860
在比特币中,工作量证明算法被称为 Hashcash ,它和上面的问题很相似,只不过计算难度非常大。这就是矿工们为了争夺创建区块的权利而争相计算的问题。 通常,计算难度与目标字符串需要满足的特定字符的数量成正比,矿工算出结果后,就会获得一定数量的比特币奖励(通过交易)。
验证结果,当然非常容易。
实现工作量证明
让我们来实现一个相似 PoW 算法。规则类似上面的例子:
找到一个数字 P ,使得它与前一个区块的 Proof 拼接成的字符串的 Hash 值以 4 个零开头。
blockchain.py
import hashlib
import json

from time import time
from uuid import uuid4

class Blockchain(object):
    ...

    def proof_of_work(self, last_proof):
        """
        Simple Proof of Work Algorithm:
         - Find a number p' such that hash(pp') contains leading 4 zeroes, where p is the previous p'
         - p is the previous proof, and p' is the new proof
        :param last_proof: <int>
        :return: <int>
        """

        proof = 0
        while self.valid_proof(last_proof, proof) is False:
            proof += 1

        return proof

    @staticmethod
    def valid_proof(last_proof, proof):
        """
        Validates the Proof: Does hash(last_proof, proof) contain 4 leading zeroes?
        :param last_proof: <int> Previous Proof
        :param proof: <int> Current Proof
        :return: <bool> True if correct, False if not.
        """

        guess = f'{last_proof}{proof}'.encode()
        guess_hash = hashlib.sha256(guess).hexdigest()
        return guess_hash[:4] == "0000"</bool></int></int></int></int>
衡量算法复杂度的办法是修改零开头的个数。使用 4 个来用于演示,你会发现多一个零都会大大增加计算出结果所需的时间。
现在 Blockchain 类基本已经完成了,接下来使用 HTTP Requests 来进行交互。
Step 2: Blockchain 作为 API 接口
我们将使用 Python Flask 框架,这是一个轻量 Web 应用框架,它方便将网络请求映射到 Python 函数,现在我们来让 Blockchain 运行在基于 Flask web 上。
我们将创建三个接口:
-
/transactions/new创建一个交易并添加到区块 -
/mine告诉服务器去挖掘新的区块 -
/chain返回整个区块链
创建节点
我们的 Flask 服务器 将扮演区块链网络中的一个节点。我们先添加一些框架代码:
blockchain.py
import hashlib
import json
from textwrap import dedent
from time import time
from uuid import uuid4

from flask import Flask

class Blockchain(object):
    ...

# Instantiate our Node(实例化我们的节点)
app = Flask(__name__)

# Generate a globally unique address for this node(为这个节点生成一个全球唯一的地址)
node_identifier = str(uuid4()).replace('-', '')

# Instantiate the Blockchain(实例化 Blockchain类)
blockchain = Blockchain()

@app.route('/mine', methods=['GET'])
def mine():
    return "We'll mine a new Block"

@app.route('/transactions/new', methods=['POST'])
def new_transaction():
    return "We'll add a new transaction"

@app.route('/chain', methods=['GET'])
def full_chain():
    response = {
        'chain': blockchain.chain,
        'length': len(blockchain.chain),
    }
    return jsonify(response), 200

if __name__ == '__main__':
    app.run(host='0.0.0.0', port=5000)
简单的说明一下以上代码:
- 第 15 行:实例化节点。阅读更多关于 Flask 内容。
- 第 18 行:为节点创建一个随机的名称。.
- 第 21 行:实例化 Blockchain 类。
- 第 24--26 行:创建 /mine 接口,GET 方式请求。
- 第 28--30 行:创建 /transactions/new 接口,POST 方式请求,可以给接口发送交易数据。
- 第 32--38 行:创建 /chain 接口,返回整个区块链。
- 第 40--41 行:服务器运行端口 5000 。
发送交易
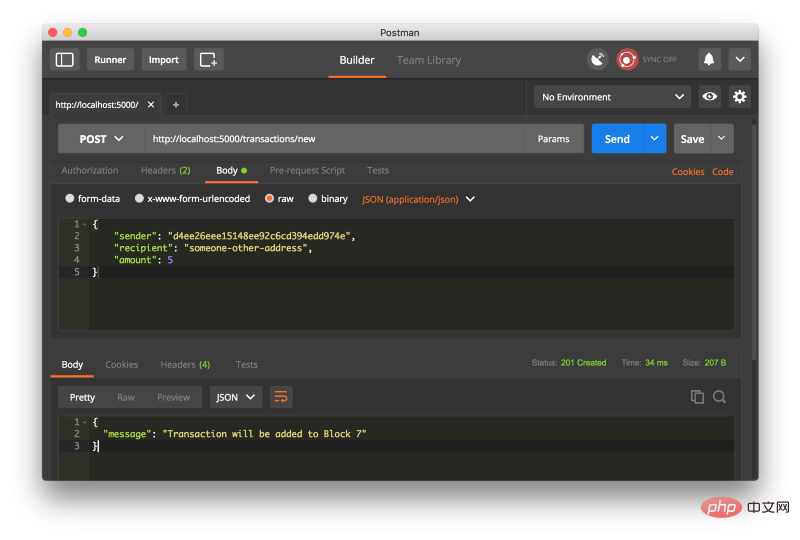
发送到节点的交易数据结构如下:
{
 "sender": "my address",
 "recipient": "someone else's address",
 "amount": 5
}
因为我们已经有了添加交易的方法,所以基于接口来添加交易就很简单了。让我们为添加事务写函数:
blockchain.py
import hashlib
import json
from textwrap import dedent
from time import time
from uuid import uuid4

from flask import Flask, jsonify, request

...

@app.route('/transactions/new', methods=['POST'])
def new_transaction():
    values = request.get_json()

    # Check that the required fields are in the POST'ed data
    required = ['sender', 'recipient', 'amount']
    if not all(k in values for k in required):
        return 'Missing values', 400

    # Create a new Transaction
    index = blockchain.new_transaction(values['sender'], values['recipient'], values['amount'])

    response = {'message': f'Transaction will be added to Block {index}'}
    return jsonify(response), 201
挖矿
挖矿正是神奇所在,它很简单,做了一下三件事:
- 计算工作量证明 PoW
- 通过新增一个交易授予矿工(自己)一个币
- 构造新区块并将其添加到链中
blockchain.py
import hashlib
import json

from time import time
from uuid import uuid4

from flask import Flask, jsonify, request

...

@app.route('/mine', methods=['GET'])
def mine():
    # We run the proof of work algorithm to get the next proof...
    last_block = blockchain.last_block
    last_proof = last_block['proof']
    proof = blockchain.proof_of_work(last_proof)

    # We must receive a reward for finding the proof.
    # The sender is "0" to signify that this node has mined a new coin.
    blockchain.new_transaction(
        sender="0",
        recipient=node_identifier,
        amount=1,
    )

    # Forge the new Block by adding it to the chain
    previous_hash = blockchain.hash(last_block)
    block = blockchain.new_block(proof, previous_hash)

    response = {
        'message': "New Block Forged",
        'index': block['index'],
        'transactions': block['transactions'],
        'proof': block['proof'],
        'previous_hash': block['previous_hash'],
    }
    return jsonify(response), 200
注意交易的接收者是我们自己的服务器节点,我们做的大部分工作都只是围绕 Blockchain 类方法进行交互。到此,我们的区块链就算完成了,我们来实际运行下。
Step 3: 运行区块链
你可以使用 cURL 或 Postman 去和 API 进行交互
启动 Server:
$ python blockchain.py
* Running on http://127.0.0.1:5000/ (Press CTRL+C to quit)
让我们通过请求 http://localhost:5000/mine ( GET )来进行挖矿:
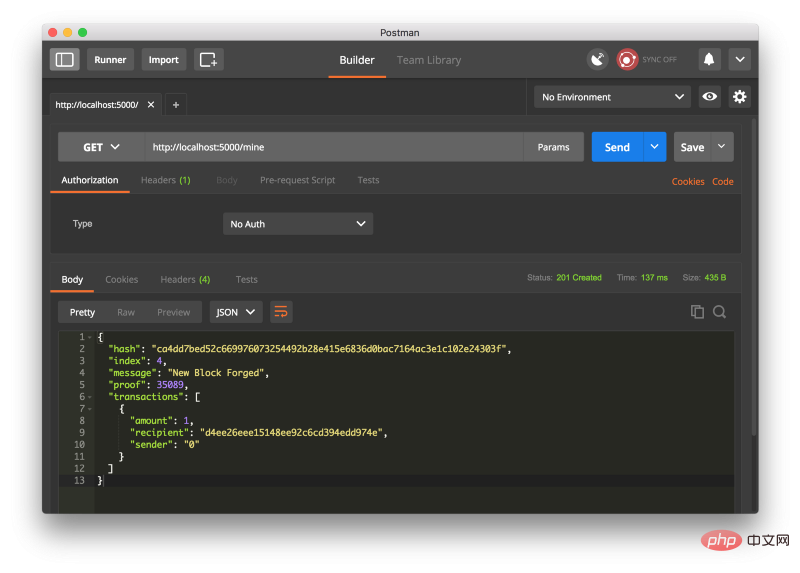
用 Postman 发起一个 GET 请求.
创建一个交易请求,请求 http://localhost:5000/transactions/new (POST),如图
如果不是使用 Postman,则用一下的 cURL 语句也是一样的:
$ curl -X POST -H "Content-Type: application/json" -d '{
 "sender": "d4ee26eee15148ee92c6cd394edd974e",
 "recipient": "someone-other-address",
 "amount": 5
}' "http://localhost:5000/transactions/new"
在挖了两次矿之后,就有 3 个块了,通过请求 http://localhost:5000/chain 可以得到所有的块信息
{
  "chain": [
    {
      "index": 1,
      "previous_hash": 1,
      "proof": 100,
      "timestamp": 1506280650.770839,
      "transactions": []
    },
    {
      "index": 2,
      "previous_hash": "c099bc...bfb7",
      "proof": 35293,
      "timestamp": 1506280664.717925,
      "transactions": [
        {
          "amount": 1,
          "recipient": "8bbcb347e0634905b0cac7955bae152b",
          "sender": "0"
        }
      ]
    },
    {
      "index": 3,
      "previous_hash": "eff91a...10f2",
      "proof": 35089,
      "timestamp": 1506280666.1086972,
      "transactions": [
        {
          "amount": 1,
          "recipient": "8bbcb347e0634905b0cac7955bae152b",
          "sender": "0"
        }
      ]
    }
  ],
  "length": 3
}
Step 4: 一致性(共识)
我们已经有了一个基本的区块链可以接受交易和挖矿。但是区块链系统应该是分布式的。既然是分布式的,那么我们究竟拿什么保证所有节点有同样的链呢?这就是一致性问题,我们要想在网络上有多个节点,就必须实现一个一致性的算法。
注册节点
在实现一致性算法之前,我们需要找到一种方式让一个节点知道它相邻的节点。每个节点都需要保存一份包含网络中其它节点的记录。因此让我们新增几个接口:
-
/nodes/register接收 URL 形式的新节点列表. -
/nodes/resolve执行一致性算法,解决任何冲突,确保节点拥有正确的链.
我们修改下 Blockchain 的 init 函数并提供一个注册节点方法:
blockchain.py
...
from urllib.parse import urlparse
...

class Blockchain(object):
    def __init__(self):
        ...
        self.nodes = set()
        ...

    def register_node(self, address):
        """
        Add a new node to the list of nodes
        :param address: <str> Address of node. Eg. 'http://192.168.0.5:5000'
        :return: None
        """

        parsed_url = urlparse(address)
        self.nodes.add(parsed_url.netloc)</str>
我们用 set 来储存节点,这是一种避免重复添加节点的简单方法.
实现共识算法
就像先前讲的那样,当一个节点与另一个节点有不同的链时,就会产生冲突。 为了解决这个问题,我们将制定最长的有效链条是最权威的规则。换句话说就是:在这个网络里最长的链就是最权威的。 我们将使用这个算法,在网络中的节点之间达成共识。
blockchain.py
...
import requests

class Blockchain(object)
    ...

    def valid_chain(self, chain):
        """
        Determine if a given blockchain is valid
        :param chain: <list> A blockchain
        :return: <bool> True if valid, False if not
        """

        last_block = chain[0]
        current_index = 1

        while current_index  True if our chain was replaced, False if not
        """

        neighbours = self.nodes
        new_chain = None

        # We're only looking for chains longer than ours
        max_length = len(self.chain)

        # Grab and verify the chains from all the nodes in our network
        for node in neighbours:
            response = requests.get(f'http://{node}/chain')

            if response.status_code == 200:
                length = response.json()['length']
                chain = response.json()['chain']

                # Check if the length is longer and the chain is valid
                if length > max_length and self.valid_chain(chain):
                    max_length = length
                    new_chain = chain

        # Replace our chain if we discovered a new, valid chain longer than ours
        if new_chain:
            self.chain = new_chain
            return True

        return False</bool></list>
第一个方法 valid_chain() 负责检查一个链是否有效,方法是遍历每个块并验证散列和证明。
resolve_conflicts() 是一个遍历我们所有邻居节点的方法,下载它们的链并使用上面的方法验证它们。 如果找到一个长度大于我们的有效链条,我们就取代我们的链条。
我们将两个端点注册到我们的API中,一个用于添加相邻节点,另一个用于解决冲突:
blockchain.py
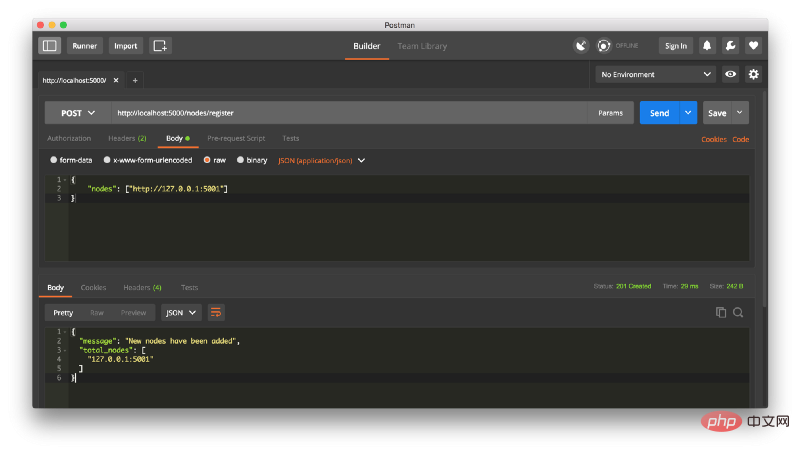
@app.route('/nodes/register', methods=['POST'])
def register_nodes():
values = request.get_json()
nodes = values.get('nodes')
if nodes is None:
return "Error: Please supply a valid list of nodes", 400
for node in nodes:
blockchain.register_node(node)
response = {
'message': 'New nodes have been added',
'total_nodes': list(blockchain.nodes),
}
return jsonify(response), 201
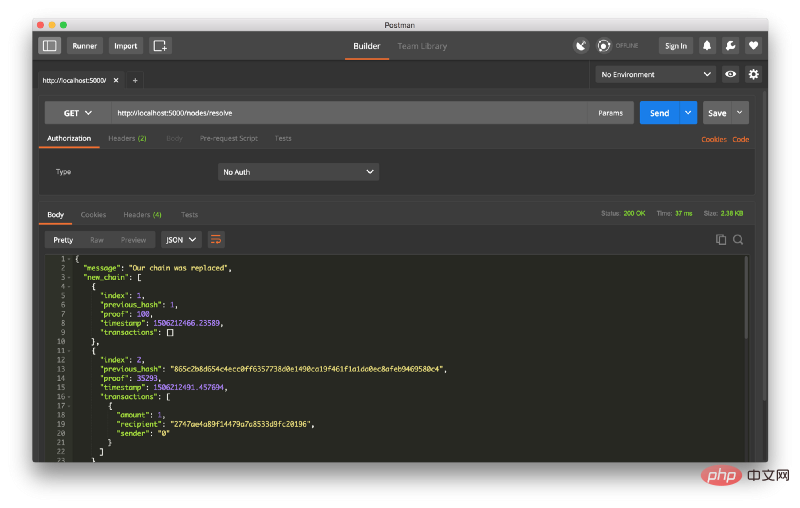
@app.route('/nodes/resolve', methods=['GET'])
def consensus():
replaced = blockchain.resolve_conflicts()
if replaced:
response = {
'message': 'Our chain was replaced',
'new_chain': blockchain.chain
}
else:
response = {
'message': 'Our chain is authoritative',
'chain': blockchain.chain
}
return jsonify(response), 200
在这一点上,如果你喜欢,你可以使用一台不同的机器,并在你的网络上启动不同的节点。 或者使用同一台机器上的不同端口启动进程。 我在我的机器上,不同的端口上创建了另一个节点,并将其注册到当前节点。 因此,我有两个节点:http://localhost:5000 和 http://localhost:5001。 注册一个新节点:
然后我在节点 2 上挖掘了一些新的块,以确保链条更长。 之后,我在节点1上调用 GET /nodes/resolve,其中链由一致性算法取代:
这是一个包,去找一些朋友一起,以帮助测试你的区块链。
我希望本文能激励你创造更多新东西。我之所以对数字货币入迷,是因为我相信区块链会很快改变我们看待事物的方式,包括经济、政府、档案管理等。
更新:我计划在接下来的第2部分中继续讨论区块链交易验证机制,并讨论一些可以让区块链进行生产的方法。
相关推荐:编程视频课程
Das obige ist der detaillierte Inhalt vonErstellen Sie Ihre eigene Blockchain mit Python. Für weitere Informationen folgen Sie bitte anderen verwandten Artikeln auf der PHP chinesischen Website!